

marktoots
-
Posts
295 -
Joined
-
Last visited
-
Days Won
14
Content Type
Profiles
Forums
Events
Everything posted by marktoots
-
I'll add my reference shots for SWCE when I can get near a laptop Sent from my SM-G800F using Tapatalk
-
Please share any photos that you have that will help with the development of this costume.
-
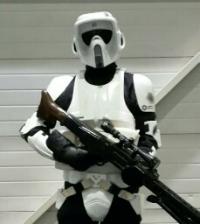
This tread is for working on the CRL. If anyone has text they'd like to add, feel free to post and I'll update as appropriate. Description: Death Trooper (Rogue One) Prefix: DT Detachment: Spec Ops Detachement Context: Star Wars: Rogue One Required Costume Components *** IMPORTANT*** The costume shall be sized appropriately for the wearer. Helmet: For 501st Approval: Helmet has a slender look It has an elongated angular face plate with veins on the nose bridge The snout consists of a vented piece similar to that seen on the Scout Trooper with an elliptical tusk (known as Image-intensifying active pulse emitters) on each side fitted with a dark green lense Each tusk can be optionally fitted with working green LEDs The backing plate for the snout has horizontal veins The main face plate is made up of several angular shapes Two vent tubes in black rubber or matt black paint are evident on either side of the face plate 8 No. vent slots are evident on either side of the face plate. These are open and lined with a black mesh The eye lense is one continuous piece with a dark green tint The back of the helmet is flattened with recessed slots of varying sizes symmetrically positioned either side of the centreline of the helmet Paint finish is mainly gloss black with some panels finished in metallic black/graphite/carbon to provide definition Nose strip and snout vent are finished with silver wash Weathering is optional but where present it shall be screen accurate Neuro-Saav Macromotion (NSM) Monitor is optional for standard Death Trooper clearance. Where fitted it the wearer has the option to include: An operational Green LED to front under emitter slot Balaclava: For 501st Approval: A balaclava is a black head sock/hood that is worn under the helmet It is used primarily to hide any view of the wearer's skin and/or facial hair Neck Seal: For 501st Approval: Black with horizontal sewn ribs approximately 8mm wide Smooth gloss or semi-gloss rubber like finish Fitted to the wearer Extends from the base of the neck to conceal the entire neck. No hair or skin should be visible around the neck area. It has a concealed overlap join at the back of the neck The neck seal is attached to a black vertical sewn ribbed apron which is made of the same material as the neckseal The ribs on the apron are approximately 6mm wide The apron extends across the front of the chest under the chest armour plate The neckseal and apron can be separate from or sewn into the undersuit. Poncho For 501st Approval: Poncho shall be rubber or a smooth semi-gloss black material with approximately 5 to 6mm wide sewn ribs May include the neckseal and apron as part of its construction or could be a separate garment Where made as a separate garment then it is not visible in the neck opening of the chest armour Undersuit: For 501st Approval: Where visible the Undersuit shall: be flat black in colour made of a jersey cotton style material have a horizontal sewn ribbed detailing each rib is approximately 4mm wide Chest Plate: For 501st Approval: Overlaps the abdominal plate. Attaches to the back plate with shoulder straps that have a rectangular rib detailing. Buckle and D-Ring shall be present. Chest plate extends under the arms to join with the back plate. Method of connection is not visible. D-Ring shall be present on chest plate under each arm. The recess in the bottom left hand corner of the chest plate must be present. Painted in gloss black the recesses and asymmetric panels are finished in metallic black/graphite/carbon to provide contrast Weathering is optional but where present it shall be screen accurate. Back: For 501st Approval: Has neck collar that extends up the back of the neck and tapers towards chest Extends over shoulders to meet chest plate Extends under arm to allow invisible connection to chest plate Has rectangular backpack with two large square recesses towards the top Left recess contains a cog with 16 notches Right recess has two vertical rectangular blocks with 5 horizontal lines towards the top Rear face of backpack has a horizontal ridge which marks the centre of its triangular profile A smaller recess with detailing is located towards the bottom left of the backpack Semi-circular detail below and left of the backpack must be present Painted in gloss black the recesses are finished in metallic black/graphite/carbon to provide contrast Weathering is optional but where present it shall be screen accurate. Lower Back: For 501st Approval: Triangular at the top tapering to straight sides. Raised angular detailing to top section. Ideally fits the curvature of the wearer's back. Finished in gloss black. Fixed to back plate and extends to below the top of the belt. Weathering is optional but where present it shall be screen accurate. Thermal Detonator: For 501st Approval : Has 14 ribs running along the length of the shaft. Ribs are spaced evenly around the shaft circumference. End caps are present. Is attached to the lower back armour. Painted to match the rest of the armour. Weathering is optional but where present it shall be screen accurate. For Level 2 Clearance: The ribs shall have pairs of notches cut into one edge close to the end caps. Shoulder Bells: For 501st Approval: One on each shoulder. Each shoulder bell is a mirror image of the other. The detailing of each shoulder bell is asymmetrical. The front edge has a graduated step. The back edge has a diagonal rather than defined corner. Two grooves run vertically up the shoulder bell symmetrically spaced about the centreline. There is a groove that forms an arc from approximately to midpoint of the front vertical groove to the front of bottom corner of the bell. A further groove forms an arc from the top of the diagonal on the back edge of the shoulder bell down to the bottom of the rear vertical groove. The shoulder bells are gloss black with the groove contrasted with metallic black/graphite/carbon. Weathering is optional but where present it shall be screen accurate. Biceps: For 501st Approval: Bicep armour detailing is mirrored on each arm The armour does not wrap the arm rather it extends approximately 3/4 way round the bicep. It is held in place by one or two black elastic cord straps. Where two are used then they shall be spaced approximately 20mm apart. The top and bottom edges are angled The armour has two vertical cover strips one on the outside of the arm and the other towards the rear The biceps have grooved detailing on the front. Painted in gloss black with the grooved detailing contrasted in metallic black/graphite/carbon Weathering is optional but where present it shall be screen accurate. Elbow Gaskets: For 501st Approval: Gaskets shall be rubber or a smooth semi-gloss black material with approximately 5 to 6mm wide sewn ribs. The elbow gaskets must extend from midway up the bicep armour to under the forearm armour covering all exposed areas of the elbow. When flexing/articulating the arm the edges of the gasket must not become exposed. All gaskets can be separate from or sewn into the undersuit. Forearms: Right: Left: For 501st Approval: Forearms have raised cover strips to the front and rear which on left forearm end approximately 60mm above the wrist The ladder detailing is evident and ideally has 13 rungs/12 indents evenly spaced along its length. This will be determined by the individual wearer's forearm length. Two bands of rubber or rubber-like material shall be evident near the wrist of the left forearm. Cylindrical detailed parts shall be evident on the left forearm. These can be finished in black or silver/aluminium. There is grooved detailing to the inside of the forearm. The indents of the ladder detailing shall be contrasted to the gloss black finish of the rest of the armour through the use of metallic black/graphite/carbon paint finish. Weathering is optional but where present it shall be screen accurate. Gloves/Hand Plates: For 501st Approval: Are black with black leather or leather-like palm, thumb and forefinger Extend underneath the forearm armour Hand plates are trapezoidal in shape and are mounted securely over the back of the glove The hand plates have a diagonal step that runs across the plate from the corner closest to the wrist below the little finger across to the centre point between the middle and index fingers. The raised section of the handplate extends towards the index finger and has a oval detail on the vertical face. Weathering is optional but where present it shall be screen accurate. Abdomen Section: For 501st Approval: Raised detailing matching screen reference costumes shall be evident and well defined. There shall be 7 horizontal notched ribs to the front of the plate with a rectangular plate below. The rectangular plate shall ideally be raised in relation to the ribs. It shall have rounded corners and a ring indent in the lower left corner as you look at it. Painted in gloss black with asymmetrically panels finished in metallic black/graphite/carbon to provide contrast Weathering is optional but where present it shall be screen accurate. Abdominal/Kidney Gasket ​For 501st Approval: Wraps around the wearer's torso Extends from just below the wearer's chest to behind the belt The lower edge is not seen Approximately 5 to 6 mm wide sewn ribs running vertically with a bias towards the back Where visible it shall have a narrow trim along the top edge It shall be rubber or a smooth semi-gloss black material Can be separate from or sewn into the undersuit For Level 2 Clearance: The gasket shall be moulded rubber rather than stitched The ribs shall be approximately 4 mm wide Where visible the top edge shall have a narrow trim which is moulded as an integral part of the gasket The abdominal plate and lower back plate shall be joined together by the gasket Belt: For 501st Approval: The belt is ribbed and made from rubber or rubber-like material. The mechanism for fastening the belt is not visible There are 28 ribs in total and the belt has an overall width of approximately 84mm. The belt has a buckle similar to the second layer of the Darth Vader's belt buckle Brushed aluminium or aluminium-like finish and in the shape of an elongated "D" There are four progressively smaller square edge cutouts in a trianglar formation on the wearer's right [*]There are three black canvas pouches (approximate dimensions 170mm x 70mm x 35mm) with a hard plate on the pouch flap [*]Two of the pouches are positioned on either side of the belt buckle, the third is located on the wearer's right towards the back [*]There are two square boxes attached on either side of the belt in a location between the wearer's hip and kidney's [*]There is a pistol holster located on the wearer's right hip [*]The holster is made from black leather or leather-like material. It consists of a wide loop around the belt and extending down the thigh with a strap to support the stock of the pistol and a second strap with popper which is secured around the pistol scope [*]There is a leather or leather-style pouch (approximate dimensions 120mm x 60mm x 25mm) with a single press stud located between front pouch and the belt box on the wearer's left [*]Weathering is optional but where present it shall be screen accurate. Shorts: For 501st Approval: The shorts shall be made from the same material as the gaskets. It shall be rubber or a smooth semi-gloss black material with approximately 5 to 6mm wide sewn ribs. The ribs shall be horizontal. The shorts shall extend up under the belt and torso armour and the legs shall extend under the thigh armour. Movement of the wearer shall not cause the edges of the shorts to become exposed. The shorts can be separate from or sewn into the undersuit. For Level 2 Clearance: The shorts legs shall be constructs such that there is a gusset panel extending front to back along with inner thigh panels extending from the gusset downwards. The gusset panel is not ribbed. The inner thigh panels shall be ribbed to match the rest of the shorts. Codpiece: For 501st Approval: Extends under the belt at the top Similar in look to the Vader cod piece with the recessed rectangular area with rounded corners. This extends up under the belt. The bottom of the cod piece is curved inwards and sits between the legs. A 25mm or 32mm wide black elastic strap is to be used to connect the cod and butt plates between the legs. Painted in gloss black Weathering is optional but where present it shall be screen accurate. Butt Plate: For 501st Approval: Extends under the belt. Has a raised rectangular section in the centre which extends up under the belt. A 25mm or 32mm wide black elastic strap is to be used to connect the cod and butt plates between the legs. Painted in gloss black Weathering is optional but where present it shall be screen accurate. Thighs: For 501st Approval: The thighs shall be fitted to the wearer. They shall give the impression of being constructed from a front and rear hard plate with ribbed rubber infill on the outer and inner thigh. There shall be a raised cover strip to the front with recessed detailing along the edges. On the wearer's right thigh the front raised cover strip shall terminate at a horizontal raised band that wraps the front plate just above the knee. The front cover strip on the wearer's left thigh shall terminate at a rectangular box greeblie at the knee. An inverted V-Shaped sniper plate shall be evident on the wearer's right thigh plate above the knee and below the horizontal raised band. Both thighs shall have a diagonal raised detailing to the front running from the outer ribbed panel to the raise cover strip. This detailing continues from the cover strip to the base of the thigh armour as a recessed groove rather than a raised strip. The wearer's left thigh armour shall have a rectangular box to the front above the knee. This shall have a sloping front face. There are two further rectangular boxes attached around the outer thigh. These have their longer side vertically aligned. Connecting bands shall be evident at the base of the inner and outer thighs with screen accurate detailing. The rear thigh plates shall have a recessed groove detailing that arcs upwards from the base of outer edge towards the inner thigh edge. This shall terminate approximately 3/4 way up the inner thigh edge. The base of the rear thigh plates shall have a trapezoidal shaped cutout to allow knee movement. The hard armour plates shall be gloss black. The ribbed infill shall be matt black to mimic black rubber. Weathering is optional but where present it shall be screen accurate. For Level 2 Clearance: Ribbed detailing shall be molded rubber. The inner thigh ribbed detailing material shall extend behind the front and rear hard plates of the thigh armour. Knee Gaskets: For 501st Approval: Gaskets shall be rubber or a smooth semi-gloss black material with approximately 5 to 6mm wide sewn ribs. The gasket shall cover all exposed areas of the Knee. When flexing/articulating the leg the edges of the gasket must not become exposed. All gaskets can be separate from or sewn into the undersuit. For Level Two Clearance: Shins: Left: Right: For 501st Approval: There is a raised cover strip to the front and rear that runs full length. At the bottom of each shin there is a raised angular extension that wraps around the inner ankle from the rear cover strip. The left shin has 2 small angular greeblies located towards the top at the front. They are either side of the front cover strip. The raised strip that runs from front to back around the outside of each shin just above the ankle shall be evident. This strip is angled downwards. Both shins have grooved detailing to the inner face and the left shin also has grooved detailing running from the top behind the angular greeblie down and forward meeting the raised strip at the front cover strip. The grooved detailing shall be contrasted to the gloss black finish of the rest of the armour through the use of matt black/graphite/carbon paint finish. Weathering is optional but where present it shall be screen accurate. Boots: For 501st Approval: Dr Martin "Mayer" or "Talib" Style Boots are used for the base boot If other boots are used: The sole shall have no heal and fine horizontal ribs There shall be a strip of leather or leather-like material running vertically up the back of the boot stitched on either side The boots shall have a black flat sole with no heel The boots shall extend under the shins They shall be made from black leather or leather-like material There shall be a seam that forms a quadrant on either side of the boot from the rear of the boot joining with the sole near the front of the heel There shall be a seam running over the front of the boot to imitate a toe cap [*]All fastenings are hidden behind a rectagular panel made of smooth rubber or a shiny black material with approximately 6mm wide horizontal ribs [*]The edges of the panel shall be turned back on themselves to form a smooth ribless border [*]The rectangular panel extends from under the shin and is fixed to the boot so that the bot fastenings cannot be seen when walking For Level 2 Clearance: Dr Martin "Jered" Style Boots are used for the base boot Optional Accessories: Items below are optional costume accessories. These items are not required for approval, but if present appear as described below. Death Trooper Pistol ***Picture Required*** For 501st Approval: SE-14R Light Repeating Blaster The barrel detailing is evident with the cocking lever and slider in place The ejection port is also evident The scope mount looks similar to the magazine but smaller in size Death Trooper Blaster E-11D For 501st Approval: Modified E-11 The main barrel is extended from in front of the power cell. The barrel extension has elongated slots cut into it along each side. A Surefire M300 Mini Scout tactical light or equivalent is fitted to the barrel extension. A resin cast is acceptable. The folding stock is in place. It is fitted with a HK416c retractable stock or similar. Laser pointer fitted below barrel with optional working red LED to front Working red LED strip fitted towards the rear of the barrel behind the magazine is optional. Working red LEDs fitted into the prongs of the counter unit is optional. All decals are in place Weathering is optional but where done the barrel scorching must be evident Variant - Death Trooper Specialist The specialist variant of the Death Trooper shall meet the requirements of the standard trooper with the following additions: Death Trooper Specialist Pauldron For 501st Approval: A black neck ornament made of leather or a leather-like material, worn over the right shoulder. It shall wrap around the neck over the chest/back armour with a join on the left shoulder. The main pauldron area over the right shoulder shall be constructed from three panels: front, rear and top joined by two stitch lines running in parallel from shoulder to neck. Death Trooper Specialist Chest Rig For 501st Approval: Wraps around the front of the wearer covering the abdominal plate but not the belt or chest plate. Has a webbing strap that secures around the waist. Has two short webbing straps that wrap around the lower chest d-rings. Has two 32mm webbing straps that run vertically up the front of the wearer and wrap around the D-Rings on the shoulder buckles. Secured by one open face buckles with locking mechanism on each strap. Has six ammo magazine pouches. The two outer pouches on each side of the chest rig have armour plates. The armour plate on the outer pouch on each side has a diagonal groove detailing Each pouch has the a HK G3 Ammo Magazine inserted. Resin cast or equivalent is acceptable. Across the front of the middle two pouches have three elastic t-shape straps attached containing C-25 fragmentation grenades. Death Trooper Specialist Ammo Pouch For 501st Approval: Black in colour, made of leather or leather-like German MP-40 style ammo pouches with the oiler pouch removed. Stitching shall be black. Worn on left shoulder. For Level 2 Clearance: The shape and stitching of the pouch flaps and closure straps shall match the screen used ones. Death Trooper Specialist Long Range Blaster Rifle For 501st Approval: Modified DLT-19 Fitted with telescopic scope. A resin cast or equivalent is acceptable. Has two tactical spotlight like devices fitted via scope mounts under the flash suppressor. Resin casts or equivalent are acceptable These devices have are connected to the main body of the rifle via piping that runs along the barrel This rifle is not fitted with the M300 tactical light that is seen on the E-11D Black in colour the rifle can be weathered. The TK Doll is optional. *Thanks to Tom Campbell for providing the reference photos for the CRL.*
-
Is it possible to get a sub-forum/thread set up for the Death Trooper so that we can co-locate reference material, CRL working document, etc? Sent from my SM-G800F using Tapatalk
-
I know what you mean! She wasn't that impressed when the TB was finished and was closely followed by a DC-15x! At least I've left a couple of months between that and starting this one. LOL Sent from my SM-G800F using Tapatalk
-
I bit the bullet earlier and ordered the boots so I guess I have another build started. Think the wife is going to kill me. LOL Sent from my SM-G800F using Tapatalk
-
Glad to hear that Dan. I already busy looking over all my photos and wishing I had got more. 😀 Sent from my SM-G800F using Tapatalk
-
I suspect that I wasn't the only one at Celebration last weekend photographing the Death Trooper from head to toe!? I know that it doesn't fit well with the SW timeline but I have found myself repeatedly drawn to back to it. Is Spec Ops going to lay claim to the CRL for this one?
-
Aquatic Assault Trooper Helmet Build
marktoots replied to Fivezero's topic in Aquatic Assault Troopers (Sea Troopers)
@Scubacat - Your idea about the fins sounds interesting -
Aquatic Assault Trooper Helmet Build
marktoots replied to Fivezero's topic in Aquatic Assault Troopers (Sea Troopers)
Well it seems like the desire to get this one done is gathering momentum. Funnily enough I started rough sculpting the lid last night. Haven't got far yet but will post some pictures as it progresses. I am looking forward to seeing how yours progresses too Interestingly I am using the WEG front cover image as the basis for my sculpt rather than the close up sketch as IMO the front cover image looks to be better proportioned. I'm interested to know where the close up sketch came from and whether it is considered to be more representative? Below is the image that I am referring to as the close up sketch. -
While there is a break in the waves of wit that are washing over me I'll change a habit of a lifetime and be serious for a moment :-) I'm gonna give this a go. Making bucks etc is new to me so the build may take a while but as some as I get up and running I'll post a WIP here
-
And feeling a little out of my depth!
-
I have a feeling I may be sinking alot of time in to this one I'll have to make sure I come up for air occasionally
-
Thanks Rob. You had mentioned before that it was the backburner due to workload :-) If you don't mind I'll PM or FB you a bit later to discuss further?
-
Hi all I've been lurking in the shadows for a while now reading and re-reading the threads here and looking at the reference images. The last posts on any of the threads here were in 2013. Has anyone progressed this further? I am seriously interested in building a WEG Seatrooper once I have completely some of the smaller costume builds (kids size!) that I am currently working on but was wondering where others had got to? And also what the process is if the CRL has not yet been approved? Thanks
