CrookKnight
-
Posts
169 -
Joined
-
Last visited
-
Days Won
5
Content Type
Profiles
Forums
Events
Everything posted by CrookKnight
-
I will post the top of the tank. I have finished it...just not posted it...as well as my helmet. Just got my replacement biceps in, so ready to finish the armor portion of the build.
-
CHEST I trimmed the chest armor, sanded the edges, cut in the slots for the straps on the sides and filed down the slots. Should be done.
-
Looks great. Congrats.
-
Thank you. Glad to be done with what I consider to be the hardest parts. Now I am going to start with the chest and work my way down. Yee haw.
-
Sounds good. Hopefully after this, I can start moving faster. I am going to slow and this is going to take me forever. I went ahead and heated a piece of ABS and made the L-Bracket. I attached it with E-600 and used high powered magnets to hold it in place until the glue dried. Once the glue dried i removed the magnets and did a test fit. Based on the fit. I glued the tank to the L Bracket and placed the top greeblie on the tank to check fit. I will rivet the top greeblie in place and then add the rivet to the bottom...
-
Do you know where I can find Walt’s Video?
-
Trying to speed this up...Going to work on this while I am working on commission. Today I worked on the back and the tank. I have trimmed both and have some questions. Does the tank have to site perfectly flush with the back piece. In other words. can you see a gap between them? I have been trying to trim the tank to the contour of the back piece, but I cannot get it exact. Also, how far from the opening on the back piece do I mount the tank? Pictures of back piece trimmed: All pieces will be painted later. I still need to trim the slots on the sides for the fabric that will connect to the chest plate. tank trimming: I rounded the top a little to fit the contour of the back piece. Is this the right distance from the open portion of the back piece to the top of the tank. From the CRL it looks pretty close. Side shots of tank on back piece. Once i confirm this is correct, I will attach the tank to the back piece. From what I can tell (from other threads) is I bend a piece of plastic 90 degree and attach it to the back piece. Then I use (1) rivet to attach it to the tank through the resin detail piece. Is this correct? Thank you for your input.
-
Looks awesome.
-
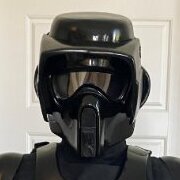
Now that the faceplate is done, I decided to add the faceplate to the visor and then attach everything to the helmet. Here is a test look, before I attached everything: Before I glued the faceplate, I tested the visor to make sure it did the 90 degrees (or close to). I then glued the left and right sides of the faceplate to the visor. I used high powered earth magnets and vice grips to hold it in place until it dries. Now I let it dry: My cat is getting bored...lol. Once I add the decals and interior harness for my head....I can get started on the rest of the armor which is the easy stuff...haha.
-
Next I added the silver reflective material for the lenses. I cut it down a little and then added the glue. I needed something to weigh it down, but still allowed it to expand while the E6000 to expand while it dried. So I went very scientific and used towels to weight it down. haha. Here are the towels weighing it down. Once it dried, i cut off the excess: Here is a picture from the front:
-
I drilled the holes in the sides of the visor and helmet and then attached the accurate bolts. I started with a small pilot hole. Then I drilled a much larger hole that allowed for the bolt plus the square piece under the bolt to fit. I then tested the visor to the helmet and it could not open far enough, so I had to trim more off the left and right top of the visor to allow it to open close to 90 degrees. Once that was complete on both sides, I attached the visor to the helmet as a test fit and it did very well. Right side: Left side:
-
Looks great @Raider. I ordered some yesterday and they should be here tomorrow. I will send pics.
-
No bolts were sent with the kit. I was waiting to cut the holes until I got bolts. Do you know what kind and size (diameter and length) that I need?
-
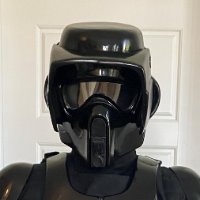
Painted the aerator a matte black to contrast with the gloss black finish. I wish I had more time to get things done, but it is slowly getting there. Also, I do not feel like waiting a couple of months to attach my visor to the helmet with Specialist level bolts and stuff. How do you normally attach it? Do you use a bolt of some kind. Pictures of aerator attached. Visor is not attached yet.
-
Anyone know where I can get the mirrored lense?
-
Thanks for the info. I tried that site and could not even checkout since it would not allow for me to setup a new account. Also, I could not tell if they were concave. They looked convex.
-
Since the aerator needs to be painted a contrasting black to the helmet, does that mean if i used gloss for the helmet this piece needs to be flat black? That is how I read it.
-
Thanks for the info. Let me know if those bolts are concave.
-
What are your thoughts on these pieces? I am going to try to build this to the highest level. Also, where can I get the best possible bolt things that go on the side of the visor that connects to the helmet?
-
Assuming that I did trim enough, I went ahead and put the first glossy coat on this and the visor. The visor still needs a little work. I had to add more putty and fillable/sandable primer to it since I took these pictures. The faceplate will receive at least 1 more coat, after I fix a few flaws. You can still see the seam line, so I have some more work to do on the visor.
-
I have a question on the trimming of the lens area. Did I trim enough? To me it looks fine, but I need to be sure.
-
Applied first coat of gloss black.
-
Got the helmet finished this weekend. Sanded, puttied, and primed a couple more times.
-
Not sure. This is what the CRL states for Level 2: "Ear holes are correctly shaped and have no mesh."
-
Worked on the helmet some this weekend: Added bondo and sanded many times. Still have to cut out vents at the ears and the hole for the visor. Added the first coat (of many to come) of the gray fillable and sandable primer. Next I will sand again that add either Spot Potty or more primer. Will also work on the visor and faceplate.