

Chef
-
Posts
866 -
Joined
-
Last visited
-
Days Won
22
Content Type
Profiles
Forums
Events
Everything posted by Chef
-
Bondo, or Filler as we call it over here can be made to go exceptionally smooth. You just need to shape it, sand it, fill it, sand it, fill it. When you get to the top layer, you need to switch to a fine grade filler. I use U-Pol Extra or Top Stop Gold. Take it down to about 240/400 grit and then spray over with a decent filler primer. Then spray a light guide coat of paint (it'll just be a mist of spots... doesn't need to be anything more) over the whole thing and then wet flat with 400 grit wet and dry paper. When done, if there are any low spots, you'll see the little spots of paint left in place. Add in more filler and redo the process until flat. Takes ages... but that's the rub.
-
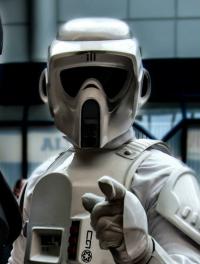
Helmet now done for him.. Front shot, showing Gloss/Satin contrast between snout area and decals. Sides and Rear showing the contrast between decals and helmet bolts etc. No mesh in the ears. onto his boots next.
-
Even weirder.. It's now fine on mine too.
-
The important part to glue is the bridge of the nose. This is where all the spring force of the flat lens tries to exert itself. Get a damned good blob in the bridge section and everything else follows on. **Edit** Odd fact... I rotated this picture in Photobucket, so it would appear the right way round. Yet when linked to as you see here, it's on it's side again.. how strange.
-
Grab 'em whilst you can... They'll be worth a fortune soon.
-
Yeah, they're not bad... You'll need to cut the shank down obviously!! The original used bolts as Jim says were the headband bolts from the 3M 9002 Speedglas series welding helmet. They are still available, but will mostly come in black now. They'll set you back about $5 a pair. Not a problem, just paint them. Ideally, you want the heads of the bolt to have a diameter of about 22mm. The ones you've found seem acceptable enough. It is just a disc at the end of the day. I use 10mm Coach bolts (square cup bolts, carriage bolts) and then grind the heads flat. So if you can get the correct sized head, then I'd say those bolts are good. Now all we need is the link!
-
Phil's armour is off the table and rough trimmed ready to be sent to him. I'll be doing your lid for you. Watch this space.
-
That's a damned fine idea Matt. I normally just put in a bit of foam. I can cut sections out of it, to take the amp Speaker and batteries and stuff. Greg, I can do, depends on what you're after.
-
I thought I'd start this on behalf of Phil, seeing as I am making most of the bits for him!! And you'll notice that I have correctly titled it as per how the Imperial Command would have us designated. Non of this rebel slander. This will also serve as reference to his Specialist Status Application as and when he has finished. No point in him going in at entry level now is there! So without further ado... Just finished his bund off today. As you'll see, it has 6 vertical stitch lines, creating 5 bars as per the latest research on BSN has shown, and it is complete with the arc cod detail, rather than the old chevron. The correct 2" closure up the rear of the bund, Pouches in place, these are a more scaled size of 6" wide, x 7" high x 1.5" deep. Note that they have been made from a coarse grain cotton canvas in order to provide a textural contrast against the close weave cotton drill cummerbund. Otherwise it just get's lost as a black on black costume. The pouches themselves have been biased stitched to the front and the flaps are double thickness with an internal stitch. More to come in due course... Armour to pull and helmet to make, as well as Boots. Phil, you've got most of the other stuff, so you can post details of your flight suit, flak vest, gloves and blaster. Cheers Rob.
-
Yeah, AA is a touch overpriced for what you get. There are people your side of the pond, but if you get stuck, contact RS PropMasters on here. They may or may not be able to sort you out... if you get my meaning.
-
All the details on the lid should be a contrasting black to the main helm. For preference, I like to have the main bucket and armour painted in a Satin Black paint, and then all the detailing areas such as the snout and bolts in gloss black. Obviously if you go for gloss black for the main armour/lid, then you'll want a Satin or Flat black for the other parts. Mike at TrooperBay does a real neat set of Storm Commando decals, you have to ask him specially for them, but they are satin, with gloss details on them. Really good looking on the lid.
-
It's in the post for you buddy.
-
I vote the doopy's pipe combo. It's cheaper and in the end actually more accurate than the Hasbro one.
-
But not as good as here!!
-
Hey John.. I PM'ed you sourcing details over on the BSN. Glad to see you made it to the party! If you need any assistance with the smaller details, shout up.
-
Nice work Jim, looking forward to seeing the Pics. Just to let you know, we now have our very own LMO Liaison so as and when you come to getting to the submission stage, we can ask all the relevant questions and make sure we're heading in the right direction from the start.
-
Come on Jim... Nearly 10 days and no actual pictures of any work going on! Chop Chop!
-
coool... Although your rotted brain means you are forgetting how to dress properly. Pouches are on the wrong sides buddy.
-
Now this comes back to the source material and the inconsistency within the EU side of Star Wars. There are many different illustrators and they each have their own take on what things look like, so there will always be some differences between what artwork is drawn up. The background literature for them is fairly consistent though. It does say they are designated Storm Commandos. They are also known as Shadow Scouts, Shadows, or Black Hats. These are terms used by the Rebel Alliance for them. So the two are the same thing, but just with different illustrators takes on them. I personally dislike the Shadow Scout thing. They are Storm Commando's. They are the Empires Finest and should be correctly addressed. There are notable Storm Commando's within the EU scene. Crix Madine was one, although he turned rebel. General Wier for another (and he wears Scout based armour, so that should be the giveaway).
-
Why not get the two... Start with the olive, put a bit of neon in... mix it up. Paint it on.... Put a bit more neon in... mix it up, paint it on... and so on... You end up getting a nice highlight effect. Stop when you think you're at the right colour.
-
Less is more bro... Less is more!
-
Looking good there buddy.
-
It's always available Jim... But the trouble is the exchange rate and shipping. By the time it gets to you, it's not competitive. So i tend not to, unless someone really really wants it. For instance, what's MonCal Armour... $400? By the time that gets over here with shipping, import duty and VAT, it'll be about £400. My armour is £350, so works nicely. Do the reverse, £350, plus £40 shipping to the states, that's £390, that's $615, without any import duty or VAT which you might have on top... No contest really. And that's exactly what I tell people who ask. Shame really... and I can't see me moving to the states any time soon.
-
pretty yeah... but $175!!! That's about half as much as a set of armour. Far too expensive for what they are if you ask me. One day... when I complete the Colonial Marine, the Snowie, various bits to the Sea Trooper and the possible Swampie... I might just do them.
-
yeah cool mask. To get the best effect, I'd have part of the front of the faceplate smashed out of the lid, say half the lens (ish), and down one cheek. Just so it exposes that rather nice ripped open gore on the mask. Not a lot... Just enough so people can see inside. That's if you are doing a helmet.

