Darth Emphatic[CMD-DWM] Posted July 14, 2016 Share Posted July 14, 2016 Thanks for the legwork on this from retrofire. First draft: Phase Zero dark troopers were the result of the Galactic Empire's Dark Trooper Phase Zero Project and the predecessors of Imperial Dark troopers. Unlike the latter they were not fully droids, but actually aged clone troopers, transformed into cyborgs. The Phase Zero dark troopers were created in the early years of the Empire to deal with a shortage of experienced troops. The program was overseen by then-Lieutenant Rom Mohc and was based on the Empirical, a hidden space station in the Dominus system. He called the program the Dark Trooper Phase Zero. Required Costume Components The following costume components are present and appear as described below. Helmet For 501st approval: Lenses must be sufficiently dark enough to obscure the costumer's eyes. They may be flat or bubbled. Acceptable colors are: black, smoke, dark green, or silver. The body of the "ears" may be black or gray. The bars have three or four bumps and may be left the same color as the body or painted black. The frown must have either 6 or 8 teeth cut out and any coloring must not leave the indented area. Acceptable colors are: black, gray or silver. If there are spaces between the teeth the wearer's face must not be seen The tube stripes are black in color and may number between 9 and 15 per side with the curve bends extending backwards. These may be hand painted or decals. There does not need to be the same number per side. Vocoder (vertically ribbed chin detail) may be black or silver. The aerators (cylinders on either side of the vocoder) are black, and screening maybe silver or black. Traps (trapezoids on dome of helmet) and tears (area beneath the corners of eye lenses) may be: hand painted, decals. Acceptable colors are: black or gray. Rear traps and tears may have vertical black lines. Note: A stock (out of the box) MRCE and/or EFX PCR helmet does not meet the basic 501st requirements without the major modification that are necessary. Neck Seal For 501st approval: Black with horizontal ribs, fitted to the wearer, and extending from the base of the neck to conceal the entire neck. Under Suit For 501st approval: Black non-textured material, either one-piece or two-piece construction with no visible zippers or logos. Shoulder Straps For 501st approval: These must be securely mounted in front and may free float in back. Shoulder Armor For 501st approval: One on each shoulder. The shoulder bells are considered effectively symmetrical; they may worn interchangeably on the left and right shoulders. Upper Arm Armor For 501st approval: Biceps are fully closed. Forearm Armor For 501st approval: Forearms must appear to be fully sealed and enclosed. Hand Plates For 501st approval: Roughly pentagonal in shape, the hand plates are mounted securely over the back of the glove. As an alternative to plastic, these may be made out of latex or latex-like material but must remain glossy. Gloves For 501st approval: Black in color, made of either rubber, nomex, leather, or leather-like material, with no visible straps or logos/designs. The fingers are enclosed, non-textured. Chest Armor For 501st approval: Chest armor overlaps the abdominal armor. Back Armor For 501st approval: Back plate contains a "O II" design with little or no overlap of the kidney plate. Abdomen Armor For 501st approval: The abdomen armor has a button area with 9 gloss black buttons, approximately 7/16" in diameter. Kidney Armor For 501st approval: A single kidney/ posterior armor piece is acceptable. If a separate kidney plate is used, it lines up with the abdomen armor. The top of the kidney armor is flush to or under the back armor. Posterior Armor For 501st approval: A single kidney/ posterior armor piece is acceptable. If a separate posterior plate is used, it lines up below the bottom of the belt with with the abdomen armor. There is a minimal gap between the posterior and and kidney armor. Belt For 501st approval: Belt face is made of plastic (ammo belt). It is comprised of 6 rectangular boxes, with three square buttons, one centered in the middle and one on each end. Belt proper may be made from glossy black ABS or a similar shiny material and must be 3 to 3.5" wide. Black canvas or similar heavy material may also be used. The drop boxes dangle from the sides of the plastic belt face via black straps and are aligned under the plastic tabs of the ammo belt. Thermal Detonator For 501st approval: (a.k.a. O2 canister) attaches to the back of the belt. This is an all black cylinder 2 to 2.5" in diameter with black end caps and a black control panel pad, with controls closest to the right end cap. Holster For 501st approval: Holster is made of black leather or leather-like material. Holster is worn on the left. Holster may be attached to the belt from behind with rivets, or with loops covering the outside of the belt. Thigh Armor For 501st approval: The thigh armor may open and firmly close in the back allowing the two halves to appear sealed when viewed by spectators. The ammo belt is installed on the bottom of the right thigh. Lower Leg Armor For 501st approval: The shin armor is able to open and firmly close in the back allowing the two halves to appear sealed when viewed by spectators. The trapezoid knee plate is affixed to the top of the left shin. Boots For 501st approval: Black leather or leather-like, above ankle height, with a flat sole, and small U-shaped elastic sections on both sides of the ankle with no buckles or laces. Jodphur-type boots or an equivalent style. All stitching must be black, and unnecessary or decorative stitching must not be present. Elvis / Mariachi boots are not acceptable. White, or other color boots may be painted black so long as the boots are maintained to remain the proper color. Jump Pack For 501st approval: A jump pack was an aerial transportation device that rocketed the user into the air for about 2 seconds before slowly descending back onto the ground. Unlike jetpacks, jump packs did not allow for maximum mobility or control in the air, although the user could control where they landed in a certain area as they fell. Need more information here Optional Accessories Items below are optional costume accessories. These items are not required for approval, but if present appear as described below. ARC Caster (Modified E-11 Blaster) For 501st approval: This weapon used a charge function to prepare a blast of electricity at the target which, when fully charged, could affect up to four other targets. Based on a real or replica Sterling sub-machine gun, scratch-built, or a modified commercial toy Stormtrooper blaster. For level two certification (if applicable): Folding stock. Stock does not need to function. [*]A real or replica ammo counter - based off of a Hengstler counter - should be present. [*]D-ring mounted on the rear. [*]Correct style scope. [*]Two power cylinders on the magazine. [*]Scratch-built, resin cast, Hyperfirm rubber cast blasters should have a total of 6 t-racks on blaster (leaving the lowest row on the Hengstler side un-covered). SE-14r Light Repeating Blaster For 501st approval: The SE-14r, sometimes referred to as the Imperial repeating pistol, was an upgrade of the standard BlasTech Industries SE-14 blaster pistol, produced for Imperial officers, stormtroopers, pilots, and other crew. It was considered a backup weapon to the standard-issue E-11 blaster rifle. Need information For level two certification (if applicable): Need information DC-17 Hand Blaster For 501st approval: The DC-17 hand blaster was a blaster pistol wielded by the clone troopers of the Galactic Republic during the Clone Wars. The DC-17 hand blaster was most notably used by ARC trooper captains, clone trooper commanders, and clone jet troopers. It shared many similarities with the DC-15s side arm blaster used by clone commandos. Need information For level two certification (if applicable): Need information 2 Link to comment
Blue Hatter Posted May 11, 2019 Share Posted May 11, 2019 Here are some of my observations from my research... Lenses of the helmet are red, possibly mirrored. Thermal detonator end caps and plate are silver (though they could also be white, it's really hard to tell in the texture images, perhaps both should be acceptable?). The shoes are Chelsea boots painted to match the color of the armor. The soles are gray, not black. There is armor over the top of the shoes. The ear greeblies on the sides of the helmet aren't standard stormtrooper ones. There are three raised rectangles, an indented rectangle painted black, and one more raised rectangle. The decals on the helmet (the vents under the eyes and on the back, and the solid decal above the brow) aren't decals at all, they're separate raised pieces, like the stormtrooper helmets in Rogue One and Solo. The black line "vents" on the tubes(?) are still decals or paint. The belt is either gray or a paler blue-gray color than the rest of the armor. The six boxes on the belt are a blue-gray that's a shade lighter than the base armor color. The lower chest has two horizontal stripes that are a shade darker than the base color of the armor. There are six intended black dots in these stripes. There are no buttons on the belt, though I might suggesting allowing them, it just makes it easier to attach the cloth belt when you can rivet it on and the buttons don't detract from the look. There's a bunch of other stuff but but that is what's off the top of my head. Link to comment
IcyTrooper[CMD-DWM] Posted May 30, 2020 Share Posted May 30, 2020 @Blue Hatter @Raider I can post each section below so that we can work on each section at at time. I'll start with a summary post to show the different sections and where we are at in the process for each and go from there. 1 Link to comment
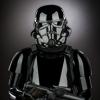
IcyTrooper[CMD-DWM] Posted May 31, 2020 Share Posted May 31, 2020 This will be the main listing and we'll tackle each part piece by piece (green is done, yellow is WIP, and red is not finalized): Helmet Neck Seal Undersuit Shoulder Straps Shoulder Armor Biceps Forearms Hand Plates Gloves Chest Armor Back Armor Jump Pack Abdomen Armor Codpiece & Posterior Armor Belt Thermal Detonator Thigh Armor Knee Detail Lower Leg Armor Boot Armor Boots ARC Caster (Weapon) --------------------------------------------------------------- Description: Phase 0 Dark Trooper Prefix: TX Detachment: Spec Ops Detachment Context: Phase Zero dark troopers were the result of the Galactic Empire's Dark Trooper Phase Zero Project and the predecessors of Imperial Dark troopers. Unlike the latter they were not fully droids, but actually aged clone troopers, transformed into cyborgs. The Phase Zero dark troopers were created in the early years of the Empire to deal with a shortage of experienced troops. The program was overseen by then-Lieutenant Rom Mohc and was based on the Empirical, a hidden space station in the Dominus system. He called the program the Dark Trooper Phase Zero. Helmet Shape of the helmet matches the CRL image and information below: The helmet is based on the standard Stormtrooper helmet, but features larger cheek tubes which bridge into a truncated nose, which is larger and wider than the standard stormtrooper faceplate. The faceplate stops at the earcap, and flares outward at an up-swept angle when viewed from the front. The helmet features a wide skirt originating at the back of the earcap, and sweeps out and downward away from the dome and traps. The skirt widens to partially cover the top of the wearers backplate, and completely covers the shoulder straps. The skirt sweeps back at about level to the rest of the bottom of the helmet, and ends at a point. The skirt is enclosed at the bottom, all the way around, as found in other Stormtrooper helmets. Lenses must be sufficiently dark enough to obscure the costumer's eyes. They are either flat or bubbled. Acceptable color is dark red. The body of the "ears" must be gray. The bars have three or four bumps and are gray. Ear bump section is outlined in black. The frown must have 8 teeth cut out and dark gray coloring must not leave the indented area. Black mesh must be used to obscure the face of the wearer. The tube stripes are medium blue or dark grey in color and may number between 9 and 16 per side with the curve bends extending backwards. These can be either hand painted or decals. Vocoder (vertically ribbed chin detail) must be black and is correct in size and shape in relation to the faceplate. Details contained are different from that of a regular stormtrooper: Two vertical details in the middle. One v-shaped detail which goes around the bottom of the the two vertical details and comes up to the midpoint of those vertical details. Below the v-shaped detail is a wedge shaped detail rounds out towards the bottom. The aerators (cylinders on either side of the vocoder) are black, and screening can be either silver or black. The interior of the aerator must be red. Tears (area beneath the corners of the eye lenses) may be hand painted or decals and must be gray. Tears are outlined in black. Tears have vertical black lines. Front traps (trapezoids on the dome of the helmet) may be hand painted or decals and must be gray. Front traps are outlined in black. There are no vertical black lines on the front traps. Rear traps (trapezoids on the dome of the helmet) may be hand painted or decals and must be gray. Rear traps are outlined in black. Rear traps have vertical black lines. OPTIONAL Level Two certification (if applicable): The lenses have backlit LEDs to give an illuminated glow effect on the lenses. Ears shall have three screws per side, one above and one below the ear bar and one at the base of the helmet. Ear bars have four bumps, not three. The third bump from the front is black. The tube stripes are positioned approximately a pencil width from the side of the cheek. The fall of tube stripe tops ideally lean toward the front. The interior of the aerators have red LEDs that give the appearance that it is glowing. Neck Seal Black with horizontal ribs, fitted to the wearer, and extending from the base of the neck to conceal the entire neck. Under Suit Black non-textured material, either one-piece or two-piece construction with no visible zippers or logos. Shoulder Straps These shall be securely mounted in front and may free float in the back. They can be affixed with rivets, Velcro or adhesive. Unlike a regular stormtrooper, there is no front or rear tab on the strap and they must not be present. OPTIONAL Level Two certification (if applicable): No visible rivets are allowed to secure the straps in the front. These shall be glued in front. These shall be held down in the back by either clear elastic or Velcro. Shoulder Armor One on each shoulder. The shoulder bells are considered effectively symmetrical. They can be worn interchangeably on the left and right shoulders. OPTIONAL Level two certification (if applicable): There should be a minimal gap between the shoulder armor and chest/back plate. Shoulder bells are angled to appear to float upwards. Biceps Biceps are fully closed. Overlap construction is only allowed for kits that come with the cover strip molded into the part. The inner half of the bicep on each arm at the edge of the cover strip is a darker gray than the base body color. OPTIONAL Level two certification (if applicable): There shall be a return edge that is present with a maximum width of 3/8” (10mm) width. Forearms Forearms are fully sealed and closed. Overlap construction is only allowed for kits that come with the cover strip molded into the part. The inner half of the forearm on each arm at the edge of the cover strip is a darker gray than the base body color. OPTIONAL Level two certification (if applicable): There shall be no return edges present on the inside of the front of the forearms. Hand Plates Hand plates are mirror images of each other. Hand plates must be styled as one of the following: Smooth clamshell snowtrooper-style (not the trapezoidal design seen in A New Hope), or Ridged clamshell snowtrooper-style (not the trapezoidal design seen in A New Hope), or Clone trooper-style which have a top curving ridge that comes to a point over the index or middle finger just past the main knuckle of the hand. Hand plates shall be securely mounted over the back of the glove. These can be made up of plastic, latex or latex-like material. OPTIONAL Level two certification (if applicable): The shape of the hand plates must be styled as clone trooper-style which have a top curving ridge that comes to a point over the index or middle finger just past the main knuckle of the hand. Gloves Black in color, made of either rubber, nomex, leather, or leather-like material, with no visible straps or logos/ designs. The fingers are enclosed, non-textured. Chest Armor Chest armor overlaps abdominal armor. There will be a darker gray coloring that curves up from each outer ridge of the raised portion of each breast towards the neck and shoulder straps. On each side of the chest there will be a silver circular greeblie with a red center that fades to black around the edges. There are two pill-shaped black marks underneath and slight offset from the greeblie. The two pill-shaped marks may be painted or decals. Chest armor wraps around the wearers body and is sealed at the sides or the chest armor is not sealed at the sides and is connected with black fabric or nylon that blends into the under suit. OPTIONAL Level two certification (if applicable): Chest armor shall have return edges all around, thicker at the bottom. Circular greeblies on chest are more conical and have a metal appearance: Greeblies get narrower towards the top and wider at the bottom. Red LEDs within each greeblie give the appearance that it is glowing. The two pill-shaped black marks are actual indentions. Chest armor is not seamless at the sides with the back armor and is connected with black fabric or nylon that blends into the under suit. Back Armor Back plate contains an “O II” design with little or no overlap of the kidney plate. There is a fading black to a darker gray coloring that goes from a 45 degree angle from the shoulder straps down towards the corner of the top of the “O II” box, then down at close to a 90 degree angle about two-thirds of the way down before cutting at another 90 degree angle out towards the sides and then again down at a 45 degree angle to the edge of the back plate under the arms. Back armor wraps around the wearers body and is sealed at the sides or the back armor is not sealed at the sides and is connected with black fabric or nylon that blends into the under suit. OPTIONAL Level two certification (if applicable): Back armor is not seamless at the sides with the chest armor and is connected with black fabric or nylon that blends into the under suit. Jump Pack Styled after the jump pack seen in the Battlefront 2004 video game and close to the CRL images with details below. The pack will be painted in the same color as the base color of the armor unless noted otherwise in the details. There are two trapezoidagon wings protruding from either side at the top of the jump pack. These wings are mirrored images of each other with 5 sides. The sides contain the following details: The side facing upwards has a recessed vent section detail painted dark gray on the fins and black to simulate looking into the pack. The vents open towards the center of the pack. The side facing the back/helmet has no details and is dark gray. The side facing outwards from the back has a recessed vent section detail painted dark gray on the fins and black to simulate looking into the pack. The vents open towards the center of the pack. The side facing the exhaust jets is slanted at a 45 degree angle and has a recessed vent section detail painted dark gray on the fins and black to simulate looking into the pack. The vent opens towards the center of the pack. The side facing outwards past the shoulders has a circular detail in the center of a circular recessed area. The circular detail in the center has a raised edge and recessed vent section. The vent section detail is painted dark gray on the fins and black to simulate looking into the pack. There is a trapezoid-like recessed area on each side of the black section towards the top of the pack and next to the trapezoidagon wings. The black center section of the jump pack is flat at the top, slants at an angle towards the middle of the jump pack before flattening out. After the flattened section it slants towards the posterior armor to the bottom of the jump pack. The following details are present: The flat part of the top has no details from the back of the armor to about the last third of the jet pack. After that there is a black section before it reaches the angled slant. The angled slant from the top has a rectangle in the center with recessed black areas on all sides of the rectangle. As it levels out there is another horizontal rectangular greeblie detail until the next slanted area. This horizontal rectangular greeblie is a gray with brown/tan mixed in to give it a metal appearance. The angled slant towards the bottom has a rectangle in the center with recessed black areas on all sides of the rectangle. Just before the rockets on each there is a recessed rectangular section that is gray on each side of the black center section. On each side of the jump pack just above the rockets there is a gray conical detail. This detail is painted dark gray. Each rocket tip will have the following details: A set of dark silver rings at the top. A light gray section in the middle. A dark gray circular section that gets narrower the closer it gets to the bottom. OPTIONAL Level two certification (if applicable): The vent details on the sides of the trapezoidagon wings have the edges of each vent fin painted a lighter gray to simulate edges. The black center section of the pack is painted to simulate textured metal with grays. In the black center section the horizontal rectangular greeblie has two small gray squares on the lower left side of the greeblie. On the each rocket tip: At the top there will be a total of 4 rings that will have a metal appearance. The white section in the middle will have a slight fade to black as it goes into the rings. The dark gray circular section at the bottom has equally spaced rectangular indentions that go all around it. Abdomen Armor Realistic style Clone Abdomen armor. Six 1/4” (6.35mm) in diameter holes per side on indents of ab plate. Twelve holes total. Abdomen armor has the appearance of no gap between the abdomen armor and posterior armor. Abdomen armor is completely contained under the chest and back armor. Codpiece & Posterior Armor The codpiece may be a separate individual piece or part of the abdomen armor and has a raised detail/ridge at the bottom. Codpiece has a darker gray rectangle that starts at the flat part of the raised detail/ridge of the lower codpiece up to the top of the codpiece under the belt. Codpiece and posterior armor connects at the hips under the belt. Posterior armor has a raised ridge that starts on each the side towards the middle and goes up the posterior armor. There is a second ridge/shelf that starts in the middle of posterior armor before the belt. Belt The belt will have the following details: Belt front has two raised rectangular raised boxes offset from the middle of the belt. Two belt boxes with an angled top that is on the outside edge of each of the two raised rectangular indents. Each belt box has a square indent about half the size of the box towards the top. There are two black lines underneath the square indent. There is another raised rectangular raised box that is to the outside edge of each of the two belt boxes towards the sides of the wearer. Any parts of the belt that are not raised shall be flat. Abdomen armor is completely contained under the chest and back armor. OPTIONAL Level two certification (if applicable): Boxes are notched on the back and fit flush to the belt. Detonator connects to the back of the belt without any visible clips and is firmly secured in horizontal position. Thermal Detonator (A.K.A O2 canister) is attached to the center back of the belt. The total length is approximately 7.50” (190.5mm). Detonator consists of a painted dark gray cylinder with 2” (50mm) to 2.68” (68mm) in diameter with gray/silver end caps on each end and a gray/silver control panel pad. The gray/silver control panel pad faces upwards with the following details Four horizontally aligned buttons. These buttons are aligned to the right on the panel, when viewing from behind. There is a circular detail at the top left of the control panel. The detonator may be attached to the belt with 1” (25mm) silver metal or metallic-appearing clips. OPTIONAL Level two certification (if applicable): The detonator is not attached to the belt with silver metal or metallic-appearing clips and sits flush with the belt. Thigh Armor Front of thigh armor has a flat triangular area near the knee. From the top of the triangle, a ridge line travels up the front of the thigh to the top edge. Rear of the thigh has a U-shaped indention. Armor is seamless. No visible traces of how the armor was assembled are shown. On the outside of the thighs there is a darker gray striping that is wide at the top of the thigh and narrows a third of the way down the thigh and extends all the way to the bottom of the thigh. On the inside of the thigh there is a darker gray striping that is wide at the top of the thigh and goes down the inside of the thigh at a 90 degree angle, cutting at a 45 degree angle at the midpoint of the thigh then cuts back down at a 30 degree angle towards the last third of the thigh. It flattens out about a third of the way from the end of the thigh and goes back to the back of the thigh before going up the back inside of the thigh at a 90 degree angle to the top of the thigh. This stripe shall not go to the bottom of the inside of the thigh. Knee Details On each side of each knee there will be a silver circular greeblie with a red center that fades to black around the edges. This detail may be attached to either the thigh armor or lower leg armor, but the method of attachment shall be hidden or blended into the undersuit. OPTIONAL Level two certification (if applicable): Circular greeblies are more conical and have a metal appearance: Greeblies get narrower towards the top and wider at the bottom. Red LEDs within each greeblie give the appearance that it is glowing. Lower Leg Armor The shin armor is able to open and firmly close in the back allowing the two halves to appear sealed. There shall be the appearance of a cover strip on the front and back. The cover strips will be a darker gray color that is different from the base color. Overlap construction is only allowable for kits that come with the cover strip molded into the part. OPTIONAL Level two certification (if applicable): Must be constructed using the butt joint cover strip method. Overlap construction is not allowed. 1 Link to comment
IcyTrooper[CMD-DWM] Posted May 31, 2020 Share Posted May 31, 2020 Description: Phase 0 Dark TrooperPrefix: TXDetachment: Spec Ops DetachmentContext: Phase Zero dark troopers were the result of the Galactic Empire's Dark Trooper Phase Zero Project and the predecessors of Imperial Dark troopers. Unlike the latter they were not fully droids, but actually aged clone troopers, transformed into cyborgs. The Phase Zero dark troopers were created in the early years of the Empire to deal with a shortage of experienced troops. The program was overseen by then-Lieutenant Rom Mohc and was based on the Empirical, a hidden space station in the Dominus system. He called the program the Dark Trooper Phase Zero. Link to comment
Blue Hatter Posted May 31, 2020 Share Posted May 31, 2020 5 hours ago, IcyTrooper said: This will be the main listing and we'll tackle each part piece by piece: Helmet Neck Seal Undersuit Shoulder Straps Shoulder Armor Biceps Forearms Hand Plates Gloves Chest Armor Back Armor Jump Pack Abdomen Armor Kidney & Posterior Armor Belt Thermal Detonator Thigh Armor Lower Leg Armor Boots ARC Caster (Weapon) Alrighty, I can definitely help out with these! I gather that it would probably be easier for me to first take some pictures of my parts to compare to and such? I've written a few costume standards for the Rebel Legion before so I understand the gist of what is likely needed. 2 Link to comment
IcyTrooper[CMD-DWM] Posted May 31, 2020 Share Posted May 31, 2020 Helmet Shape of the helmet matches the CRL image which features wider cheeks that round out to a point in the back. Lenses must be sufficiently dark enough to obscure the costumer's eyes. They are either flat or bubbled. Acceptable colors are red. Backlit LEDs give an illuminated glow effect on the lenses. The body of the "ears" must be gray. The bars have three or four bumps and are gray. Ear bump section is outlined in black. The frown must have 8 teeth cut out and black coloring must not leave the indented area. Black mesh must be used to obscure the face of the wearer. The tube stripes are black in color and may number between 9 and 16 per side with the curve bends extending backwards. These can be either hand painted or decals. Vocoder (vertically ribbed chin detail) must be black. The aerators (cylinders on either side of the vocoder) are black, and screening can be either silver or black. The interior of the aerator must be red. Red LEDs within the aerator give the appearance that it is glowing. Tears (area beneath the corners of the eye lenses) may be hand painted or decals and must be gray. Tears are outlined in black. Tears have vertical black lines. Front traps (trapezoids on the dome of the helmet) may be hand painted or decals and must be gray. Front traps are outlined in black. There are no vertical black lines on the front traps. Rear traps (trapezoids on the dome of the helmet) may be hand painted or decals and must be gray. Rear traps are outlined in black. Rear traps have vertical black lines. OPTIONAL Level Two certification (if applicable): Ear bars have four bumps, not three. The third bump from the front is black. Link to comment
Blue Hatter Posted June 2, 2020 Share Posted June 2, 2020 Would it be best for me to briefly list my thoughts on each section, like under helmet, for example, "red lenses", "flat black chin" and then expand on those later after opinions are given, or go into more detail right off the bat? At least for this first version of it. One thing, though, regarding the interior of the aerators being red... I'd actually recommend them being silver inside, something bright and reflective, because that will reflect the LED light better than red would. The interior of my aerators are painted a bright silver with some reflective glitter and that helps to reflect the light. Using some mirrored foil would probably work even better. Or even just gluing in a small strip of tin foil. Not that this should be required or anything, but when I printed the aerators, on the bottom inside I made the interior a bit of a cone shape (also painted silver) which directs the light upward and out. I also painted the mesh of the aerators a reflective silver (different than the interior, actually) so that when the lights were on the mesh would "disappear" a bit more. If the builder was able to get the LED lights closer to the end of the aerators they probably wouldn't have to worry so much about reflecting the light, so long as they used some kind of diffusion material to diffuse the light. My lights sit fairly far back so I had to make the insides more able to propel and focus the light. I did use diffusion material on all of the lights. Heh, a cheap shower curtain liner from the Dollar Tree works pretty well for light diffusion. 1 Link to comment
IcyTrooper[CMD-DWM] Posted June 2, 2020 Share Posted June 2, 2020 15 hours ago, Blue Hatter said: Would it be best for me to briefly list my thoughts on each section, like under helmet, for example, "red lenses", "flat black chin" and then expand on those later after opinions are given, or go into more detail right off the bat? At least for this first version of it. One thing, though, regarding the interior of the aerators being red... I'd actually recommend them being silver inside, something bright and reflective, because that will reflect the LED light better than red would. The interior of my aerators are painted a bright silver with some reflective glitter and that helps to reflect the light. Using some mirrored foil would probably work even better. Or even just gluing in a small strip of tin foil. Not that this should be required or anything, but when I printed the aerators, on the bottom inside I made the interior a bit of a cone shape (also painted silver) which directs the light upward and out. I also painted the mesh of the aerators a reflective silver (different than the interior, actually) so that when the lights were on the mesh would "disappear" a bit more. If the builder was able to get the LED lights closer to the end of the aerators they probably wouldn't have to worry so much about reflecting the light, so long as they used some kind of diffusion material to diffuse the light. My lights sit fairly far back so I had to make the insides more able to propel and focus the light. I did use diffusion material on all of the lights. Heh, a cheap shower curtain liner from the Dollar Tree works pretty well for light diffusion. I'd say what you did is fine for this, we'll knock out each section of the CRL one step at a time. Some sections will obviously be quicker than others, but I definitely want to see all the feedback you and the community has as well as the staff here to make sure we make things accurate, feasible and hash out L2 details. You can go ahead and add bullet points to your post taken from mine above and edit them to see how it should look or what you are suggesting and then I can update the master post with the information that we all agree on. One thing we'll need to settle is whether something that is difficult to do but would make it hyper-realistic would be pushed to level 2 versus stuff for basic approval. For example, painting the aerators bright silver with reflective glitter to make the lights look better may be a L2 detail, whereas we just need to make sure there is a red LED or film over the LED to give it the red glow, etc. A reflective silver on the mesh would definitely be a L1 detail if it will give us the look we are looking for. 1 Link to comment
Blackwatch[CMD-DCA] Posted June 4, 2020 Share Posted June 4, 2020 Agree with Ryan. CRLs are step by step, incremental, and I find our process different from all the Standards I wrote in the RL because we are working with a LOT more images and resources, where in the RL we didnt have nearly as many. I would suggest you take a read through the final six pages of the Del Meeko we just finished up last week. We got really in depth with that, but there are things that are defintely L1 basic approval items, vs L2 optional/ specialist approval items. Seeing how we handled each component there will give you an idea for how we want to tear this costume apart inch by inch and determine how it will be in the end. Del Meeko CRL discussion 2 Link to comment
Blue Hatter Posted June 5, 2020 Share Posted June 5, 2020 16 hours ago, Blackwatch said: Agree with Ryan. CRLs are step by step, incremental, and I find our process different from all the Standards I wrote in the RL because we are working with a LOT more images and resources, where in the RL we didnt have nearly as many. I would suggest you take a read through the final six pages of the Del Meeko we just finished up last week. We got really in depth with that, but there are things that are defintely L1 basic approval items, vs L2 optional/ specialist approval items. Seeing how we handled each component there will give you an idea for how we want to tear this costume apart inch by inch and determine how it will be in the end. Del Meeko CRL discussion Alrighty. I'll take a look at it and get some ideas going. On 6/2/2020 at 3:50 PM, IcyTrooper said: I'd say what you did is fine for this, we'll knock out each section of the CRL one step at a time. Some sections will obviously be quicker than others, but I definitely want to see all the feedback you and the community has as well as the staff here to make sure we make things accurate, feasible and hash out L2 details. You can go ahead and add bullet points to your post taken from mine above and edit them to see how it should look or what you are suggesting and then I can update the master post with the information that we all agree on. One thing we'll need to settle is whether something that is difficult to do but would make it hyper-realistic would be pushed to level 2 versus stuff for basic approval. For example, painting the aerators bright silver with reflective glitter to make the lights look better may be a L2 detail, whereas we just need to make sure there is a red LED or film over the LED to give it the red glow, etc. A reflective silver on the mesh would definitely be a L1 detail if it will give us the look we are looking for. Roger roger. I'll start listing a my observations and thoughts and go from there. I'll also try to snap some pictures this weekend to help explain my thoughts. 1 Link to comment
Blue Hatter Posted June 17, 2020 Share Posted June 17, 2020 On 6/11/2020 at 6:12 AM, Blackwatch said: any progress ? Sorry, not yet. Things got a little busy on my end. I am updating my build thread with some finished pictures, though... 1 Link to comment
Blue Hatter Posted June 23, 2020 Share Posted June 23, 2020 So here are a few of my observations during my build. This is rather brief for now. FYI, the names of the colors are the "official" names found online, not the names of the paint I used, just to make it simple for now. I can provide the names of the spray paint colors I used if desired. The names below are the closest approximations that I could find to the colors I see. Most colors appear, to me, to be varying shades of blue-gray.https://en.wikipedia.org/wiki/Shades_of_bluehttps://en.wikipedia.org/wiki/Blue-gray Helmet -The helmet is painted "morning blue" -Teeth are painted "independence blue" -Black aerators with silver or red interior -Aerators are light with red LEDs -Dark red flat lenses (can't tell if they're supposed to look mirrored or not, either is probably fine) -Ear greeblies have three protruding rectangles, one black indented rectangle, and then one last protruding rectangle -Cheek vents and vent plates on back of the helmet have the vents cut in and are painted black inside -Tube vents could be either cut in or be a sticker (it's impossible to tell on the Pandemic texture if they're supposed to look cut in or not, the texture is too small) -Ear greeblies, vent plates and forehead plate are painted "periwinkle blue" -Chin is flat black Torso -The bulk of the chest armor is painted "morning blue" -Indented area near the shoulders should either be a separate piece under the main chest piece or be painted to look like it's sitting below -The section mentioned above is painted "Berkley blue" -Two pill-shaped indentations to the right side of the chest, painted black -Silver "bolts" on the chest, indented circular center, center is backlit with red LED lights -The shoulder straps are painted "morning blue" or a shade lighter (the Pandemic texture appears to show that the shoulder straps are a shade lighter but it's very close) -Stomach armor has "space cadet blue" stripes down the center and six black circular indentations down the center of each stripe -Cod piece is "morning blue" with an "independence blue" or "Berkley blue" square in the middle of it Arms -The outer half of the upper arm and lower arm armor are painted "morning blue" -The inner half of the armor is painted "Berkley blue" -The outer half of the armor layers over the inner half Legs -Thigh armor appears to be layered, with a base layer and two thicker layers over it on the front and back. The armor should appear to be made of two layers, or be painted to appear this way -The "over layers" on the front and back of the thigh armor are painted "morning blue" -The "under layer" on the center parts of the thigh armor are painted "Berkley blue" -The base color of the calf armor is "morning blue" -There is a stripe of "dark blue-gray" running down the front and back of the calf armor -Cone-shaped "bolts" on either side of the knee, painted silver, circular indented center that is lit with red LEDs Belt -Mouse gray base color -"Periwinkle" or "powder blue" boxes"(a shade or two lighter than the base armor color) -Cloth belt is mouse gray or similar in color (could either be the same width as the plastic belt or the width of a standard stormtrooper belt, it's the same width on the Pandemic texture the belt is also just one big graphic that wraps around the model with no separation between plastic and cloth, so I'd say either width should be fine) -Two clone trooper armor boxes on the front of the belt painted mouse gray. Shoes -Chelsea boots with a strip of material up the toe (similar to clone trooper shoes) -Painted "morning blue" -Soles are gray in color -Bottom of soles have a crinkle texture (probably optional?) -There is a portion of armor over the shoes made of two layers -There are two pill-shaped indentations on the shoe armor toward the two, painted black Jetpack -Base color of the jetpack is "morning blue" -Large air intake tank (not sure what to call this) down the enter -Air intake tank is painted gunmetal and has a rough stucco-like or stone-like texture -Back of the jetpack is gunmetal -Bottom of the jetpack is gunmetal -Jet thrusts are stainless steel or silver in color and have an off-white stripe around the center of them -Trapezoid-shape cut on the top of the air intake tank, inside of this opening is painted black -Optional black mesh over the trapezoid opening -Silver half cones on the sides of the jetpack above where the thrusters are attached -Wings on either side of the top of the jet pack -Bottom of wings has vents painted black and these are framed in "independence blue" -Outward facing side of the wings has vents painted black and these are framed in "dark blue-gray" -Top side of wings has vents painted black and these are framed in "dark blue-gray", which this is also framed in pale "periwinkle" Thermal detonator -Dark gray base color -Silver sides and face plate 2 Link to comment
Blackwatch[CMD-DCA] Posted June 25, 2020 Share Posted June 25, 2020 Blue you clearly put some work into this. Ok, that means its time for me to do my thing. Ill align it with the standardized format we use, I use a lot of cut copy past. As we go through each part, we will beat it to death, rake it over the coals, dehydrate it , grind it to a fine powder, and rehydrate it for later use. its a process, and in the end, we all win. We will discuss each part of the uniform, starting at the top, and working our way down, one bit at a time as the part is completed. We also need to determine baseline Level 1 standards, as well as Level 2 standards for Specialists. Ready, Steady--go Link to comment
Blackwatch[CMD-DCA] Posted June 25, 2020 Share Posted June 25, 2020 edited to keep topic on track with Icytroopers proposal. 1 Link to comment
Blue Hatter Posted June 25, 2020 Share Posted June 25, 2020 5 hours ago, Blackwatch said: I think that sounds pretty good so far! I do have a few thoughts, though... The skirt widens to partoially cover the top of the wearers backplate, and completely covers the shoulder straps. I'm not sure that description is entirely needed, or maybe it's a little too complicated? To me it's sounding like the back of the helmet is supposed to somehow drape over the armor and shoulder straps, like it's touching them, but it's just a long swoop (or whatever you want to call it) going back. Maybe just a description similar to that might be less confusing? Something like "a swoop/skirt/whatever from the back of the helmet and is roughly X inches long to the end". Also, "partially" is spelled wrong. The “ear” bars have three or four bumps and are gray or painted gray, with a black outline. Painting the bumps with rank stripes (highlighted) in black is optional. The ears do have four bumps, three, an indented bar (painted black inside), and one more bump. Depending on how picky it should be, the indented black bar is wider than the other four bars/bumps by roughly 1 1/2 times. I'm not sure what you mean by "painting the bumps with rank stripes"... Is that the black outline around the rectangular ear greeblie? The tears and traps have black outlines around them. Though maybe that's implied about painting them, I wasn't sure. Other than that I think it's sounding alright. I'll poke around for better color names, though. Gray, I think, isn't quite descriptive enough as "gray" is just a mix of black and white, it's a shade and not a color. By definition gray has no color in it. Heh, I'm a art/theater major, colors are my thing. ?? (I can also see more colors than average, but that's another story.) I seem to remember a website where you could upload an image and click on various parts and it would give you the name of the color you clicked on... I'll see if I can find that website again. Also, gray-blue and blue-gray are actually two different things. Gray-blue is gray with a hue of blue in it (a cool gray as opposed to a warm gray), blue-gray is blue with a gray hue. But maybe I'm being too nit-picky there... Sorry. Again, I'm an art dude... XD Link to comment
Blackwatch[CMD-DCA] Posted June 26, 2020 Share Posted June 26, 2020 edited to keep topic on track with Icytroopers proposal. Link to comment
Blackwatch[CMD-DCA] Posted June 26, 2020 Share Posted June 26, 2020 edited to keep topic on track with Icytroopers proposal. Link to comment
Blue Hatter Posted June 26, 2020 Share Posted June 26, 2020 Those changes look good to me. No complaints here. And yeah, I agree that we need a way to agree and identify the colors better. This weekend I'll try finding that website I mentioned which may help with getting the colors. If we can at least find names of the colors that would probably make it easier to find matching paint colors. Finding spray paint for this armor was a nightmare, I searched for a good part of a year. The color my armor is is actually a mixture of colors... A base coat of one color and then a few coats of transparent white, gray and black until I got something that looked pretty close to the references. Most of the paint I got was from a place called 00Connec, or something like that... but I would not recommend using them. Ever. They have the rudest customer service I've ever experienced, they pretty much tell you that they don't want to help you and that you're bothering them if you ask a question, and they never return your calls. One person outright hung up on me after I asked if they knew if there were any local sellers. I will never, ever shop with them again. Montana Gold has a color that's very similar to the color I got from 00Connec that I used to paint the main parts of the armor (the largest part of the chest, thighs, arms, etc.). The shoulder straps are actually painted with that color after I ran out of the 00Connec paint and couldn't get ahold of them to see if they had more (they changed the names of the paint on their website for some reason and I couldn't figure out which was which). It's the Montana Gold "Mt. Fuji" if I remember right, but I'd have to look at the can I have to say for certain. I used "Polar Blue" for the vent frame on the top of the jetpack and I think it was "Nautilus" for the vent frame on the bottom of the jetpack. I used "Mouse" for the belt and I think it was either "Cool Candy" or "Denim Light" for the boxes on it. I'll get my paint cans out this weekend and get the names. 1 Link to comment
Blackwatch[CMD-DCA] Posted June 27, 2020 Share Posted June 27, 2020 looks like thats a good starting point as a reference. We can work from there. Link to comment
RAIDER[CMD-DCA] Posted June 27, 2020 Share Posted June 27, 2020 On 6/26/2020 at 5:56 AM, Blue Hatter said: Those changes look good to me. No complaints here. And yeah, I agree that we need a way to agree and identify the colors better. This weekend I'll try finding that website I mentioned which may help with getting the colors. If we can at least find names of the colors that would probably make it easier to find matching paint colors. Finding spray paint for this armor was a nightmare, I searched for a good part of a year. The color my armor is is actually a mixture of colors... A base coat of one color and then a few coats of transparent white, gray and black until I got something that looked pretty close to the references. Most of the paint I got was from a place called 00Connec, or something like that... but I would not recommend using them. Ever. They have the rudest customer service I've ever experienced, they pretty much tell you that they don't want to help you and that you're bothering them if you ask a question, and they never return your calls. One person outright hung up on me after I asked if they knew if there were any local sellers. I will never, ever shop with them again. Montana Gold has a color that's very similar to the color I got from 00Connec that I used to paint the main parts of the armor (the largest part of the chest, thighs, arms, etc.). The shoulder straps are actually painted with that color after I ran out of the 00Connec paint and couldn't get ahold of them to see if they had more (they changed the names of the paint on their website for some reason and I couldn't figure out which was which). It's the Montana Gold "Mt. Fuji" if I remember right, but I'd have to look at the can I have to say for certain. I used "Polar Blue" for the vent frame on the top of the jetpack and I think it was "Nautilus" for the vent frame on the bottom of the jetpack. I used "Mouse" for the belt and I think it was either "Cool Candy" or "Denim Light" for the boxes on it. I'll get my paint cans out this weekend and get the names. @Blackwatch knows this...but based on worldwide availability (affordability) we will just have to settle on some generic terms to get the color as close as possible. What he has done in the helmet is about right I think. 1 Link to comment
IcyTrooper[CMD-DWM] Posted June 28, 2020 Share Posted June 28, 2020 23 hours ago, Blackwatch said: looks like thats a good starting point as a reference. We can work from there. I'm going to go through your proposal but I think you may have bypassed mine ?. I'm sure we probably have similar stuff or if you want to take a look in that and I can edit the master post that I have? Link to comment
Blackwatch[CMD-DCA] Posted June 29, 2020 Share Posted June 29, 2020 Sorry Ryan I did not see your propoosal , I had read Alex's post from Tuesday and worked from there. Lets work from one proposal. Yours has the correct bullet forattting that my computes refuse to work with, so lets use yours. The only difference is that on my L2 I have the ear bumps with four bumps and a fifth rectungular black depression that Alex described. Link to comment
IcyTrooper[CMD-DWM] Posted June 29, 2020 Share Posted June 29, 2020 1 hour ago, Blackwatch said: Sorry Ryan I did not see your propoosal , I had read Alex's post from Tuesday and worked from there. Lets work from one proposal. Yours has the correct bullet forattting that my computes refuse to work with, so lets use yours. The only difference is that on my L2 I have the ear bumps with four bumps and a fifth rectungular black depression that Alex described. No problem sir, I just didn't wanna make you do more work than you had to for it. Link to comment

Recommended Posts
Create an account or sign in to comment
You need to be a member in order to leave a comment
Create an account
Sign up for a new account in our community. It's easy!
Register a new accountSign in
Already have an account? Sign in here.
Sign In Now