PaulM[TX] Posted June 8, 2018 Share Posted June 8, 2018 Hi All, It's been awhile sense I introduced myself I have started my DT build and this is where I'm at. I've gone over this forum quite a bit and been looking at everyone's builds. So this is my list. Helmet - Originally I purchased one from Plastic Arms but could not get it to fit right. Big Head so I'm going with Jim Tripon - Received Armor - Jim Tripon - Received Undersuit - Made myself Gloves - Endorfinders - Received Boots - Dr Martens - Received Se14r - Roman Bela - Received E11d - Roman Bela - Received Belt and Pouches - Armory Shop - Received I have some misc items still to get but the journey has begun. Any comments are more than welcome. Link to comment
PaulM[TX] Posted June 8, 2018 Author Share Posted June 8, 2018 Hi All,It's been awhile sense I introduced myself I have started my DT build and this is where I'm at. I've gone over this forum quite a bit and been looking at everyone's builds. So this is my list. Helmet - Originally I purchased one from Plastic Arms but could not get it to fit right. Big Head so I'm going with Jim Tripon - Received Armor - Jim Tripon - Received Undersuit - The DarkSide Closet - Ordering Soon Gloves - Endorfinders - Received Boots - Dr Martens - Received Se14r - Roman Bela - Received E11d - Roman Bela - Received Belt and Pouches - Armory Shop - Ordered should be shipping soon I have some misc items still to get but the journey has begun. Any comments are more than welcome. Jim's Kit Sent from my iPhone using Tapatalk Pro Link to comment
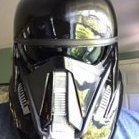
PaulM[TX] Posted June 8, 2018 Author Share Posted June 8, 2018 Here are a few more with Plastic Arms and Jim's helmets Sent from my iPhone using Tapatalk Pro Link to comment
PaulM[TX] Posted July 2, 2018 Author Share Posted July 2, 2018 Another piece to the puzzle. Just need to do a little more weathering. Sent from my iPhone using Tapatalk Pro Link to comment
PaulM[TX] Posted August 10, 2018 Author Share Posted August 10, 2018 Finally getting some paint on my helmet armor is next. Sent from my iPhone using Tapatalk Pro Link to comment
PaulM[TX] Posted August 26, 2018 Author Share Posted August 26, 2018 Started to put clear coat on and this happened. Waited about four days for black to cure but apparently it wasn't long enough. I'll be sanding this one out just glad it's another helmet I had and not the one I'll be using. Sent from my iPhone using Tapatalk Pro Link to comment
PaulM[TX] Posted August 26, 2018 Author Share Posted August 26, 2018 Thinking of using this fabric for my undersuit. Couldn't get a good picture of it but it's has a little more shine to it. It's very flexible and will breathe well. Sent from my iPhone using Tapatalk Pro Link to comment
PaulM[TX] Posted August 26, 2018 Author Share Posted August 26, 2018 Also got started on my E-11 going to replace some of the 3D printed stuff with aluminum pieces to give it a little more strength. Sent from my iPhone using Tapatalk Pro Link to comment
nanotek[501st] Posted August 27, 2018 Share Posted August 27, 2018 You’re doing a great job. Keep it up Link to comment
PaulM[TX] Posted September 1, 2018 Author Share Posted September 1, 2018 Thanks going to try and get the armor all fitted this weekend. Sent from my iPhone using Tapatalk Pro Link to comment
PaulM[TX] Posted September 3, 2018 Author Share Posted September 3, 2018 A little more progress today glueing up forearms and calves. Sent from my iPhone using Tapatalk Pro 1 Link to comment
PaulM[TX] Posted November 1, 2018 Author Share Posted November 1, 2018 Big score came in the mail today. Never thought I would find a pair of Jered's in my size. Sent from my iPhone using Tapatalk Pro Link to comment
PaulM[TX] Posted November 8, 2018 Author Share Posted November 8, 2018 One piece of the puzzle done Sent from my iPhone using Tapatalk Pro 2 Link to comment
Spliedt729 Posted December 18, 2018 Share Posted December 18, 2018 Looks amazing, what did you use for lights in your helmet?Sent from my iPhone using Tapatalk Link to comment
PaulM[TX] Posted December 21, 2018 Author Share Posted December 21, 2018 Looks amazing, what did you use for lights in your helmet?Sent from my iPhone using TapatalkThanks I used green LED's that I defused so it wouldn't have bright spot in the middle. Sent from my iPhone using Tapatalk Pro Link to comment
PaulM[TX] Posted July 2, 2019 Author Share Posted July 2, 2019 Finally back at it. Changed out the 3D printed light with a real one. Also changed the range finder with one that I machined myself. Link to comment
PaulM[TX] Posted July 2, 2019 Author Share Posted July 2, 2019 Worked on the collar had to reinforce it seemed to flimsy. Link to comment
PaulM[TX] Posted July 5, 2019 Author Share Posted July 5, 2019 Started to work on the strapping. I decided to go with snaps to hold the front and back plates together. Then I'll just use velcro to hold the shoulder straps on. I think I'm going to be attaching everything to the front and back so I just wanted a little more strength to hold all this together. Link to comment
PaulM[TX] Posted July 5, 2019 Author Share Posted July 5, 2019 Some more strapping on the front and back. 1 Link to comment
Blackwatch[CMD-DCA] Posted July 8, 2019 Share Posted July 8, 2019 the rifle looks fantastsic Link to comment
PaulM[TX] Posted July 8, 2019 Author Share Posted July 8, 2019 1 hour ago, Blackwatch said: the rifle looks fantastsic Thanks I appreciate that. ? Link to comment
PaulM[TX] Posted July 26, 2019 Author Share Posted July 26, 2019 Got some work done on my belt. I went with a 1 1/2" nylon belt on the back side of the rubber belt to help hold everything together. I used chicago scews to hold the pouches and holster to the nylon belt. This way nothing is really hanging on the rubber belt. I also wanted to use the nylon belt with parachute buckles on the ends so that I can get the belt tight on me. Then I'll just use some velco in certain places to hold the rubber belt in place. Hopefully I can get the rest of this thing fitted this weekend and finally get some paint on it. Link to comment
PaulM[TX] Posted November 20, 2019 Author Share Posted November 20, 2019 So I'm finally back at it and decided to make my own undersuit. I used a pair of pajama bottoms for the basic patterns and just kept tweaking them until I got the right fit. I'll use a pair of suspenders to help with holding them up as the fabric I'm using is a little slippery. Overall they fit good. 1 Link to comment
PaulM[TX] Posted November 20, 2019 Author Share Posted November 20, 2019 This is the top I put together kind of did the same thing I did with the pants. I found a T-shirt pattern and modified it for all the different patterns. It took some time to get it so I wouldn't sew myself into a corner. It defiantly had to be sewn a certain way. The only thing I have to do to it is sew the hems which I will do when I get all the armor in place. 1 Link to comment

Recommended Posts
Create an account or sign in to comment
You need to be a member in order to leave a comment
Create an account
Sign up for a new account in our community. It's easy!
Register a new accountSign in
Already have an account? Sign in here.
Sign In Now