wook1138[TX] Posted October 3, 2018 Share Posted October 3, 2018 Hi. I’m going to post my Deathtrooper build, which I suspect will be a slow process. I’m still tweaking my sandtrooper and I also have a TK that I’m up grading. So the wife is less than thrilled with yet another build. She hasn’t walked out yet so I’ll assume all is good. Anyway... I’m still in the researching and buying stage of the build. So what I have so far besides a massive visa bill is: Armor - 850 Armor Works ABS kit. Received Helmet - Armoryshop raw cast resin Mk3 helmet. Arrived. Gloves - Endor Finders. Arrived. Boots - Doc Martens Talib (found a sale on Amazon). Arrived. SE-14 - on order from Maz3Dshop. Received E-11D - 3D print from Jerry Budde. Received I’m not a tall guy so I ordered larger boots and picked up some lifts to gain a bit of height. I’m only 5’10 so I need all the help I can get. Update Dec 15, 2018 Order and/or received a bunch of other items for the build Tusk lights - Conventional LED light kit from ArmoryShop and some various EL panels and drivers from EL Wire Craft (some EL panels still in shipping) Trim for helmet - Armory Shop. received Upgraded wrist rockets and belt buckle - Plastic Arms Dealer. recieved. I will probably get the wrist elastics from him as well E-11D hardware kit with working light - 3D Props NL. Received Speed Strap holster for SE-14R and small belt pouch - Kerry Alan Rowntree. recieved Canvas Ammo Pouches x3 - Armory Shop. Ordered Specialist chest rig harness (no accessories yet) - Armory Shop As far as my choice in armour is concerned, I went with ABS because that is what I know and I don’t have a work space for sanding fibreglass. Plus, I can only paint in the summer months because of the stupid cold weather here (central Canada). Here are a few pics of what I have. Boots and gloves. The gloves are awesome, btw. Armoryshop helmet. Denis has been great to deal with. Helmet looks great and fits my slightly large head. More to come... eventually. Sent from my iPhone using Tapatalk Link to comment
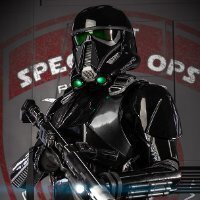
wook1138[TX] Posted October 9, 2018 Author Share Posted October 9, 2018 So, a question regarding the paint scheme for the DT helmet. What is it? I’ve gone through some video reviews of the Anovos helmet and tried to figure out what gets painted what. I’m assuming the Anovos helmet paint job is accurate (right?). Anyway, it looks like there is gloss black, metallic black, flat black, and weathered aluminum/silver. I’ve tried to map it out below in the image. I’m assuming all other recesses at the back are painted with flat black. Can anyone let me know what I missed or just got wrong? Thanks. Sent from my iPhone using Tapatalk Link to comment
wook1138[TX] Posted October 11, 2018 Author Share Posted October 11, 2018 Started some work on the helmet. I had never worked with a resin helmet before, so this was all new to me. The helmet is practically ready for painting. The surface is pretty smooth and shouldn’t require a lot of prep work. The first thing I had to do was cut away some extra material from the casting process. The outside of the helmet appears to have been cleaned up already. Inside of helmet.Back side of front grill (not even sure what this is called)Few extra bits on top of the range finder. So time for the Dremel. Plastic cutting disc and sanding drum. Well, the good news is that this stuff cuts and sands really easily. Bad news is that it makes a real mess. No, I’m not wearing a glove. Inside front. I cut away a lot of material but left a little. I noticed that the Anovos helmet has no return edge here, so maybe I’ll remove it at some point bDid some hand sanding, washed the bucket, and added a few light coats of black Plastidip to the inside. Why? Why not. It is black and hopefully dampens sound a little. The helmet came pretty well packed, but one part didn’t survive the trip. A little bit of super glue and all is fineOnce I gave all the parts a quick sanding, I was able to do a test fit of the parts. The only thing I noticed that didn’t look right was the piece below the eyes. It seems to overlap the lens area a bit. I may half to sand this back in touch. The holes for the wiring are not centred. Oh well. Not sure if this really matters. At first I thought there was an issue with the way the lights were seated on the helmet. But after looking at a video for the Anovos helmet, this seems to be normal. I might have to sand down the tubes the lights fit onto to make it fit a bit better, but that is work for another day. Sent from my iPhone using Tapatalk Link to comment
Chaos[CMD-DCA] Posted October 11, 2018 Share Posted October 11, 2018 Looking good so far! I wouldn't worry about the eye/cheek piece, it looks almost identical to the Celebration display and the promo photo's helmet. A word of advice on the plastidip, if you plan on putting velcro inside for pads, electronics, etc., or gluing them in, you will need to sand away the plastidip. Things will stick to the plastidip but the plastidip will pull away from the resin's surface. 1 Link to comment
wook1138[TX] Posted October 11, 2018 Author Share Posted October 11, 2018 2 minutes ago, Chaos said: Looking good so far! I wouldn't worry about the eye/cheek piece, it looks almost identical to the Celebration display and the promo photo's helmet. A word of advice on the plastidip, if you plan on putting velcro inside for pads, electronics, etc., or gluing them in, you will need to sand away the plastidip. Things will stick to the plastidip but the plastidip will pull away from the resin's surface. Thanks! That is good to know about the eye. I did give the interior a light sanding to help the plastidip stick, but I suspect you are right about removing it for gluing. 1 Link to comment
Woodo007[501st] Posted October 15, 2018 Share Posted October 15, 2018 If the lights being off centre bugs u like it does me there is a solution. You can use EL light panels, trimmed to fit the lens. I will try and add a link. All us UK guys use them in our helmets with off centres holes. It means u don’t get an obvious LED spot on your lights. The company we use is called EL wirecraft. They are based in the UK. https://elwirecraft.co.uk/Ps. I got the idea from the godfather Tom CampbellSent from my iPhone using Tapatalk 1 Link to comment
wook1138[TX] Posted October 15, 2018 Author Share Posted October 15, 2018 If the lights being off centre bugs u like it does me there is a solution. You can use EL light panels, trimmed to fit the lens. I will try and add a link. All us UK guys use them in our helmets with off centres holes. It means u don’t get an obvious LED spot on your lights. The company we use is called EL wirecraft. They are based in the UK. https://elwirecraft.co.uk/Ps. I got the idea from the godfather Tom CampbellSent from my iPhone using TapatalkThanks! I am absolutely checking this out. This is exactly what I was thinking, but had no idea where to start. Cheers mate. Sent from my iPhone using Tapatalk Link to comment
wook1138[TX] Posted October 16, 2018 Author Share Posted October 16, 2018 So a little more work on the helmet. I trimmed out the eyes and vents and did some general cleaning up of casting artifacts and 3D print lines that were transferred from the original. There really wasn’t a lot to clean up. Eyes. Drilled some holes and then played connect the dots with the dremel. This thing scares me hence the drill holes to help control the cuts. Rough cut of eyes. Sanding the eyes. I did eventually knock down that bit that sticks up above the snout, between the eyes. Drilled holes in the vents and cut them out with utility knife. Cut and sanded. Anovos vents for reference. Filled some rough areas with putty. The back of the side monitor or range finder or whatever this is called has recesses to mount magnets. The magnets I have are larger so I had to drill out the recesses with a 1/2” bit. Ready for some filler primer. I usually use the duplicolor stuff but they were out at the store. The can is almost empty so I guess I’ll try the rustoleom. The other paints are the black primer and various blacks I’ll use (gloss, metallic, and matte). So primer and sanding for the next couple of days. Sent from my iPhone using Tapatalk 2 Link to comment
Chaos[CMD-DCA] Posted October 18, 2018 Share Posted October 18, 2018 So far, so good! Looking Great Greg! 1 Link to comment
wook1138[TX] Posted October 22, 2018 Author Share Posted October 22, 2018 Slow progress. I don't have much time to work on the helmet right now (kids, work, grumpy wife, etc) but I'm running out of warm weather to paint in. A few more weeks and my garage will be too cold to paint. So here is what I've managed to get done Did a few layers of filler primer. The Rustoleum stuff proved a lot more difficult to work with than the Dupli-color so some extra sanding was required. It goes on really rough and is mess to sand (both dry and wetsand). I sand it down starting from 220 grit to 600 grit. I wet sand once I get to about 400 grit. Came across some air bubbles in the cast. no big deal - just filled with putty. It did add some wait time for the putty to completely dry. The putty I used (Squadron) shrinks a bit during drying so I had to re-apply a few times. After a few coats of the grey filler primer and lots of sanding, I started painting some of the plates with black sandable primer. I just like the color scheme of this - so I added the pic. Time for the black sandable primer on the helmet. Areas that will accept glue eventually get taped off. Luckily I have a helmet stand that I could use - just covered it in plastic bags. The matte finish of the primer. It has a dusty texture to it, so it needs to be wetsanded for sure. I like the look of the matte finish on this helmet. Plus, I was just stoked to finally see the helmet black! Wetsanding the helmet with 600 grit paper. I would sand - then wash the helmet down - feel the surface for areas that didn't seem nice and smooth and then sand some more - wash and repeat until necessary. Sanded and ready for first coat of base coat (gloss black TS-14 Tamiya) First coat - a bit on the light side. I will put the paint on a little bit thicker with the next coat or two. I almost went through a whole can of paint on the helmet, plates, monitor, and lights. I'll add a few more coats tomorrow and the next day and see how it turns out. I will wait at least a couple of weeks before attempting the clear coat. This means I will likely have to find a place to paint or wait until warmer temperatures - which is usually May here. ? I still need to add the metallic black parts and paint the silver parts as well. Matte painting will be done after the clear coat. Sent from my iPhone using Tapatalk 1 Link to comment
wook1138[TX] Posted October 22, 2018 Author Share Posted October 22, 2018 Oh yeah, and 850 Armor Works tells me my armor is shipping any time (maybe it has already). Link to comment
Chaos[CMD-DCA] Posted October 22, 2018 Share Posted October 22, 2018 Greg, looking good, " I'll add a few more coats tomorrow and the next day and see how it turns out." Be careful added new layers of paint over partially cured layers. This is when a lot of people get the bubbling/crackling effect with the last coat. I'd wait a good 48-72 hours before you add any new layers of gloss paint. As far as painting in your garage, during the winter months when I live in Washington state, I built a little paint booth out of 1x2s and plastic drop cloth material. You can make a work bench top one or any size really. I then put a small electric heater/fan inside the booth and kept it going while the paint cured. Worked like a charm! Link to comment
wook1138[TX] Posted October 23, 2018 Author Share Posted October 23, 2018 4 hours ago, Chaos said: Be careful added new layers of paint over partially cured layers. This is when a lot of people get the bubbling/crackling effect with the last coat. I'd wait a good 48-72 hours before you add any new layers of gloss paint. Thanks! Yeah, I think I'll take your advice on that. I did test a smaller piece and there are some very small bumps that formed once dry. Do you ever sand your color coat? I have a few bits of dust (and cat hair ?) in my first layer. I've removed the bits and sanded and buffed up to 3000 grit. Hopefully it paints over ok. Link to comment
wook1138[TX] Posted October 23, 2018 Author Share Posted October 23, 2018 I did add a second coat to the plates. Two are black and two are metallic black. I’m not sure if the imperfections are normal or partly due to the first coat degassing. There are bumps that look like particles caught up in the paint. Not sure. At least I didn’t notice any $&@!ing cat hair. A pic with the plates in place. I just love the look of the DT helmet, so I’m probably posting more pics than I need to. ? I might go for the second coat of black tomorrow or the next day. Then I need to mask areas for the metallic black and silver, so I might be able to get everything done but the clear coat this weekend. Sent from my iPhone using Tapatalk Link to comment
Chaos[CMD-DCA] Posted October 24, 2018 Share Posted October 24, 2018 On 10/22/2018 at 3:01 PM, wook1138 said: Thanks! Yeah, I think I'll take your advice on that. I did test a smaller piece and there are some very small bumps that formed once dry. Do you ever sand your color coat? I have a few bits of dust (and cat hair ?) in my first layer. I've removed the bits and sanded and buffed up to 3000 grit. Hopefully it paints over ok. On 10/22/2018 at 3:01 PM, wook1138 said: Thanks! Yeah, I think I'll take your advice on that. I did test a smaller piece and there are some very small bumps that formed once dry. Do you ever sand your color coat? I have a few bits of dust (and cat hair ?) in my first layer. I've removed the bits and sanded and buffed up to 3000 grit. Hopefully it paints over ok. Yes, I've wet sanded a color coat due to minor imperfections, I always hit everything with a tack cloth before doing a final coat. And take compressed air and blow everything in and around your part before spraying. 1 Link to comment
wook1138[TX] Posted October 25, 2018 Author Share Posted October 25, 2018 So, I did some research on using the TS paints. I had a great game plan. Did some fine wetsanding of the helmet and parts with 1500 up to 3000 grit sandpaper. Utilized an air compressor and tack cloth to keep everything clean (thanks Chris). Hit the pieces with a quick mist coat then went for a couple of wet coats about 20 minutes apart followed by a clear coat. This was working awesome on the smaller pieces. Started on the helmet. Was almost done the gloss black wet coat (was only going to do one) when, right as I was about to stop, I decided to hit the left tube a little more. As soon as I sprayed I knew I put on way too much paint. Sure enough - big ol' paint run. ? So I guess I'll have to wait a few days, sand it down, and try again. Anyone have an Anovos helmet they want to get rid of. jk... sort of. 1 Link to comment
wook1138[TX] Posted October 26, 2018 Author Share Posted October 26, 2018 I gave the respirator and snout bridge a coat of glossy aluminum and clear coat yesterday. So today I sprayed a few light layers of gunmetal. I took s rag with mineral spirits and gently wiped away the gunmetal paint along ridges and other high points. I tested it by holding it up to the helmet and found the parts too light. Ended up doing a few coats of metallic black with the same weathering technique. I think I’m happy with what I ended up with. With the metallic black parts in place. Reference Oh, the pieces I did yesterday with a gloss coat. Well, no gloss on the metallic black (right) as they look less glossy in reference pics. AnovosSent from my iPhone using Tapatalk 1 Link to comment
wook1138[TX] Posted October 27, 2018 Author Share Posted October 27, 2018 So, a question to other 850 Armor Works customers. What was your initial impression of the armor. BBB day was yesterday - which was exciting - then I opened the box and I become less excited. I have not worked with black ABS before and I realize the the imperfections are going to show a bit more, but some of the pulls seems a bit rough. Plus the gear arrived pretty banged up as there was not much in the way of packing. I'm sure I can polish everything out, but I have to say that I'm a little underwhelmed with what I've seen so far. I haven't had a chance to go through everything. I'll post pictures of some of my picky-guy concerns later. All this said, this was a very reasonably priced kit, so... . Has anyone out there found the need to paint their black ABS 850 kit? I've reached out to 850 on one item so far, but I wanted to hear some feedback from other customers. Thanks. Link to comment
wook1138[TX] Posted October 30, 2018 Author Share Posted October 30, 2018 Not much completed in the last few days... busy with other things. I did try to repaint my helmet. I sanded down the paint drips and repainted with a couple coats of glossy black. I was doing a gloss clear coat when I noticed something. A couple of bubbles. They occurred where I had my halogen work lights sitting way too close to the helmet. Don’t know if it was coincidence or the heat, but it means more sanding and painting. On the bright side, the part of the helmet I got some clear coat on looks pretty good. This also arrived today. Print looks pretty clean so it should be easy to sand and paint. I got it from Maz3Dshop in the UK. Sent from my iPhone using Tapatalk Link to comment
Chaos[CMD-DCA] Posted October 31, 2018 Share Posted October 31, 2018 On 10/29/2018 at 5:50 PM, wook1138 said: Not much completed in the last few days... busy with other things. I did try to repaint my helmet. I sanded down the paint drips and repainted with a couple coats of glossy black. I was doing a gloss clear coat when I noticed something. A couple of bubbles. They occurred where I had my halogen work lights sitting way too close to the helmet. Don’t know if it was coincidence or the heat, but it means more sanding and painting. On the bright side, the part of the helmet I got some clear coat on looks pretty good. Greg, A lot of people have had issues with clear coats and other have had great success after painting their helmets with gloss black. To be honest, I painted mine with 4-5 light coats of Rustoleum Pro 2 gloss black, let it cure for about a week so that it would get nice and hard and then used Meguiar's Ultimate Compound, followed with Meguiar's Ultimate Polish and it looks just as good as using auto paint. If I ever get a scratch on any part of my paint job and I don't want to leave it as a weathered or battle scar look, I just use the Compound to buff out the scuff and then Polish over the area again. Link to comment
wook1138[TX] Posted November 2, 2018 Author Share Posted November 2, 2018 FML. I started to sand the largest of the weird bubbles. It goes right into the resin. Looks like the heat from my lamp caused a thin layer of resin(?) to spawl (couldn’t think of a better word). Good news is that my painting maybe wasn’t so bad. Bad news... F$&@$?$&CK!!! Not happy. There are three more of these “bubbles”. Grrrr. View from the back. Close up. Primer stopped about 0.5mm ago. Three moreSent from my iPhone using Tapatalk Link to comment
Chaos[CMD-DCA] Posted November 3, 2018 Share Posted November 3, 2018 Treat it like a rust spot on a car. Bondo, sand, prime, repaint. No worries, you got this! Link to comment
wook1138[TX] Posted November 3, 2018 Author Share Posted November 3, 2018 22 minutes ago, Chaos said: Treat it like a rust spot on a car. Bondo, sand, prime, repaint. No worries, you got this! Thanks man. It is the irony of trying so hard not to mess up the paint job and then that happens. But yeah, looks exactly like a nasty rust spot. I had my self-pity beer, so back on the horse this weekend. Link to comment
wook1138[TX] Posted November 5, 2018 Author Share Posted November 5, 2018 So life did not offer me much opportunity to work on the DT this weekend. In lieu of fixing my helmet I turned my attention to the side monitor. On the cast there is a slight indent where the green light should be. I know, not seen on screen, but still cool. I’ve decided to mod my monitor to include a light. I drilled out the hole with a 3/32” bit. I originally thought I could use fibre optic line with 3mm led lights. The fibre optic line was just too dim. So I drilled a 5/32” hole from the back side and stopped short about 1/4 “ or so. The 3mm light fits in there nicely. I’ll still need to counter sink everything into the back of the monitor a bit so it mounts to the helmet ok. Sent from my iPhone using Tapatalk 1 Link to comment
wook1138[TX] Posted November 7, 2018 Author Share Posted November 7, 2018 On 11/2/2018 at 9:38 PM, Chaos said: Treat it like a rust spot on a car. Bondo, sand, prime, repaint. No worries, you got this! Do you use regular Bondo? Or the spot putty stuff? Thanks. Link to comment

Recommended Posts
Create an account or sign in to comment
You need to be a member in order to leave a comment
Create an account
Sign up for a new account in our community. It's easy!
Register a new accountSign in
Already have an account? Sign in here.
Sign In Now