Ensi[TX] Posted February 17, 2019 Share Posted February 17, 2019 Hey all New guy here, name's Daniel (from Hoth) and I have 2 TK's (TFA and ANH) which i've built and detailed in my build threads over on the FISD. I think it is a great thing to do a build thread as it helps the person building to get advice, and also it helps new builders so they know what to do or what not to do. I've read so many build threads when doing my 2 previous costumes I wanted to keep the tradition and make one for my Mudtrooper. Yesterday I fired off the deposit to Jim Tripon for my kit. Full deal with armor/helmet/softparts/hoses/belt+hanger, along with an extra bicep for the medic config Reason for going with Jim is that my TFA TK is from him, and I just LOVE the sharp "pulls". That and the price is fair + he does the uniform too, why not get everything there. For the blaster i'm going with an E-10. My current plan is to get a DoopyDoo's E-11 kit and print the E-10 specific parts from Sean Fields. I've recently started dabbling around with 3D Modelling, and I have modified a few of his files to be more accurate. I can share them but only when I am "happy" with them and if Sean gives me his permission For the buttstock i'm buying a HK416C airsoft stock from eBay later. Before firing off the equivalent cost of my car to the Phillipines, I have been amassing lots of muddy goodness (it costs less when you buy a lot of small things over time ?). PARTS Armor: Jim Tripon (Jimmiroquai) Ordered Helmet: Jim Tripon (Jimmiroquai) Ordered Tunic+Jacket: Jim Tripon (Jimmiroquai) Ordered Plash Palatka: eBay (with leather grommets) Boots: eBay (Genuine Soviet Officer Boots) PVC Tunic Patches: Jim Lau Aluminium Helmet Disk Greeblies: TheAluminiumFalcon Helmet Seal Trim: sealsdirect.co.uk (Model: U46) Halcyon Nose Bridge Adjuster Resin Cast: Guillermo Carbonell Gloves: @JAFO (Highlander Special Ops #GL033-BK) Mask Buckles (Yugo+Black Ones): @JAFO 19mm Tan Mask Webbing: @JAFO Cheapo Helmet Torch: @JAFO Bimini Rifle Sling Snap Hook: @JAFO Sling Mount: eBay 25mm Black Polypropylene Rifle Sling Webbing: eBay 2mm Neoprene Rubber Mask Sheet: eBay British Army Coolmax T-Shirt (Brown): eBay 25mm Serrated Helmet Buckles (Vogue Star): eBay SureFire M300A Ripoff (with KX1A markings): eBay Various buckles/triglides/etc: eBay Ultimately i'm trying for level 2, but as of now I know Jims fabric is not the bull denim. Eventually! First posts without pictures are not good first posts, so here are some pics Palatka after 90c wash which warped the grommets a bit..: Mud Supply Haul: Some of my E-10 Mods from Sean Fields files: A mask I got printed up to test different paints/weathering techniques. Mask has been prepped and painted with Belton Molotow Chome Effect spray, not really chrome but a pretty convincing metal/aluminium. Best spray i've seen (that is kind of durable) that isn't airbrushed Alclad. Might have to get an airbrush and some alclad later.. And finally a paint test I did. I am going to go with Montana Black Storm for the main color of my armor. I do not have a paint gun or the funds for custom mixed paint, I think it is pretty close EDIT MAY: I decided to go with Fosco English Green instead. The Montana Black Series paint does not dry well at all and the color isn't that correct either. That's all for now 2 Link to comment
Blackwatch[CMD-DCA] Posted February 18, 2019 Share Posted February 18, 2019 good day sir! you are a man after my own heart. I love this. And you practice what I preach: TEST TEST TEST! i am going to be following this build with great interest. i also love that you built up a source/ part list, which is something I used to have my TIE Cadets do when I was mentoring. I had them change the color to indicate sourced ordered or in hand, but what you have is great and I appreciate it. dont worry about a paint gun--we get GREAT jobs done with spray cans. prime, sand, wet sand. Wait 48 hours between major coats. . Check for imperfections and spray your color coat. Wet sand with 400 and spray again. Wet sand that if you want but since this is a DIRTY trooper I dont think that is needed. Patience will reward you as you paint. 1 Link to comment
RAIDER[CMD-DCA] Posted February 18, 2019 Share Posted February 18, 2019 Welcome! Thank you for doing this! You are right...these threads are great for the builder and future builders alike. Appreciate you being here and putting in the work! Link to comment
Blackwatch[CMD-DCA] Posted February 19, 2019 Share Posted February 19, 2019 Raider touched on something there. Others will come along and read the WIPS--see the victories, and the struggles. In the end, it ALL helps. I post my failtures...it helps people learn what not to do. Posting perfection all the time really doesnt help people learn, when they only see the finished product. I post my mistakes. Link to comment
Bobby Boucher Posted February 19, 2019 Share Posted February 19, 2019 The goggles looks great! Need to fix my printer so I can print one as well. What settings did you use to print? I noticed Molotow has become pretty popular after it was used a lot on Tested. Link to comment
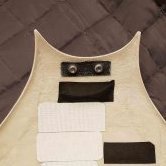
Ensi[TX] Posted February 22, 2019 Author Share Posted February 22, 2019 I've been hit with a severe case of the man-flu this week, so not much progress on anything. But slowly getting better so i'll start working on my E-10 mods further and maybe also my grenade, which I didn't show in the first post Also going to get the measurements for my jacket+pants today. Grenade printed on Flashforge Finder, standard 0.18 layer height. In hindsight I would've modded them and added a registration pin to the lower shaft. Prototype of my modified Rangefinder (is this what this piece is called?). Need to do further work to it, though, screw holes need to be further in for example. And for the sticks I found some old christmas light adapters and chopped off the threaded rubber/plastic ends to get these covers i'm planning to use. Along with the metal sheathing. You will find a close sheathing if you search for Tinned Copper Braid. On 2/18/2019 at 2:48 AM, Blackwatch said: good day sir! you are a man after my own heart. I love this. And you practice what I preach: TEST TEST TEST! i am going to be following this build with great interest. i also love that you built up a source/ part list, which is something I used to have my TIE Cadets do when I was mentoring. I had them change the color to indicate sourced ordered or in hand, but what you have is great and I appreciate it. dont worry about a paint gun--we get GREAT jobs done with spray cans. prime, sand, wet sand. Wait 48 hours between major coats. . Check for imperfections and spray your color coat. Wet sand with 400 and spray again. Wet sand that if you want but since this is a DIRTY trooper I dont think that is needed. Patience will reward you as you paint. Why mess up on your kit when you can mess up on pieces that doesn't matter that much? And yeah, the parts list I think everyone should have. Helps other to know where to get different stuff! Currently i'm only missing the armor and softparts + the blaster Oh man.. Sanding...Spraying.. Sanding.. Brings me back to the FOTK build haha. On 2/18/2019 at 4:39 AM, Raider said: Welcome! Thank you for doing this! You are right...these threads are great for the builder and future builders alike. Appreciate you being here and putting in the work! Thanks! On 2/19/2019 at 3:09 AM, Blackwatch said: Raider touched on something there. Others will come along and read the WIPS--see the victories, and the struggles. In the end, it ALL helps. I post my failtures...it helps people learn what not to do. Posting perfection all the time really doesnt help people learn, when they only see the finished product. I post my mistakes. Oh believe me i'll post my failures too, if not for showing other people what not to do, it can at least be of comedic value On 2/19/2019 at 6:18 PM, Bobby Boucher said: The goggles looks great! Need to fix my printer so I can print one as well. What settings did you use to print? I noticed Molotow has become pretty popular after it was used a lot on Tested. These goggles were actually printed by a friend of mine, but it's had several rounds of sanding and filling. I believe it is the standard setting of 0.18 layer height. Right after he printed me these I got my own printer (the same one) It's a Flashforge Finder V1. The Molotow is cool yeah, I have the Liquid Chrome pen from them too and even though that looks amazing it goes dull just by breathing on it This was what they had at the Montana shop and I grabbed one as I had some standing credit with them left. 1 Link to comment
Ensi[TX] Posted March 1, 2019 Author Share Posted March 1, 2019 The Plash gods are in my favor!! 3x washes at 90c 1x wash at 40c with a Dylon Intense Black pod 1x wash at 40c with detergent to remove excess dye Further revision to the rangefinder. Made the rectangles thinner+taller, the outline smaller, moved the button more forward, and added a recessed line instead of the "step-down" on the front. Still to be updated.. And got my HK416C stock, this thing is gonna feel so good on the blaster! My armor is ready to be shipped, just waiting on the uniform from the tailor now! 1 Link to comment
JAFO[501st] Posted March 1, 2019 Share Posted March 1, 2019 Coming along nicely!That’s not a Rangefinder. It’s a Taser! The box is supposed to spring forward, like a bayonet, and the taser rods spark up.Sent from my iPhone using Tapatalk Pro Link to comment
Ensi[TX] Posted March 1, 2019 Author Share Posted March 1, 2019 1 minute ago, JAFO said: Coming along nicely! That’s not a Rangefinder. It’s a Taser! The box is supposed to spring forward, like a bayonet, and the taser rods spark up. Sent from my iPhone using Tapatalk Pro Ah so that's what it is Been wondering about that.. Link to comment
Ensi[TX] Posted March 4, 2019 Author Share Posted March 4, 2019 Prepped and painted the grenade and also my printed TU unit. Grenade still has to be hand-painted on the pad details and also needs weathering. Color is the Montana Black Storm. Man these cans spray like ass. Still experimenting on getting the best results. So far a really good long shaking along with a different nozzle and spraying close has provided the best results. I didn't shake long enough, and switched between nozzles on this grenade so it produced a rather rugged finish. Which kinda worked out pretty nicely, got that military-esque texture to it. Chrome endcap is Belton Molotow Chrome Effect spray. Chipping effect achieved by putting polishing compound for cars (yes..) on the black layer before painting the green. Worked real nice! TU unit was printed on 0.08 layer height, given 2-3 coats of spray putty, then painted black. Link to comment
Blackwatch[CMD-DCA] Posted March 4, 2019 Share Posted March 4, 2019 i feel ya. Im two cans in on my Army trooper. MG sells different spray nozzles to give different effects, so its worth a try. Also clean the spray point of the nozzle with windex each time you put it away--acrylic drying in the tip is a real problem even in airbrushes. I also warm my can up to get that last bit of volitle pressure to push that paint out. 1 Link to comment
IcyTrooper[CMD-DWM] Posted March 5, 2019 Share Posted March 5, 2019 That TU unit looks good with the compound replicating the chips. Link to comment
Ensi[TX] Posted March 10, 2019 Author Share Posted March 10, 2019 Got some work done on my E-10. Decided to go with a 22mm pipe down the entire barrel for strength. Was lucky enough to find an off-cut of a brass pipe in the back at work. And hey it was exactly 22mm! Really gives the blaster some weight, makes it feel like an actual rifle. But it's mainly for the structural strength. After fitting I found things I need to edit on the files, that's why it's important to test! Some progress on the updated files: And an endcap i've modelled from the ground up. This is my first self-modelled piece Kit ETA is next friday! 1 Link to comment
Blackwatch[CMD-DCA] Posted March 12, 2019 Share Posted March 12, 2019 Wow that looks really sweet. Tried drilling my barrel out at work. There was a half inch bit in the press...but it's BENT and someone lost the Chuck key! Link to comment
Ensi[TX] Posted March 12, 2019 Author Share Posted March 12, 2019 4 hours ago, Blackwatch said: Wow that looks really sweet. Tried drilling my barrel out at work. There was a half inch bit in the press...but it's BENT and someone lost the Chuck key! How do you manage to bend a half inch bit and lose the chuck key at the same time ? Link to comment
Blackwatch[CMD-DCA] Posted March 13, 2019 Share Posted March 13, 2019 I.DONT.KNOW! I mean, SRSLY!!!!!!!! Link to comment
Ensi[TX] Posted March 18, 2019 Author Share Posted March 18, 2019 So I had my first experience with FedEx and well, I got a text saying it was gonna be delivered today (on friday). Overjoyed I refresh the tracking every 2 minutes and look out the window. Then suddenly "Customer not home, returning to hub". Well, nothing! Oh well, going to have it on Monday. Been hard at work with the modelling, still learning, this is kind of fun Next post will be BBB day 1 Link to comment
Ensi[TX] Posted March 20, 2019 Author Share Posted March 20, 2019 Nothing's better than BBB day!! Time to get to work First Order of business is sanding the insides of the armor with 120 then 180 grit to get rid of stray fibers. Then lightly sand the outside with 240/320. Then give it a proper wash 2 Link to comment
RAIDER[CMD-DCA] Posted March 21, 2019 Share Posted March 21, 2019 That's exciting!!! It's go time!!! Link to comment
IcyTrooper[CMD-DWM] Posted March 21, 2019 Share Posted March 21, 2019 BBB days are the best! Time to get rockin' and rollin' Link to comment
merkava74[TX] Posted March 24, 2019 Share Posted March 24, 2019 How do you get your prints so smooth without print lines? Link to comment
Ensi[TX] Posted March 24, 2019 Author Share Posted March 24, 2019 2 hours ago, merkava74 said: How do you get your prints so smooth without print lines? Sanding and spray-filler And a couple of sore arms. Link to comment
merkava74[TX] Posted March 24, 2019 Share Posted March 24, 2019 Just now, Ensi said: Sanding and spray-filler And a couple of sore arms. Darn... I was hoping for an easier way... ? Link to comment
Bobby Boucher Posted March 27, 2019 Share Posted March 27, 2019 On 3/24/2019 at 3:47 AM, merkava74 said: Darn... I was hoping for an easier way... ? Or just use ABS and you acetone smooth it! I think ABS is much easier to sand also Link to comment
Ensi[TX] Posted March 27, 2019 Author Share Posted March 27, 2019 Finally time for another update, got a bit done recently! First up was a good sanding on the insides of all the parts with a 120 grit sanding sponge. This is to remove the stray fibers from the kit to prevent itching. Sanding done wet because I didn't want fibreglass dust flying around my house. I then gave all the parts a light sanding on the outside with 320 to knock down irregularities and to give the primer some grip. In jim's kit you will get these air bubbles everywhere on some parts. One solid coat of spray putty fixed most of it! Also had a bit of fun in the mud ? Produced some pretty good results! Although, after further shaking off all the sand and gravel the effect diminished, but left a nice slightly worn appearance. Going to supplement with some acrylic weathering afterwards. Boots definitely need it as almost all the mud went off under a rinse. I then decided to do the screen accurate way of adding texture to the helmet. The helmet has texture while the armor is smooth. Cheapest brush and black house-paint I could find were used. Had to continue to stipple after the entire helmet was done because the paint levelled out in some places. I am pretty happy with the results, just hoping the Montana Black will play nice with this Sadly as the trim is molded into the helmet I won't be able to add the trim I bought Oh well, maybe if I upgrade the helmet in the future! 2 Link to comment

Recommended Posts
Create an account or sign in to comment
You need to be a member in order to leave a comment
Create an account
Sign up for a new account in our community. It's easy!
Register a new accountSign in
Already have an account? Sign in here.
Sign In Now