Dishrack[501st] Posted October 14, 2020 Share Posted October 14, 2020 Hello, I'm Jon from Knightfall Garrison in Australia. Earlier this year, a mate lent me his spare printer as a way of luring me into the 3D print world. I guess it worked because I've been printing little bits of this psychopathic protocol droid ever since. It's been a learning curve for me - especially starting out with the borrowed Cocoon Create Model Maker (hint: don't). With no heating element and a print bed limited to 10x10x10 cm (approx 4x4x4"), it was often a choice between brims to maintain print adhesion, or no brims and get a piece to actually fit on the bed! A hair dryer became essential to heat the bed. I printed all of the small parts that would fit - namely hands, fingers, forearms and various greeblies - with high levels of success. Where I couldn't fit the pieces, I opted to slice them in software and print in pieces and then join them by melting with a soldering iron. At some point, I realised I needed more space so I opted for an Ender 3 that was on sale for a couple of bucks. Still not big enough to print a single piece of the torso but more than enough for everything else. Scaling/sizing has been a fine line here. I wanted it to be snug to maintain the lean lines of a protocol droid that are instantly recognisable, whilst also maintaining wearability. Many hours/days/months still to print... 8 Link to comment
Allan1313[MBO-CMD] Posted October 14, 2020 Share Posted October 14, 2020 Welcome Jon! The world needs more 000. Its definitely a challenge to print and get the sizing correct. I printed my entire 000 on a Prusa MK3 (bit over 8x8x8 print bed). Its a labor of love but well worth it. Let me know if you have any questions or need some help/advice. 2 Link to comment
Blackwatch[CMD-DCA] Posted October 22, 2020 Share Posted October 22, 2020 wow....thats just gnarly Link to comment
Dishrack[501st] Posted November 10, 2020 Author Share Posted November 10, 2020 Finished the torso a few weeks ago. Despite taking and checking my measurements several times, I had to concede that the assembled torso was simply too tight across my chest to wear comfortably. I've been using Armorsmith to scale the costume but even so, I guess it's a fine line between form fitting and form functional. In any case, I've scaled up appropriately and started reprinting. Ho hum. To spin this into a positive, I was going to print the head next anyway and by increasing the torso size, I had to scale up the head to match which has then provided more room for padding, electronics, etc. so that's a plus. It's a surprisingly comfortable mask to wear (I won't call it a bucket as it can't be pulled over the head but rather sits as two pieces that bolt together in order to encapsulate my unpleasantly shaped skull). Had to split the print to fit on the bed but nothing that won't sand out. The antenna is removable for transport - it slots into place. I modified the file to accept a 2mm brass rod down its centre for reinforcement/longevity, as well as a magnet at its base to ensure it stays in place. The large greeblie spans over the join where I sliced the model. When glued, this should add some strength. TK bucket for scale. 4 Link to comment
Dishrack[501st] Posted November 10, 2020 Author Share Posted November 10, 2020 As I plan ahead, I'm keen for some advice. What's the feeling on wearing rubber shorts? Noting that the CRL calls for a hard construction (fiberglass, ABS, HIPS) of parts with the only exception being "rubber style" feet, would rubber style shorts (either cast or printed with flexible filament) be approvable? My understanding is that the screen used C3PO costume utilised hard shorts in episode IV only, using rubber shorts in V & VI, as well as the prequels (and probably the sequels too but I don't know). I expect there's a reason for that that we can all appreciate. Whilst 000 obviously isn't C3PO, the same parts are utilised so I thought I'd seek some advice as I ponder how to get the most movement out of the costume. Link to comment
RAIDER[CMD-DCA] Posted November 10, 2020 Share Posted November 10, 2020 18 hours ago, Dishrack said: As I plan ahead, I'm keen for some advice. What's the feeling on wearing rubber shorts? Noting that the CRL calls for a hard construction (fiberglass, ABS, HIPS) of parts with the only exception being "rubber style" feet, would rubber style shorts (either cast or printed with flexible filament) be approvable? My understanding is that the screen used C3PO costume utilised hard shorts in episode IV only, using rubber shorts in V & VI, as well as the prequels (and probably the sequels too but I don't know). I expect there's a reason for that that we can all appreciate. Whilst 000 obviously isn't C3PO, the same parts are utilised so I thought I'd seek some advice as I ponder how to get the most movement out of the costume. Good question. Looking at the CRL in its current state, it would need to be hard materials. No way around that at the present. As the costume is a comic book character, we can't really point to screen references for a definitive answer and so we could look to C-3P0 as an example regarding construction. I did some reading after seeing your post and it does seem like a more flexible material (rubber) was used for C-3P0 (stunt costume versions only?) for the ESB and ROTJ. So could an update to the CRL be discussed? It could, but no guarantees that would be done in a time frame that would line up with your build/approval. And no guarantees it would clear. If references (C-3P0) showed that was used then it could fly though, but that's a process. 1 Link to comment
DHKnecht Posted November 11, 2020 Share Posted November 11, 2020 Looking great so far. This is one of the most impressive builds of all of the different CRL's out there when finished, and its difficulty has to be one of the toughest . One quick question, what material are you using to print it? Link to comment
Dishrack[501st] Posted November 16, 2020 Author Share Posted November 16, 2020 On 11/11/2020 at 7:58 AM, RAIDER said: Good question. Looking at the CRL in its current state, it would need to be hard materials. No way around that at the present. Thanks for that; I appreciate that it's a change that's even potentially on the table. I'll have to print the shorts in order to create a mould for casting anyhow, so in terms of timing, I'll proceed with hard shorts for approval and then perhaps we can revisit this down the line. 1 Link to comment
Dishrack[501st] Posted November 16, 2020 Author Share Posted November 16, 2020 On 11/12/2020 at 10:08 AM, DHKnecht said: Looking great so far. This is one of the most impressive builds of all of the different CRL's out there when finished, and its difficulty has to be one of the toughest . One quick question, what material are you using to print it? Printing in PLA so not a lot of room for flex ?. I never really planned this; I just started one day to see if I could do it...and here we are. 1 Link to comment
Dishrack[501st] Posted November 23, 2020 Author Share Posted November 23, 2020 This week saw v2 of the torso completed. Like v1, it's sliced into eight pieces (four on front and four on back), although I took more care in slicing this time to ensure the joins weren't on stress points. Like other pieces, I tacked with superglue and then "welded" on the inside with a soldering iron and spare filament. Those who are following along know that v1 was too tight to wear comfortably across my upper body, so v2 is was scaled to better accommodate my chest. Obviously this means everything else is scaled up so it's suddenly become a very large torso and I hope it doesn't look too bulky but at least everything will be scaled the same. I also made the decision to keep the back of the torso open on this print as it's covered by another piece anyhow. I figure this will allow easy access to electronics/battery, or even just a removable panel to cool off a bit backstage. Also this week, I managed to find some loose LED downlight lenses with the correct arrangement to install the tri-lights of a protocol droid's eyes. I'm really happy that they have the correct diameter (35mm) to fit inside the eye sockets without modification. Those unfamiliar with this build might be pondering how I'm going to see through these lenses. Basically there's a 10mm hole that gets drilled in the middle and that's all there is...two pin point tubes to look through. Unfortunately they won't both line up with my eyes at the same time so it'll be one eye at a time, unless I can rig some sort of horizontal periscope to fit my face... ? It doesn't look like much progress but that's a good 130+ hours of (re)printing just to get back to where I was, so it's slow going. I did manage to get some priming and sanding of the head done during the week too but I'll save that for when it's in a more presentable state. 2 Link to comment
IcyTrooper[CMD-DWM] Posted November 24, 2020 Share Posted November 24, 2020 Looks like Franken-pieces! That is a lot of printing time! Link to comment
Lt. Dan[501st] Posted November 24, 2020 Share Posted November 24, 2020 This build is most impressive to me! Looking forward to see it complete? Link to comment
Dishrack[501st] Posted November 30, 2020 Author Share Posted November 30, 2020 Crunch time (or is that crack time? More on this in a moment...) for trying on the resized torso. I'm calling it a success. It was certainly a lot more comfortable and featured less swearing and skin pinches that the first version. Hilariously, the rigidity of it forces my arms to hang in a very natural protocol droid fashion. It also pulls my posture up a bit. On the down side, I'm going to have to be very careful not to slouch and put undue pressure on the joins because it all feel very fragile. It was still very tight on my sternum and did make an audible cracking noise when I tried to take a deep breath. Bearing in mind that I've only joined the pieces by melting/welding them with a soldering iron, I should probably look to reinforce this. I'm certainly open to advice here. @Allan1313 maybe? Looking at the photos now, I think there's room for improvement in the placing of the torso - perhaps I can bring it forward to take up some of the gap behind my arms? Maybe I need to wear a back brace or tape my shoulders before I suit up. Maybe just suck in the gut or wear a girdle. These are all things I will play with. I've started spray putty and sanding the head. It's still a way off being perfect but it's getting there. I thought I'd throw it on for effect and I'm pretty happy with how it's all looking. 2 Link to comment
Lt. Dan[501st] Posted November 30, 2020 Share Posted November 30, 2020 Honestly, this costume is nothing for people with claustrophobia ? Looks very good Jon, from my point of view ? Link to comment
IcyTrooper[CMD-DWM] Posted December 1, 2020 Share Posted December 1, 2020 Very nice on the prints so far! May have to make some kind of resin or fiberglass on the inside. Fiberglass can be a pain in the butt to work with though and the whole health aspect. I'll definitely want to see what @Allan1313 did for the inside of his. I am using this filler called Evercoat 411 Poly Flex Flexible Polyester to fill on my Royal Guard helmet and perhaps that may help with adhesion on the joint as well? It is a glazing putty though so I'm not sure on the bonding aspect of it but it is used on bumpers because it can withstand flexing. Link to comment
Allan1313[MBO-CMD] Posted December 2, 2020 Share Posted December 2, 2020 21 hours ago, IcyTrooper said: Very nice on the prints so far! May have to make some kind of resin or fiberglass on the inside. Fiberglass can be a pain in the butt to work with though and the whole health aspect. I'll definitely want to see what @Allan1313 did for the inside of his. I am using this filler called Evercoat 411 Poly Flex Flexible Polyester to fill on my Royal Guard helmet and perhaps that may help with adhesion on the joint as well? It is a glazing putty though so I'm not sure on the bonding aspect of it but it is used on bumpers because it can withstand flexing. I honestly didn't do too much to reinforce my seams. In some high stress areas I put some scrap abs strips. I printed mine in PETG with isn't as rigid as PLA and has a bit of flex to it. The only thing I have had an issue with was my shorts split, but that was because it was a bad print and had a week spot which I since fixed. The shorts are definitely a pain in the but. Mine are in 2 pieces that I strap together. I wanted to do a 1 piece, but my fat butt didn't cooperate. Also looking at the way you have your eye lenses setup is going to be real bad. As you say they are only a 10 mm opening and even when they are both lined up with your eyes it is still nearly impossible to see. I would look into changing that. Here is what mine are like: 2 Link to comment
Allan1313[MBO-CMD] Posted December 2, 2020 Share Posted December 2, 2020 @Dishrack it seems that that you chest is already pretty tight on you as you can feel it when breathing, also keep in mind that you will be needing to do the abdomen (belly wrap with wires). The belly is going to be a certain amount of thickness. It its already tight I don't know how much more "girth" from the belly you would be able to fit in. Just something to think about. 1 Link to comment
Dishrack[501st] Posted December 2, 2020 Author Share Posted December 2, 2020 14 minutes ago, Allan1313 said: I honestly didn't do too much to reinforce my seams. In some high stress areas I put some scrap abs strips. I printed mine in PETG with isn't as rigid as PLA and has a bit of flex to it. The only thing I have had an issue with was my shorts split, but that was because it was a bad print and had a week spot which I since fixed. Ahh, I was too new to printing to know the difference between PETG and PLA when I started and now I feel somewhat committed. I was leaning towards aluminium strips on the inside as it's relatively shapeable, light weight and yet rigid metal; I'll do some tests with ABS though, thanks. What did you actually use to join the pieces? 19 minutes ago, Allan1313 said: Also looking at the way you have your eye lenses setup is going to be real bad. As you say they are only a 10 mm opening and even when they are both lined up with your eyes it is still nearly impossible to see. I would look into changing that. Thanks for that; great to see what the inside looks like! I was planning to cover the lenses on their backs so I think my set up will look similar to yours on the inside when complete. The lenses were more to diffuse the red LEDs when viewed from the front. I'm just experimenting though; this is all a journey for me 18 minutes ago, Allan1313 said: @Dishrack it seems that that you chest is already pretty tight on you as you can feel it when breathing, also keep in mind that you will be needing to do the abdomen (belly wrap with wires). The belly is going to be a certain amount of thickness. It its already tight I don't know how much more "girth" from the belly you would be able to fit in. Just something to think about. Yeah, this is concerning to me too. I'm currently printing the Jesse M files at 110%. I'll know more once I get the shorts done but I really don't want to go much larger. Thanks for your advice. It's good having someone who's already walked this path to point out some of the issues I'm facing. 1 Link to comment
Dishrack[501st] Posted December 2, 2020 Author Share Posted December 2, 2020 22 hours ago, IcyTrooper said: Very nice on the prints so far! May have to make some kind of resin or fiberglass on the inside. Fiberglass can be a pain in the butt to work with though and the whole health aspect. I'll definitely want to see what Allan1313 did for the inside of his. I am using this filler called Evercoat 411 Poly Flex Flexible Polyester to fill on my Royal Guard helmet and perhaps that may help with adhesion on the joint as well? It is a glazing putty though so I'm not sure on the bonding aspect of it but it is used on bumpers because it can withstand flexing. Thanks for the advice - I really appreciate it. The overwhelming advice from my garrison mates is that fiberglass is the way to go. I think it'll be a combination of internal cover strips and maybe one or two layers of fiberglass as I don't want to add any more bulk that I've already got. 1 Link to comment
Allan1313[MBO-CMD] Posted December 2, 2020 Share Posted December 2, 2020 7 minutes ago, Dishrack said: Ahh, I was too new to printing to know the difference between PETG and PLA when I started and now I feel somewhat committed. I was leaning towards aluminium strips on the inside as it's relatively shapeable, light weight and yet rigid metal; I'll do some tests with ABS though, thanks. What did you actually use to join the pieces? Thanks for that; great to see what the inside looks like! I was planning to cover the lenses on their backs so I think my set up will look similar to yours on the inside when complete. The lenses were more to diffuse the red LEDs when viewed from the front. I'm just experimenting though; this is all a journey for me Yeah, this is concerning to me too. I'm currently printing the Jesse M files at 110%. I'll know more once I get the shorts done but I really don't want to go much larger. Thanks for your advice. It's good having someone who's already walked this path to point out some of the issues I'm facing. I used e6000 to join the pieces. I then coated everything in XTC3d, its an epoxy that helps eliminate the print lines and strengthen the print. For the lenses I printed them in transparent red PETG and think they work well. 1 2 Link to comment
nanotek[501st] Posted December 3, 2020 Share Posted December 3, 2020 A lot of my 3D printed work is fibreglass reinforced and fibreglass resin coated. Even just coating both the inside and outside of 3D prints with resin strengthens the piece quite a lot, but it also adds to the weight. Sealing 3D print lines with any kind of resin/epoxy is a good idea, it definitely makes the removal of 3D print lines easier. I see a lot of work where they just use spray fillers and you can still see the lines through the paint (because it isn't sealed correctly). 2 Link to comment
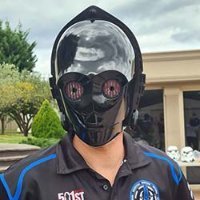
Dishrack[501st] Posted December 14, 2020 Author Share Posted December 14, 2020 Thanks for the advice on fibreglass and resin. I'll look into that down the track. It's certainly been a rough fortnight with a bit of personal injury and property damage but let's see what I actually managed to achieve on the costume...not much! I've drilled out the centre of the eye lenses (posted previously) to accommodate the tube that I'll actually be looking through when wearing the costume. I designed a backing piece for it to fit the three red LEDs in each eye. It came out pretty well. Unfortunately the eye holes don't line up with my eyes but I'm investigating a sort of periscope arrangement inside the mask. I've bunged in some 3mm red LEDs but haven't wired them yet. Still, they look plenty menacing even when not illuminated. Test fitted to the mask (without LEDs) Certainly taking on the protocol droid look that we're all familiar with. I wish I had more to report but hopefully my run of bad luck is over and this week will yield better outcomes ? 4 Link to comment
IcyTrooper[CMD-DWM] Posted December 14, 2020 Share Posted December 14, 2020 I'd say those eyes turned out very nice! 1 Link to comment
nanotek[501st] Posted December 16, 2020 Share Posted December 16, 2020 Sorry to hear about your recent run of bad luck! Hopefully you recover quickly. Your eyes look great! Link to comment
Dishrack[501st] Posted December 29, 2020 Author Share Posted December 29, 2020 Probably won't get back to this until next year so thought I'd close out 2020 with a progress marker for my own records and a bit of forum spam. Upper body now printed (re-printed in some cases, after upscaling) but arm greeblies and pistons still to be added. 5 Link to comment

Recommended Posts
Create an account or sign in to comment
You need to be a member in order to leave a comment
Create an account
Sign up for a new account in our community. It's easy!
Register a new accountSign in
Already have an account? Sign in here.
Sign In Now