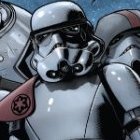
darthRivera[TX] Posted January 24, 2021 Share Posted January 24, 2021 Hello all! Kreel, appears in various issues of comics. And unfortunately the drawings are not the same. In issues # 59 & # 60 he shows us a more "realistic" armor. That's why I decided to modify an Anovos armor to emulate the armor of this character. I post this wip because the references are drawings, it makes it a bit difficult for me to interpret some things. Then I would like to receive some kind of help, recommendation on some pieces of armor. And I can't hide that I would love for this whole process work for a possible CRL. To start, I apologize for my English. _____ 05/04/2021 First "suit up" _______ 09/09/2021 References. Here you can see the complete comic, specifically # 60 that contains more images. https://readcomiconline.to/Comic/Star-Wars-2015/Issue-60?id=148960 There are many references from many angles, so it makes the job easier. My first conclusions, it is required to modify the chest, modify the abdomen. I have doubts with the orange shoulder, is it a pauldron or an additional shoulder? It looks like an additional shoulder with the Empire logo, but in other issues they draw a pauldron. The rest of the armor I interpret as a normal TK, with a few different little details. Three different pouches, I have to analyze if I create them totally or if some Sandtrooper pouches work. Lightsaber, looking at the images, it is very similar to Luke's saber (ROTJ), with some modifications of course, I made a drawing. I will work with those details as I progress. I started modifying the armor. In the next post I show you my current progress. 1 Link to comment
darthRivera[TX] Posted January 24, 2021 Author Share Posted January 24, 2021 I bought an Anovos armor at a very good price on ebay. I bought the white one. But it turns out I received black armor. Seller error. Now I have to paint and replace some parts, it complicates the work a bit, but I keep going. I already submitted the claim on ebay and the problem was "solved". CHEST But the chest, interpreting the drawings, I must eliminate or round the shape, in addition to creating lines on the sides. Here are the results. And after painting shoulders, helmet, back and chest, I put everything together for a bit of motivation and to get on with the work. (I'm not going to post the work on the helmet because many already know how to paint a TK helmet.) If we see the chest references the lines, they are not just lines, it is a thick cut that gets thinner as it reaches the bottom. 1 Link to comment
darthRivera[TX] Posted January 24, 2021 Author Share Posted January 24, 2021 Abdomen Start with the abdomen. The references show 3 vertical white lines, one in the center and two on the sides that are aligned with the lines on the chest. Additional, two rectangles on each side, white, horizontally parallel. The latter, the images show that they have some relief. I remove, everything that the abdomen of a regular TK has, leaving only the curved shape. Before continuing with the white lines, I want to measure my armor completely (torso), to have a guide on where to create these elements. __________ 02/23/2021 For the white rectangles on the abdomen, I designed a 45mm x 105mm rectangle, And seeing the references, these rectangles are not only painted, they have "relief". So they are 5mm thick. I got a 3d print, made of ABS plastic. I heated them to take the shape of the abdomen, where they are going to be placed and ready to glue them. Additionally, I drew the three white lines that are seen in the center of the abdomen. I found no reference that will tell me if it has any "relive". Similarly, with the dremmel, I did a little wear, way, I don't know the correct name lol. Then in the final finish they will be painted white. The two lines at the ends are aligned as best as possible with the lines on the chest. _____________________ 03/03/2021 Interior strapping pending, but modification work is done. 1 Link to comment
darthRivera[TX] Posted January 24, 2021 Author Share Posted January 24, 2021 Normal build & paint. The rest of the armor I am building with the minimum requirements of TK CRL I'm not going to post much detail about these parts, nor about the inner straping Right now, I have my upper extremities ready. The lower extremities are built, pending painting. Pending buy boots. 1 Link to comment
darthRivera[TX] Posted January 24, 2021 Author Share Posted January 24, 2021 Left arm communicator. I started with a prototype. The references do not show much detail, a rectangle with a light blue screen. Once the prototype is attached, I cut the center leaving a slight edge to install a semi transparent plastic, and inside it, install led lights. I used this image for reference to determine the size. First results (prototype) I have not thought about the straps that hold this device yet. Size and material. I imagine they should be leather or leather-like. Final finish pending. 2 Link to comment
RAIDER[CMD-DCA] Posted January 25, 2021 Share Posted January 25, 2021 You’re talking my language @darthRivera I actually started snappings of these guys this weekend. Personally I am eyeing Cav (knife guy). Keep the momentum going! If you email me all of your references in a zip or google drive folder to iamdarthraider@gmail.com I can create a reference thread and upload these directly to the forums. @nanotek I can tell u one of these will prob be my next build. might be worth looking into starting a SCAR Squadron forum section down the line. 2 1 Link to comment
darthRivera[TX] Posted January 25, 2021 Author Share Posted January 25, 2021 44 minutes ago, RAIDER said: You’re talking my language @darthRivera I actually started snappings of these guys this weekend. Personally I am eyeing Cav (knife guy). Keep the momentum going! If you email me all of your references in a zip or google drive folder to iamdarthraider@gmail.com I can create a reference thread and upload these directly to the forums. @nanotek I can tell u one of these will prob be my next build. might be worth looking into starting a SCAR Squadron forum section down the line. Thanks, I'm very excited about this build, I'll send you all the references I have in a moment. In my case I focus on the comic issue #59 and 60. The SCAR Squadron has many variations of drawing in the different issues. 1 Link to comment
darthRivera[TX] Posted January 25, 2021 Author Share Posted January 25, 2021 Only Kreel has these variations, the other members of the Squad, the same thing happens. That is why I think it is better to focus on one version. 1 Link to comment
darthRivera[TX] Posted January 27, 2021 Author Share Posted January 27, 2021 Analyzing the position and size of the horizontal white rectangles on the sides of the abdomen. After measuring my armor. I see that the space is not much on the sides. The space shown in the reference drawing, has a size in reality is not possible. This is the actual space I have. Because of this, in the end it will look similar to the right side of this reference. The chest and belt, on top of these white rectangles. Possibly use ABS plastic of a good thickness, so join two sheets, since these rectangles come out of the adbomen. 2 Link to comment
darthRivera[TX] Posted January 31, 2021 Author Share Posted January 31, 2021 First prototype of the communicator. I need to improve the transparency of the screen. I should do the tests with LED lights, maybe also put something black on the section of the forearm that covers the communicator. I should be thinking about the straps too, but I think it will be the last. 4 Link to comment
RAIDER[CMD-DCA] Posted January 31, 2021 Share Posted January 31, 2021 The idea is there! Yes I think something to conceal the forearm below the screen...that might mean mounting the LEDs on a piece and then putting underneath 2 Link to comment
darthRivera[TX] Posted January 31, 2021 Author Share Posted January 31, 2021 1 hour ago, RAIDER said: The idea is there! Yes I think something to conceal the forearm below the screen...that might mean mounting the LEDs on a piece and then putting underneath Yes, a piece of black foam or silver tape that helps spread the led light. I don't know, I'm going to try some things. I want to apply transparent paint to the screen, it is not noticeable in the photo but I sanded the plastic a little to remove transparency, I think painting would help. 2 Link to comment
Fivezero[TX] Posted February 1, 2021 Share Posted February 1, 2021 Great looking build! You're definitely on the right track! One thing you may want to try is an EL panel, might give you that look on that communicator. https://www.adafruit.com/product/414 2 3 Link to comment
darthRivera[TX] Posted February 1, 2021 Author Share Posted February 1, 2021 36 minutes ago, Fivezero said: Great looking build! You're definitely on the right track! One thing you may want to try is an EL panel, might give you that look on that communicator. https://www.adafruit.com/product/414 Wow, thanks for the info. I'll definitely go this way. 2 Link to comment
darthRivera[TX] Posted February 13, 2021 Author Share Posted February 13, 2021 BELT Yesterday I received my new belt from Trooperbay, which replaces the ANOVOS black belt. The quality is much higher, in addition to the fact that I need it white, not black. An interesting detail. For a regular Tk, the holster affixed with only two fasteners at the bottom. The references indicate that it should be fastened with 4 fasteners. I think it is the correct way to attach the holster to the belt. Luckily the ANOVOS holster brings the 4 fasteners What do you think? ____________ 03/08/2021 1 Link to comment
RAIDER[CMD-DCA] Posted February 14, 2021 Share Posted February 14, 2021 I think you are right on the fasteners. Its a minor detail but seems consistent in the art and I think we could allow for 2 fasteners for Level 1 in the CRL but make 4 fasteners the Level 2 requirement. Great find! Interestingly the belt buttons are not consistent nor the angled belt corners lol 1 Link to comment
darthRivera[TX] Posted February 14, 2021 Author Share Posted February 14, 2021 4 hours ago, RAIDER said: I think you are right on the fasteners. Its a minor detail but seems consistent in the art and I think we could allow for 2 fasteners for Level 1 in the CRL but make 4 fasteners the Level 2 requirement. Great find! I agree. Thanks. 4 hours ago, RAIDER said: Interestingly the belt buttons are not consistent nor the angled belt corners lol You're right, those other belt details are more important. The cartoonist gave more importance to the fasteners lol Inconsistencies is what there is most in comic book drawings, I think that in this character there are acceptable ones to try to emulate him. Being a comic book artist is hard work. lol Continuing work, more updates soon. 1 Link to comment
darthRivera[TX] Posted February 23, 2021 Author Share Posted February 23, 2021 I did an update on the abdomen section, referring to the "white rectangles" of the abdomen. Based on these being "relive" and not just painted, I got some 3d printed ABS rectangles. More details in the Abdomen section. ________ I have been working on the inner strapping, there is progress, but not noticeable, but it is progress. lol ________ I'm close to finishing the armor. And I want to go analyzing the "accessories", pauldron, ammo pouches, saber, etc. I would like initial with the pauldron or shoulder pad. To help me determine the material and ideas of how to put the shoulder together. First, pauldron or shoulder pad? In the other Issues, we can notice that it is a pauldron, but in those same issues, they completely stop drawing the pauldron leaving the impression that it is a shoulder pad. If it is a pauldron, it would be the easy way. But I am looking for the right way. On the other hand. The issues that I am using as a reference, there are no clues that I pointed to a pauldrón. It's more of a shoulder pad, or an additional shoulder on top of the white shoulder armor. Looking at the first reference, I am a little concerned about mobility. But in the other references, and all other references, it shows the piece over the shoulder armor and leaving the shoulder strap free. This contributes to mobility. I have no problem building this piece, I only have doubts, in its material or finish. Plastic? Leather or a leather-like material? I have in mind a solid base, but flexible, and cover it with vinyl or leather-like material, how to wear it? I do not know yet. lol What do you think? Thanks for the comments and help. Link to comment
RAIDER[CMD-DCA] Posted February 24, 2021 Share Posted February 24, 2021 I think due to the “version” of Kreel you have chosen in those particular issues, I would say follow those references which means you will NOT use a pauldron but instead some custom shoulder bell cover. As far as material that is hard to say. A matte orange plastic cover over the bell or leather 2 Link to comment
darthRivera[TX] Posted February 24, 2021 Author Share Posted February 24, 2021 14 minutes ago, RAIDER said: I think due to the “version” of Kreel you have chosen in those particular issues, I would say follow those references which means you will NOT use a pauldron but instead some custom shoulder bell cover. As far as material that is hard to say. A matte orange plastic cover over the bell or leather I agree with you. It must be a custom shoulder bell cover. I'm going to work on some prototypes to see if there are good results. 1 Link to comment
RAIDER[CMD-DCA] Posted February 24, 2021 Share Posted February 24, 2021 It might be more work than you want to attempt, but some mechanism that u attach to the bell (rivets, snaps etc) that allow the cover to “float” and swivel so you can have some shoulder mobility would be sweet 2 Link to comment
IcyTrooper[CMD-DWM] Posted February 24, 2021 Share Posted February 24, 2021 I agree with @RAIDER on this as a separate piece as a cover. The use of snaps for a float is a good idea, otherwise static attachment could be magnetic or Velcro, etc. 1 Link to comment
darthRivera[TX] Posted March 3, 2021 Author Share Posted March 3, 2021 Today I finished the painting of the abdomen (Updated abdomen section) , this piece, along with the chest were the ones that had to be modified. I hope it is an acceptable finish, or the minimum quality required for a 501st suit. I need to finish the inner strapping for the first fit test, then I start with the shoulder bell cover 2 Link to comment
RAIDER[CMD-DCA] Posted March 4, 2021 Share Posted March 4, 2021 It looks good. if theres a way to clean up the edges and sharpen the edges i think ud have it nailed 100% anxious to see it all together 1 Link to comment
darthRivera[TX] Posted March 4, 2021 Author Share Posted March 4, 2021 12 minutes ago, RAIDER said: It looks good. if theres a way to clean up the edges and sharpen the edges i think ud have it nailed 100% anxious to see it all together Thanks. Yes, you are right I have to correct those edges, it is not complicated. I should order the boots to fit the lower leg armor and I would be ready for a full suit test. soon more updates Link to comment

Recommended Posts
Create an account or sign in to comment
You need to be a member in order to leave a comment
Create an account
Sign up for a new account in our community. It's easy!
Register a new accountSign in
Already have an account? Sign in here.
Sign In Now