DoggyDoc[CMD-DCA] Posted January 15 Share Posted January 15 Just thinking about the UV resin curing issue. When I did it, I did very thin coats in small areas and cured as I went. Typically, it only took a few seconds to fully cure an area. ‘Not sure if this helps. 1 Link to comment
Mal86 Posted January 15 Author Share Posted January 15 2 hours ago, DoggyDoc said: Just thinking about the UV resin curing issue. When I did it, I did very thin coats in small areas and cured as I went. Typically, it only took a few seconds to fully cure an area. ‘Not sure if this helps. Thanks! I appreciate the follow up. That is basically how I did it the first time around, but I still had the tackiness in some areas and not in others. This time I went much thicker and most of it cured with no tackiness in the sun. There are a few spots that are still very slightly tacky, even after after focused light from the UV lamp, and being run through water. My wife says she wonders if its just like the little bit of tackiness that you sometimes get from some things with moisture from your skin. I'm not thrilled about the idea of uncured resin on the inside of the armor. The only other thing I can think to do is to scrub those parts again in water and see how it goes. After that, I'm not sure what else to do. Moving the light around in the thighs and the bucket seems to be working decently well. 1 Link to comment
DoggyDoc[CMD-DCA] Posted January 15 Share Posted January 15 Very strange. have you tried wiping it down with isopropyl alcohol? That is what needs to be used for the non water soluble resins. Maybe just try in the tacky areas? 1 Link to comment
Mal86 Posted January 15 Author Share Posted January 15 3 hours ago, DoggyDoc said: Very strange. have you tried wiping it down with isopropyl alcohol? That is what needs to be used for the non water soluble resins. Maybe just try in the tacky areas? I scrubbed some of the tacky parts with water and a sponge and its almost all gone. There was one spot that was still a little tacky that I scrubbed again and am letting dry. Hopefully this will solve this issue. Thanks again for all your feedback and help. This leads me to my next question: The forearms are shaped more like a zero than a circle. The tighter edges rub against my wrists. Is there a trick or a way to reform them to be more round around my wrist? For example, if I wore them twisted, they'd fit great, but then the ladder would perpendicular to the back of my hand instead of parallel. EDIT: Looking at some of the reference photos it looks like some of them have the ladders more perpendicular than parallel. Is this acceptable? EDIT 2: I have full range of motion in my arms, which I didn't before, with the ladders perpendicular. Now I'm assuming this is the way they were meant to be worn. Please let me know if anyone is aware of anything that indicates otherwise. I'm going to have to unglue my forarms and the rigging, but it'll be worth it if this is what needs to be done. Edit 3: I've started looking at other people's submission photos and it looks like this is the way to do it. Lessons were learned, but I'm glad I used E6000 for everything. 1 Link to comment
Chaos[CMD-DCA] Posted January 16 Share Posted January 16 @Mal86 I clam shelled my forearms for two reasons, one so that they would fit snug around my forearms and over the undersuit so they don't twist out of place, the second is since they are snug, and one has the 2 rubber band around it, it allows me to put my big ape hands thru the openings on the wrist end. If you look at Paul's shore troop forearms, the inside elastic bands pull the clamp shelled side tight and keeps it closed. 1 Link to comment
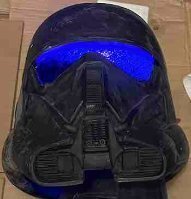
Mal86 Posted January 19 Author Share Posted January 19 On 1/15/2024 at 8:54 AM, DoggyDoc said: Just thinking about the UV resin curing issue. When I did it, I did very thin coats in small areas and cured as I went. Typically, it only took a few seconds to fully cure an area. ‘Not sure if this helps. @DoggyDocI think you and Chris were right about the curing. As I've been doing the bucket, I've had to put the light very close to any tacky spots because the light is inside the helmet and they have stopped being tacky. I think the small light I got isn't strong enough to fully cure at the distance I had it in the small light box I made. Every spot inside the bucket that I put the light right next to and left it for a while has gone from tacky to not tacky. Thank you again for helping me figure this stuff out. I wanted to report back to let you know the solution and to document it in case anyone else reading this thread runs in to the same issue in the future. 1 Link to comment
Mal86 Posted January 19 Author Share Posted January 19 SI think I have the front and the back top sections positioned correctly around my chest and back. Please give me any feedback on this. Also, I believe I need to cut the the back section so that the front will sit flush. If I do that though, I'm worried the tusks are going to stick out oddly. I'm thinking I need to cut this section: Any feedback on the positioning, cut line, and tusks would be appreciated. Link to comment
Mal86 Posted January 19 Author Share Posted January 19 Also, I don't have full range of motion when I have the forearms on. It's either digging in to my wrist or by bicep when I bend my arm (yellow arrows). I'm thinking about trying to cut or grind down that curve closest to my bicep (red dashed line) to make it fit better. Any thoughts or feedback on that? I'll also need to cut out the little portion that comes under the other side (thick red) and continued example of where to grind/trim from the other side: Link to comment
DoggyDoc[CMD-DCA] Posted January 19 Share Posted January 19 1 hour ago, Mal86 said: Also, I believe I need to cut the the back section so that the front will sit flush. If I do that though, I'm worried the tusks are going to stick out oddly. I'm thinking I need to cut this section: Any feedback on the positioning, cut line, and tusks would be appreciated. I didn’t need to cut my back piece as I am fairly big in the chest and belly area. You want the armour to fit well against your body though. my thoughts would be that if you don’t cut it, then can you pull the lower parts of the front and back pieces in to bring the chest in and down some? If this doesn’t work, then you may need to trim the shoulder bridge, but you may need to reshape it to meet the chest shoulder bridge properly. The shoulder strap does hide the seam, but not completely. 34 minutes ago, Mal86 said: I'll also need to cut out the little portion that comes under the other side (thick red) and continued example of where to grind/trim from the other side These adjustments seem appropriate, you need to be able to bend some in the arms. And this area will disrupt the details of the forearms the least. 1 Link to comment
Mal86 Posted January 19 Author Share Posted January 19 8 hours ago, DoggyDoc said: my thoughts would be that if you don’t cut it, then can you pull the lower parts of the front and back pieces in to bring the chest in and down some? If this doesn’t work, then you may need to trim the shoulder bridge, but you may need to reshape it to meet the chest shoulder bridge properly. The shoulder strap does hide the seam, but not completely. I can rest it lower, without the overlap, but I think the space for where it sits below my neckline may be too low from looking at another post where I saw Chris give someone feedback that they needed to move their chest piece up. I'll take some photos later with both pieces positioned without needing to trim and see what you guys think. Link to comment
DoggyDoc[CMD-DCA] Posted January 19 Share Posted January 19 4 hours ago, Mal86 said: I'll take some photos later with both pieces positioned without needing to trim and see what you guys think. Good plan. Always best to tape things up and check for fit and positioning before cutting. 1 Link to comment
Mal86 Posted January 20 Author Share Posted January 20 Here is the positioning without any trimming. Position 1 - Front pulled up higher: I'm concerned that with this positioning has the back of the neck as being too far back. Position 2 - Back of the neck moved further forward: Realize this first picture is not as helpful, as I wasn't thinking about my hands being in the way. ( Obviously, the back is popping out. I'm not sure how well I can get it to hold down on the sides if I do it this way, but I could try. Based on the above, let me know if you think I should cut and join as indicated the prior post. Thanks! Link to comment
Mal86 Posted January 20 Author Share Posted January 20 Anyone tried this stuff for joining shins and forearms? I thought the gap filling aspect might be good. J-B Weld 50139 Plastic Bonder Body Panel Adhesive and Gap Filler Syringe - Black - 25 ml https://a.co/d/715f3t2 Link to comment
Chaos[CMD-DCA] Posted January 21 Share Posted January 21 I have finally gotten around to taking a look at what you have going on with the neck area. Ideally, you want the neck "tusks" to rest evenly against the front chest armor slope. If you look at the Shore Trooper in Paul's files/build, the tusks have a piece (tab) that slides into a slot in the front armor. This keeps the tusks flush against the front armor. Jim's kit does not have this and I too had an issue early on with the tusks having a gap. I made a file that creates a "tab" that is attached to the back neck piece and slides under the front armor, basically replicating the tab set up on Paul's ST. It glues onto the inside of the neck and is then filled in with bondo or filler so its less noticeable. Once everything is painted you can't see it. You might want to look at having the back of the collar slightly aft, it will help prevent your helmet from banging on the top edge and it will give you more range of motion to look up. 1 Link to comment
DoggyDoc[CMD-DCA] Posted January 21 Share Posted January 21 On 1/20/2024 at 12:09 AM, Mal86 said: Anyone tried this stuff for joining shins and forearms? I thought the gap filling aspect might be good. J-B Weld 50139 Plastic Bonder Body Panel Adhesive and Gap Filler Syringe - Black - 25 ml https://a.co/d/715f3t2 This is exactly the same as what I used for the forearms and shins and it worked very well. 1 Link to comment
DoggyDoc[CMD-DCA] Posted January 21 Share Posted January 21 On 1/19/2024 at 8:59 PM, Mal86 said: Here is the positioning without any trimming. Position 1 - Front pulled up higher: I'm concerned that with this positioning has the back of the neck as being too far back. Position 2 - Back of the neck moved further forward: Realize this first picture is not as helpful, as I wasn't thinking about my hands being in the way. ( Obviously, the back is popping out. I'm not sure how well I can get it to hold down on the sides if I do it this way, but I could try. Based on the above, let me know if you think I should cut and join as indicated the prior post. Thanks Personally I think position 1 looks better. The shoulder bridges line up and the fit looks good. With the back piece, I used Velcro on the side tabs of the chest piece to connect to the back, so it pulls everything in at the bottom of the plates 2 Link to comment
Mal86 Posted January 21 Author Share Posted January 21 @DoggyDoc and @Chaos - Thank you both. I was comparing the back of the neck positioning to this post: I was worried the back of the neck in position 1 above would be too far back based on that. @Chaos I'll take a closer look at the collar items. I'm not 100% clear, but I also didn't have much time to look. Thanks again. Link to comment
Mal86 Posted January 22 Author Share Posted January 22 15 hours ago, Chaos said: I have finally gotten around to taking a look at what you have going on with the neck area. Ideally, you want the neck "tusks" to rest evenly against the front chest armor slope. If you look at the Shore Trooper in Paul's files/build, the tusks have a piece (tab) that slides into a slot in the front armor. This keeps the tusks flush against the front armor. Jim's kit does not have this and I too had an issue early on with the tusks having a gap. I made a file that creates a "tab" that is attached to the back neck piece and slides under the front armor, basically replicating the tab set up on Paul's ST. It glues onto the inside of the neck and is then filled in with bondo or filler so its less noticeable. Once everything is painted you can't see it. You might want to look at having the back of the collar slightly aft, it will help prevent your helmet from banging on the top edge and it will give you more range of motion to look up. @Chaos Looked closer at this. This looks perfect. Would you mind sharing the file? Thanks. Link to comment
Mal86 Posted January 22 Author Share Posted January 22 Wife helped me tape the pieces together. It actually looks like the chest and back armor will fit decently without any cutting as long as the neck isn't too far back for fitment purposes. I think I'm going to need to cut about 1.5 inches off the top of the thighs so I can bring them higher. The rest on top of my knee caps, not above. Shins are not held together by anything other than tape that wasn't very strong. I think they'll be fine once I glue and use the elastic clamshells. Given the amount of taping the crotch piece took, I left off the posterior. The helmet is just resting on my head with nothing to support it up any higher, so I assume it'll be a little higher with something in it to make it more comfortable. Does the abdomen piece need to be higher up to leave more space for the belt? Any other fitment issues anyone sees? Link to comment
Chaos[CMD-DCA] Posted January 22 Share Posted January 22 Paul, Looking good. I should explain why I told Hector to rotate his back up some, he was having an issue getting his tusks to lay flat. I actually have my collar farther back and even cut some of the back down so my helmet wouldn't make contact. So I think how you have it now will work perfect for you. If it does make contact you can always trim some off the back and it won't effect CRL approval at all. As far as your abdomen, if you look at the screen suits. The belt sit below the abdomen rectangle with the circle indent. With Jim's kits in order to make that work, you'll need to put an edge under the rectangle to give you some place to put velcro or snaps to hold the top part of the belt in place. I made some strips and attached them to the lower edge of my abdomen and attach my belt there. This requires you to raise your abdomen up some so the belt sits properly in place around your waist. The belt should be centered at your hip level. You don't want a "low rider" look! LOL Screen suit My suit My suit showing lower strips for belt attachment Here is the file for the collar tabs. https://www.dropbox.com/s/n56rr6rzxsm2vl2/collar tab support.stl?dl=0 You will have to position the tabs so that they fit under the chest center edge. Photo is for reference and may not be in the correct position for your suit 1 Link to comment
Mal86 Posted January 22 Author Share Posted January 22 Thanks again for all the help so far! For the Level 2 certification for the Thermal Detonator, can someone explain this to me (and let me know if Jim Tripon's TD already has this): OPTIONAL Level two certification (if applicable): There are two small notches on the outer ⅕ of each side of the canister approximately 3/4" (20mm) from the inner edge of the end caps and spaced approximately 1" to 1.25" (25-30mm) apart on the lower edge of each horizontal grooves. Refer to reference photos for specific details. 1 Link to comment
DoggyDoc[CMD-DCA] Posted January 23 Share Posted January 23 Yes. Jim’s thermal detonator has the level 2 requirements 1 1 Link to comment
Mal86 Posted January 23 Author Share Posted January 23 2 hours ago, DoggyDoc said: Yes. Jim’s thermal detonator has the level 2 requirements Perfect. Thank you. I’m trying to go ahead and plan for all my cutting, sanding, grinding, etc. 1 Link to comment
Mal86 Posted January 26 Author Share Posted January 26 I printed my straps in TPU face down, so they would have more of a matte finish per the CRL. I plan to use a heat gun to try to eliminate some of the stringing that came from the upside down print. The sides are still pretty shiny. Chaos had suggested sanding or plastidip. I haven't been able to do an even job sanding, but I was using a sanding block. I may try hitting it with some sand paper, so I have more control on where the pressure is. Any other tips or suggestions for getting the shine off TPU? Link to comment
DoggyDoc[CMD-DCA] Posted January 27 Share Posted January 27 I sanded mine with a belt sander to get rid of print lines and then sprayed them with Plastidip Link to comment

Recommended Posts
Create an account or sign in to comment
You need to be a member in order to leave a comment
Create an account
Sign up for a new account in our community. It's easy!
Register a new accountSign in
Already have an account? Sign in here.
Sign In Now