DoggyDoc[CMD-DCA] Posted May 31, 2024 Share Posted May 31, 2024 I embedded 1/2 of a Chicago stud into the knee plate with j weld and then drilled a hole through the thigh armour to screw them together Link to comment
Mal86 Posted May 31, 2024 Author Share Posted May 31, 2024 14 hours ago, DoggyDoc said: I embedded 1/2 of a Chicago stud into the knee plate with j weld and then drilled a hole through the thigh armour to screw them together Any reason you didn't want to permanently attach the piece? Link to comment
Chaos[CMD-DCA] Posted May 31, 2024 Share Posted May 31, 2024 I would imagine, for those that have 3D printed parts, the need to be able to replace a broken spar is easily done with a removable sniper plate. Just guessing. Link to comment
DoggyDoc[CMD-DCA] Posted June 1, 2024 Share Posted June 1, 2024 13 hours ago, Mal86 said: Any reason you didn't want to permanently attach the piece? No reason. I felt that attaching it via screw would be more secure as it is a very minimal contact attachment 1 Link to comment
Mal86 Posted June 2, 2024 Author Share Posted June 2, 2024 Alright team, here are some updates and a question: Cut the edge of the wider thigh box and sniper plate. Attaching the boxes and on the thigh and building up the other thigh with JB Weld: I've been progressively building up the strip on the shin based on @wookie_shaver's post regarding liquitex modeling paste to see how it works. I haven't gotten to sanding it yet, but its looking good. I still need to plastidip the straps and smooth the 3D print lines on these: Which leads to my question. What is the proper positioning of this strap: If its the last one, I know I'll need to cut or reprint that strap. Also, on painting... I assume everywhere that is flat black should either be painted on top of the clear coat or covered up when clear coating (is there a right/best way to do this?) However, should the metallic dark grey and the weathered silver be under or over the (or masked from) the clear coat? 2 Link to comment
Chaos[CMD-DCA] Posted June 2, 2024 Share Posted June 2, 2024 Because your kit is a Tripon one, here is what you need to do for the side buckle. With your front and back upper and lower armor on and positioned to fit. The rear armor side overlaps the front side piece. Draw a pencil line along the front edge of the back side piece. If you do not expect to need to change the girth of your lower, place the rear upper corner at the edge of the pencil line, the flat edge should align with the back side piece top edge. This is where you position and attach the side buckle. It should look like this: 1 Link to comment
Mal86 Posted June 5, 2024 Author Share Posted June 5, 2024 I needed to try it on again, so I felt like I was getting somewhere. I think the fitment is coming along: The chest and back aren't connected yet, but I had my wife mark the overlap, so I can add some velcro. I also measured the belt around to get an idea of the amount of overlap. Forearms are a little low, but I need to add a loop on my sleeves so that they don't ride up as I slide them on. As always, any feedback is appreciated. 1 Link to comment
Mal86 Posted June 5, 2024 Author Share Posted June 5, 2024 So, I found out that a friend paints cars as a hobby. He recommended I get a single stage gloss black and use his gear to paint. He said that I’ll end up with orange peel, but that I can cut and buff it to get it as clean and shiny as I want. He said I can rattle can the other colors on top of the single stage. Anyone see any issues with that or have any feedback on doing it this way? Link to comment
Chaos[CMD-DCA] Posted June 6, 2024 Share Posted June 6, 2024 A lot of people have done that for painting their kits. As a matter of fact next year when I repaint my kit, I will use the same process. I will probably use Imron paint as it is very durable, but its about $100 a gallon. LOL everything else was expensive on my build, why not extend that to the paint? Link to comment
Mal86 Posted June 6, 2024 Author Share Posted June 6, 2024 @Chaos that was part of my headspace. I haven’t really gone cheap on the rest of it. If it’ll give me a more durable and longer lasting finish, then it seems to make sense. He also said that if it gets scratched then I can polish or wax. This is what he recommended I get: https://www.ebay.com/itm/143633367231?mkcid=16&mkevt=1&mkrid=711-127632-2357-0&ssspo=mJk8wBaTRJ-&sssrc=4429486&ssuid=F6hPmDASQTC&var=&widget_ver=artemis&media=COPY 1 Link to comment
Mal86 Posted June 8, 2024 Author Share Posted June 8, 2024 So, I printed my shoulder buckles, pouch plates, SE-14R and (eventually will print) my belt boxes with PLA+/PLA Tough. Today, I left the buckles outside in the direct sun for a couple of hours while doing something with one of my kids. It was soft when I got it and slightly deformed. Before I continue finishing the PLA+ pieces and making more, should I anticipate a problem trooping with these parts or them being in the car during events? Thanks! Link to comment
DoggyDoc[CMD-DCA] Posted June 8, 2024 Share Posted June 8, 2024 PLA will have issues with heat if they are left in a car etc, so you will need to be more careful with them. I use petg for my prints as it holds up to heat better. Link to comment
Mal86 Posted June 9, 2024 Author Share Posted June 9, 2024 4 hours ago, DoggyDoc said: PLA will have issues with heat if they are left in a car etc, so you will need to be more careful with them. I use petg for my prints as it holds up to heat better. I haven’t printed with petg yet, but I’m going to pick some up tomorrow add reprint everything except the SE-14R. I don’t want something to get ruined because it gets too hot and the blaster is done, so it if gets messed up then I’ll deal with it then. Everything else isn’t finished yet. 1 Link to comment
Mal86 Posted July 4, 2024 Author Share Posted July 4, 2024 Taking a new step in my leather working my trying to stitch leather. I had some pretty thick leather from some armor I made that I am using for the pouch. My order of operation would not normally be to sew first, but I wanted to make sure I could do it before I did anything else. I'll probably dye and seal the leather then come back and add the snaps, attach a strap for the belt on the back with rivets, and then try to finish sewing up the edges. 1 Link to comment
Mal86 Posted July 4, 2024 Author Share Posted July 4, 2024 How are people connecting the thermal detonator? @DoggyDocshared his method with me, but it involves shaping a squared 3D printed file to fit the curve of the armor, which I'm having trouble doing. Any other methods or suggestions? 1 Link to comment
Chaos[CMD-DCA] Posted July 5, 2024 Share Posted July 5, 2024 https://www.facebook.com/share/p/YjMSmW8T6bZ5N4ap/?mibextid=oFDknk https://www.facebook.com/share/p/nN9C8FL9LCHjqv4W/?mibextid=oFDknk https://www.facebook.com/share/p/QoJkqx4AF31jhwx2/?mibextid=oFDknk Link to comment
Chaos[CMD-DCA] Posted July 5, 2024 Share Posted July 5, 2024 18 hours ago, Mal86 said: How are people connecting the thermal detonator? @DoggyDocshared his method with me, but it involves shaping a squared 3D printed file to fit the curve of the armor, which I'm having trouble doing. Any other methods or suggestions? Docs method is pretty much the norm for Jim's kits Link to comment
Mal86 Posted July 5, 2024 Author Share Posted July 5, 2024 4 hours ago, Chaos said: Docs method is pretty much the norm for Jim's kits @Chaos, maybe I'm overcomplicating it. I was trying to make the point where the bracket attached to the armor match the curve of the armor. It may be simple enough that when I attach it, it'll flex the armor enough to not make it look like it isn't attached. Also, it'll be on the insides of the TD, so it might not be noticeable. Gerald had told me he used a belt sander to add the curvature to the back, which I tried to do (poorly) with a dremel). Link to comment
PiotrRasputin[TX] Posted July 5, 2024 Share Posted July 5, 2024 7 hours ago, Mal86 said: @Chaos, maybe I'm overcomplicating it. I was trying to make the point where the bracket attached to the armor match the curve of the armor. It may be simple enough that when I attach it, it'll flex the armor enough to not make it look like it isn't attached. Also, it'll be on the insides of the TD, so it might not be noticeable. Gerald had told me he used a belt sander to add the curvature to the back, which I tried to do (poorly) with a dremel). You could try using a contour gage to press against your armor, then use that to trace the pattern against the bracket. https://www.amazon.com/Feeke-Adjustable-Measurement-Woodworking-Construction/dp/B08GC48QXP/ref=asc_df_B08GC48QXP/?tag=hyprod-20&linkCode=df0&hvadid=693660084959&hvpos=&hvnetw=g&hvrand=1599112101708622892&hvpone=&hvptwo=&hvqmt=&hvdev=c&hvdvcmdl=&hvlocint=&hvlocphy=9021571&hvtargid=pla-1559652326350&mcid=bc2828a7af6b324f8adbc6cac0de8d23&gad_source=1&th=1 1 Link to comment
Mal86 Posted July 7, 2024 Author Share Posted July 7, 2024 On 7/5/2024 at 6:05 PM, PiotrRasputin said: You could try using a contour gage to press against your armor, then use that to trace the pattern against the bracket. https://www.amazon.com/Feeke-Adjustable-Measurement-Woodworking-Construction/dp/B08GC48QXP/ref=asc_df_B08GC48QXP/?tag=hyprod-20&linkCode=df0&hvadid=693660084959&hvpos=&hvnetw=g&hvrand=1599112101708622892&hvpone=&hvptwo=&hvqmt=&hvdev=c&hvdvcmdl=&hvlocint=&hvlocphy=9021571&hvtargid=pla-1559652326350&mcid=bc2828a7af6b324f8adbc6cac0de8d23&gad_source=1&th=1 @PiotrRasputinThank you for the suggestion. My father in law has some contour gauges. I'll borrow them next weekend and see what I can come up with. I also reprinted the brackets solid. I think some of the issue I had before was getting to the infill when trying to shape. Hopefully the contour gauge and the solid piece will help me get to the shape I need. 1 Link to comment
Mal86 Posted July 7, 2024 Author Share Posted July 7, 2024 Dyed and sealed the leather pieces: No pictures, but: - Glued two inch strapping to inside of belt. - Tested adding threaded inserts in to one of my misprint straps (went well). - Printed/Reprinted everything (except the SE-14R) in PETG (though I'm not having as clean prints, so I've been messing with my settings. - Newly printed Shoulder buckles sanded smooth. Slowly making process.. 1 Link to comment
Mal86 Posted July 8, 2024 Author Share Posted July 8, 2024 Has anyone had issues with OPLE Props responsiveness or shipping speed? I placed my order May 29. We had some communication about the measurements, which I sent June 7. I followed up June 20 and July 3. I have not heard anything since his June 7 email to me before I sent measurements. Link to comment
DoggyDoc[CMD-DCA] Posted July 11, 2024 Share Posted July 11, 2024 On 7/7/2024 at 8:39 PM, Mal86 said: Has anyone had issues with OPLE Props responsiveness or shipping speed? I placed my order May 29. We had some communication about the measurements, which I sent June 7. I followed up June 20 and July 3. I have not heard anything since his June 7 email to me before I sent measurements. My experience was pretty smooth. Link to comment
Mal86 Posted July 11, 2024 Author Share Posted July 11, 2024 2 hours ago, DoggyDoc said: My experience was pretty smooth. @DoggyDocGlad to hear that. He's been pretty active on the OPLE Props FB page, so I don't know if he's just been really busy or what. I tried sending a message through FB Messenger on July 9 asking to see if he had gotten my emails and haven't heard back yet. I'll wait a little longer and see what happens. Link to comment
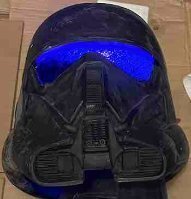
Mal86 Posted July 27, 2024 Author Share Posted July 27, 2024 Are there any other options other than Ople Props (or an Anovos helmet) for the the level 2 bubbled lenses? I still haven’t gotten any recent responses from Marc and I’m trying to figure out what I should do. Link to comment

Recommended Posts
Create an account or sign in to comment
You need to be a member in order to leave a comment
Create an account
Sign up for a new account in our community. It's easy!
Register a new accountSign in
Already have an account? Sign in here.
Sign In Now