

Fivezero
-
Posts
1,259 -
Joined
-
Last visited
-
Days Won
70
Content Type
Profiles
Forums
Events
Everything posted by Fivezero
-
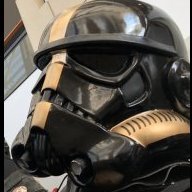
Been a long time, I know. I've been real busy lately and haven't had much drive to work on any projects the last few months. Fortunately, I just suddenly felt like working on this yesterday and a LOT got done on it too. As in a little gluing and some paint and it's ready...again. So let's commence with the pics (there's a lot)!!! First, i cut the ankles off of the shins. Oh yeah and I built a new workbench, that is a lot bigger than the computer desk I was using before. Then using those cut-offs, I created some clear copies to then glue back on the shins. I heated up a small chunk of plastic and then pressed it into the cutout to get the shape. Gluing them on. Also had to apply a little heat here and there to get them to fit to the shin. Because they're not exactly perfect, I had to cut out some rectangles to blend into the ridge on the shin (it's clear, you can barely see it). Ready for some Bondo! This morning hit them with some bondo and got the ankles all sanded and blended in. And now for the fun stuff! Took a quick picture comparing the previously used EL wire to the new LED/Clear ankle method (EL on the left, LED on the right). The LEDs are an amazing improvement, I think it looks 1000% better. The EL wire (while it looks bright) is actually pretty dim at a distance and they drain these little batteries like crazy (lost TWO while setting this up). The final illuminated area won't quite be that big though, just showing off the new effect. And I also got working on my new clear shoulders! Had to do a little sanding, trimming and filling to make them usable, that plastic doesn't like heat and had some ripples on the edges from being stretched. After that, taping them off for some gloss black! Paint (was literally painting this at midnight, I got into a good groove yesterday)! Got the tape off this morning, and quickly rigged up an LED strip to compare against one of the old shoulder bells (new on the left, old on the right). Again, a huge improvement over before. And yes, the old shoulder lights are on. The new bells all around look better, the light stands out a lot more and they have a much better profile since they're only one bell, not two with an LED strip sandwiched in between. Overall, I am very happy with how these tweaks have turned out. I feel about 15,000 times more confident sending this in for approval with these improvement. But, now I just need to get the shins assembled (again), trimmed, painted and LED strips mounted. The shoulders need a little more sanding (for the light diffusion), then LEDs mounted. It feels so good to work on this again. Fivezero
-
Need to find cheap 501st approved full armor kit!
Fivezero replied to malevolent trooper's topic in Shadow Stormtrooper
Hey there, welcome aboard!! I'll send you a PM to help get you started with armor. Fivezero -
Looking good! Fivezero
-
Thanks Tej! Final projects and exams slowed my progress a bit this weekend, but still got a little done. Started cleaning up the new pack box and painting it. Also finally starting making parts up for kits. Nothing too impressive yet, just getting the small greeblies out of the way. Fivezero
-
Nope Todd, you are the first to have them all. I'm still missing the regular Nova... I just need to get a helmet for my complete set (it's one of those things I keep forgetting to do).
-
Yeah, I love this trooper too much and really was starting to hate those shoulders the more I looked at them. Want it to be perfect before it gets sent in for approval. And Toddo, was originally planning to make a clear helmet, but that option would be very hard to pursue.... Hence why I pursued other options to achieve the lighting effect. This plastic is a pain to work with, those bells are literally the two only semi-decent pulls I got out of about 10 tries. The stuff really like to web and cinch together. Here's one of the first attempts I tried last year. We might be able to make to make a silicone mold then make a clear helmet using clear resin though..... ^ Ew.... Fivezero Also just noticed that this project is 2 days away from this its 3rd birthday, I was still in high school when I started this thing, wow....
-
Congratulations on getting approved Torri!! You've done a fantastic job!!
-
Awesome looking Medic Todd!!!
-
Clear shoulder bells!!!! Did some messing around with some clear plastic I had while testing EVO parts and finally got some decent results for once. They'll need a bit of work (all those bubbles...) but most of that is getting covered in black paint anyway so not a huge deal. Basically I don't think I'm going to send this thing in UNTIL I have the clear parts I want made up. While I'm glad my idea for the shoulders worked, they still felt too big and bulky (and ugly) to me, so that is partly why I haven't sent this guy in for approval yet. I'm going to try and make some clear legs as well (at least the ankles, then graft them to my current shins). I'm fine with the forearms as they are currently. They'll eventually get replaced, but they look and work just fine right now. Fivezero
-
Hey guys, sorry for my absence. Was real sick for a couple weeks in March, and was really exhausted for a couple weeks afterwards (school didn't help either :/) But I'm starting to feel a bit better now and brought this stuff out to work on it again. Here's what I've gotten done lately (not much...) Got to vacuum form a couple test pieces, which didn't go spectacular. Some stuff like the fingerplates and chestbox came out great, the shoulder bell didn't though. Tomorrow I'm going to make a mold of the shoulder to make them out of resin. Everything else though, seemed to cooperate with me. Here's some pics for you guys! Chestbox Shoulder Bell: ugly, had to break it to get the original out. Figured it would end up like this, but hoped it would work. So after I get the mold made up for the Shoulder, everything should be all set and I can start making some kits for you guys (finally ). Just making sure I get the best armor made that I can for you guys. And for my own EVO, I have been busy doing some modifications/rebuilding on it. First I cut down the chest and back plates. I intend to remake the underarmor thingy that the EVO has. I originally had one, but the armor covered it up, so I ended trashing it. I trimmed a lot off the back plate and a small amount off the chest. This is about how open it should look when I'm wearing it. Also started rebuilding my pack. I wanted to make the main lower box longer like the EVO's pack as well as changing the frame around to match. I plan on using some magnets to attach the pack to my back plate and running a strap to the ab plate just like it should. Anyway more pics! New lengthened lower box, frame adjusted to match the EVO pack. Comparison of old box to the one. Rough mock-up of the final look of the pack. I also need to repaint a lot pieces, they've gotten a little beat over the last couple years and I might redo the weathering too. Anyway, that's how Fivezero's EVO 2.0 is coming along! I'm hoping to at least have it all back together and ready to go by next month. I'll get started on making up parts kits this weekend and hopefully get a nice day to paint an EVO pack as well as my new EVO bucket (finally made one for myself). Fivezero
-
80%ish TK with lots of mods and extra details. Chest (with chestbox) Back Biceps (one with orange stripe) Forearms (wrist straps and left forearm has tube) Belt (with circular greeblies and pouches) Ab (with circular greeblie and hose attaching to chestbox tube) Kidney Butt Thighs (no ammo pack) Shins (EVO knees and right shin has tubes) Sandie Backpack (a couple minor differences, but essentially the same) And then all the other custom parts on top.
-
Thanks Toddo! I'm trying to keep it as low as I can for you guys since there are a lot of other things you future EVOs need.
-
Okay guys! I got a draft done for the CRL today, hopefully get some new pics taken this week while I wait for materials for the EVO parts. Time to get this guy submitted! I'm going to put the suit on tomorrow just to double check and make sure I have everything secured this time. Fivezero
-
I'm aiming for about $150ish for pricing, we'll see how it goes by the time kits are being made.
-
Good news future EVO Troopers! The parts are all ready to go now!! Just waiting for some plastic to arrive so I can get to work making kits for you guys!! Oh and here's the current list of included parts: 2x Shoulders (will need 5 holes cut out, will include some plastic to cover the holes) 1x Chestbox (incudes extra piece of plastic for front rectangle) 2x Chestbox Inlets 1x Chestbox Tube 5x Tubes (1 for forearm, 4 for shin tubes) 2x Handplates 10x Fingerplates (they're long, cut 8 of em in half for the fingers, leave 2 uncut for thumb plates) 2x Kneeplates 3x Belt/Ab Circular Greeblies 3x 18" Hose Sections (2 go into helmet, 1 from chestbox tube into ab plate) Fivezero
-
Hey! Well I looked and it's a "State Street" boot from Payless, unfortunately they are no longer available.... They're not super perfect boots, but they look fine when dyed and weathered. Anyways we'll have to do some more searching around to find some others. As for the pack, I'm thinking it will be required (haven't seen a pic of an EVO without it yet). They need their packs for the extreme environments they fight in. Fivezero
-
Fantastic pics! Superb job Torri! Fivezero
-
I used boots that had no elastic on them (not TK boots). Just about any kinda boot that has a similar feel to TK boots but without the elastic should work. Here's a side shot of my EVO to show what I'm talking about. For the belt, I used ABS for it. The belt in the references has a sheen to it like the armor and I like my plastic belts. And for an update on the kits, the armor parts are getting very close to being finished. School has set me back a bit (yeah boring papers and projects!!), but I still managed to do some work here and there on them. Just a tiny bit of finishing work left which I'll get done this weekend as well as making some plaster reinforcements for the shoulder and kneeplate. Even though I'm a bit behind where I'd like to be, I should still be on track to get started making kits next week! Fivezero Oh and I'm also rebuilding my EVO. Since half the parts are ripped off already, figured I might try to redo some things to make it a little more accurate (going for Specialist once CRL is in place). I'll upload some pics tomorrow of some of the things I'm rebuilding (mostly the pack and pouches, other things are just minor adjustments).
-
Thanks for the interest guys!! I still got a few things I want to take care of before I get rolling on a channel. I want to get a 3D printer, then a new workbench, my truck needs some loving sometime this summer too (poor thing is rusting away). However, that won't stop me from getting things mapped out (goal is for 2015 to start producing stuff)!
-
Well got a bit done on the kneeplate today! It's still a little rough but definitely liking how the shape came out! There's a little depression I noticed that will need to be corrected (the green circle). Other than that I'm liking it! I'll get that fixed and get the rest of it sanded, then add the edge molding. Still have a little bit of work on the shoulder, but should definitely have everything set by the end of the weekend. CRL V2.0 is ready to go as well! Sunday, I hope to spend some time writing tutorials. Still on track for the first test kit next weekend! Fivezero :D
-
If I ever win the lottery DE... Though I'm still thinking about making a Youtube channel to show some of this more effectively.....
-
Thank you very much everyone!! I'm very excited to see some more EVOs around (2014 is going to be the year of the EVO). I haven't been able to work on much so far this week (class ). But tomorrow I"m going to start wrapping everything up! I'm also hoping to get the CRL text tidied up this weekend, with pics coming after the new parts are done. And I'll get started on my EVO tutorial/break down to help you guys see how I put everything together. I've got "spring" (more like winter) break in a couple weeks, so I'm aiming for that to be the first week of production. I'm still aiming to get the first test kit done next week though (still give me some time to tweak things)!! Fivezero
-
Hey, that sucks about the master, but keep at it! I've noticed that there is a great deal of trial and error when doing this stuff. Learn from the mistakes and keep going! And don't be afraid to stray from the pepakura templates, make modifications if you can in real life rather than on the model. I use pepakura to get me a general shape to work with and then fine tune with a knife or scissors. Good example is the curve along the bottom of the chest plate, rather than following the angular nature of the model, modify it to make a much smoother and more natural curve! Just a tip from my experience using pepakura. Here's my Shocktrooper chest to demonstrate. You can (kinda) see the original angular template over the "finished" piece. There are even a couple spots I want to touch up, but a couple of seconds with some scissors and you have a nice curve. Keep at it though, I never get it right the first time!! Fivezero
-
Making some great progress Torri, keep at it! Fivezero
-
Wickerman Imperial Navy Commando Build
Fivezero replied to WickerMan's topic in Imperial Navy Commando
Go Wickerman, go! Nice job on the helmet revisions, looking very nice!! Keep at it! Fivezero