

Fivezero
-
Posts
1,259 -
Joined
-
Last visited
-
Days Won
70
Content Type
Profiles
Forums
Events
Everything posted by Fivezero
-
Well, had to do some minor changes/additions for some small details. But it has finally been submitted to my GML to pass on up the chain for approval!! Now we wait... Fivezero
-
More plaster! Shoulder bell, did a quick couple passes to knock some material down. Forearms, again about 10 minutes of work on the one on the right, the one on the left is raw. Coming along nicely, just need to get the big stuff ready to go (back and chest).
-
Thanks guys, really appreciate the compliments!! I'm so freaking excited to have this thing done and be able to see it light up! I absolutely love how everything looks. Way back when I started, one of my huge worries was getting the effect right. I think it looks spot on, couldn't be happier with it. Anyway time to start getting all the reference photos together and finish up the CRL text and get it ready to submit and get us another Spec Ops trooper!! Kinda sad almost to see this thing finished, yes there are going to be tweaks/fixes/repairs, etc. This is a trooper is just like what we've seen before in terms of armor but with such a crazy twist. I'll be honest, I thought when I first started that was going to be a very good chance that it wouldn't be possible. I expected everything to look bad and not emulate what is seen in the Force Unleashed game. It has been one fantastic project and this has been one magnificent journey! Thanks again guys! Fivezero And Al, we have much bigger toys to scare the neighbors, but nothing like a chrome trooper glowing blue.
-
Welp, here it is! Used a different camera too, worked a little better! Still had a couple minor issues, meh, I don't think they'll hold up getting this thing approved. Still doesn't quite fit just right yet, but it's way better than it was. Anyway here's the pics!! I really love how this thing lights up! :D :D Fivezero :D
-
Nice helmet, magmas are very pretty!
-
Hmm, this is very interesting! As a big footed guy, I have a lot of trouble finding any kind of boots in my size, let alone stuff for troopers. I might see if they can do some dark gray boots for my TFU Shadow.
-
Everything's fixed and ready for some new pictures tomorrow! Very pleased with how everything is working now and there shouldn't be any issues (fingers crossed)! Got a checklist ready of what to watch for. Excited to be at the end of this almost four year journey!
-
Woot! Mixed up some plaster today, got a few things casted! Boots! One leg, rear boot armor also done! Tomorrow I'll get the other leg cast and probably the rest of the leg details as well, then the forearms, shoulders, back and finish with the chest! I'm very pleased with how everything is turning out so far. A little bit of elbow grease and some sandpaper, they'll be looking just right in no time (i.e. no polygon artifacts). Fivezero
-
Just got done fixing some of the issues. Started off by trying everything on to really see what was going on. Funny thing was, most of the problem went away just be simply moving my suspender straps while they were on. I balanced the tension across my shoulders (can't think of a better way to say it) and it raised everything up a bit. Last night I think I had too much strapping behind me, let the kidney plate drop dramatically. Also to help out, I adjusted the shoulder straps back on my back plate, gained another inch. So, overall went from literally about a 4 inch gap between my back plate and the kidney plate to about an inch now. All because I was basically throwing my armor on too quick last night. So used to being able to just throw my armor on and not having to worry about adjusting things (thanks Frankenarmor!!). So that's the biggest concern gone. The forearms, I'm going to stick with them for now. I'll get the electrical problems sorted (find out why the one is killing batteries) so they don't cut out when I'm taking pictures. But Toddo, never got clear ones made up. It was always the last thing I wanted to upgrade. The shoulder and legs really needed them bad, so I redid them. The forearms still do the job and glow blue (just not quite as long as I'd like), so I never got around to it. As for basic comfort, not too bad. Getting it on is a bit of chore and trying to make sure wires are tucked in. You can see just fine out of the helmet, just a slightly blue tint to everything. The welder's lens does it job and keeps most of the light down (the lights are obviously in front). No heat generated at all either, absolutely no problem with that. The LEDs really generate no real heat (they do, it's about 77 degrees Fahrenheit, but definitely not noticeable). Other than that, got a few other things to tidy up. Probably won't be able to get new pictures for a few days though. But glad to see it all together and everything mostly works (looking at you left forearm). Feels good to finally be at the stage where I'm just doing minor tweaks and adjustments. Pretty soon, we'll have another trooper for the roster!! Fivezero
-
New pictures! Overall, went much better than last time I took pictures. Still had a couple minor problems with some straps. This time it seems to be mostly fit related things. One of my bicep straps broke halfway through and I didn't catch it unfortunately. I took a look at it this morning, and my bicep armor will only go up so far (think I've gained some muscle in the last couple years). My other concern is my back plate, there are some big gaps between the rest of the armor, it's always been a problem for being a big guy. I think part of the problem is that this thing is Frankenarmor (a piece from this kit, a piece from that one, some of it made by me, etc.), if I were to rebuild it I would go one brand new kit from the beginning. The leg armor was also sitting too low, covered up the red stripes on the boots... Unrelated to fit issues, I don't really like the forearms a bunch. The EL tape just doesn't work for me. It doesn't look quite right in regards to the effects (should be similar to the shoulder lights) and I had one arm completely drain a battery in 20 minutes (you can see it in the picture on the right). The other was also starting to get weak by the end as well. If I wish to wear this at a troop, I'm going to need a new power source for those. However, I think I'm going to focus my efforts on making clear forearms instead and going all LED on this guy. I'd also like to try and get the LEDs a little bit brighter if I can too, they get a bit washed out by light and camera flash. On a positive note, loving my new shoulder and lower leg armor!! I would like to take some new pictures before submitting it, but I might just go ahead and submit it anyway to get the process started. Worst case, I take new ones anyway; best case, they're fine with them. But whatever, the thing still looks cool though! Fivezero
-
Well got the belt primed and painted this morning. Still going to try to get some pictures of the whole thing tonight! Paint might be a bit soft, but whatever I want to get this thing wrapped up and submitted! Fivezero
-
More progress! Chest and back pep molds are ready to go! Tried something different with the back plate. Made up the walls for the mold in the 3D model before making the pep file. A lot better and easier than free handing everything. But that's every core armor mold taken care of now and almost ready for some plaster! Also got the forearm armor plate cut out and glued together and bent to shape. The supports were also taken care of and this morning I got the biceps and the one shoulder piece cut out. They still need to be formed though. Also did some experiments with some urethane resin and cardstock. Worked out fine for the most part, but it sets up too quickly to do anything large (i.e. lots of wasted resin). Guess I have to use fiberglass resin then, was hoping to avoid the fumes and everything.... Going to get everything resined today, let it it sit for a bit and maybe get some plaster casts made up on Sunday? Fivezero
-
Oh stop it Toddo, I'd say you have a really good handle on costume building (how many costumes do you have now?), but I appreciate it. Scratch-building armor isn't too hard, just need to break things down into easy-to-make pieces and you need lots of patience and thinking/planning, not too bad. Anyway just as planned here are the biceps, sorta... Decided to just make them as final pieces rather than make molds (as I originally planned way back when), They're basically just cones (without a top of course) no bulges or anything really defining besides the center ridge thingy. Got them marked out, but didn't get a chance to cut them out yet. And here's the actual forearm molds for the plaster casts, now ready for some resin! They're a little crude, but should work fine for a one time casting. Here's the little armor plate and its supports that just out from the left forearm. Six total cut-outs for two pieces (about 1/4" thick total) with 12 cut-outs for the supports/attachments. Still need to actually cut them out of course, I'm saving them for when I grow tired of pepping. Gives me something different to work on. And finally started on the shoulders. Reusing a piece I made before for the big shoulder on the left side, got another marked out. Still need to pep the other parts, that'll be quick (about 20-30 minutes), done for tonight though. Tomorrow I'll get the shoulders ready to go for sure and then probably get started on the chest plate. After that is the back plate and that'll be it for now. Plan is to start resining by the end of the week, and start casting some plaster next week. I've got spring break in three weeks, goal is to have everything ready for a week of sculpting!! Fivezero
-
WOW, been almost a year since I last worked on this. Done a lot of thinking, and I'm starting over from scratch again. Reason being, I want to be able to make at least two suits at once. The way I've been going about it is basically scratch-building each suit individually. Only way to really do what I want is to spend my time making one set of mold/forming bucks to use twice. So join me once again as I start over on the Shocktrooper!! Basic plan is to make a simple cardstock mold (and resin it) using Pepakura to pour plaster into. Then refine these plaster castings and use them as forming bucks. I'm not too worried about them holding up in the long term, just need them to make two of everything and I'm done with them. The helmet will be cast using urethane resin in a silicone mold. I'm starting at the bottom of this trooper and working my way up. To start we have the boot armor, ready for resin! Once everything that needs to be resined is made up, I'll spend a whole day resining everything. Took a bit of a break from Pep and made up the thigh ammo belt. Woke up this morning and back to the Pep, this time the shins are being redone! I'll use my cut up FX thighs to make some new molds (they're a bit too small for my big legs), they also need a few tweaks to work with everything else. Finally after the leg cardstock semi-molds were made up, I went to work on the handplates. Stacked up three cutouts from sintra, glued them together, then heated them up and gave them a curve. There is finger armor too, that will probably be worked on when I get some gloves for this guy. Tomorrow is get the biceps ready to go. Will probably move onto the forearms as well, I'll see how it goes. From there, the shoulders, then chest, back and finish up with the helmet. And after all the molds are done and the armor is formed and the suits are assembled, I'll get the tails made up to cap it off!! Fivezero
-
Well, the belt was actually going to be used to vacuum form a new one, but at some point I decided to just use as it is. Anyway, no painting got done, had a bit of a storm go through/still going through.
-
Hey guys! Sorry it's been awhile! I picked this back up the last couple days to finish it off. Everything is all ready to go and rigged up to wear. Unfortunately I had an incident with my belt, and well it broke into multiple pieces. So what do I do? Make a new one of course!!! Started off by casting new boxes for the belt using the old boxes (since the belt was snapped in thirds, just broke them off further). New belt face, nothing fancy here, flat sheet of plastic cut to size and everything marked where it needs to go. Here's everything secured together. Everything is glued down, the boxes also have screws to give them a mechanical connection vs. pure adhesion. They're quite hefty and didn't want one popping off while trooping. The new belt was a little stiff, a couple seconds with the heat gun and some pressure gives it a little curve to help it conform to my body. And that's how you make a belt! I hope to at least get the thing primed MAYBE painted tomorrow evening, I'll see how it goes. Either way I'm taking new pictures of the whole suit by next Friday, I absolutely promise (I'm dying to see what my new lighted parts look like!!!). Fivezero
-
JK II Shadowtrooper Helmet Sculpt
Fivezero replied to Fivezero's topic in Shadowtrooper (Jedi Knight II)
Yeah Todd, I love plaster, wish I thought to use it a long time ago. The only drawback is you really have to wait until the plaster is dried out thoroughly since the plaster is ultra soft then. After that it isn't too bad, but it's still pretty soft. But it beats the heck out of cardstock + fiberglass resin + bondo + bondo + more bondo + even more bondo. And Dizzy, I unfortunately don't have the model anymore. I did some reorganizing on my computer this summer, and somehow all my raw models got deleted, sorry man. I fortunately didn't lose any of the individual models I made up (for example the ears for this guy, or the chestbox for the EVO). Just my master folder with all the untouched models, I haven't tried to rebuild it yet either apart from a couple troopers I know I need like my SWG Shocktrooper. Someday I'll get it back together... Anyway made a little more progress on this today. Got the vocoder all marked out, going to use some wire I had laying around to make the little ribs. Also finished the lines off too. All that's left is to drill some 5/8" holes in the cheeks for the mic tips and then some finishing work. Also made up some 3D models for some details pieces. Here's the new ears for the helmet. At the far right is the original from the helmet, I was going to use this and scratch build. Decided to make a more detailed one and get it 3D printed (will only cost $10!!). My first revision is in the middle, with the final part on the left with the edges rounded off, a little more accurate. Also made up the little mic tips. Was also going to scratch build these, but decided to get them 3D printed. The mesh is also slightly above the bottom of the part, would make it a little hard to mold. But at $1.87 a piece, I won't be buying one and molding/casting new ones. I'll just use straight printed ones for the finished helmet. Almost there with this helmet. Fivezero -
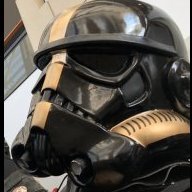
Every piece of armor that is lit up has it's own power source. I decided to do this to prevent having to have wires running all over the place, and then hiding them, then wires coming unplugged/breaking while wearing it, etc. It seems easier to me. The only downside is that I have to remember that I need all 15 batteries to power this thing (forgot a couple when I took the first full suit pictures) and of course having to buy 15 batteries, which is only a few bucks really (found a nice seller online!) and they seem to last forever with the LEDs. Here's the batteries I'm using. They are A23 12 volt batteries. They're very small, about a third of the size of a AA battery and I have no trouble hiding them in the armor (they also don't get in the way when you're wearing it). The important part is the 12 volt as that is what the LED strips are set up for. Otherwise you'd need 8 AA batteries for each piece of armor, which comes out to 120 batteries for the whole suit being powered individually. I also found appropriate battery holders on Ebay as well, they work great!! All in all, keeping each piece powered individually helps putting it on and wearing it easier. It goes on just like a regular suit of armor, except for the added steps of flipping a switch and checking to make sure the lights are on. Otherwise, I would literally have wires running from ankles to my wrists to my head, that seems like a lot to keep track of when putting it on. And if a connection breaks somewhere, then I'd have to track it down, fix it, hope something else doesn't break. Just my way of doing it. Fivezero
-
Thank you very much guys! Not much progress the last couple days, been raining a lot lately so haven't been able to paint. Hoping to get them painted tomorrow or Friday. The last LED strips I need are also on their way, so everything should be all finished this weekend!! I'll get some new pics taken next week and hopefully submitted for approval, finally!! Fivezero
-
Hey guys! Another sculpt from Fivezero. This project is for our XO, Darth Emphatic. He asked me about pepakura and it basically ended with me making a foam helmet, demonstrating using foam. Well after a couple months of it sitting on my shelf, I decided to try something new and use the foam helmet as a mold for a plaster helmet sculpt. Worked on it for a bit back in May and finally got it off the shelf tonight to start finishing it up. The original foam helmet. Plaster poured in with the carnage from demolding following. The raw, ugly cast ready for some sculpting (this is literally the exact same as the 3D model from the game, not detailed at all). Started by smoothing everything out and then got started on some face detail/shape. Other side shaped and sculpted. Frown added, little more sculpting all around. More face detail. And after that it got shelved for a couple months. Got it back on the bench tonight and started sculpting again. Did some more smoothing all over then got started on the detail lines all over the back of the helmet. And that's where it's at right now! Hope to get it all finished up this weekend. Got a few more details to add, some sanding, some minor filling, some more sanding after that and it should be ready for molding. Definitely love the plaster as it is nice and soft and very easy to knock down very fast to shape (it's cheap too!). I also hate the plaster since it is so soft, a lot of the marks you see are from fingernails catching and gouging the surface. I'll probably do that Swamptrooper Helmet that's been sitting on my shelf forever in the same style.... Anyway that's all for now! Fivezero
-
Well, got some shoulders finally made, but some surgery was required.... This was my last resort if nothing else worked, so unfortunately had to split the shoulder in half to get some vac formed parts. First pulls! My shoulder bells. So as you can see, they have to be made in two parts and then put together. There will be a little bit of filler needed to cover the seam, but shouldn't be anything major. They also came out a bit thinner than I wanted (it'll work for me, not for you guys), so I'm going to get some thicker plastic for these things. But with this hurdle overcome, everything is just about in place to finally get some kits out the door!! I have a little bit of repair to do to the shoulders and a little bit of refining to the knee and we are all set! Fivezero
-
Did some test pulls today! Got the small parts pretty much taken care of and ready to go, need to do some adjustments for the larger parts, but those should be all ready to go by the end of the weekend. My parts Mocked it up on my work gloves. Still need to clean them up a bit more and painted. Fivezero
-
Legs done! Almost... Need some paint and lights and these are ready to go!!
-
Well couldn't work on the TFU Shadow today, so decided to get back on track with rebuilding the EVO. Got started on the pack, making it a bit more accurate to the in-game model for the EVO. I reconfigured the frame a bit (separated it into two pieces) so it connects into the side of the lower box. You can also see the hose that wraps around the left side in its new position above the frame (before it on the lower bit where the frame is now). Second piece of the frame in its new spot. Added an elbow to the side pipe, nothing too special. Everything all glued down and secured. The lower frame and side pipe are also attached (just not in this picture). Just need to attach the hose on the left and then do some painting and weathering. Then get some magnets to stick in the top box and backplate and run a strap on each side to the ab plate. I also finally made myself a helmet. Got started on the details and did a little weathering. Brow trim attached and drilled out holes for the hoses to attach (they screw in like a bolt). Finally got the pin stripes applied and the visor attached. It's too clean, time for some dirt (after I get some brown paint...). Got some spots to touch up as well, nothing major though. Next big thing is this underarmor thing under the ab and kidney plate. Also hope to finally get some of the other parts cast this weekend (test run for kits for you guys). Fivezero
-
Thanks a bunch guys!!! Glad to be back making stuff! Unfortunately couldn't get much done today, ran out of plastic for cover strips. Also need some more LEDs as well. All of it is ordered and on its way. Hopefully everything will be put back together by the weekend and ready for paint. Fivezero
