Lt. Dan
-
Posts
225 -
Joined
-
Last visited
-
Days Won
14
Content Type
Profiles
Forums
Events
Everything posted by Lt. Dan
-

PiotrRasputin's Death Trooper WIP
Lt. Dan replied to PiotrRasputin's topic in Imperial Death Trooper
Dan, hell there is a LOT to do with this one before going anywhere😅 I'm on holiday atm, but for a first review here are my initial thoughts: Heat and form the biceps armor to bring more tightness to your arms and attach a holding strap to the shoulder bells. The butt plate sits UNDER the belt and is attached with a strap between your legs to the codpiece. Attach the thighs to the belt with straps to hold them up. The rear right canvas pouch is missing on the belt also the third rocket cylinder on the left forearm. Tuck in your shoe laces! I can't see the side buckles were the front and rear armor connect, don't know if they are in place? These are the things you can do easily and quick at first. Try a new fitment and watch for the details! -
That way you save on weathering!🤣
-
Gerald, I think you have something mixed up. Paul was asking about Paul Prentice´s straps and brackets, not Jim Tripon´s. Paul, the straps and brackets from Paul Prentice are state of the art. They have the curve for Level 2, they are flexible and the brackets are outstanding. I´ve used them for my build and they fit perfect. I can recommend them without reservation!
-
Paul, as long as the parts match the CRL criterias in shape and appearance the overall materials they are made off don´t matters, unless it is explicitly mentioned. The parts you are looking for are good to go, but pricey in my opinion especially the D-ring set!
-
A 501st Newbie: A Death Trooper Story
Lt. Dan replied to GrandMoff501st's topic in Imperial Death Trooper
Great pics Casey! So all you need now is to send in some approval pics😉 Btw, the shoulder rest of your E-11D is upside down! -
DoggyDoc’s Jimmiroquai Imperial Death Trooper Build Thread
Lt. Dan replied to DoggyDoc's topic in Imperial Death Trooper
Fingers crossed🤞 -
DoggyDoc’s Jimmiroquai Imperial Death Trooper Build Thread
Lt. Dan replied to DoggyDoc's topic in Imperial Death Trooper
That looks way better Gerald😎 -
DoggyDoc’s Jimmiroquai Imperial Death Trooper Build Thread
Lt. Dan replied to DoggyDoc's topic in Imperial Death Trooper
I wouldn't be too specific about the stickers. They correspond in appearance and layout to the CRL and are not explicitly further specified. You are good to go I think. -
DoggyDoc’s Jimmiroquai Imperial Death Trooper Build Thread
Lt. Dan replied to DoggyDoc's topic in Imperial Death Trooper
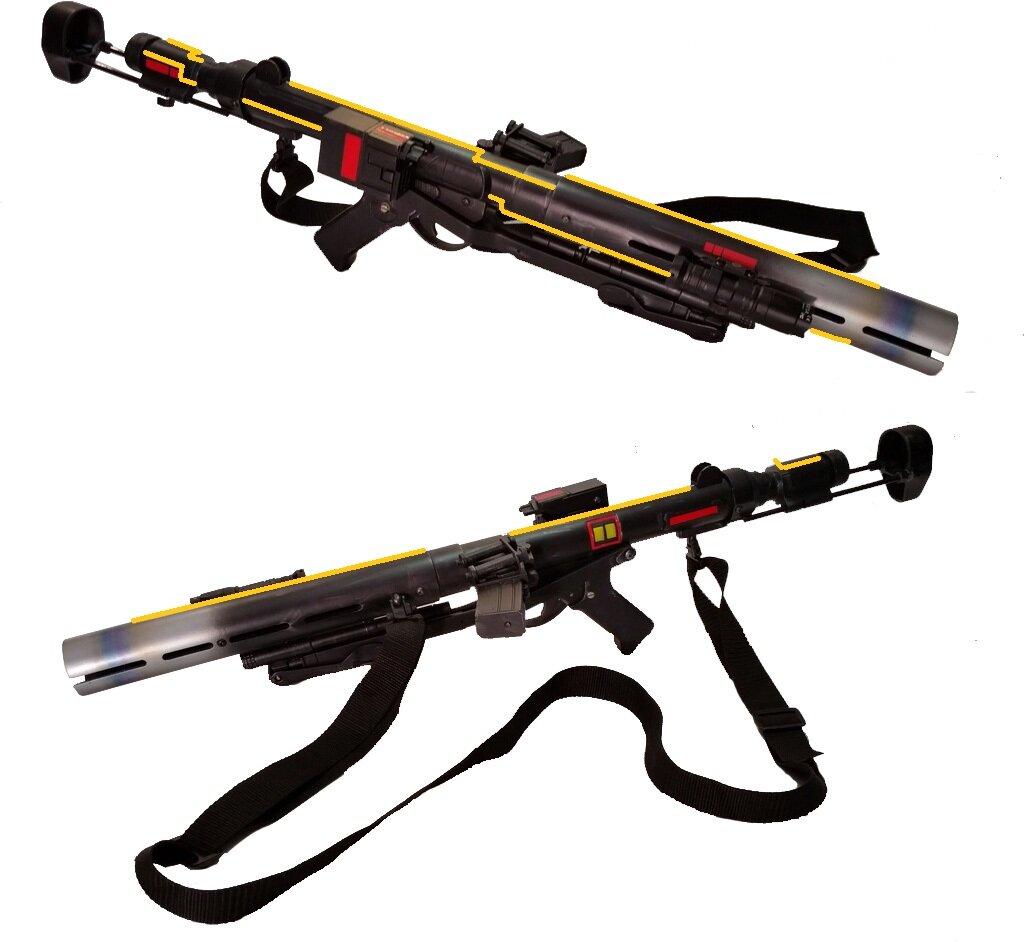
In my opinion the blaster in the lower reference picture section is not correct. Look at the SWCE 2016 Display pics or the two close ups from Rogue One screen shots, there you can see the lining on top and on the right side of the barrel. Also the E-11D pics in the CRL "optional accesssory" section show the lining very clear. NO lining on the left side of the blaster! I have attached that picture and highlited the lining with yellow for better view. I got my lining set from @Chaos in the past and he delivered a visual guide how to attach the lining correctly.
-
DoggyDoc’s Jimmiroquai Imperial Death Trooper Build Thread
Lt. Dan replied to DoggyDoc's topic in Imperial Death Trooper
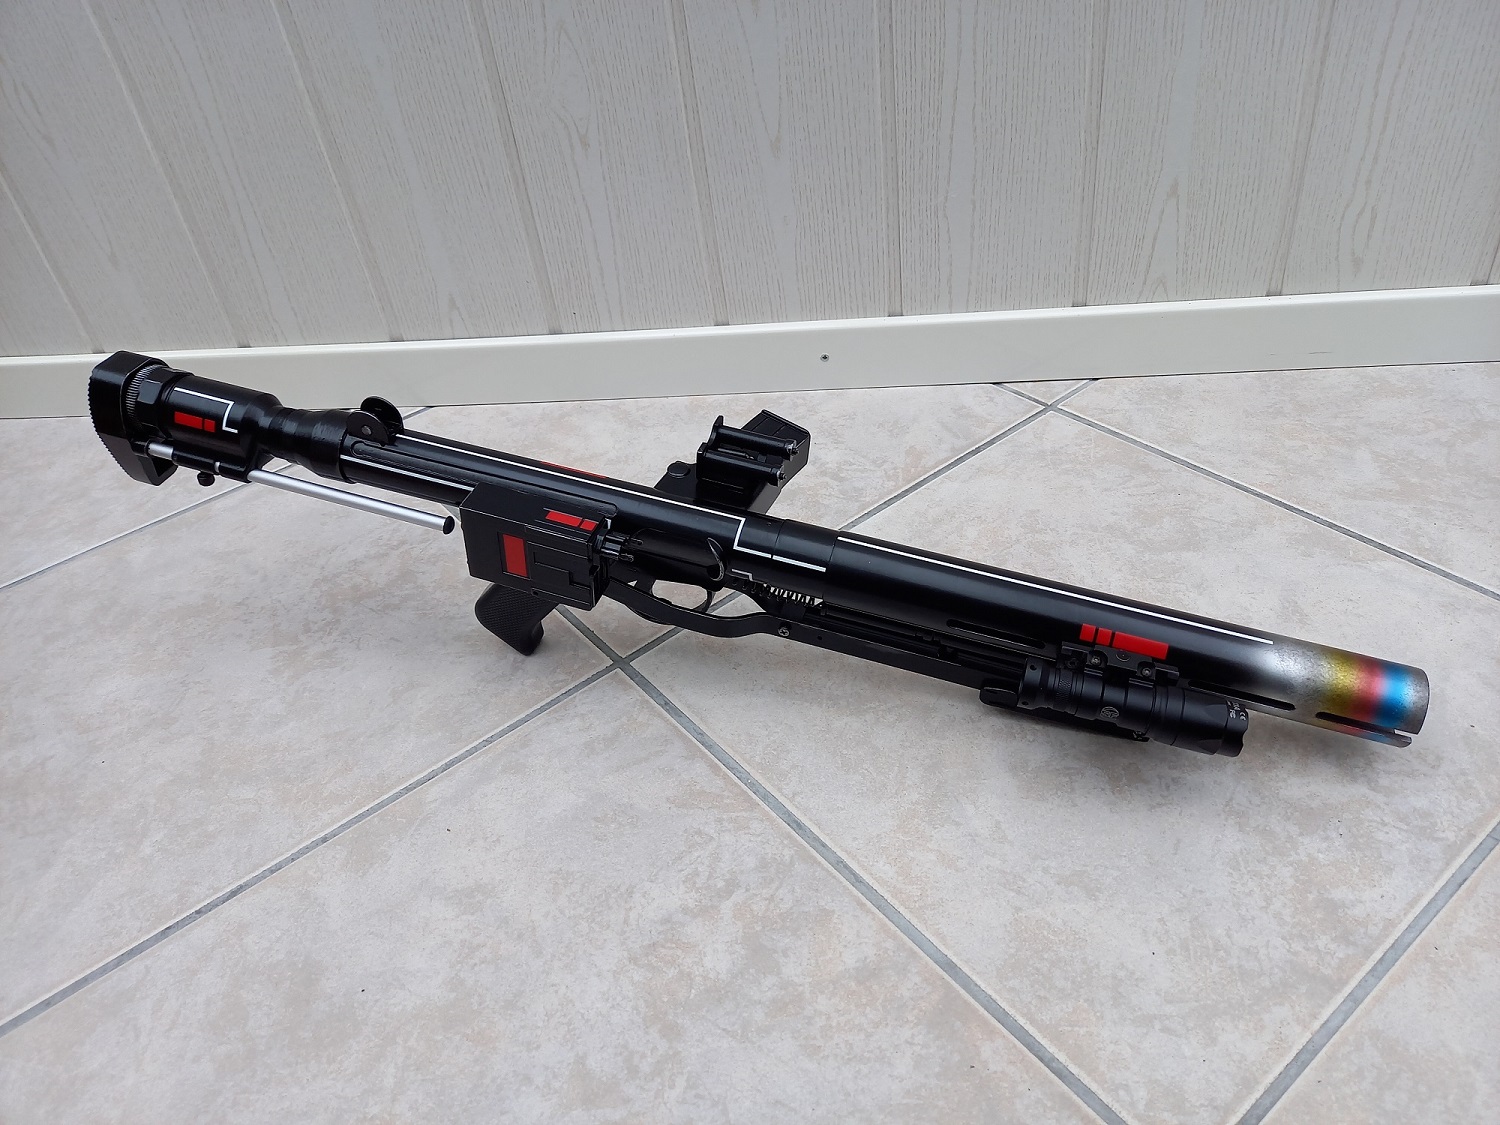
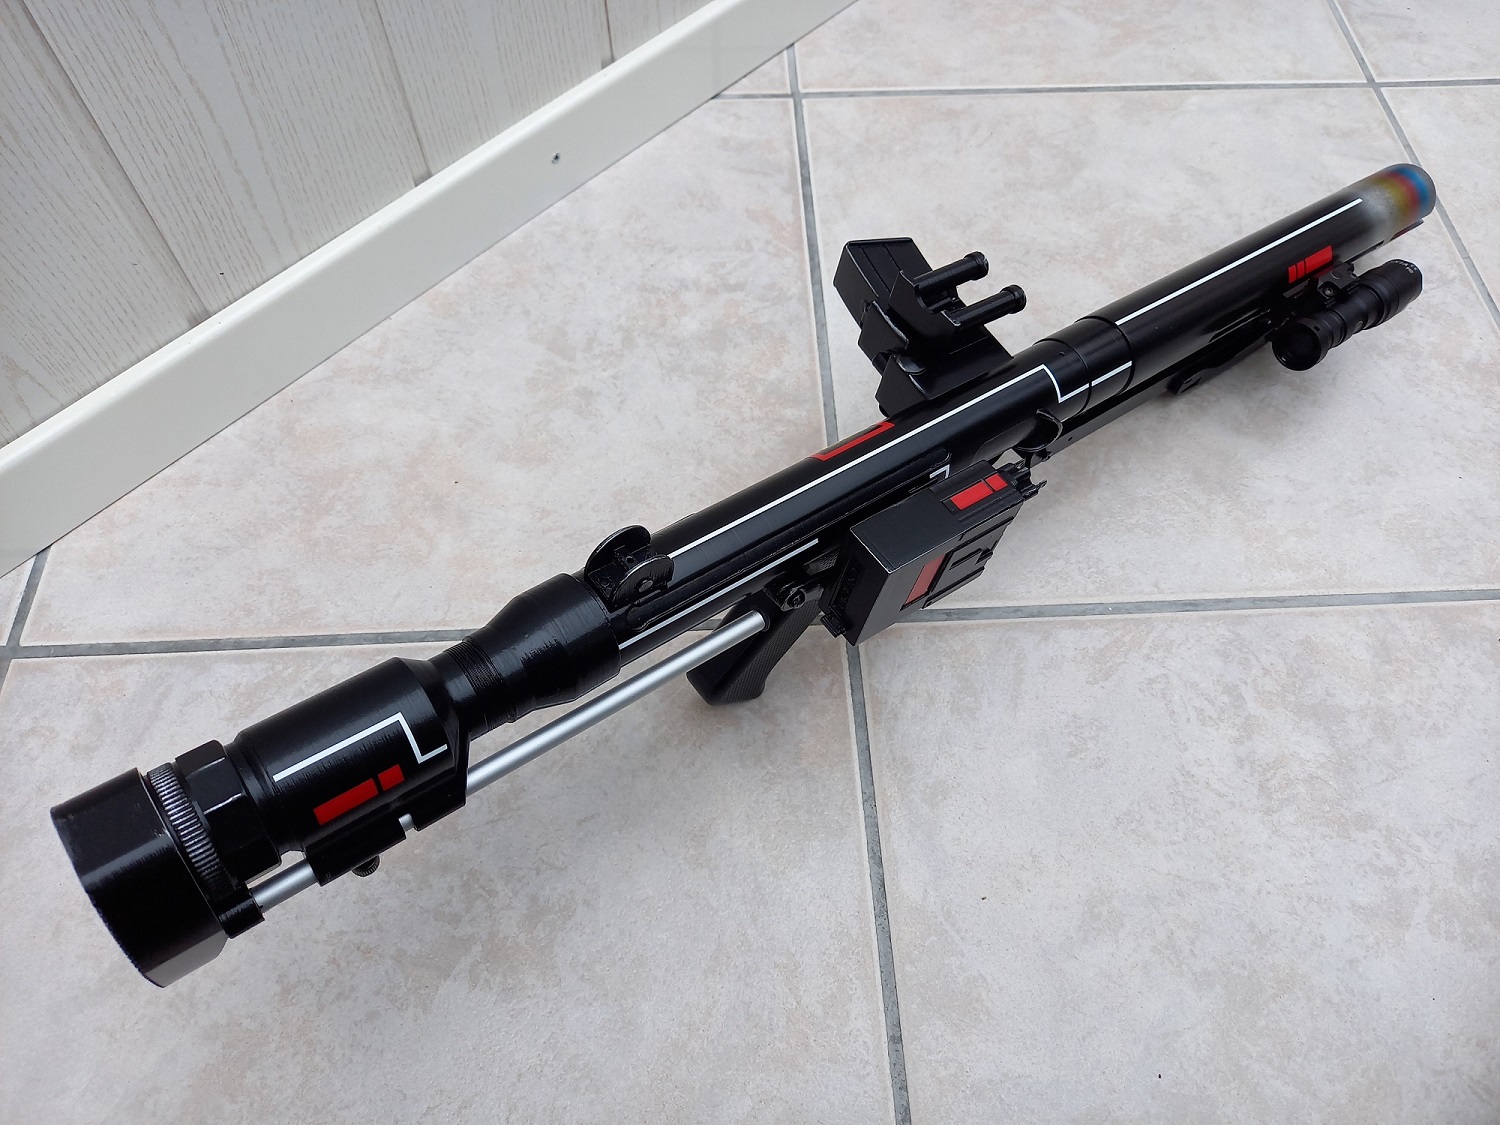
Yes Gerald, that should look way better, it is meant to be more than a pinstripe style! Also, the decals on the left side of the blaster are set wrong. They have to be on top of the barrel. I´ve attached a pic of my blaster to clarify!
-
A 501st Newbie: A Death Trooper Story
Lt. Dan replied to GrandMoff501st's topic in Imperial Death Trooper
Hey Casey, good to hear that you have progress. You did your homeworks as I can read. Top of the pops stuff thoroughly!😎 -
DoggyDoc’s Jimmiroquai Imperial Death Trooper Build Thread
Lt. Dan replied to DoggyDoc's topic in Imperial Death Trooper
Don´t forget the side buckles on the chest piece, Gerald☝️ Otherwise I think you are good to go for painting, beside the things you mentioned👍 -
DoggyDoc’s Jimmiroquai Imperial Death Trooper Build Thread
Lt. Dan replied to DoggyDoc's topic in Imperial Death Trooper
-
Or look it up here: And here´s another one: https://deltaleatherworks.com/product/death-trooper-pouch/
-
A 501st Newbie: A Death Trooper Story
Lt. Dan replied to GrandMoff501st's topic in Imperial Death Trooper
Hey Casey, according to the Facebook Page of IB Boots aka Keep Trooping their email address is: vincent@keeptrooping.com Hope this helps and looking forward to your build!😎 -
Hey Ethan, since you listed my harness as an example picture, here's a quick comment. I was at the same point back then, but was lucky that Ukswrath still made some. However, I also had two or three months waiting time. I had also written to Geekypink, but it was very difficult to get a timely response from her. At that time, she also offered only harnesses for TK´s, no idea if that has changed in the meantime or if they could be modified!? Maybe you should think about alternative mounting options without a harness. There are other ways to include the armor pieces among each other, like in this tutorial for example: https://www.jollyrogers1942.com/death-trooper-build-reference.html (I used that primarily as a pattern for the belt at the time.). Then you will basically only need an additional belt to attach the thighs armor, which you can simply make out of nylon webbing. I'm afraid that at this point no one else can offer you a suitable ready-made harness🤷♂️Please @all improve me if I am wrong!?
-
DoggyDoc’s Jimmiroquai Imperial Death Trooper Build Thread
Lt. Dan replied to DoggyDoc's topic in Imperial Death Trooper
That is badass😎 -
Hey Daniel, I really don't see why you shouldn't go to level 2 or Specialist? Dude, you're the CRL model, step on it!😅
-
DoggyDoc’s Jimmiroquai Imperial Death Trooper Build Thread
Lt. Dan replied to DoggyDoc's topic in Imperial Death Trooper
Great, then I have the middle config as mentioned and there´s no need for another pic, thanks @Chaos Btw, its the first time I recognized that there are two rivets underneath the magazine of the SE-14R🤔 -
DoggyDoc’s Jimmiroquai Imperial Death Trooper Build Thread
Lt. Dan replied to DoggyDoc's topic in Imperial Death Trooper
For me, the DT holster was and is a cramp. No idea who came up with it. Completely impractical from a military point of view. Apart from the fact that the blaster also wiggles back and forth like a lamb's tail and scrapes the armor. I adjusted my holster the way that the large loop goes vertical around the wide receiver of the scope. I also shortened the small loop so that it sits in tension just below the scope adjustment screws. This way the blaster hangs at least reasonably straight in the holster. If you glue a small piece of foam to the back of the blaster now, at least it won't scratch the paint on the armor. At the moment I have no picture on hand, but can gladly make one if needed! -
DoggyDoc’s Jimmiroquai Imperial Death Trooper Build Thread
Lt. Dan replied to DoggyDoc's topic in Imperial Death Trooper
A Dremel with a small milling attachment is also great because it's just faster. But you have to be quite careful, because you quickly mill away too much! -
Lots of work, but looking good😎
-
DoggyDoc’s Jimmiroquai Imperial Death Trooper Build Thread
Lt. Dan replied to DoggyDoc's topic in Imperial Death Trooper
Haha, this is a Grogu-sized lightsaber😅 -
Death Trooper Helmet sources?
Lt. Dan replied to RobC_TX1138's topic in Armor Tips, Tricks and Tutorials
Robert, please have a look at the DT section for the actual vendors list if not already done: -
DoggyDoc’s Jimmiroquai Imperial Death Trooper Build Thread
Lt. Dan replied to DoggyDoc's topic in Imperial Death Trooper
Correct Gerald! You are good to go when the starting edge of the buckle aligns with the collar end. This should be about 11-13 visible ribs on the rubber strap (as a work aid), depending on the length of the buckle. The lower D-ring then should free flow over the chest plate. The bend of the straps is good for me, also the height of the ribs👍