Lt. Dan
-
Posts
225 -
Joined
-
Last visited
-
Days Won
14
Content Type
Profiles
Forums
Events
Everything posted by Lt. Dan
-
Hi Mark, Maz3DShop on Etsy, located in Poland: https://www.etsy.com/de/listing/490972524/deathtrooper-gewehr-e-11d-update-model?ga_order=most_relevant&ga_search_type=all&ga_view_type=gallery&ga_search_query=e-11d&ref=sr_gallery-1-4&organic_search_click=1
-

DoggyDoc’s Jimmiroquai Imperial Death Trooper Build Thread
Lt. Dan replied to DoggyDoc's topic in Imperial Death Trooper
Looks good so far!🥳 -
Starting a Jimtripon DT Build
Lt. Dan replied to GrandAdmiralDeathTrooper's topic in Imperial Death Trooper
Hi Mark! Excellent choice in beginning to build a DT. Looking forward to your progress! Make sure to make your way to several build threads and see what others have done. There are so many ideas that would definetely help you for the beginning. A very individual approach is always due. There is no such thing as "the" solution for everyone. @DoggyDoc has already given some examples. And in my opinion, the prudent thing is to try😀 As for the question above: my kit is painted with automotive car paint and that works excellent. I would always go this way again! -
Hi Elora, I would think gloss black is gloss black, all over the world. If you do spot repair you'll always see a little shade especially when you use rattle cans. I would recommend using an airbrush, because you can dose the colour better to the right spot and painting the transitions is much easier. When you sand, start always with fine sanding paper and feel your way slowly. As always, trying is the best way. As for the pictures: you can either resize them to fit or you can use a picture upload hoster to place links.
-
DoggyDoc’s Jimmiroquai Imperial Death Trooper Build Thread
Lt. Dan replied to DoggyDoc's topic in Imperial Death Trooper
That might be one reason, but don´t get me wrong because I´m not a composit professional: for my understanding, fiberglass should be patched or glued with epoxy resin. That should also hold the ABS in place I think. -
DoggyDoc’s Jimmiroquai Imperial Death Trooper Build Thread
Lt. Dan replied to DoggyDoc's topic in Imperial Death Trooper
I have achieved very good results with Alclad 2 lacquers for airbrushing. A very wide range of paint codes including chrome and transparency applications. -
DoggyDoc’s Jimmiroquai Imperial Death Trooper Build Thread
Lt. Dan replied to DoggyDoc's topic in Imperial Death Trooper
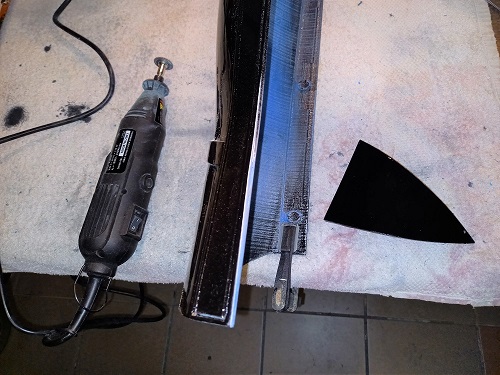
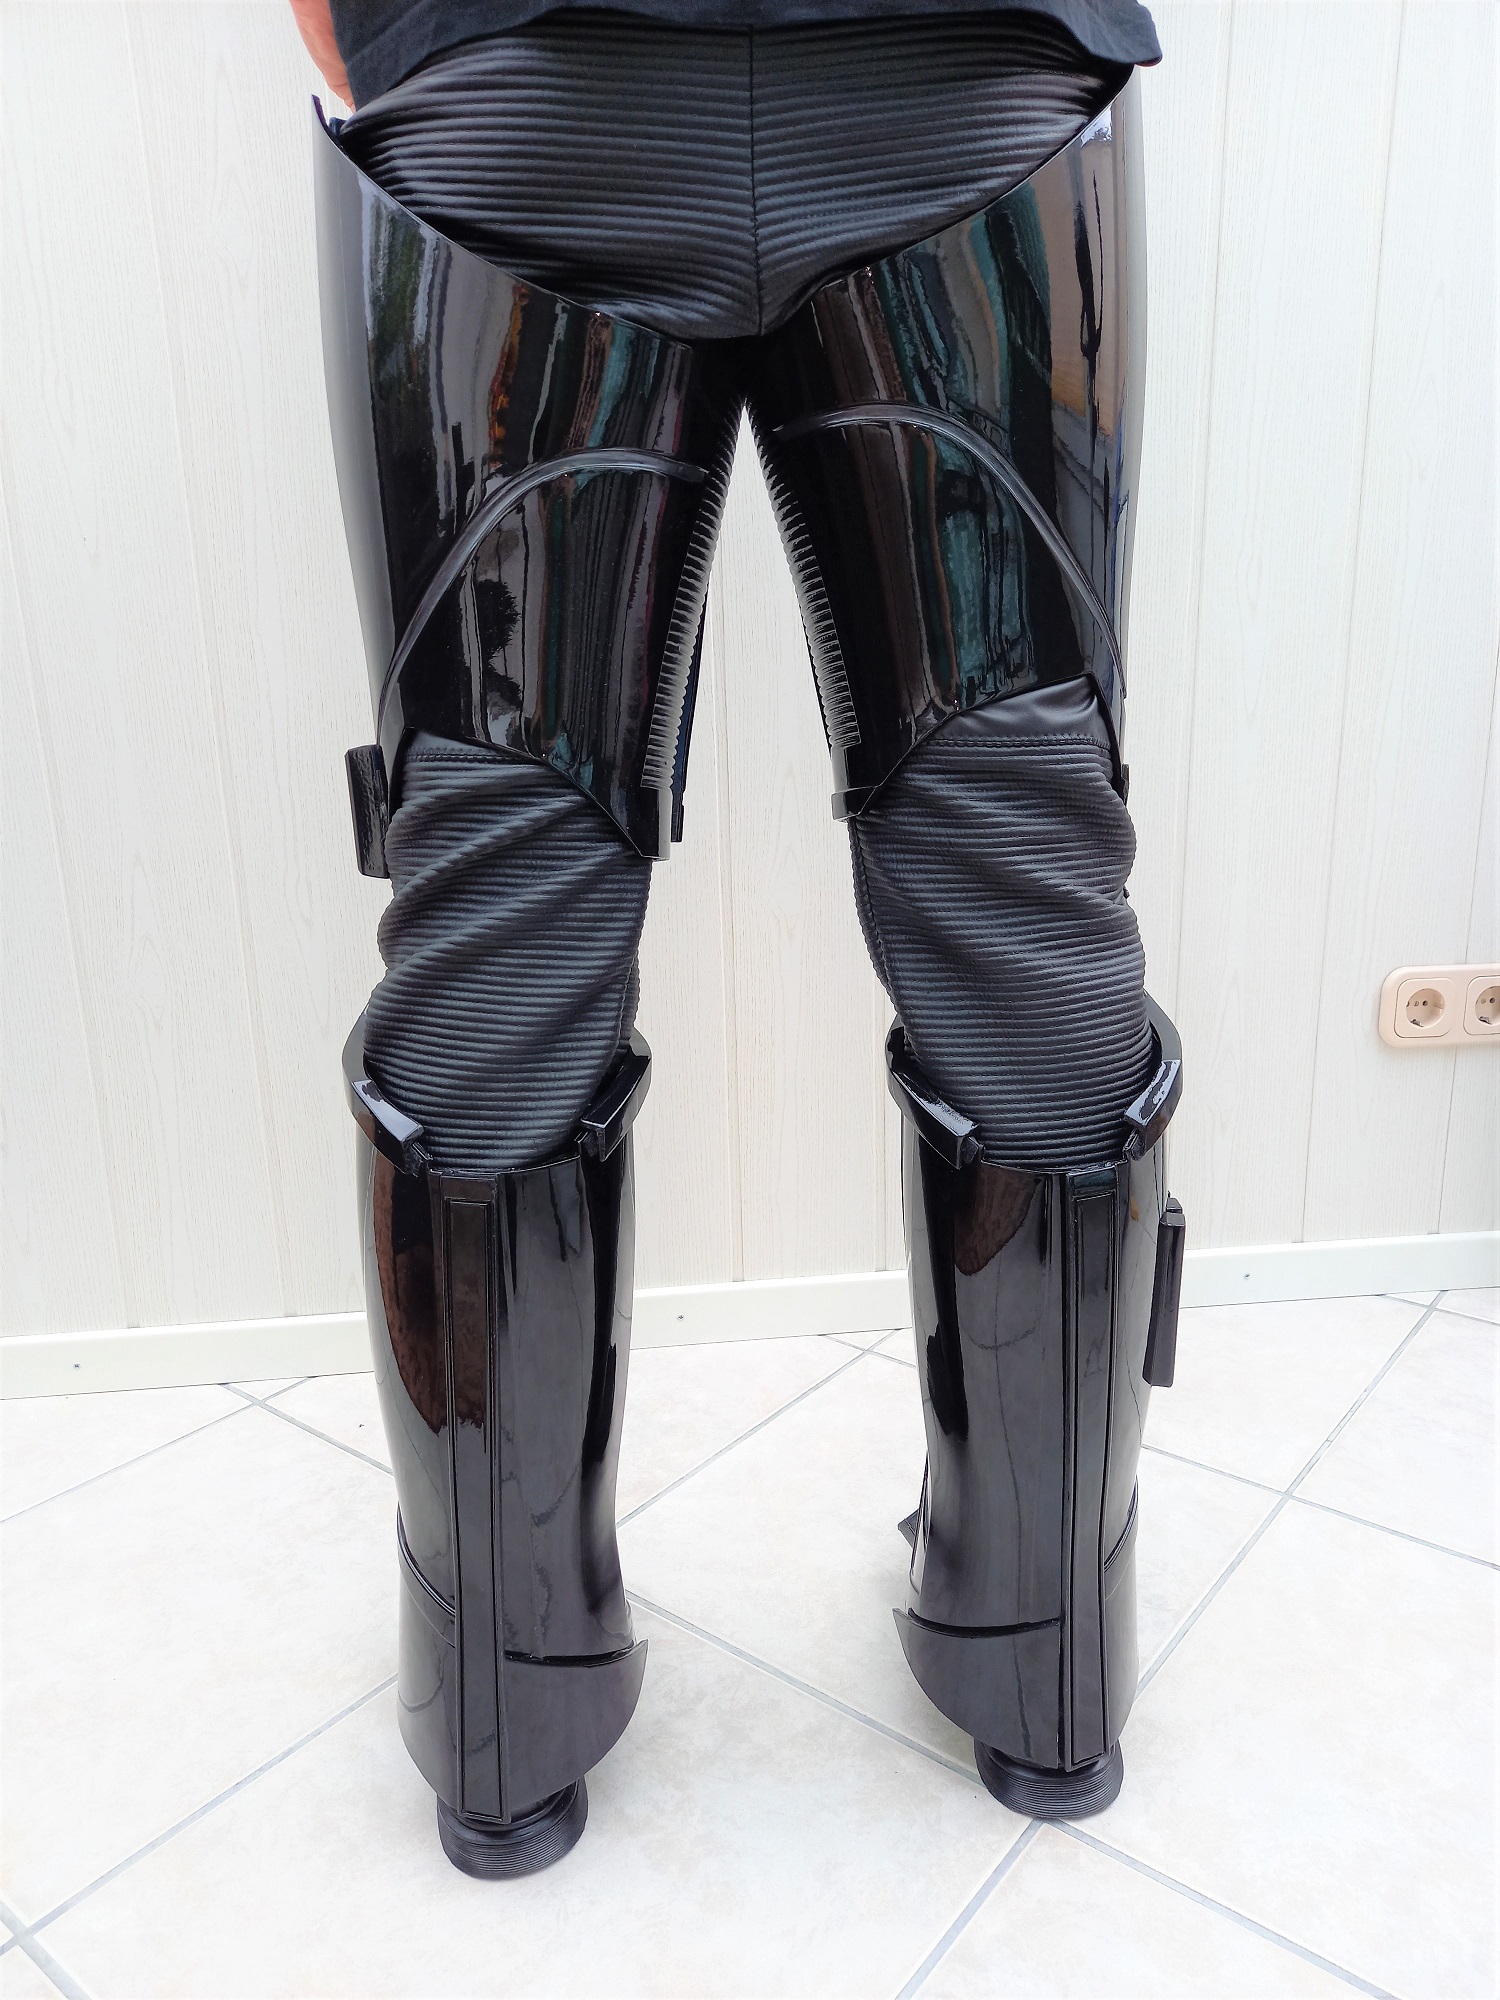
I personally cut the triangle part off the outer shin and glued it permanently to the opposite inner shin. As you can see in the second pic the gap is absolutely not visible when both shins are attached!
-
DoggyDoc’s Jimmiroquai Imperial Death Trooper Build Thread
Lt. Dan replied to DoggyDoc's topic in Imperial Death Trooper
Not familiar with the fibre glass kit as mine is 3D printed, but @Chaos can perhaps bring light into the darkness ??? -
DoggyDoc’s Jimmiroquai Imperial Death Trooper Build Thread
Lt. Dan replied to DoggyDoc's topic in Imperial Death Trooper
Your basement space is most impressive 😮 Nice idea btw! -
Unfortunately, this is the problem with ABS parts🤷♂️ Nevertheless a good start for your DT project! Regarding the surplus parts I have no idea. In your first picture everything that you need seems to be there, so these must be superfluous I think!?
-
DoggyDoc’s Jimmiroquai Imperial Death Trooper Build Thread
Lt. Dan replied to DoggyDoc's topic in Imperial Death Trooper
Gerald wrote: Do the ribs need to be triangle shaped? Nope! Just watch out for the CRL details: There are approximately 28 ribs in total and the belt has an overall width of approximately 3.25" (84mm). -
I think you are looking for US vendors only, if not, Ople Props here in Germany has them. They have an Etsy shop: https://www.etsy.com/de/listing/566944341/sturmtruppe-helm-bubble-linsen
- 1 reply
-
- 3
-

-

-
Exactly!
-
DoggyDoc’s Jimmiroquai Imperial Death Trooper Build Thread
Lt. Dan replied to DoggyDoc's topic in Imperial Death Trooper
Nice starting list Gerald! Excited to see your progress with 3D printing, as I´m interested in starting 3D printing too? -
Both as well as, Anthony! Basically version 1 and version 2 are standalone costumes. But version 2 must have all parts needed for version 1. Of course you can upgrade from version 1 to version 2 later if you decide to. The differences between version 1 and 2 are the pauldron, ammo pouches and chest rig. Please bare in mind that every new version (added accessories) needs a new approval through your GML!
-
Totally agree with Lance! The paint is ok, but the quality of execution is creepy. Especially the buckles don´t look weathered. They look like they've been tinkered with. There should be a sharp edge between buckle and D-ring. I would recommend to sand that area to remove the excessive glue. Also the excess paint on the side rubber straps should be removed. With that said, according to the CRL, the side straps must have "a smooth trapezoid shape at the top end". When I´m right he has used cut shoulder straps, which is not correct. He can use a thin metallic wire attached to the inside of the covers or velcro at the ends to give more shape to the covers. This way they lay flat against the boots and don't look so bulky. Lance is right. The LED bulb sits to the front under emitter slot in the upper left corner and definetely shouldn´t stuck out that far! Please refer to the CRL: https://databank.501st.com/databank/File:Tx_imperial_death_trooper_neurosaav.jpg There is also a problem with the helmet. The vent slots on the side panels are enclosed. Belonging to the CRL they have to be "cut out and lined with steel small mesh and backed with black material", also "The side panels are slightly weathered with matte black paint." On the submission pics they are completely light silver in apperance which isn´t correct. The overall paint job is, lets say "rough", and should be improved with a little more love to the details. Kyle, I hope this helps for the beginning!
-
Funny to read your opening post from 2017! You should have bought up all the Jereds back then. You could make a fortune with them now!?
-
Congrats Bro! Welcome to the elite line?
-
Badass Sal! Fingers crossed for your submission?
-
Here is a pic of what mine looks like inside, hope that helps! https://bilderupload.org/bild/38a736246-20221015-100846
-
@ChaosSorry if I'm wrong, but no matter how I spin it, I only count 7 side vent ribs at the Cybercraft helmet. I always stated this in various other comments and for me its clearly visible. Maybe someone will clear that up when they buy a helmet there.?♂️Otherwise your comparison is much appreciated!
-
I know your problem. I´m dealing around with an ICAT Driver for months now and do not get any further due to multiple other non SW projects?
-
Hey Jennifer! Great to see another candidate joining the DT adventure? I'm always impressed by people who dare to 3D print by themselves. I'm absolutely ignorant to it? Good luck with your build and don't hesitate to ask, I think here are several 3D print-enthusiasts.
-
Good morning Abdiel! Nice first suit up after one year of storage I would say, considering that your pics are a bit dark and far away for details imo? Couldn´t say for sure if your poncho and abdominal gaskets have the vertical or diagonally angled down ribs? To me the surface looks smooth which would be wrong. Your right thigh armor is offset. It doesn´t align with your shin armor. On the right side pic it looks like that the thigh armor is too big for you thigh and hangs crooked. You should adjust the fit. If whining at a high level, I would replace the belt boxes because they are a bit too far back as well as the small leather pouch. But again, your pics are very dark to spot details for sure.
-
Hey Rob, great shopping list AND regarding to your post: you did your homework so far? As for the paint codes: gloss black and flat black are self-explanatory, I don't think that there are great differences. It is what it is? Have a lot of fun building your costume and if you have questions don't hesitate to reach out again!