

Mal86
-
Posts
183 -
Joined
-
Last visited
-
Days Won
6
Content Type
Profiles
Forums
Events
Everything posted by Mal86
-
So, I found out that a friend paints cars as a hobby. He recommended I get a single stage gloss black and use his gear to paint. He said that I’ll end up with orange peel, but that I can cut and buff it to get it as clean and shiny as I want. He said I can rattle can the other colors on top of the single stage. Anyone see any issues with that or have any feedback on doing it this way?
-
I realize I could probably make the belt boxes in Fusion360, but I'm wondering if anyone has an STL they are willing/able to share just to reduce the time I need to spend on it. Thanks!
-
I needed to try it on again, so I felt like I was getting somewhere. I think the fitment is coming along: The chest and back aren't connected yet, but I had my wife mark the overlap, so I can add some velcro. I also measured the belt around to get an idea of the amount of overlap. Forearms are a little low, but I need to add a loop on my sleeves so that they don't ride up as I slide them on. As always, any feedback is appreciated.
-
Take a look at this post:
- 1 reply
-
- 3
-

-
Death Trooper building in Germany (Jim Tripon kit)
Mal86 replied to Deathwatch's topic in Imperial Death Trooper
Makes sense on the rubber insert. I just wanted to make sure you didn’t think it was needed. Another thing to consider on the cuts: I also cut a little above the line and then used a dremel rotary tool with a sanding wheel to smooth the curves, so I went deeper with that than the original cut. I will note that I had never cut fiberglass before, so you may be willing to be less cautious than I was. -
Death Trooper building in Germany (Jim Tripon kit)
Mal86 replied to Deathwatch's topic in Imperial Death Trooper
That is probably about the amount I took off. However, I probably cut it 4-5 times. I was always worried about taking too much off and not being able to fix it, so I'd cut a bit, check fitment and try again. You can see my first round of cuts here: Just so you know, it is not required to do the rubber insert. You can leave the Tripon kit as is. I plan to spray the parts that are meant to appear rubber with plastidip. -
Alright team, here are some updates and a question: Cut the edge of the wider thigh box and sniper plate. Attaching the boxes and on the thigh and building up the other thigh with JB Weld: I've been progressively building up the strip on the shin based on @wookie_shaver's post regarding liquitex modeling paste to see how it works. I haven't gotten to sanding it yet, but its looking good. I still need to plastidip the straps and smooth the 3D print lines on these: Which leads to my question. What is the proper positioning of this strap: If its the last one, I know I'll need to cut or reprint that strap. Also, on painting... I assume everywhere that is flat black should either be painted on top of the clear coat or covered up when clear coating (is there a right/best way to do this?) However, should the metallic dark grey and the weathered silver be under or over the (or masked from) the clear coat?
-
I did not let it dry 24 hours. I did thin it, but I just waited until it was dry to the touch. I was also worried I thinned it too much. I’ll re try with the 24 hour wait. Thanks for the suggestion. I also emailed the company to ask if it was water proof once it dried. I’m most worried about finishing the shins then painting then having them come off if they get too wet.
-
I tried this tonight and after a little sanding, I went to rinse off the piece. All of the liquidex came off. Is that your experience? i had also started the build up the trim on my shin piece with this, but I’m concerned it might not be the best option if it is going to soften and come off with water.
-
Any reason you didn't want to permanently attach the piece?
-
Congratulations!
-
Looking at it more, it looks like I could cut the curve of the thigh in to the sniper knee piece to have it fit. Any thoughts/feedback are appreciated as always.
-
Sniper Knee Piece: On Jim's kit there is barely any surface area that makes contact to adhere. What solutions do people use for this? Do you fill it in with something to have more surface area or somehow reshape it to curve?
-
Thanks! I ordered both.
-
Does anyone know if you need this mounting system: https://www.opleprops.com/en/mounting-systems-visors-fan-systems-rankbars/1413-mounting-system-for-visors-or-lenses.html to install these lenses (or if it makes it easier, etc.): https://www.opleprops.com/en/lenses-visor-lense-star-wars-cosplay-4/325-OPLE-Props-Deathtrooper-Rogue-one-bulbed-lense-Anovos-Trooper-Helmetlense-Lense-Costume-Helmet-Cosplay-Krennic-death-trooper-rog.html
-
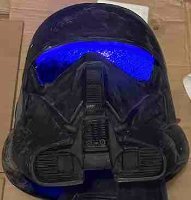
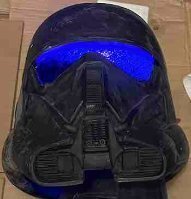
Progress: Glued the tab back on to the boot, but it came off when taking the shins on and off... Added velco to hold corners of boot covers down: I think I fixed my shin hitting my knee issue with some foam (but I still want to velcro it to the front of the boots, given the fact that they still twist: Opened up the grill in my helmet: Not pictured: - drilled holes to connect arm impellers to forearm - Sanded down a good bit of JB Weld from various joints - Opened up the back piece to fully allow shoulder straps to go through - tested Plastidipping Shoulder straps (Chaos' suggestion) to get the right finish (looked good) - Patched the hole I accidentally drilled in the back plate - Adjusted the velcro on the shins to provide a better fit - trimmed a little bit off the front of the shins How does everyone finish the armor? Do you sand everything smooth, then go over everything with bondo and a spatula to fill in any small gaps/indents? Is there a better way? (not here yet, but just trying to plan a few steps ahead) Also, what supplies are recommended for the hardhat version of the helment? Thanks...
-
Thank you to @DoggyDoc for sharing the tusk STLs in the pictures below. Are the proportions appropriate? The seem a little closer in than the reference images, but it could just be the angle.
-
From today's lessons learned: While JB Weld says that one way to remove it is to heat it 600F, it should be noted that the fiberglass softens and cracks at the temperature too. No real damage done (some minor cracks I'll need to clean up when finishing them). I'm thinking of slightly trimming the bottom of the shin where it goes over the boot, to make it a little lower. I might also add a foam pad in the front of the shin. The issue with my knee is that the curve of the piece pushes it in to the bottom of my knee. However, there is enough of an opening that if I put something in the front of the shin, it won't even make contact with my knee. I'm cautiously optimistic that the little bit of trimmer at the bottom, plus Chaos' recommendation to velcro the shin in place will give me enough of a gap that it'll fix the knee issue.
-
I'll look at adding the velcro to the front to hold it in place. When you say the boot spat, do you mean the cover pieces or something else? I don't think I I can widem the shin at the ankle any more without either: 1) widening the part 2) trying to reduce some of the fabric in the pants (upon closer inspection, I don't think this will affect that area) 3) trying to take some stuffing out of the boot 4) figure out if there is a way to undo the JB Weld at the front fo the shin and redo it not as tight at the bottom As it stands right now, I made the joint at the bottom, near the ankle as small as I could. Any suggestions on what might be best, with that in mind?
-
I'm looking for feedback on the fitment of the shin. I wrapped it around my leg, had my wife draw a line on it, and then added velcro based on the line. When I wear it velcroed, it feels like its riding up and the top of the front is pushing in to my kneecap. I hadn't experienced that before the velcroing. Any feedback on either the positioning or on the shoving in to my knee/riding up would be appreciated.
-
How is this working for you? I have some pieces of my kit I need to 3D Print. I had planned to use a resin and baby powder mixture I had seen on another video.
-
It is MCM Design's files. It came with a .dxf file for the decal, but I have not attempted to figure out if that is useable with the cricut yet. If you can send over one I can use, it'd be appreciated. No rush, it'll probably be a few weeks before I need it. I ran out of spray paint before finishing the SE-14R, so I'll need to get some and finish it before attaching the decal. Thanks again!
-
@Chaos Thanks! My wife has a cricut and I bought some silver metal heat transfer vinyl to try to make it. Is there a better material? Campbell’s files came with your a file, but I haven’t looked at it yet. If yours would work on the cricut, I’d appreciate the personal use of it.
-
I found these on the backs of some tags for one of kid's clothing. It feels like I can peel them off and they would still be sticky. Does the circuit board need to be exactly as the image on the CRL or could I use one of these for level 2?
-
On the shins, my assumption is that this section needs to connect to the rear closure as marked in red: Am I right in my assumption? If so, how do you create an extension of that raised section?