

Mal86
-
Posts
183 -
Joined
-
Last visited
-
Days Won
6
Content Type
Profiles
Forums
Events
Everything posted by Mal86
-
Polarmuffins DeathTrooper build WIP
Mal86 replied to PolarMuffin83's topic in Imperial Death Trooper
This is what Jim did for me. It's slightly different than how Chaos has his set up. It wasn't what I was expecting based on the photos I sent him, but it seems to work fine. I mention it so you can make sure you get what you want. -
Polarmuffins DeathTrooper build WIP
Mal86 replied to PolarMuffin83's topic in Imperial Death Trooper
Make sure you are clear on this. I paid extra to have my corset separate. I sent Jim a bunch of pictures from Chaos' build. However, it was not sewn exactly how I wanted. It will work out fine, but they attached the parts that go over my shoulders to the corset, which has the pro of holding it up. If you want a picture, let me know and I'll take one and post it. On the 3D printed stuff, I'm sorry you are dealing with that. If I'm reading it correctly, you will have a way to re-print, correct? If not, maybe see if there are any 501st members near you who can help out. -
I tested the rustolium primer filler and I was underwhelmed. Not sure if I didn't put on a thick enough coat, but I thought it would do a better job filling some lines on an FDM print. Given @DoggyDoc's recommendation, I will probably get some duplicolor and see how they compare.
-
Polarmuffins DeathTrooper build WIP
Mal86 replied to PolarMuffin83's topic in Imperial Death Trooper
If you can print TPU, you might be able to find the shoulder straps and side straps to print. You might also be able to find the buckles to print. -
Thanks! I used your strapping system, so the ab and lower back do float independently, but I did intend to velcro them to the belt and then to velcro the cod/posterior to the belt as well. Any adjustments I need to consider there other than trial and error?
-
I'd suggest getting the soft parts before spending much more time on the armor. If the pieces don't fit properly over the soft parts or need other adjustments, it might be frustrating to have spent the time sanding and finishing the pieces, just to have to reprint or modify. If you are looking for something to work on while waiting for soft parts, you could always work on belt parts (pouches, leather holster, etc.) or printing and finishing the blasters.
-
I don't know enough about the galactic armor files to give you feedback on their general need to be modified, so I'm not addressing that other than by suggesting that you closely examine each piece and compare it to the CRL before committing. On the thighs, I believe the ribbing for the undersuit is insufficient for the thighs. I'm not saying you need to get these, but I think this should give you an idea: https://plasticarmsdealer.com/collections/death-troopers/products/screen-accurate-sheet-of-hard-rubber-for-death-trooper-thighs I think I've seen posts where people got rubber mats from hardware stores or amazon and cut them up and attached them. I hope that helps.
-
Did another rounds of trimming my thighs and the insides of the forearms. I'm going to add a strap from the wrist on my shirt to go around my thumb. The sleeve bunches up as I move around with them on, messing with the fitment. I think the tops of the thighs are about the right height, but they still rub a little in my lower abs when I sit, so I'm debating shortening, if I should be able to sit in the armor. Are you able to sit in the armor once its complete? If so, anything special that needs to be done to make it more comfortable? I'm thinking about how to manage going to a con and wanting to sit through panels, etc. The crotch peice rubs against the inner thighs, so I am going to need to open the inner thigh area up a little.
-
Welcome! I'm working on my Death Trooper as well. Everyone here is very helpful. Let us know how we can best support you. I put this thread together when I was trying to decide what kit to get:
-
It is absolutely wearable. If I hadn't stumbled across the person who was looking for a Night Death Trooper, I probably would have kept the original and used it. Blasterfactory's position was that the scratching was actual consistent with the original Death Trooper costumes. My buckle might get weathered eventually, but I wanted my initial build to look like a crisp, sharp, and highly polished trooper. Feel free to let me know if you have any other questions, or if I can help in any other way. I've tried to make this build thread as informational as I can to help others.
-
Thank you! I've slowed down a little due to some of my work and family commitments, but its still coming along.
-
Thanks for letting me know. I think I fixed it.
-
Picked up some paints to test from a local hobby shop...
-
Working on checking upper body fitment (ignore the goofy smile as my wife made me laugh before taking the picture). It appears that there is a rather large gap between the chest and my chest. If we pushed the front and the back together, it gets smaller but its still there. Ultimately, the ab armor pushes the chest armor off my body some. Also, when pushing the chest and the back together (as they might be on the sides) then the tusks come up slightly from where they should be sitting (but I could probably use Chaos's tusk attachments to fix that). Please take a look and let me know your thoughts: Varying degrees of chest positioning: Initial: Wife pushed it together and stepped away (but I'm concenred the ab armor might have gotten pushed lower than it sits): Wife holding it (also ab might be a little lower than it should be): You can see the tusks lifting in the image above. I also having finished all of the connection points holding the shoulders to the biceps. Hopefully, that'll help straighten that up. As always, any feedback or thoughts appreciated.
-
Death Trooper Upper/Lower Torso and Arm Armor Rigging
Mal86 replied to Chaos's topic in Imperial Death Trooper
@ChaosDid you use an elastic strap for the middle strap or just a regular nylon strap? -
Finally shaped and glued the spot for the belt to velcro on the front. I got some of this PVC Board: https://www.amazon.com/dp/B01EKEOJDA?psc=1&ref=ppx_yo2ov_dt_b_product_details I cut it up, as shown in a previous post to make a ledge. I glued the center a while ago, but I used a heat gun to shape the curve around the edges and glued it and left it to set: Also started gluing some snap connection points and some of Chaos' 3d printed parts in to the shoulder and bicep.
-
With the d-rings and buckles, should those be a matte black, a gloss black, something in between?
-
@Chaos @DoggyDoc- Thanks. The glue at the seam didn't feel strong enough, so I pulled it apart. I'm wondering if I could layer up some of the resin I still have and then use the JB Weld on the resin. Any reason that shouldn't work? Also, did you guys use the glove attachments from Tripon's kit? I think they look fine, but just wanted to confirm there weren't any issues. Lastly, I 3D printed on of the shoulder buckles and the top is not as smooth as I'd like. I'm going to reprint with smaller layer height to see if it looks better, but I'm wondering what you did. Did you sand it to smooth it or add a little resin or any other suggestions on how to make it look good and remove the print lines?
-
I tried to use JB Weld on one of the shins tonight, but I don't think its going to hold because I don't think there is enough surface area contact between the two pieces due to the indentation at the front center. Did anyone else run in to this issue? If so, how did you address? Building up the area with something or...? Here is what I'm talking about:
-
@DoggyDocThey are sticking out, just not as far as they could be if I had them closer to the edge: And here is the alignment without the clamps: I think it came out pretty well. it does have the ability to pivot a little, so I might add some velcro, depending on what happens when I move around in it.
-
I'll get some more shots when I take it off, but I attached Mr. Paul's Shoretrooper connectors. At the rear points, I used Chicago screws and velcro to hold it in place. For the front piece I attached snaps on to nylon webbing. The nylon webbing is attached with E6000. It seems to work well. My two concerns are: 1) whether my connection point for where I attach the shoulder strap/buckle is going to hit the metal (but I think this will be okay); 2) whether I needed to move the connector closer to the edge to have the metal stick out further (but I also think this will probably be enough). I put the glue on both parts and snapped them together and clamped them in place to let them cure:
-
@DoggyDocI think you are right. Now that they are pulled up higher, the tops press in to my hips and prevent me from sitting. Any feedback on the general fitment here? Obviously, I'm just holding the belt for spacing perspective. Also, these white lines are indents cut in using my dremel. Are these sufficient for for level 2 shins?
-
I got impatient and went ahead and tried them on... They are now at/barely above the top of the knee, but I know I remember reading a recommendation that they should be about 2 fingers above the knees. Let me know what you think: I also realize in looking at the pictures that one is higher than the other, so assume I have them even for feedback purposes...
-
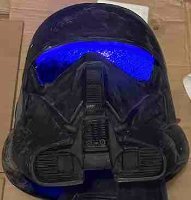
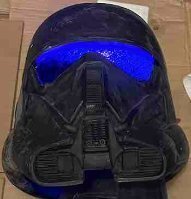
For those following along at home... I printed something to help the pouches hold form. First one was too small, so I made some adjustments and the second one worked well. I'm printing two more for the other two pouches: I printed a plate for the pouch, but it's a little small (hard to see in the picture). I'm going to adjust and print after I can get measurements with the pieces that hold the form in. Based on the recommendations, I trimmed the neck to have a better range of vision: The line isn't perfect, but it's pretty close. I was worried I'd wear the whole thing down if I didn't call it good enough. If anyone thinks its not good enough, please let me know and I'll make adjustments. I started cutting the opening for the straps, but mistakes were made: However, I think the are started well and I plan on ordering some small files that I'll use to finish it up: I also used JB Weld to join one side of one of the forearms and then trimmed it down a little: However, after a test fit, it's still not trimmed enough, so I'll be trimming it down a little more. I cut the thighs about 3/4 of an inch (5 ribs) at the ribbed portion of the inner thigh and tried to blend the rest of the way up: I'm waiting for them to dry so I can test fit. It might not be enough, but I'd rather take too little off than too much off. As always, any feedback, suggestions, etc. is appreciated.
-
A quick update without pictures (so, who knows if it really happened)... I have Mr. Paul's Shoretrooper shoulder bell connectors. They were not sitting in a way that would make them easy to attach to the back piece or easily attach to the front piece. I took the dremel sanding wheel and evened/smoothed out the back shoulders where they meet the front shoulders. This should allow me to use a chicago screw to mount it to the back (I'm also thinking I might use some velcro for stability as well) and then I plan to attach some snaps some nylon webbing and glue it to the front of Mr. Paul's shoulder connectors and the chest piece as the way to have them join. I'm not sure if I'll need to apply resin to the areas I thinned. There was a lot of dust, so I rinsed them and am letting them dry and will re-evalute the need for resin, but I assume I'll end up doing it. I also went ahead and JB Welded one of the forearms and have it clamped overnight to see how that goes. I plan to cut down some of the upper inner thigh on both thigh pieces for better fitment.
