

Mal86
-
Posts
183 -
Joined
-
Last visited
-
Days Won
6
Content Type
Profiles
Forums
Events
Everything posted by Mal86
-
Haven't swapped out my laces, but don't use the pull tab to get them on your feet.
-
Vincent from Keep Trooping's Original Response: “pull tabs” are reminiscent of an era when shoe designers accounted for specific material in the making process; nowadays they often are more decorative than anything else; it is the case in the original DrMartens boot used to make the killer shoes. It happens frequently with many brands, that said pull tabs come off because the way we use it, instead to grabbing the tab between fingers , we often put a finger inside the loop thus weakening its structure. There is also a matter of storage ; too dry or too humid for an extended period of time will weaken leather. As for your situation, I checked the picture and the structural integrity of the boot is not compromised, you have a clean cut and the stitching is still strong. The tab is not going to be seen while wearing a costume not required for clearance. The best course of action now is to make sure you nourish the leather with a proper cream and use a shoe horn. I let him know I was working for level 2 and I need the tabs. His follow up response: I can think of two ways , none of them ideal 1. Go to a cobbler and ask them to stitch that part you have back…. They may not agree, the tab will be shorter, and difficult to stitch at the same place. If they do it will last as long as you do not pull on it 2. DIY method with leather glue, clean the leather edge (cut a mm off on both sides) Glue the first edge where it broke off, wait 24 hours that the glue is strong enough, make the loop and glue the second edge in place wait 24 hours - it should hold enough so that you can at leats tea the proper pictures for clearance. It won't be strong enough to have any stress on it but it will do the trick I plan to go the DIY route since it just needs the appearance.
-
I waited until today to send the email. I was a little frustrated when it happened, so I wanted to wait.
-
Well, I was doing another test fit with my thighs and shins. I put my boots on and used the loop on the back to try to pull it on to my foot... Apparently, the loops on the keep trooping boots must be decorative because I ripped it off. Any suggestions on how to fix?
-
For those with Jim's kit: When you attached the pieces that went on to the shins and thighs, did you fill them in with anything?
-
@DoggyDoc Thanks. I've finally cut it to where I can sit without it painfully digging in to my hips, so I think i should be good, but I was more focused on everything being situated. I'll do another run through the the focus being on movement instead of just form. @TookBreakerThanks! I'll re-try the shins with pants tucked in socks and the panels on the boot to make sure they fit. Thanks for the suggestions. Glad to hear the velcro works. It'll make it easier to put on myself. My plan was to wait to do any velcroing until after painting, etc. Anyone have any reasons that might not be the best idea?
-
Alright, team... I'm looking for fitment feedback. Here are a few notes to consider: The front and back of the chest pieces are not connect under the arms yet. When held together it seems to position everything better I plan to add loops at the bottom of the pant leg and at the ends of the sleeves as both ride up and put too much fabric in the armor pieces at the forearms and shins (the left pant leg is over the boot and under shin, but I wasn't going to fix it for these picture). The backs of the shins can be held closed. I have nothing holding them yet. I was originally planning to do elastic like I did with the forearms, but now I think a velcro strip will be better as I can take it on and off that way without sliding my foot through it. I'm open to ideas and feedback on this. After the front pictures we realized the left shin is a little too high, but I can scoot it down over the top of the boot. Thanks in advance for taking a look and giving me your thoughts.
-
@swman77, @Chaoshas a PDF that compares CyberCraft to Anovos and details what needs to be changed to make it approvable. It's too big for me to upload, but here is a link to where he posted it to the Death Trooper Build FB Group: https://www.facebook.com/groups/DeathTroopersBG/permalink/5531104410261163/ If you can't get it from there, let us know and I'm sure we can find a way to get it to you.
-
Welcome. I'm still working on my kit as well. I went with KeepTrooping for the boots. They seem decent quality. However, I haven't trooped in them. From my reading of people's feedback, they seemed pretty equal with CrowProps being the higher priced option and the only option for larger shoe sizes. Let us know how we can support you!
-
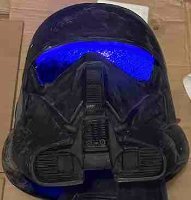
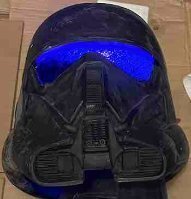
Taped it up to not coat the detailed parts in filler primer Only took the tape off for the last coat of filler primer Primed... Then a lot of sanding... Primed: Then I decided to hit it with some gloss aluminum Tamiya in the hopes that if any of the black rubs down or doesn't adhere well, it'll look like its metal underneath: Biggest learning: It doesn't matter how smooth it feels. if I can see lines with the filler primer, I'm going to see them with the paint. Plan to wet sand with 2k grit before hitting it with a tamiya black.
-
Polarmuffins DeathTrooper build WIP
Mal86 replied to PolarMuffin83's topic in Imperial Death Trooper
What Chris posted was my first version. I did one pouch like that and it was more of a pain. I don't think I took a picture, but what I did for the other two was I took the bottom and sides and made them one piece of fabric. The front was another piece of fabric. The back was another piece, which was just another cut out of the front. Then the top and the flap that goes over the front (as well as the little triangular portions) were another piece. This made for easier assembly and a cleaner look. If you need any help or feedback, based on that, let me know. -
Polarmuffins DeathTrooper build WIP
Mal86 replied to PolarMuffin83's topic in Imperial Death Trooper
I think @DoggyDoc had one in his thread. I initially used it as a go by, but modified it to make my own. I’m pretty sure I took a picture of the first version, but I found it easier to see by separating it. I’ll look through my photos later and see if I have one I can post. However, basically, I took the measurements from the CRL added some space for the seam allowance. -
Assembled the SE-14R after some sanding. Here are my notes: 1) Cheesehead screws in grip are too long. They bump each other in the center where they meet. I'd probably get a couple MM shorter. They'd sit better and avoid that problem. 2) The scope is backwards. I spent a good bit of time moving one of the metal things to the other side knowing they were both on the same side, only to realize that they need to be on the other side. 3) When widening one of the metal things, it broke. I still used it and I'll fill the crack with something in the hope it'll be less noticeable. Be careful when widening those. 4) Glue the grips on as well as screwing. Some of the edges will not sit flush unless glued. 5) glue the frame to the barrel. It closed the slight gap I had from screwing and removed a slight wiggle (I think I didn't screw the back screw tight enough and i had already glued on the piece that covered the screw hole), so a little super glue along the edge of the gap and some pressure fixed it. 6) Make sure the screws holding the frame to the barrel are properly tensioned before glueing the piece that covered it (see note 5) Any tips from those who have done it on things to look at when priming and painting?
-
Any opinions on Jinta Props Death Trooper armor?
Mal86 replied to HaringJr's topic in Imperial Death Trooper
If you don’t get anything here, there is a DT build Facebook group you could try. -
Any opinions on Jinta Props Death Trooper armor?
Mal86 replied to HaringJr's topic in Imperial Death Trooper
If you search the forums, I think you will find some posts about ABS not looking as crisp with the details that are in the DT armor. I don't know much about that particular armor, but I decided not to go with ABS based upon what I read. -
@PiotrRasputin thanks for the tip on where to buy the screws. I just went ahead and ordered everything I needed from there for both blasters. I added an extra of each screw to be safe.
-
MKE-Trooper – Rogue One Death Trooper WIP
Mal86 replied to MKE-Trooper's topic in Imperial Death Trooper
This was my shopping list for protective gear, but I bought these with the purpose of working with UV Resin, so I just kept using them for the fiberglass and other cutting: Goggles: https://a.co/d/czBH3s8 Respirator: https://a.co/d/jc81HCH Cartridge: https://a.co/d/aQGHGsy That JB Weld is what I used to adhere the front of my shins and my forearms. -
MKE-Trooper – Rogue One Death Trooper WIP
Mal86 replied to MKE-Trooper's topic in Imperial Death Trooper
This is the dremel tool I used: https://a.co/d/dCBbDrN I was so worried about cutting the fiberglass, but it was so much easier than I expected. I used a metallic silver sharpie to mark my lines. I used the cutting tool to cut close to the lines, then I used the rotary sanding drum to get it down to the lines evenly. With some pieces I then went over with sandpaper. I then rinsed them under my spigot outside. I also did my first test cuts by drawing lines on Jim's pouch covers since I was going to be 3D printing my own. It's a giant mess and depending on the angle it might get in your face. I used goggles, a respirator, and gloves. I also wore old clothes. I did it outside on my front porch and then went in to my garage and changed out of the clothes. -
There is someone local to me selling an Anovos DT helmet. What is a good price for them? Why are they so sought after versus finishing a regular one?
-
Updates: SE-14R: Printed all the parts and have started sanding (more items are sanded since this photo): I put some scratches in the scope when I spread the metal holder wide enough to move it to the other side. I might repaint or leave as weathering... I used 2000 grit sandpaper to take off the brand labeling and "MADE IN CHINA" from the scope. It worked pretty well. I have noticed some dips here in there where I have sanded, so I'll either need to fill them with spot putty or resin. Not sure yet. Still need to get my screw and tap the holes. We also picked up some silver iron on stuff for my wife's cricut to make the circuit board. Shins: Finally adhered the front of my right shin together. I need to line up the holders for the elastic for the back. I still need to do the left shin. I still have a lot of other work to do on the suit, but I've been busy with family, work, life...
-
The only feedback I have is I broke a FDM 3D printed part and reconnected it with a soldering iron. It didn’t look clean, but that part wasn’t going to be visible and it held. I did recently watch these videos and plan to test it on some prints eventually: you could use the soldering iron to join and this method to smooth, but I have no personal experience yet.
-
@Chaos& @PiotrRasputin - Thank you both! Scope ordered. I hadn't gotten to the screws yet. I was planning to go to a hardware store and see what I can find, but I appreciate having another resource. I do have some metric taps from a lightsaber project. I'll need to double check the sizes, but I'm pretty sure I've got those. Any recommendations on order of operations? Would you smooth then assemble or assemble then smooth? Thanks again!
-
Started printing my SE-14R - Purchased the MCM files. Any tips on smoothing these layer lines? Sanding? UV Resin? A little of both? Or this area that is rough from supports: Lastly, any suggestions on a scope to get to add realism? The one recommended with the file on aliexpress is discontinued. Thanks.
-
Recommendations for finishing the inside of Helmet
Mal86 replied to MKE-Trooper's topic in Imperial Death Trooper
I haven’t finished my helmet, but I coated the inside with UV Resin and cured it to address the fiberglass issue. -
Death Trooper Upper/Lower Torso and Arm Armor Rigging
Mal86 replied to Chaos's topic in Imperial Death Trooper
It seems to do a better job recentering/pulling it back to the proper angle than the center elastic alone.

