Mal86
-
Posts
183 -
Joined
-
Last visited
-
Days Won
6
Content Type
Profiles
Forums
Events
Everything posted by Mal86
-
Thanks. I tried using my dremel with a sanding wheel on one of my failed prints and I was able to get a little more even of a matte look on the sides. I was trying to avoid the plastidip as I do like the current finish, unless I don't have a better option.
-
I printed my straps in TPU face down, so they would have more of a matte finish per the CRL. I plan to use a heat gun to try to eliminate some of the stringing that came from the upside down print. The sides are still pretty shiny. Chaos had suggested sanding or plastidip. I haven't been able to do an even job sanding, but I was using a sanding block. I may try hitting it with some sand paper, so I have more control on where the pressure is. Any other tips or suggestions for getting the shine off TPU?
-
Perfect. Thank you. I’m trying to go ahead and plan for all my cutting, sanding, grinding, etc.
-
Thanks again for all the help so far! For the Level 2 certification for the Thermal Detonator, can someone explain this to me (and let me know if Jim Tripon's TD already has this): OPTIONAL Level two certification (if applicable): There are two small notches on the outer ⅕ of each side of the canister approximately 3/4" (20mm) from the inner edge of the end caps and spaced approximately 1" to 1.25" (25-30mm) apart on the lower edge of each horizontal grooves. Refer to reference photos for specific details.
-
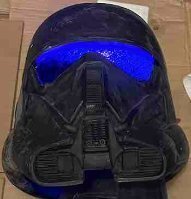
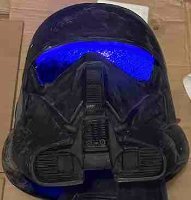
I didn’t get a chance to look at it closely, but in this video Tom is explaining the electronics in his helmet and shows the inside of it. Maybe it will help: https://www.facebook.com/share/v/Pq3Z6ostgM7tXoBj/?
-
Wife helped me tape the pieces together. It actually looks like the chest and back armor will fit decently without any cutting as long as the neck isn't too far back for fitment purposes. I think I'm going to need to cut about 1.5 inches off the top of the thighs so I can bring them higher. The rest on top of my knee caps, not above. Shins are not held together by anything other than tape that wasn't very strong. I think they'll be fine once I glue and use the elastic clamshells. Given the amount of taping the crotch piece took, I left off the posterior. The helmet is just resting on my head with nothing to support it up any higher, so I assume it'll be a little higher with something in it to make it more comfortable. Does the abdomen piece need to be higher up to leave more space for the belt? Any other fitment issues anyone sees?
-
@Chaos Looked closer at this. This looks perfect. Would you mind sharing the file? Thanks.
-
@DoggyDoc and @Chaos - Thank you both. I was comparing the back of the neck positioning to this post: I was worried the back of the neck in position 1 above would be too far back based on that. @Chaos I'll take a closer look at the collar items. I'm not 100% clear, but I also didn't have much time to look. Thanks again.
-
Anyone tried this stuff for joining shins and forearms? I thought the gap filling aspect might be good. J-B Weld 50139 Plastic Bonder Body Panel Adhesive and Gap Filler Syringe - Black - 25 ml https://a.co/d/715f3t2
-
Here is the positioning without any trimming. Position 1 - Front pulled up higher: I'm concerned that with this positioning has the back of the neck as being too far back. Position 2 - Back of the neck moved further forward: Realize this first picture is not as helpful, as I wasn't thinking about my hands being in the way. ( Obviously, the back is popping out. I'm not sure how well I can get it to hold down on the sides if I do it this way, but I could try. Based on the above, let me know if you think I should cut and join as indicated the prior post. Thanks!
-
I can rest it lower, without the overlap, but I think the space for where it sits below my neckline may be too low from looking at another post where I saw Chris give someone feedback that they needed to move their chest piece up. I'll take some photos later with both pieces positioned without needing to trim and see what you guys think.
-
Also, I don't have full range of motion when I have the forearms on. It's either digging in to my wrist or by bicep when I bend my arm (yellow arrows). I'm thinking about trying to cut or grind down that curve closest to my bicep (red dashed line) to make it fit better. Any thoughts or feedback on that? I'll also need to cut out the little portion that comes under the other side (thick red) and continued example of where to grind/trim from the other side:
-
SI think I have the front and the back top sections positioned correctly around my chest and back. Please give me any feedback on this. Also, I believe I need to cut the the back section so that the front will sit flush. If I do that though, I'm worried the tusks are going to stick out oddly. I'm thinking I need to cut this section: Any feedback on the positioning, cut line, and tusks would be appreciated.
-
@DoggyDocI think you and Chris were right about the curing. As I've been doing the bucket, I've had to put the light very close to any tacky spots because the light is inside the helmet and they have stopped being tacky. I think the small light I got isn't strong enough to fully cure at the distance I had it in the small light box I made. Every spot inside the bucket that I put the light right next to and left it for a while has gone from tacky to not tacky. Thank you again for helping me figure this stuff out. I wanted to report back to let you know the solution and to document it in case anyone else reading this thread runs in to the same issue in the future.
-
I scrubbed some of the tacky parts with water and a sponge and its almost all gone. There was one spot that was still a little tacky that I scrubbed again and am letting dry. Hopefully this will solve this issue. Thanks again for all your feedback and help. This leads me to my next question: The forearms are shaped more like a zero than a circle. The tighter edges rub against my wrists. Is there a trick or a way to reform them to be more round around my wrist? For example, if I wore them twisted, they'd fit great, but then the ladder would perpendicular to the back of my hand instead of parallel. EDIT: Looking at some of the reference photos it looks like some of them have the ladders more perpendicular than parallel. Is this acceptable? EDIT 2: I have full range of motion in my arms, which I didn't before, with the ladders perpendicular. Now I'm assuming this is the way they were meant to be worn. Please let me know if anyone is aware of anything that indicates otherwise. I'm going to have to unglue my forarms and the rigging, but it'll be worth it if this is what needs to be done. Edit 3: I've started looking at other people's submission photos and it looks like this is the way to do it. Lessons were learned, but I'm glad I used E6000 for everything.
-
Thanks! I appreciate the follow up. That is basically how I did it the first time around, but I still had the tackiness in some areas and not in others. This time I went much thicker and most of it cured with no tackiness in the sun. There are a few spots that are still very slightly tacky, even after after focused light from the UV lamp, and being run through water. My wife says she wonders if its just like the little bit of tackiness that you sometimes get from some things with moisture from your skin. I'm not thrilled about the idea of uncured resin on the inside of the armor. The only other thing I can think to do is to scrub those parts again in water and see how it goes. After that, I'm not sure what else to do. Moving the light around in the thighs and the bucket seems to be working decently well.
-
Thank you both. I've basically had the light in a thigh or the bucket since this afternoon, repositioning every 30 minutes. This seems to be the most effective way. Then I feel around to feel what doesn't seem fully cured and continue on. For the overnight, the thigh is on its side with the bucket at the end, so the light is going through the thigh and in to the bucket. I installed elastic band holders in my forearms tonight as well, but I set it up so the elastic was on the inner portion of the forearm. Later I found one of @Chaos' recommendations to someone to glue the inner seam and leave the outer one as the one that stretches open. Is there a reason to do it one way or the other?
-
I've coated the interior of all of the armor pieces with the 3d printer resin. It's curing in the sun, except the helmet, which I'm curing in a home made curing box (cardboard box, aluminum foil, and a UV light). Most pieces are no longer tacky. I've still got a couple of pieces curing that have some areas of tackiness. I've rotated those areas to be in the sun. I'm struggling a little bit with curing the interior of the thighs and the helmet. My current process is to keep rotating them (either in the sun or curing box). Any suggestions from anyone on better ways to manage?
-
Chris, Thanks for the feedback. For clarity, the tackiness is very minimal. It's barely there. I couldn't tell it was tacky with the gloves on. I did check the uv wavelength before buying and it is correct. It is overcast today, but I put everything outside to see if that helps. On the crack, I'll give it a try. Thanks again!
-
@Chaos,@DoggyDoc, or anyone else... I started brushing the inside of the armor with the water washable resin this evening and then hitting it with the UV light to cure. Then I rubbed the insides with a wet paper towel, then I let them sit for a little bit, then I dried with a dry paper towel. Once I cleaned up and took my gloves off, I realized that I've ended up with some tacky sections. Is this an error in my process or is there an additional step I need to take now to address this? Also, I put a small crack in a piece of the thigh armor. What is the best way to address that? Thanks in advance.
-
I saw someone using a foam brush on a youtube video, but that was for a 3D print. The foam might not be the best for the fiberglass side. I'm sure I've got a bristled brush I can use, or I'll add it to the list. Thanks for the time to give me feedback on it!
-
This is my resin shopping list: https://www.amazon.com/gp/product/B08YJ1SWGZ/ref=ewc_pr_img_4?smid=A1ATU7Y86J8NTM&th=1 https://www.amazon.com/gp/product/B07XJZK4R6/ref=ewc_pr_img_5?smid=A3SNVVMEXOSKIB&psc=1 https://www.amazon.com/gp/product/B00IF7RCU6/ref=ewc_pr_img_3?smid=ATVPDKIKX0DER&psc=1 https://www.amazon.com/gp/product/B009POHLRC/ref=ewc_pr_img_2?smid=AO66QNXKFK6OP&psc=1 https://www.amazon.com/gp/product/B00467C7AE/ref=ewc_pr_img_1?smid=ATVPDKIKX0DER&psc=1 I have some foam brushes I can use. Am I missing anything or any feedback on what I have?
-
@Chaos @DoggyDoc How much resin do you think I need to do the light coating on the inside of everything? Also, do I need a particular kind to be able to continue to flex/bend pieces until I get everything fitted? Lastly, given that I'm not printing and don't need quality for printing, is there a good cheap brand that will do the job? Thanks!
-
A few quick updates: 3 Pouches sewn: Working on printing side d-ring straps in TPU. Finish is not exactly what I want, so I'm going to try some calibration on the filament settings and see how it comes out. New to TPU printing (and really, new to printing in general): Inspired by @Chaos' belt holder, I'm working on one as well: Still need to pick up some resin, brush, UV light, and respirator to move on to coating the insides of the armor.
-
I have not personally used it, but I've seen a lot of positive feedback about using this app for sizing 3d printed armor: https://www.thearmoredgarage.com/