Shaggy9342[501st] Posted March 4, 2011 Share Posted March 4, 2011 So after going to CV and participating in the costume contest in a costume I had built from a kit (although I was the only one with the who had made it at the time) and seeing all the scratch built costumes I was inspired to build my own. I decided on the Sith trooper from the KOTOR games. After asking around a little a few months ago and doing some searching on the internet I gathered up all the Sith Trooper ref pics that I needed. Then I found out about Pepakura and found that someone on the 405th forums had already made a complete model ready to be printed out. However, quite a few of the details on the model were inaccurate. Granted, these could be fixed once I started Bondo work and fiberglass on the cardstock. I believe that this is what ID2661 has done. To me though, never having made a complete Pepakura costume before I wanted to save myself as much time and effort as possible and so instead decided to either model the trooper myself in Blender or commission someone else to do it. Since my modeling skills are elementary at best I gave up after less than a week's worth of work lol. I then searched the web for someone who could both make the model and do it at a reasonable price. Luckily for me, I soon found an absolutely amazing artist who gave me a fantastic price. Now I'm just waiting as he sends me progress pics on the render (below). The model is more accurate than the previous Pepakura model without being so detailed as to make building the model out of cardstock too insanely complicated. For those unfamiliar with the Pepakura method of building THIS THREAD does an excellent job of showing the steps. Anyways, here are the first pics: Link to comment
izzi[TX] Posted March 4, 2011 Share Posted March 4, 2011 Very cool. Keep us updated! -iz Link to comment
Darth Agnon[501st] Posted March 5, 2011 Share Posted March 5, 2011 Wow, going all high tech on us. This should look great. Link to comment
ID2661[501st] Posted March 5, 2011 Share Posted March 5, 2011 I wish you luck, pal. Mine armor is made without papakura files. All was sculpted ( base on boxboard), molded, and tested on my own body. i searched pepakura few months, visited many forums, without result. I can upload some pics. Link to comment
Shaggy9342[501st] Posted March 5, 2011 Author Share Posted March 5, 2011 Wow 2661, I am impressed. Awesome job for a hand sculpted costume. Shoulder pads are pretty much done now. Link to comment
Shaggy9342[501st] Posted March 6, 2011 Author Share Posted March 6, 2011 Chest and shin guards pretty much done. I've been absolutely floored by the work this artist is doing. He's finding details I never would've seen, such as the 4 indents on the shoulder and the indents on the bottom of the shin. Not to mention the speed he's working at. Anyone interested in his work should check out peripheralarbor.com Link to comment
Shaggy9342[501st] Posted March 7, 2011 Author Share Posted March 7, 2011 Ok, model is pretty much done. Any critiques or insights would be extremely helpful at this point as changes can still easily be made before I start working. Thanks! Link to comment
TK-1422[TX] Posted March 7, 2011 Share Posted March 7, 2011 I've always wanted to see a Sith Trooper build - great job thus far on the modelling! I hope this project makes it to real life! Link to comment
crazas[TX] Posted March 7, 2011 Share Posted March 7, 2011 Sith troopers look so cool that I just started to play a new KOTOR game yesterday!! Link to comment
Shaggy9342[501st] Posted March 7, 2011 Author Share Posted March 7, 2011 Slightly revised model. Knees are more accurate, small indent near the neck added, face plate slightly changed and the ridge details on the lower thigh were removed. I'm just going to add them in later as they're too detailed for Pepakura. I'd still love any input! Anyone see any potential problems? Ideas for changing the model that will make it easier to construct? Link to comment
Darth Agnon[501st] Posted March 7, 2011 Share Posted March 7, 2011 How do you plan on doing the helmet? I'm not seeing how you could keep those dimensions and still get your head in it. Unless you do it in a couple different pieces like a Vader helmet. Link to comment
Shaggy9342[501st] Posted March 7, 2011 Author Share Posted March 7, 2011 How do you plan on doing the helmet? I'm not seeing how you could keep those dimensions and still get your head in it. Unless you do it in a couple different pieces like a Vader helmet. Yellow - helmet Blue - neck piece Red - face mask I'm hoping this will prevent the problem that all Royal Guards have with their neck. You still won't be able to move too much, but on the other hand it's hard to get a costume with better visibility. Hmmm. I should probably piece out the whole costume this way. Link to comment
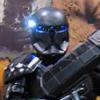
Shaggy9342[501st] Posted March 9, 2011 Author Share Posted March 9, 2011 Helmet is now remodeled with a fixed face-shield. I really don't think there's anything left to do with the model at this point. I've triple checked every piece and I'm happy with everything. So I'm now going to start working on unfolding the model, printing it out and putting it together. Link to comment
Darth Agnon[501st] Posted March 9, 2011 Share Posted March 9, 2011 Will that blue part of the helmet (neck) be like a vinyl or plastic? Link to comment
Shaggy9342[501st] Posted March 9, 2011 Author Share Posted March 9, 2011 Will that blue part of the helmet (neck) be like a vinyl or plastic? Right now I'm thinking it'll be a hard piece but I might reconsider after I have the paper model and I try it on. That's when I'm really going to figure out how the armor should fit together and what pieces need to be seperate and what pieces can be one. The calf for example, might be split into more pieces once I've worked with it a little to add mobility. Link to comment
Rotccole Posted March 9, 2011 Share Posted March 9, 2011 ...Dibs on one of the first run! If thats ok of course? Link to comment
Shaggy9342[501st] Posted March 9, 2011 Author Share Posted March 9, 2011 Hahaha, I'm not going to lie and say I haven't thought of doing runs of this costume but that's quite a ways off. For now I'm just gonna focus on building the costume and getting everything perfect. But if I ever do get to the point of making a run of these remind me of that post and I'll make sure you're on the list. Although since this is going to be the only costume project on my plate for the indefinite future, it might get finished faster than I expect. I just won't really know until I'm farther into this. But it's awesome to hear that someone's already interested! ...Dibs on one of the first run! If thats ok of course? Link to comment
Shaggy9342[501st] Posted March 11, 2011 Author Share Posted March 11, 2011 pep files? Haha, sorry but I'm not sharing those just yet. After I've unfolded them and built them and worked out any kinks I might post them online but for now I'm keeping them. Also, I'm having a few problems with importing them into Pepakura Designer. I think the problem is stemming from the model relying heavily on a mirroring function. I can work around it by building the model inverting the unfolded pattern but it's gonna be a nuisance for everything but the calf. You can see what I'm talking about in the pics below. Those are what I get from importing the model. Link to comment
Shaggy9342[501st] Posted March 14, 2011 Author Share Posted March 14, 2011 So I've discovered that one of the most fun things about Pepakura builds is getting the scale exact. Right now I feel like Goldilocks. The first shoulder I printed off was too small, the second one was too big and now the third one is looking just right. Do any of you Pepakura pros out there have advice on finding the right size? Link to comment
Shaggy9342[501st] Posted March 18, 2011 Author Share Posted March 18, 2011 Well I finished the shoulder but (much to my dismay) it was accidentally destroyed when a friend knocked all my D&D books onto it. I'm a little too frustrated right now to start over on it so I'm starting in on the head. I'll post pics once I'm done. Link to comment
Shaggy9342[501st] Posted March 18, 2011 Author Share Posted March 18, 2011 It's a helmet! Well...kind of. Link to comment

Recommended Posts
Create an account or sign in to comment
You need to be a member in order to leave a comment
Create an account
Sign up for a new account in our community. It's easy!
Register a new accountSign in
Already have an account? Sign in here.
Sign In Now