Blackwatch[CMD-DCA] Posted June 22, 2022 Share Posted June 22, 2022 That looks great now get em muddy! Link to comment
SirCalcium[TX] Posted August 25, 2022 Author Share Posted August 25, 2022 Apologies for the silence, but I've got some updates to share. The gloves have been dirtied The chin cups I bought earlier, I decided wouldn't cut it and luckily a friend 3D printed me a chin cup used for X-Wing pilot helmets. Going by the CRL model thats the one used for the helmet. With the part finished and some elastic measured out, I have temporarily fixed the strap to my helmet pending feedback If all is well then I can rivet the strap in place, then add the screw caps, and generally finish the helmet Additionally I've been working on a TK ammo belt with help from a local Garrison armourer Just waiting for the glue on the screw caps to dry (using Gorilla Glue since E6000 isn't as easy to find in the UK). When the glues all set I can weather it up. 1 Link to comment
Blackwatch[CMD-DCA] Posted August 26, 2022 Share Posted August 26, 2022 The gorrilla glue will be fine. Are you going to go for Specialist when you are done? Follow all links in blue, which means the TK ammo belt will be the ROTJ style. Chinstrap looks fine, I had to get a Xwing cup for mine as well. Remember that the Army is in the field, and weathering is encouraged. I love real weathering, IE good old Louisiana mud, while my gear is a combination of painted weathering and mud rubbed over that. 1 Link to comment
SirCalcium[TX] Posted August 26, 2022 Author Share Posted August 26, 2022 1 hour ago, Blackwatch said: The gorrilla glue will be fine. Are you going to go for Specialist when you are done? Follow all links in blue, which means the TK ammo belt will be the ROTJ style. Chinstrap looks fine, I had to get a Xwing cup for mine as well. Remember that the Army is in the field, and weathering is encouraged. I love real weathering, IE good old Louisiana mud, while my gear is a combination of painted weathering and mud rubbed over that. Good to hear. I can proceed with finishing up the helmet then. ? At this point in time I don't think I'll be aiming for Specialist, mainly because the main seller of ROTJ parts in the UK isn't working on TK parts at this point in time (Cast from Original), however I'm not against working towards Specialist at a later date. I'll definitely weather the parts I can, maybe I could wait for the rain to come back and go for a walk. 1 Link to comment
Blackwatch[CMD-DCA] Posted August 29, 2022 Share Posted August 29, 2022 On 8/26/2022 at 12:24 PM, SirCalcium said: Good to hear. I can proceed with finishing up the helmet then. ? At this point in time I don't think I'll be aiming for Specialist, mainly because the main seller of ROTJ parts in the UK isn't working on TK parts at this point in time (Cast from Original), however I'm not against working towards Specialist at a later date. I'll definitely weather the parts I can, maybe I could wait for the rain to come back and go for a walk. i can count how many days it has NOT stormed this month on one hand. This is August, Monsoon season here. Everything is total mud and guck here. Link to comment
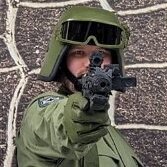
SirCalcium[TX] Posted August 29, 2022 Author Share Posted August 29, 2022 I'm in Scotland I'll get rain sooner or later. Anyways, got the helmet painted green Still needs to be clear coated, and weathered. Aside from weathering parts, the last 2 parts needed are the black trim on the helmet, and the goggles. For the trim I have 2 options. Either paint the trim section on the helmet black, or apply a trim around the helmet Link to comment
Blackwatch[CMD-DCA] Posted August 30, 2022 Share Posted August 30, 2022 I would apply a trim, just like you see in my helmet in the Sapper profile pic to the left here. I used rubber edge trim from an industrial supply house but you can use a wide trim like a door trim. Heres the CRL text Helmet - Version 1 Open face helmet whose base consists of a dome with rim and helmet skirt. The helmet skirt is to be smooth all around with no indentations on the rear. A telemetry unit is attached centered to the right or left sides of the dome aligned to the rim. The telemetry unit consists of: Rectangular box with a slight bevel and details on. The box is in the same color as the helmet. Telemetry unit details closely resemble the reference photos. The helmet is to be painted in olive tone with a flat or satin finish. A black trim is covering the edge of the helmet skirt and forehead of the dome. Black chin strap and chin cup. Link to comment
SirCalcium[TX] Posted September 1, 2022 Author Share Posted September 1, 2022 Quick update, helmet is clear coated and next step is dirtying up it and the TK belt. I've got some trim ordered and waiting it's arrival. Really the only part that's left are the goggles. Any suggestions? Link to comment
Jankes[PR-CMD] Posted September 2, 2022 Share Posted September 2, 2022 On 9/1/2022 at 9:12 AM, SirCalcium said: Quick update, helmet is clear coated and next step is dirtying up it and the TK belt. I've got some trim ordered and waiting it's arrival. Really the only part that's left are the goggles. Any suggestions? @SirCalcium GOGGLES: check out my WIP. In it I showed the goggles which I am very happy with. They look great and can be adapted very well to the needs of our CRL @Blackwatch Please explain to me what is the difference between a TK belt from ROTJ and that from NH? I have spoken with Polish equipment manufacturers and no one can help me. They refer to their belts as NH, they don't know what the ROTJ version is different 1 Link to comment
SirCalcium[TX] Posted September 2, 2022 Author Share Posted September 2, 2022 1 hour ago, Jankes said: @SirCalcium GOGGLES: check out my WIP. In it I showed the goggles which I am very happy with. They look great and can be adapted very well to the needs of our CRL @Blackwatch Please explain to me what is the difference between a TK belt from ROTJ and that from NH? I have spoken with Polish equipment manufacturers and no one can help me. They refer to their belts as NH, they don't know what the ROTJ version is different @Jankes had a look at your WIP, and could you tell me where you got those Polish Army Goggles? Link to comment
Jankes[PR-CMD] Posted September 2, 2022 Share Posted September 2, 2022 12 minutes ago, SirCalcium said: @Jankes had a look at your WIP, and could you tell me where you got those Polish Army Goggles? Due to living in Poland, it is much easier for me. I just searched the shops and it turns out that they are nowhere to be found, probably because of the war in Ukraine, everything was sent there. The only option is to buy from a private person, I also did it myself. If you wait about a month, I can try to get them for you and send them by traditional mail. 1 Link to comment
SirCalcium[TX] Posted September 5, 2022 Author Share Posted September 5, 2022 The trim I ordered arrived. I did some initial weathering, but I think it needs more. Link to comment
SirCalcium[TX] Posted September 15, 2022 Author Share Posted September 15, 2022 Done some more weathering to the helmet Additionally one of my Garrison members who made an AT-AT Commander had a spare set of goggles that he gave me. Aside from painting the frames green and replacing the band with a green one, is there any other mods needed? Link to comment
Jankes[PR-CMD] Posted September 15, 2022 Share Posted September 15, 2022 Be careful when painting the goggle frame. My paint did not stick to the rubber. 1 Link to comment
SirCalcium[TX] Posted September 17, 2022 Author Share Posted September 17, 2022 Just before I bought the goggles off my fellow Garrison member, I did go and purchase another set of goggles that I think most people go for when doing either the AT-At Commander or IAT. Side by Side comparison time The newer ones on the left are smaller but the strap is smaller than 1 inch, whereas the older ones on the right have the right strap width but I feel are bulkier. That said I've tried both on my helmet and they both fit, but I'd rather the experts give their thoughts Link to comment
Blackwatch[CMD-DCA] Posted September 29, 2022 Share Posted September 29, 2022 the pair on the right, with the uvex strap look a little more like the CRL . I have and use both. I have the pair on the left on my Army Ground Commander. 1 Link to comment
SirCalcium[TX] Posted October 12, 2022 Author Share Posted October 12, 2022 Got some work done to my goggles. Regarding painting them, I asked my GML (who does a lo of prop work) about painting rubber. This is the process. First I roughen up the rubber surface with sandpaper, I was told higher grit is better but I ended up using a mixture of grits, low to get rid of some markings and writing, and higher all around the rest of the frames. Next I sprayed the goggles with Adhesion Promotor. The brand I used is a UK one called Hycote, I don't know if this brand or product is available elsewhere, but it will ensure the paint bonds to the frames After applying 2 coats (and giving it 24 hours to cure) I applied a layer of primer, for this I used Montana Gold Universal Primer. Next up was the green. For that I used Montana Gold Olive Green (aka IAT Green) Lastly I applied a layer of matt clear coat to seal the paint, put the lens back in, and now I can move onto the strap. For the strap should I add an adjustment buckle like most goggles, or will it being a single strap be acceptable? Thanks to this combination I'll spray my boots the same way 1 Link to comment
Jankes[PR-CMD] Posted October 12, 2022 Share Posted October 12, 2022 You should add buckle for the strap. It looks good, and works when you wear the gogles just on face. Head is smaller than helmet. 1 Link to comment
SirCalcium[TX] Posted October 16, 2022 Author Share Posted October 16, 2022 I've worked on the boots, goggles, and the belt buckle. First up boots I'll get them weathered up, may help hide paint cracks. Next up I've fixed the band to the goggles Lastly whilst I may not get Specialist rank when I go for submission (need to get the correct ammo belt) I did paint the belt buckle for Specialist. Question for this is do I leave the black clasp parts as is, or do I paint them green too? Link to comment
Jankes[PR-CMD] Posted October 17, 2022 Share Posted October 17, 2022 Your boots are without zip closing? Goggles looks very good for me, but it's little to dark in the picture. Paint the clasp parts green too, like the buckle. It will looks strange without it. *My tip: I've painted whole belt green, so everything is same green and looks fine for me 1 Link to comment
Blackwatch[CMD-DCA] Posted October 17, 2022 Share Posted October 17, 2022 There is an old Army adage: if it dont move, PAINT IT. In the case of the IAT trooper paint the harness, belt, buckle, gloves, pouches, boots, paint it all. it should all appear to be uniform. 1 1 Link to comment
SirCalcium[TX] Posted October 29, 2022 Author Share Posted October 29, 2022 Some productivity has happened, provided the Scottish Autumn weather lets me, My boots have been weathered up. I used a combination of black and brown show polishes. Next is the belt and harness. Both greened up Annoyingly despite my paint applications I can't prevent the paint being scrapped off when the buckle connects together. I can try and repaint the buckle again. Lastly is the pouches And it was during this I read the CRL again and found this. "A minimum of 4 small pouches are required, which may consist of any combination of double handcuff, small utility pouches, magazine pouches or other MOLLE style pouches of similar size." Meaning I'm 1 pouch short of any form of clearance, so near and yet still so far 1 1 Link to comment
SirCalcium[TX] Posted October 29, 2022 Author Share Posted October 29, 2022 Whilst looking for a fourth pouch, I came across this one on ebay. Just making sure it's acceptable before making the jump Size is 21x13x9cm Link to comment
Blackwatch[CMD-DCA] Posted October 29, 2022 Share Posted October 29, 2022 That pouch looks fine to me, its very similar to the one that is posted in the group of pics for the pouches David Ramsey used when he set up his rig for the CRL pics. Just make sure all straps are night and tight , not flopping about. On the buckle, that happens, so what you will want to do is make sure the buckle is well-sanded for the paint to grip that slippery plastic, and perhaps use a plastic primer to help it bond. There isnt much you can do about the side squeezes, they are forced into a tight channel. maybe keep a cup of the paint right next to you and touch up the belt just before the pics are taken for your L2 photos when you apply for Specialist. 1 1 Link to comment
Jankes[PR-CMD] Posted November 2, 2022 Share Posted November 2, 2022 (+++) I am very pleased to see someone else paint their equipment one color. (---) I invariably pick on your boots (constructively of course :)). They lack a zipper and I don't like their top edge. Link to comment

Recommended Posts
Create an account or sign in to comment
You need to be a member in order to leave a comment
Create an account
Sign up for a new account in our community. It's easy!
Register a new accountSign in
Already have an account? Sign in here.
Sign In Now