Blackwatch[CMD-DCA] Posted November 2, 2022 Share Posted November 2, 2022 zippers are acceptable, but how I wrote the CRL they are not mandated. We use the commuter/ totes/stadium boot because its a convenient option. That style of boot is getting harder to find without a lot of decorative stitching on it. 1 Link to comment
SirCalcium[TX] Posted November 2, 2022 Author Share Posted November 2, 2022 Possible 4th pouch arrived today. Before going any further here's a picture of it with an approvable pouch, just to be 100% sure it is acceptable. If it's a yes, then I'll get it painted, once I get dry weather again 1 Link to comment
Blackwatch[CMD-DCA] Posted November 2, 2022 Share Posted November 2, 2022 I think itwill be fine. I also think that's the same kind of pouch I have on the back of my Colonial Marine. 1 Link to comment
SirCalcium[TX] Posted November 9, 2022 Author Share Posted November 9, 2022 Time for an update. The large pouch has been painted Now added to my belt, I repainted the buckle 1 Link to comment
Blackwatch[CMD-DCA] Posted November 9, 2022 Share Posted November 9, 2022 looking good. its OK to fill out more pouches on the rig, four is the minimum. Link to comment
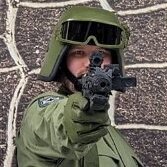
SirCalcium[TX] Posted November 9, 2022 Author Share Posted November 9, 2022 With all the parts more or less assembled I took the costume to an event I was attending to get full costume pictures (I didn't wear the costume outside the changing room since it's not cleared yet, and I was there with the Rebel Legion) However whilst kitting up I noticed that I didn't pack the gloves (insert any an all swear words regarding such a simple mistake) Regardless I went ahead with a full kit up just in case. With the TK Ammo Belt Without the Ammo belt And with the hat And bonus image, one of the TK costumers brought his DLT-19, so here's me holding it I know it's not in the CRL, but it was done for a bit of fun If all looks well, I'll get another set of pictures, and this time make sure I have the gloves Link to comment
Blackwatch[CMD-DCA] Posted November 9, 2022 Share Posted November 9, 2022 OK! thanks for this, this helps and its going to help you. Move those straps so that they sit right on top of the chest pockets, they should come straight down over them. also make sure to get the sleeve down as far as possible so they appear to enter the glove wrist opening. You have the straps right in most of the pics but in one its crammed beside you for some reason. You want those straight. Take a look at your pants leg at the top of the boot. You want that fluffed into the boot, covering the top edge. Not quite a blouse, and definitely not a Imperial-style-cram-it-straight-in-the-boot either. \ You can space your pouches out in back, they dont need to be crammed together so tight. When you take the pics, make sure you do a full go around the CRL and have your L2 pics ready to go. 2 Link to comment
SirCalcium[TX] Posted November 12, 2022 Author Share Posted November 12, 2022 Another round of pictures taken and this time I got the gloves on. Also adding what could be LV 2 Submission I'll be posting these on my Garrison forum too. 3 1 Link to comment
Blackwatch[CMD-DCA] Posted November 12, 2022 Share Posted November 12, 2022 Roger that Calum, now lets get you approved, then on to Specialist! 3 Link to comment
SirCalcium[TX] Posted November 17, 2022 Author Share Posted November 17, 2022 Great news. My GML approved and cleared the IAT this morning. First IAT for the ISG. https://www.501st.com/members/displaymember.php?userID=33721&costumeID=427 Onto the next step. Specialist. 2 Link to comment
Blackwatch[CMD-DCA] Posted November 17, 2022 Share Posted November 17, 2022 Congratulations, Trooper!!!! Welcome to the Imperial Army! Lets get that Specialist application started. 1 Link to comment
SirCalcium[TX] Posted November 17, 2022 Author Share Posted November 17, 2022 Application for Specialist submitted 1 Link to comment
Jankes[PR-CMD] Posted November 21, 2022 Share Posted November 21, 2022 Congratulations! Very nice, cheers! 1 Link to comment
SirCalcium[TX] Posted December 7, 2022 Author Share Posted December 7, 2022 Adding this wee extra bit. In my initial submission for Specialist, one of the rejecting factors was due to the paint flaking on the boots. Whilst I was told to weather over the chipping my preferred method of shoe polish caused more paint to fall off. To this end I decided to redo the boots. Sometimes the best fix is to go back to the drawing board. After thinking and researching some solutions, I found a special leather paint in my local B&Q (US equivalent would be Home Depot, or Lowes). The paint is Rustoleum Flexible Fabric Paint, and yes the can is that small. To prep the boots I scraped off as much of the original paint as possible, then applied 3 layers of the fabric paint onto the boot, 1 can will be used for 3 layers. After the paint dried it was the same process, applied primer, then the green, then paint on weather with watered down acrylic paint. 3 Link to comment
Dropkick[CMD-DL] Posted December 7, 2022 Share Posted December 7, 2022 Congratulations on your clearance, trooper. Wear that costume with pride ? 1 1 Link to comment

Recommended Posts
Create an account or sign in to comment
You need to be a member in order to leave a comment
Create an account
Sign up for a new account in our community. It's easy!
Register a new accountSign in
Already have an account? Sign in here.
Sign In Now