

Fivezero
-
Posts
1,259 -
Joined
-
Last visited
-
Days Won
70
Content Type
Profiles
Forums
Events
Everything posted by Fivezero
-
JK II Shadowtrooper Helmet Sculpt
Fivezero replied to Fivezero's topic in Shadowtrooper (Jedi Knight II)
Oh don't worry, these guys are in the mid-range of what we have... You can probably just barely make out the rifle cartridge at the bottom. And here's the rest of it, shells and casings fired by almost every tank, tank destroyer, anti-tank gun and howitzer since WWII... There's a couple projectiles missing that are out in the garage being restored currently. We usually display a bit of it with our WWII halftrack at shows (we have ti painted to represent a field artillery unit). This is another thing Fivezero has been up to lately, oh and don't worry it is all inert. Close, they're late WWII experimental 90mm Armor Piercing rounds. Some local farmer auctioned off a bunch of stuff this past weekend, how he got a hold of two experimental rounds is a mystery to me. But don't worry we do have 105mm tank and howitzer rounds. Fivezero -
Awesome looking box, fantastic job!
-
JK II Shadowtrooper Helmet Sculpt
Fivezero replied to Fivezero's topic in Shadowtrooper (Jedi Knight II)
More updates! It's all glued together now and ready for some sanding! I had to reprint the rear part of the helmet as it didn't quite fit, but its all ready for finishing now. And I was going to start sanding it this weekend, but I got a little distracted by working on some new acquisitions... Fivezero And yes, you absolutely deserve this helmet DE.... -
JK II Shadowtrooper Helmet Sculpt
Fivezero replied to Fivezero's topic in Shadowtrooper (Jedi Knight II)
Finally have an update! Been busy getting the helmet printed! Finished the last piece last night. And then I started getting it all glued together! Tomorrow I'll finished gluing it all together, then it'll get a coat of fiberglass resin to reinforce the inside. Then I'll sand and shape the outside to make it all nice and smooth! Then add the details! Fivezero -
JK II Shadowtrooper Helmet Sculpt
Fivezero replied to Fivezero's topic in Shadowtrooper (Jedi Knight II)
Hands down, the best thing I've bought man. I LOVE this machine, printed all kinds of stuff from parts for scale tank models all the way up to full helmets and blasters! (And I stole it for $150 on Ebay...) It is so much more accurate and easier than pepakura + cardstock. Anyways I ran out of filament, will have some more coming tomorrow so I can back to printing out the helmet. -
Fantastic looking Magma man, paint job is great!!
-
Shadow Stormtrooper (Force Unleashed) CRL Proposal
Fivezero replied to Fivezero's topic in TFU Shadow Trooper
Good to hear, yeah it really helps emphasize the lighting on this trooper (one of the things I want to work on in the future is improving the lighting). ANYWAYS, I'll get the pictures all edited this weekend. -
Awesome stuff man, the pack looks great!
-
Yep here's the other CRL that's taking WAY too long to get together. Here's the EVO CRL. Still have a few photos to finish and then I'll post those up. I'll also take some measurements of some of the EVO specific stuff (pouches, tubes, etc.). This one might need a little work, considering the amount of custom pieces, so as always, post any changes you guys think of! EVO Trooper Helmet • White fiberglass, ABS (Acrylonitrile Butadiene Styrene), or HIPS (High Impact Polystyrene). • Traps (trapezoids on dome of helmet) and tears (area beneath the corners of eye lenses) are gray • The only acceptable lens colors are Dark Green, Smoke and Black. Lenses must be sufficiently dark enough to obscure the costumer's eyes. • Frown is black as well as groove along the side of the helmet. • There is an orange stripe that is offset on the left side of the helmet above the lenses. • Two black, vertical stripes run along the back of the “cheeks.†Neck Seal • Black with horizontal ribs, fitted to the wearer, and extending from the base of the neck to the top of the Adam's apple. Shoulder Bells • One on each shoulder being flat black in color. There are five holes on both shoulder bells. The left shoulder has an offset orange stripe running vertically. Biceps • Biceps are fully closed with an offset orange stripe on the left bicep. Forearms • Forearms are fully closed with an offset orange stripe on the left forearm. The left forearm also has a tube attached to the side. Both forearms have straps running around the circumference of the forearm. Hand Plates • White, roughly pentagonal in shape, the hand plates are mounted securely over the back of the glove. As an alternative to plastic, these may be made out of latex or latex-like material. • TK handplates are not acceptable • Each finger has two finger plates with the thumb having a single, longer plate. Gloves • Black rubber, nomex, leather, or leather-like material, with no visible straps or logos. The fingers are enclosed, non-textured. Chest • Chest plate overlaps the abdominal plate. • Chestbox mounts on the chest plate with a central box and a lower tube. Two hoses lead out of the box into the helmet, and a single hose comes out of the tube and attaches to the abdomen plate. Back • Back plate contains a "O II" design with little or no overlap of the kidney plate. Under Suit • Black non-textured material, either one-piece or two-piece construction with no visible zippers or logos. Abdomen Plate • The ab plate has a button area with 8 black buttons and one white button; buttons are approximately 7/16" in diameter. • A circular detail is present on the right side, just above the belt. • A hose coming from the chestbox attaches to the left side just above the belt. Kidney Plate • It is allowable to have a single kidney/butt plate for 501st requirements. If a separate kidney plate is used, it should line up with the ab plate, with the top of the kidney plate being flush to or under the back plate. Butt Plate • It is allowable to have a single kidney/butt plate for 501st requirements. If a separate butt plate is used, it should line up below the bottom of the belt with with the ab plate, with minimal gap between it and the kidney plate. Belt • Belt face is made of plastic (ammo belt). It is comprised of 6 rectangular boxes, with two large circular greeblies on the ends of the belt. • Four rectangular pouches mount on the belt, two on each side. Thigh • The thigh armor is closed in the back. Lower Leg • Lower legs close in the back. Knee plates mount on both legs. The right leg has 4 tubes, similar to the forearm tube, mounted on the side. Boots • White leather or leather-like, above ankle height, with a flat sole, with no buckles or laces. Jodhpur-type boots or an equivalent style. • Elvis or Mariachi boots are not acceptable. • There should be no seam on the front of the boot. • A "dog bone" shaped strap covers the bridge of the foot. Field Backpack • Styled after the ANH Sandtrooper packs with some minor changes: • The frame of the pack is in two separate sections; one extends around the sides and top of the pack, with the other section laying below the bottom box • A hose extends around the left and top side (as you look at it) of the pack. • The lower box is taller than standard Sandtrooper packs
-
Ukswrath's Anovos Shadow Stormtrooper Build
Fivezero replied to ukswrath's topic in Shadow Stormtrooper
Great build, keep it up! -
JK II Shadowtrooper Helmet Sculpt
Fivezero replied to Fivezero's topic in Shadowtrooper (Jedi Knight II)
Yep, you heard right.. Here's the start! Here it is compared to old helmet, I made it about 12% bigger and it made a huge difference. And then there's that moment where you forget to hit "mirror part" and accidentally print an extra piece... Fivezero -
JK II Shadowtrooper Helmet Sculpt
Fivezero replied to Fivezero's topic in Shadowtrooper (Jedi Knight II)
Thanks Steve! Here's some more progress for ya. Got the final tweaks done to the model, and split it between a front piece and back piece and added some thickness to the model. Then I split the two main pieces into smaller pieces to fit on my print bed. Everything looks good, so first thing tomorrow I'll get the 3D printer running! Fivezero -
Shadow Stormtrooper (Force Unleashed) CRL Proposal
Fivezero replied to Fivezero's topic in TFU Shadow Trooper
Yes sir! I sent along a couple with me in the dark when I submitted it to the LMO. If you want I can retake the individual armor photos in the dark to go along with the current photos, no problem at all! -
JK II Shadowtrooper Helmet Sculpt
Fivezero replied to Fivezero's topic in Shadowtrooper (Jedi Knight II)
Digging up this old thread! My first goal before I work on any new troopers for myself, is getting this dang helmet done for DE. Unfortunately my previous sculpt was a tad too small and I was having a couple issues with vacuum forming the front of the helmet. So scrapping the old sculpt and starting a new one... SO I got to work on a new 3D model. The original game model is, well, a little lacking. So I've been doing some modifications to the original model to prep it for 3D printing. I'll still have to some work after it's printed, but this is a better starting point than the game model. So here's where I'm at! I still have some tweaks to do as well as modelling the frown. Other than that it looks like I'll begin printing it out this week! Fivezero -
Shadow Stormtrooper (Force Unleashed) CRL Proposal
Fivezero replied to Fivezero's topic in TFU Shadow Trooper
Thanks guys!! I finished up the images tonight. I resized them a bit for the forum, but I have the originals if you guys need them. I still have to get the full armor pics finished up, I'll get those done tomorrow. Otherwise here it is! -
Latest CRL proposal for Shadow Stormtrooper (Force Unleashed) is below. Completely rewritten to align with our latest Shadow Stormtrooper CRL revision, adding details as necessary for this trooper. ------------------------------------------ This will be the main listing and we'll tackle each part piece by piece (green is done, yellow is WIP, and red is not finalized): Helmet Neck Seal Under Suit Shoulder Straps Shoulder Armor Biceps Forearms Hand Plates Gloves Chest Armor Back Armor Abdomen Armor Kidney Armor Posterior Armor Belt Thermal Detonator Thigh Armor Lower Leg Armor Boots ----------FINALIZED TEXT GOES BELOW THIS LINE------------ Description: Shadow Stormtrooper: The Force Unleashed Prefix: TX Detachment: Spec Ops Detachment Context: Star Wars: The Force Unleashed Shadow Stormtroopers are elite troopers equipped with experimental cloaking armor. Their distinctive armor silver and gray armor allows them to disappear into almost any environment to accomplish their mission. Special Notes: Armor color is a combination of metallic silver, semi-gloss medium gray and gloss black. Armor is made from one of these (or similar) types of materials: Fiberglass ABS (Acrylonitrile Butadiene Styrene) HIPS (High Impact Polystyrene). Armor lighting is blue in color. Blasters are not required for legion membership per our weapons policy. Helmet Helmet is metallic silver. Lenses must be sufficiently dark enough to obscure the costumer's eyes. They are either flat or bubbled. Light shines onto the lens, coming from the top of the lens. The “ear” bars have three or four bumps and are gray. The rearmost bump is black. The frown must have 8 teeth cut out. Light shines through the teeth cut outs. The tube stripes may number between 9 and 16 per side with the curve bends extending backwards. Light shines through the tube stripes. Vocoder (vertically ribbed chin detail) is black. The aerators (cylinders on either side of the vocoder) are black, and screening is silver. The interior of the aerator can either be white, silver or black. Traps (trapezoids on dome of helmet) and tears (area beneath the corners of eye lenses) can be hand painted or decals. Acceptable color is dark gray. Rear traps and tears have vertical black lines. OPTIONAL Level two certification (if applicable): Ears shall have three screws per side, one above and one below the ear bar and one at the base of the helmet. Screws are slotted, flat topped, countersunk and painted metallic silver. Ear bars have four bumps only, not three. Correct 'Hovi mic' aerator tips. The screen in the aerator tips shall be painted silver and the interior of the aerator tip shall be painted white or black. Screens used shall be of a wide type mesh. Traps/tears shall be hand painted or decals in black or gray and shall have the correct details similar to the ANH TK. Neck trim shall be an S-type profile rather than a U-type profile. Neck trim is black. Neck Seal Black with horizontal ribs, fitted to the wearer, and extending from the base of the neck to conceal the entire neck. Under Suit Black non-textured material, either one-piece or two-piece construction with no visible zippers or logos. Shoulder Straps Shoulder straps are metallic silver. These shall be securely mounted in front and may free float in the back. They can be affixed with rivets, Velcro or adhesive. The rear tab of the strap is optional and may or may not be present. OPTIONAL Level two certification (if applicable): No visible rivets are allowed to secure the straps in the front. These shall be glued in front. The rear tab of the strap shall be removed same as the TKs seen in ANH movie. Shoulder Armor Shoulder armor is gloss black, painted to match reference photos. One on each shoulder. The shoulder bells are considered effectively symmetrical. They can be worn interchangeably on the left and right shoulders. Light shines through the left, right and bottom edges of the shoulder armor. Shoulders have a black elastic strap that wraps around the inside of the bicep. OPTIONAL Level two certification (if applicable): There should be a large gap between the shoulder armor and chest/back plate. Biceps Biceps are metallic silver. Biceps are fully closed. Overlap construction is only allowed for kits that come with the cover strip molded into the part. OPTIONAL Level two certification (if applicable): Must be constructed using the butt plate joint and cover strip method. Overlap construction is not allowed. There shall be a return edge that is present with a maximum width of 3/8" (10mm) width. Forearms Forearms are metallic silver. Forearms are fully sealed and closed. Light shines through the top and bottom edges and through the square depressions along the top ridge of the forearms. Overlap construction is only allowed for kits that come with the cover strip molded into the part. OPTIONAL Level two certification (if applicable): Must be constructed using the butt plate joint and cover strip method. Overlap construction is not allowed. There shall be no return edges present on the inside of the front of the forearms. Hand Plates Hand plates are metallic silver. Pentagonal in shape, hand plates should be securely mounted over the back of the glove. These can be made up of plastic, latex or latex-like material. OPTIONAL Level two certification (if applicable): Handguards shall be latex or latex-like, painted metallic silver and affixed with adhesive to rubber gloves with no visible strapping or stitching. Gloves Black in color, made of either rubber, nomex, leather, or leather-like material, with no visible straps or logos/ designs. The fingers are enclosed, non-textured. OPTIONAL Level two certification (if applicable): Gloves shall be rubber or rubber-like chemical gloves, in black. Chest Armor The upper portion of the chest armor is semi-gloss medium gray and the lower portion is metallic silver. Chest armor overlaps abdomen armor. Light shines from the chest armor onto the abdomen armor. A flexible U-shaped gasket or molded lip is present around all edges. Gasket is metallic silver. OPTIONAL Level two certification (if applicable): Chest and back shall be connected with a black fabric (preferably elastic) that does not stick out or show under the shoulder plastic straps. Back Armor Back armor is metallic silver. Back armor contains a “O II” design with little or no overlap of the kidney plate. A flexible U-shaped gasket or molded lip is present around all edges. Gasket is metallic silver. Abdomen Armor Abdomen armor is semi-gloss medium gray. The abdomen armor has a button area with 9 gloss black buttons. Correct sized buttons are approximately 7/16” (11mm) in diameter. Abdomen armor button area detail matches reference photos. A flexible U-shaped gasket or molded lip is present around the sides and top of the abdomen armor. The gasket does not extend around the cod armor. Gasket is semi-gloss medium gray. OPTIONAL Level two certification (if applicable): There should be no gap between the ab and kidney plate, a single visible seam line is ideal. Any gap between the abdomen and kidney armor shall be no more than 1/2” (12.5mm). Any shims used to achieve this effect shall have a similar material and color as the abdomen armor. Shims should be flush and seams are allowed. Four rivets are present on both sides of the ab plate: two on each side, the heads should be rounded or domed, solid, approximately 5/16" (8mm) diameter and equally spaced out along the depth of the armor and about 20mm from the edge. They must be painted semi-gloss medium gray. Paperclip brads are not considered to have a domed head. Note: For the original TK armor the type of rivets used were bifurcated rivets or split rivets. Kidney Armor Kidney armor is metallic silver The kidney/posterior armor may be either one piece (ROTJ style) or two pieces (ANH style). If a separate kidney plate is used, it lines up with the abdomen armor. The top of the kidney armor is flush to or under the back armor. OPTIONAL Level two certification (if applicable): Four rivets shall be present on the both sides of the kidney plate (two on each side), the heads should be rounded or domed, solid, approximately 5/16"(8mm) in diameter and approximately 3/4” (19mm) from the edge. They are spaced top to bottom to match reference photos. They must be painted black. Paperclip brads are not considered to have a domed head. Note: For the original TK armor the type of rivets used were bifurcated rivets or split rivets Posterior Armor Posterior armor is semi-gloss medium gray. The kidney/posterior armor may be either one piece (ROTJ style) or two pieces (ANH style). Belt The ammo belt is metallic silver and shall be made of similar material matching the overall armor. It is comprised of 6 rectangular boxes, with two square buttons on each end of the belt. The soft belt proper is made of fabric, or material with a fabric covering and must be 2” to 3.5” (50-90mm) wide. Fabric is metallic silver. The drop boxes dangle from the sides of the plastic belt face via gray straps and are aligned under the plastic tabs of the ammo belt. Drop boxes are semi-gloss medium gray. The belt closes by overlapping in the rear center of the kidney/posterior armor where the thermal detonator is attached. Belt has lights to shine onto the posterior armor. OPTIONAL Level two certification (if applicable): The top corners of the plastic ammo belt shall be trimmed at a 45 degree angle that meets the outer edge of the fabric belt. The bottom corners of the ammo belt are trimmed with a broad curved cut. The top of the ammo belt should sit at or just above the bottom of the central and vertical abdomen button panels. Belt proper is thinner than standard TK-style belts, being 2” (50mm) wide with the top aligned at the bottom of the 45 degree cut. Drop boxes must be attached using gray straps and must have full inner drop boxes to close the back. Flat covers are not allowed. Drop boxes are vertically aligned with the end of the ammo belt with a 1/2” (13mm) gap between belt and box. Eight rivets shall be present on the belt proper (arranged in pairs on each side of the ammo belt), the heads should be rounded or domed, solid, approximately 5/16" (8mm) diameter. Rivets are spaced out to match reference photos. They must be painted black. Paperclip brads are not considered to have a domed head. Note: For the original TK armor the type of rivets used were bifurcated rivets or split rivets. Thermal Detonator (A.K.A O2 canister) is attached to the center back of the belt. Detonator consists of a cylinder with 2” to 2.68” (50-68mm) in diameter with metallic silver end caps on each end and a metallic control panel pad. The metallic silver control panel pad faces upwards, with the controls/round washer-style detail closest to the right end cap. Line shines through the cylindrical body of the detonator. The total length is approximately 7.5” (190.5mm). OPTIONAL Level two certification (if applicable): Thermal detonator will attach to belt with a mounting block in place of clips. This block can be secured with a discrete method (rivets, Velcro, bolts, or similar method) to the belt. Mounting block is metallic silver. Thigh Armor The thigh armor is semi-gloss medium gray. The thigh armor may open and firmly close in the back allowing the two halves to appear sealed. The small ammo belt is installed on the bottom of the right thigh. Ammo belt is metallic silver. Light shines onto the thigh armor from behind the ammo belt. Overlap construction is only allowable for kits that come with the cover strip molded into the part. Cover strips must end at the top of lower ridge in front and back. If the two parts of the thigh armor cannot fit the user, cover strip should not be too wide. Instead, shims can be used to close the back of the thigh armor. Shims shall have a similar material and color to the whole armor, should be flush without seams. OPTIONAL Level two certification (if applicable): The thigh ammo belt is attached to the thigh armor with no visible fasteners. The ends of ammo belt must sit above the bottom ridge of the thigh armor, with the bottom of the front ammo belt face flush with the bottom of the thigh armor The thigh ammo belt must be trimmed with a short end and a long end, with all edges being square. The shorter end of the ammo belt is attached to the outside of the thigh armor and the longer end attached to the inside of the thigh armor. Must be constructed using the butt joint cover strip method. Overlap construction is not allowed. Lower Leg Armor Shin armor is metallic silver The shin armor is able to open and firmly close in the back allowing the two halves to appear sealed. The trapezoid knee plate is affixed to the top of the left shin. Knee plate is metallic silver on the sides, with the central hexagon being semi-gloss medium gray. The bottom 3/8” (10mm) of the shin armor must have light shining through the armor. Overlap construction is only allowable for kits that come with the cover strip molded into the part. OPTIONAL Level two certification (if applicable): Sniper knee plate must be aligned with the ridges on the shin. The sniper knee plate must not have visible rivets or fasteners attaching it to the shin. Shins are constructed using the butt joint cover strip method. Overlap construction is not allowed. Boots Boots are above ankle height and made of dark gray leather or leather-like material. A red stripe, approximately 5/8” (15mm) runs along the inside, across the front and along the outside of the boot, matching reference photos. Small U-shaped elastic sections on both sides of the ankle. Flat sole with a short heel. No buckles or laces. Jodhpur/Chelsea-type boots or an equivalent style is acceptable. Elvis or Mariachi boots are not allowed. OPTIONAL Level two certification (if applicable): There is no seam present on the front of the boot.
-
Shock Trooper (EA Battlefront)
Fivezero replied to mikedwelle94's topic in Non-TX and Custom Creations
Looks great! Good luck with approval!! -
Thanks guys!! Got the chest made up last night! Getting closer! Fivezero
-
Shock Trooper (EA Battlefront)
Fivezero replied to mikedwelle94's topic in Non-TX and Custom Creations
Looks great man! -
Looks awesome, love that moment when you get to making parts after working on sculpts/molds forever!!
-
Thanks for the photos Ken, every single one helps out! Anyway, more progress tonight. I threw some bondo on the biceps, I'll sand them down tomorrow night. I also finally poured some plaster for one of the thighs and the back plate. They're going to need some work to finish off but they are good for a starting shape. Unfortunately I ran out of plaster and couldn't get the chest poured. So that'll have to wait until Wednesday. Other than that I got all the other armor parts smoothed out and ready for some detailing. Game plan is to get the chest poured on Wednesday and finish up everything else. Friday I'll get started on bondoing the chest, back and thighs maybe sand them. Saturday keep working on everything, Sunday finishing touches possibly? Next week will probably be devoted to some more polishing on everything, I might be able to start vacuum forming too (no promises though). Fivezero
-
Welp I had some more parts come in, basically everything I need to finish it off and make it look fairly complete (still need a couple small parts). Otherwise it's ready for some T-track and I need to make up a small box to go over the feed tray. The T-track will probably be held on with magnets, so I can take them off to turn it back into a regular MG34 to use with our halftrack. Another project almost scratched off the list! Fivezero
-
Hey guys! Apologies for the lack of updates, been having trouble with power and internet lately (crazy weather here in Michigan lately.... ). Anyway I've still been working had on this armor! Chest mold, back is done too. I also 3D printed out the biceps, unfortunately I'm a bit behind as I had my extruder heater die on me right before I printed them (had to wait for a new one). And here's the beginning of the body filler! Two coats on everything then I sanded it all down. And spent a nice cold, snowy day outside sanding these guys down! I still have a little finish sanding to do on some parts then we're ready to detail them! I'm hoping to try and get this group of parts done this weekend and then next week finish up the chest, back and the thighs! Still aiming for the end of the month (March) to crank out a couple kits! Fivezero
-
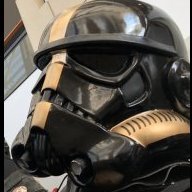
Thought I'd dust this old thread off.... I've been stuck looking for an unobtainium part for the last couple years. Namely the barrel shroud, there hasn't been for sale for a good price in awhile... But got a cool package in the mail today! One barrel shroud complete with front and rear sights, latches and bipod stud for a fantastic price. Dated 1945 in case anyone is curious... Here it is laid out with my E-11 (built from a demilled Sterling) for scale. Unfortunately I can't quite close the shroud on the receiver, got a little more grinding to do to make it fit right. I also got out that receiver yesterday and prepped it for welding (since I know how to weld now) while I was waiting fro some Flametrooper stuff to dry and cure. Basically I had to undo the mess I made with it, but now it's all welded together, with proper blocks welded inside to demil it. The blocks make sure you can't put the internals in it. The receiver is a solid piece now, still got some cleanup and minor welding to do, but she's done! I'm still missing a few pieces too; namely the bipod, feed tray, feed blocks, the barrel shroud extension (that's on the way though!) and some minor buttons and latches here and there. For the meantime I'll 3D model them and 3D print them to complete the look while I track down the correct parts. Very excited to get this thing back out and it doubles as a blaster and prop to use with our halftrack! Fivezero
-
Looks great Kevin!
