-
Posts
1,469 -
Joined
-
Last visited
-
Days Won
111
Content Type
Profiles
Forums
Events
Everything posted by Chaos
-
I have finally gotten around to taking a look at what you have going on with the neck area. Ideally, you want the neck "tusks" to rest evenly against the front chest armor slope. If you look at the Shore Trooper in Paul's files/build, the tusks have a piece (tab) that slides into a slot in the front armor. This keeps the tusks flush against the front armor. Jim's kit does not have this and I too had an issue early on with the tusks having a gap. I made a file that creates a "tab" that is attached to the back neck piece and slides under the front armor, basically replicating the tab set up on Paul's ST. It glues onto the inside of the neck and is then filled in with bondo or filler so its less noticeable. Once everything is painted you can't see it. You might want to look at having the back of the collar slightly aft, it will help prevent your helmet from banging on the top edge and it will give you more range of motion to look up.
-
@Mal86 I clam shelled my forearms for two reasons, one so that they would fit snug around my forearms and over the undersuit so they don't twist out of place, the second is since they are snug, and one has the 2 rubber band around it, it allows me to put my big ape hands thru the openings on the wrist end. If you look at Paul's shore troop forearms, the inside elastic bands pull the clamp shelled side tight and keeps it closed.
-
Awesome. If I could give you some advice. I put elastic straps on the bottom of the legs, so that I could put them under my foot arch when I put my boots on. It keeps the legs from riding up out of the boots. Also I put an elastic strap on the ends of the sleaves that lined up with my thumbs. This keeps the ends of the sleaves from pulling out of the gloves. I got the idea from a photo that Victor Botha posted, his undersuit had sleave thumb holes. Just a suggestion.
-
sounds like a "curing" issue to me. Go back and hit the tacky areas with the UV light again. If that doesn't fix it, put another layer over the top of the tacky areas and hit it with the UV light again. Make sure you are exposing the resin for the recommended time. You might also want to check and see what UV spectrum the resin requires for proper curing. Some resins require a specific UV wave spectrum to cure properly. Not all UV lights are the same spectrum. As far as the crack, put some superglue in the crack, before it cures sprinkle some baking soda on the crack and glue inside and outside. it will cure instantly, then put another thin layer of glue on top of that and sprinkle again with baking soda, sand smooth the outside and repaint. leave the inside built up as this will strengthen the filled in crack.
-
The sling is a 1.25 inch sling. I recommend not using any sling clip/buckle that you have to 3D print. I bought metal swivel clips from this place: https://www.unclemikes.com/swivels-and-slings/rifle-swivels/qd-115-swivel---tri-lock/P00951.html I bought this type so I could screw the mounting posts into my 3D print. It has held up very well over the years. and I bought a plain black 1.25 inch sling from this place https://qm-supply.com/product/m-16-slings/ Any similar item will do. There is no CRL specific requirements for weapons, they simply must look like the reference in details and size.
-
@HidingInCosplay Just checking in on this thread. Any more progress and or photo updates? Also I have been using Nikko's statue files and hollowing them out to be wearable. You said you also go files from Andromeda 3D, do you have a link for their files. I have searched their Instagram posts but no luck.
-
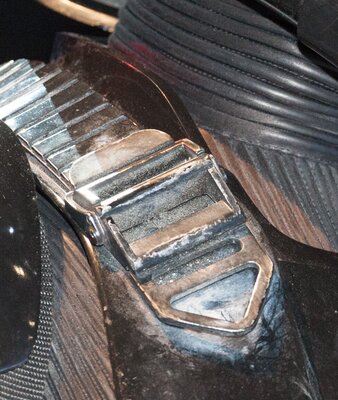
Just a little technique you might want to think about. After you adjust the buckles to where you want them, put a small square patch of black felt on the back side of the metal buckles. It will prevent you from taking off your chest rig and having an "oh sh1t" moment when you discover the back side of the buckle has scratched the crap out of your chest armor.
-
I use Frog painter's tape to mask off areas when I apply paints etc. Blue painter's tape works as well, I just prefer the pretty lime green color of the Frog tape.
-
So I have discovered something new in my life. Its called UV printer resin and it is amazing. I originally painted the inside of my Tripon kit with a substance like Plasti-Dip and it worked awesome at eliminating the fiberglass shards. Over the years that wears off and has to be recoated which is no big deal. However I tried brushing on a thin layer of UV printer resin and hitting it with a UV light. It cures almost instantly and seals in the fiberglass. It is AMAZING ! LOL wish I had figured this out the last time I upgraded/modified/repaired my armor. One more thing you might want to consider to help preserve the paint on your kit in the areas where the pieces overlap is epoxying some type of medium thick black felt on the inside of the overlapping pieces. Not only does it prevent the paint from getting "rub marks" but it quiets the armor rattle some what.
-

Best way protecting DT Armor paint - Ceramic Coating?
Chaos replied to TookBreaker's topic in Imperial Death Trooper
Sounds to me like you are already have a great system in place. You your self said you wanted to start off shiny and new and let the suit "weather" with use. I use an auto polish on my kit to bring back the shine after I wash off my weathering before re-weathering it again. Ceramic coatings are designed to protect from UV and dirt and oils. Like Doc said the coating is very thin and if you do go that route I would recommend putting multiple layers. I'm a cheap-skate so using something that expensive for armor that I want to look like what's on screen, doesn't make sense for me to use. -
Dan, you might want to use a software program called Armorsmith Designer. It allows you to make an avatar to your body dimensions and then scale a 3D file to fit. Someone in your Garrison may have it and can do it for you. I don't have Tom's helmet file or I could do it for you. Another option is to straight line measure your head front to back and side to side and then scale the assembled file in something like 3D Builder (a Window's program) or Blender, and use the measuring feature to scale the file to your measurements. Try and error could waste a lot of material until you get it correct.
-

TookBreaker's Death Trooper - COMPLETED
Chaos replied to TookBreaker's topic in Imperial Death Trooper
Congratulations! -

TookBreaker's Death Trooper - COMPLETED
Chaos replied to TookBreaker's topic in Imperial Death Trooper
Paul is correct. The black material prevents the "see thru" effect. -

TookBreaker's Death Trooper - COMPLETED
Chaos replied to TookBreaker's topic in Imperial Death Trooper
Looking good. If you haven't yet done so, the helmet vent screens need to back line with a black material "The vents are cut out and lined with steel small mesh and backed with black material." -

Deathtrooper Forearm Gauntlet Question
Chaos replied to Darthstorm's topic in Imperial Death Trooper
I'm a one of the DCAs for the DT and the Primary on the last CRL update. Ideally, your armor should be proportional to your body and maintain the appearance outlined in the CRL. How many "indentations" would you need to remove in order for the forearms to fit you? Get with your GML, explain what your issue is and discuss whether he/she would approve the modification. As Ryan mentioned in the FB group, the CRL does say "approximately" and was worded for situations like this. If your GML has any questions, he/she can reach out to us in the Legion GML/CRL section of the forums. -
I'm thinking it may read something like this: Damage and repair pattern; to achieve this, build your DT to Basic Level 1 Standards, once approved by your GML place the armor kit in one or multiple cardboard boxes, then mail it to yourself via your preferred ground/air package service. (Note: for a heavier damaged look I suggest the USPS, for less damage may I suggest FedEx or DHL) Once your kit arrives, make all repairs using gold tinted two part epoxy or bonds. Add gold paint as required. Level 2 will require a minimum of 18k gold leafing. 🤣😅 Sorry, I'm sitting on a plane heading to Hawaii and am bored! On a more serious note, it may take a while to even get this going due to so few available full 360 references.
-

Road Kill Death Troopers ... Images and Thoughts
Chaos replied to Mal86's topic in Night Death Trooper
I think the way we normally approach CRL builds and details. I don't think making this one (to CRL standards) would be as easy as painting the details. As with Kylo's temper tantrum helmet, the cracks will need to be 3d defined. You could for the parts that are not "repaired" but match the V1 and V2 armor pieces, you could use those as cross over elements. I think it would be a cool variation more as a joke to incorporate a green light saber thru the helmet just so I could have the eye lenses lit up 🤣😅 -
Stop here if you don't want to read a Spoiler for the latest episode of Ahsoka! This latest Death Trooper variant we just saw in Ahsoka gives me a good reason to buy an 850 kit and run over it a few times before assembling it. OMG I'm loving it!!!
-
I'll take a look at the buckles on Cults 3D to see how close they are. I know those are Shore buckles. If not, I have a 3D file I printed for my buckles you are welcome to.
-
It is always easier to build to Level 2 than to have to retrofit from Level 1. You can print the TPU straps on a 200mmx200mm bed. Jim's buckles that come with his kit as good for Level 1 and general use as they are, you just need to clean them up a little by sanding and smoothing them. I think Paul's shoulder buckles which are cast or resin 3D printed along with the shoulder straps are worth what he is asking. I don't think Paul has the side armor buckles and straps so would need to source these. I had the capability to 3D print my own designed chest buckles and shoulder straps as well as the side armor buckles and short straps. One thing to keep an eye on is that some of the shoulder buckle D-rings sold out there have a pointed end. The original shoulder D-rings had a rounded point on the front. I did use Jim's side armor D-rings as they were sturdy and looked like the ones on the screen suits. I did however, swap out his side armor D-ring straps for ones I made. The files I made were designed to use Jim's provided side armor D-rings.
-
I should chime in here about Jim's shoulder straps. His straps are Basic Level approvable and CRL compliant "Attaches to the back plate with shoulder straps that have a rectangular rib detailing, rubber in appearance and matte black in color." They just are not Level 2 compliant. If you have no plans of building your kit to Level 2, you can save the money and use Jim's straps. I wore his straps for a few years after I was basic level approved. I only just recently printed my own straps in TPU prior to submitting for Level 2. Just my 2 cents.
-
That style of pouch is acceptable, the no visible stitching applies mainly to the flap and pouch area and the color or the stitching. The black side seam stitching is not that noticeable. During the early development, people were trying to use off the shelf pouches that had white thread stitching and we were having them blacken the thread so the "stitching was not visible", this is where the requirement originally came from.
-
Yes, no stitching showing on the pouch. There are a couple tutorials that individuals made in which they DIY'd their pouch.


.thumb.png.a8767d50d9fcb4c53df5561026bd13d4.png)

.thumb.png.bdb6855c5caf45719dac09b219c66101.png)