-
Posts
1,469 -
Joined
-
Last visited
-
Days Won
111
Content Type
Profiles
Forums
Events
Everything posted by Chaos
-

DoggyDoc’s Jimmiroquai Imperial Death Trooper Build Thread
Chaos replied to DoggyDoc's topic in Imperial Death Trooper
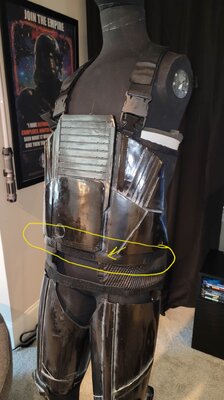
Jim's kit doesn't have a piece under the abdomen. I used a piece of ABS and epoxied it to the bottom edge. This gave me a place to put velcro strips to hold the belt in place. -

A 501st Newbie: A Death Trooper Story
Chaos replied to GrandMoff501st's topic in Imperial Death Trooper
Case, welcome to the darkerside of The Darkside. Excellent choice in the DT. For boots and gloves you can check out Imperial Boots or Crowprops. Right now the only maker I know who is making quality undersuits in Jim Tripon, you can find him on FB. Best of luck with your build, and always we are here to assist. -

DoggyDoc’s Jimmiroquai Imperial Death Trooper Build Thread
Chaos replied to DoggyDoc's topic in Imperial Death Trooper
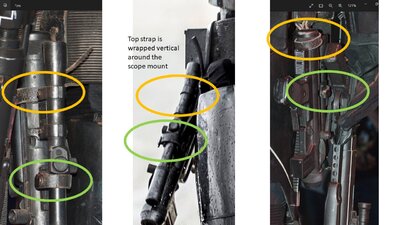
SE-14R strapping. We have seen 3 ways in the movie and TV, I have mine like the far right configuration. -

DoggyDoc’s Jimmiroquai Imperial Death Trooper Build Thread
Chaos replied to DoggyDoc's topic in Imperial Death Trooper
@DoggyDoc wished I'd know you needed the belt pouch covers, I've got a file for that as well. I'll send you some pictures later reference the pistol strapping. -

DoggyDoc’s Jimmiroquai Imperial Death Trooper Build Thread
Chaos replied to DoggyDoc's topic in Imperial Death Trooper
I hate sanding, I've started dabbling in using UV resins on my small detailed 3rd Gen Dark Trooper pieces, it definitely cuts down on my over all sanding. Just a thought. -

DoggyDoc’s Jimmiroquai Imperial Death Trooper Build Thread
Chaos replied to DoggyDoc's topic in Imperial Death Trooper
That looks really good! You are going to shorten the buttstock rods aren't you? 😉 -
Excellent find!
-
Do you have access to a 3D printer? If so you can print a file I have in a flexible filament like TPU or a name brand called PolyFlex. Your other option is to file any rubber matting that has ridges that are 3-4mm in width and evenly spaced. The original material's ribs are rounded, however, the CRL does not specifically say that. (We did that on purpose so people could use any similar looking matting. When you size your thighs you will have to make sure you follow the CRL particularly where the inside and outside width ratios are concerned. The ribbed infill shall be made of black rubber, or a semi-gloss black material, or if part of the thigh pieces, have the appearance of being rubber or rubber-like material. The inside thigh ribbed section is wider than the outside ribbed section. Something like this is probably about the closest you will find at a reasonable price https://www.amazon.com/Herco-All-Purpose-Corrugated-Rubber/dp/B01EK5AMBW I would show this to your GML and ask him if this would meet his/her approval. It meets the CRL requirements and looks close enough in my option. I have not seen this in person but from the pictures it looks right. You don't want to use the same matting as the belt material.
-
The links should still be good, but let me know if they don't work.
-
I saw that! Andreas is killing it! I have had to put my project on a brief hiatus, I got a promotion and its interfering with my project. @Andreas Funk I have not forgotten about the hand files. Once again I redesigned the finger joints. I am printing them off this week so hopefully the changes I made will be better than the last design. Be patient!
-

DoggyDoc’s Jimmiroquai Imperial Death Trooper Build Thread
Chaos replied to DoggyDoc's topic in Imperial Death Trooper
Best way to color the shoulder buckles is to paint them silver. Then paint them black and knock down or "wear off" the black paint to reveal the silver in areas that would normally show wear. The D rings are done the same way but because they would receive more wear and tear, they appear to be more of a silver color. The side buckles are done the same way. -

DoggyDoc’s Jimmiroquai Imperial Death Trooper Build Thread
Chaos replied to DoggyDoc's topic in Imperial Death Trooper
try this, its what I coated my chest rig to cover over the white paint markings I used when I was sewing. It doesn;t wear off or smudge after its dry. https://www.walmart.com/ip/Duplicolor-HVP106-Vinyl-Fabric-Spray-Paint-Flat-Black-11-oz/39154179 -

DoggyDoc’s Jimmiroquai Imperial Death Trooper Build Thread
Chaos replied to DoggyDoc's topic in Imperial Death Trooper
Doc your kit is going to be "Epic" -

DoggyDoc’s Jimmiroquai Imperial Death Trooper Build Thread
Chaos replied to DoggyDoc's topic in Imperial Death Trooper
-

TookBreaker's Death Trooper - COMPLETED
Chaos replied to TookBreaker's topic in Imperial Death Trooper
You are more than welcome. I'd go with the EL panels. I wish I had, they look so much better. If not, you can lightly sand the tips of the LEDs to reduce the focal point and use diffuser paper or white parchment paper. If you are going with having your undersuit tailored, I might have something you'd be interested in. I modified my Jimmi undersuit after I decided to use the corset design for my abdomen and lower back armor. It basically puts the zipper in the back so that it doesn't show in the front and is more like the screen used undersuits. Its really easy to put on by yourself and zips up much like a wetsuit. I had mentioned putting the shirt zipper in the back to Jimmi, not sure how his new suits come. If you aren't going with the corset set up and want to keep the abdominal gasket as part of the undersuit this will still work. Looking awesome! Here is the mod I made to Jimmi's undersuit. Undersuit Redo.pdf -

Death Trooper Helmet sources?
Chaos replied to RobC_TX1138's topic in Armor Tips, Tricks and Tutorials
@RobC_TX1138 Currently I know of only two vendors that are selling completed helmets. 850 Armor Works and Cyber Craft. Physically I prefer the shape and design of the Cyber Craft helmet. The only issue I noted in a comparison that I did between the CC helmet and an Anovos was that the CC will require repainting all the asymmetrical panels and the silver will need to be dulled done to meet CRL requirements. I have not seen either the 850 or CC in person only used photos from each's website. The paint job on the 850 helmet on their website isn't the best, I'm sure since they posted that photo that they have gotten better at painting their helmet. You can always ask each to send you current photos. The CC website says that their helmet will fit a head circumference of 63cm or 24.8 inches. If you have a larger head or need more room for electronics you may have to go the 3D printed kit option and have it sized appropriately. If you have a Jim Tripon helmet you have one that is sized to fit larger noggins. -

DoggyDoc’s Jimmiroquai Imperial Death Trooper Build Thread
Chaos replied to DoggyDoc's topic in Imperial Death Trooper
Those will work. -
@RobC_TX1138 My comparison of the Cyber Craft DT helmet and the Anovos or screen accurate helmet should have been specific enough, the helmet meets all the physical requirements and I outlined what would have to be repainted to meet CRL requirements. Right now I think that they are the only ones besides 850 Armorworks that sell finished helmets.
-

DoggyDoc’s Jimmiroquai Imperial Death Trooper Build Thread
Chaos replied to DoggyDoc's topic in Imperial Death Trooper
Looking awesome! -

DoggyDoc’s Jimmiroquai Imperial Death Trooper Build Thread
Chaos replied to DoggyDoc's topic in Imperial Death Trooper
-

DoggyDoc’s Jimmiroquai Imperial Death Trooper Build Thread
Chaos replied to DoggyDoc's topic in Imperial Death Trooper
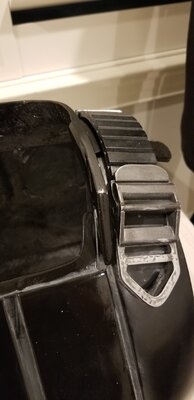
@DoggyDoc Gerald Your straps look good for Level 2, don't worry about the number of segments that are showing as these will be different for each Trooper depending on their upper torso size. We kept that out of the updated CRL for just that reason. When applying for Level 2 you will only need to show us in a photo that they indeed do bend. As far as the buckles. The ones used on the screen were cast formed in two pieces; the buckle and the D ring. The D ring is secured under the overhang on the front of the buckle. The two pieces are joined as if they are one and attached to the chest armor. You can see that by looking at the first two photos of the screen used suit that was on exhibit at Celebrations. The location of the buckle is approximate, but if you you look at the screen suits it appears in almost all the angles that the D ring corner (where is goes from being straight to curving to the front point) is just about even with the top line of the chest armor center detail that is horizontal in the indentations for the collar tusks. Any where in this area is good. The third photo is from my chest piece and is more of a downward-front-on looking view which might help you. Also remember that the buckle and D ring assembly are angled slightly inwards. How you chose to rig your front to back armor pieces is entirely up to you but a lot have found (Especially if they are hanging the shoulder pouch and chest ammo pouch rig) to have the buckle and D ring assembly hard attached to the chest armor and then open up a slot in the back greeblie to slide the straps into. Then again some people have permanently attached the back of the strap to the back armor and lay it over and use snaps, velcro, or strong magnets to secure the buckle D ring in place. I use the first method. I had to build up the area around the back greeblie on my Jimmi kit just to give it some more mass and structural strength. The fourth photo shows how it looks when the back of the strap is inserted into the back greeblie. One more tip, if you look at the fourth photo you will notice that I trimmed the back half of my collar to make the very back ridge about an inch lower, I did this because Jimmi's helmet would sit lower and it would prevent me from looking up and would "knock" against the bottom of the helmet. The Anovos was not so bad but it still would hit once in awhile. After I trimmed the collar I could actually look up almost 45 degrees. I have seen where some people have said they just cut off the back collar and covered it with the pauldron. You wont be able to do that for Basic or Level 2 approval. I don't recommend doing it even after approval, the average person may not notice it, but to those of us who know .... trust me we will notice it! Hope this helps. Your build is coming along nicely! -

DoggyDoc’s Jimmiroquai Imperial Death Trooper Build Thread
Chaos replied to DoggyDoc's topic in Imperial Death Trooper
Nice! And Yes, pistol is matte or satin finish -

Chaos' Dark Trooper Gen 3 Pre-Build Thread
Chaos replied to Chaos's topic in Dark Trooper - Generation 3 - Mandalorian
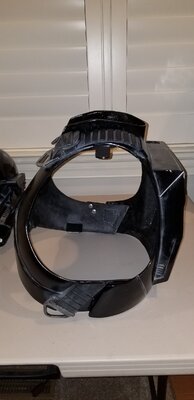
Its not a problem, this weekend I am making some adjustments, when I am done I can send them to you to check out.



.thumb.png.19a4448a868d48efcfa42687cd039197.png)
.thumb.png.a862a54122b70bb41930471ecaf33758.png)
.thumb.png.ebe97527ff59e40f82315d16fb1a66fa.png)
.thumb.png.24ea55beb12bd08c5110b0a25a977f95.png)
.thumb.png.4301b13e7c2284a75e3478a214f336ef.png)
.thumb.png.faff35eaba3f5db28d09592f0f9496e5.png)
.thumb.png.dfb05b8967798c96bef4ac64e0174a80.png)
.thumb.png.43b3a1380f817f3696e61a09ba6481bc.png)