

Fivezero
-
Posts
1,259 -
Joined
-
Last visited
-
Days Won
70
Content Type
Profiles
Forums
Events
Everything posted by Fivezero
-
Fivezero's Pepakura How-To (This is very PIC HEAVY)
Fivezero replied to Fivezero's topic in Miscellaneous Tips and Tricks
Maybe I'll take this one too? -
Fivezero's Pepakura How-To (This is very PIC HEAVY)
Fivezero replied to Fivezero's topic in Miscellaneous Tips and Tricks
Part 2: The Build - SWG Bounty Hunter Helmet So here we go, first we start off with printing the object you're making. Pretty standard here, File then Print... Here's the printed out stuff (had to redo it, forgot Edge ID ) And dive right in to cut it out. CUT THE SOLID LINES ONLY!!!!!!! I just use a utility knife when I cut this. I hate this part of the build, it is time consuming, boring and very repetitive. But after you're done is when the fun starts! Everything all cut out. Now there are two kinds of lines you will notice on the actual pieces. A dashed line for Mountain folds (the fold will fold out to look like this ^) and a dot and dash line for Valley folds ( think like a valley so it folds in like this V). Just think Mountain and Valley. I use two different colored pens, one for Mountain (blue on my piece) and the other for Valley (green for this build). This serves two purposes to keep your lines differentiated with color (it helps) and to indent the cardstock to make nice clean and crisp folds. Just keep working around to get all of the lines indented. I use a ruler to keep every line straight. All ready to fold (the FUN part)! Remember - - - is the MOUNTAIN fold, where you fold it out like a Mountain. - . - . is the VALLEY fold where you fold it in like a Valley. I use a bit of hot glue to connect the seams, it's pretty permanent and provides some structure to keep the cardstock together later in the build. Now once you get going on the next piece, you will want to check the different pieces to see how they fit together (unless you want to make it a big puzzle). Here's how ya do it. And here's the interface. So if I wanted to connect a different piece to one I've assembled, just click on a piece next to it in the model and it will highlight it on the model and in the grid on the right. Then search for your parts in your stack of cut out pieces and start building!! This also helps to show how pieces go together since you might need a very slight fold or an extreme fold to connect stuff. So there ya go guys! -
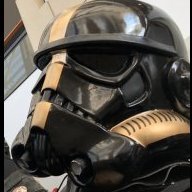
This is a Work in Progress, it will be revised (probably many times). But here's a little thing to get started. PART 1: The Program Alright so Pepakura is a great program that I use to craft much of my custom armor that I build. You can just about anything you want with this program. Whether it be a Stormtrooper chest plate or CLU's helmet from Tron: Legacy, if you can make a 3d model of it then you can make it in Pepakura. I encourage you to check it out and do some experimenting (that's how I learned a majority of what I know). You can download a free version but won't be able to save your unfolds. But here's some basics I've learned over the years. So we begin by opening (File, Open ) a 3d model. There is a list in the program of file types that can be opened (.obj, .3ds, .dae are examples). I use Google Sketchup for many of my models that I work with and in the free version you can export as .dae, so it works for Pepakura. For this little how-to we'll use a simple Venator-class Star Destroyer. Now I usually go right to Unfolding by hitting the Unfold button on top. The program begins to unfold all of the polygons in the model onto the grid on the left. The dotted lines are the edge of the paper. Currently the model is about 56mm long (but we'll scale this thing later). I usually head into the File menu to adjust Printer and Paper Settings. I make the Paper size "Letter" in the drop down menu of the window and adjust the margins to 5 mm (gives you more space to put polygons on). Now close that window and head to 2D Menu on the top. Here I click "Show Flaps" and turn them off (It gives me more room to arrange the shapes). I also turn on Edge ID to help with assembly unless you want to waste time trying to figure out what goes where. Also in the 2D Menu you will find the "Change Scale" option. Click this to begin changing the scale of your piece (duh, really Fivezero ) So it brings up a window with options to scale the piece. Type in what dimension you want to change and the others will change in proportion. I made it 560mm long. And here's what everything looks like after scaled. However now comes the fun part where you rotate and disconnect faces to fit everything in between the dashed lines that represents the area that is printed on the paper. So the Disconnect/Connect Face tool is the little blue icon, that is the third tool from the left. Basically you drag it over the pieces to find a green line then click to disconnect the face. Double click the red line to connect faces (they will connect only with the ones they're supposed to connect to in the model). It is done! This is the next tool that is crucial to arranging the pieces in the Grid... This is the Rotate tool, to (you guessed it) rotate the pieces and get them to fit. It is the second from the left on the toolbar. When you select this, a bunch of circles appear on the pieces at the vertices. Click a circle and a crosshair pops up. Then you click another circle and drag your mouse to rotate the piece. Do some experimenting to get the piece to fit. So here's some progress on the pieces. The more pieces you fit in each box, means less paper (well I use cardstock) gets used to print out your armor. And here's the finished arrangement (not perfect, but I'm not actually assembling this). Make sure all of your pieces are within the grid lines or they'll get cut off when you print them out.
-
Yeah approval will still be a little off. The LMOs are going to do a full blown review of the thing (it isn't a painted stormtrooper so it makes sense). At least they haven't said much about the helmet (other than brow trim). I would probably cry if they said rebuild it Pics will come don't worry
-
Alright so I've received a little feedback. They want me to take a few shots of the shoulders and knees. I might have to rebuild them, if they decide so (so I'm going to start preparing for that). It'll also look like I'll need to tone the weathering down a bit (no problem, nothing a little rubbing alcohol won't solve). Finally I found some thicker brow trim since they feel my current trim is a little thin.
-
Whoa there, computer. There never was a double post...
-
Heh, I'll post a little how to someday for ya guys. Moving right along today. Don't worry if it looks very sharp right now. I found a little trick while making the EVO helmet that I'll apply on the torso.
-
Well that actually went a lot quicker than the last time, probably because I didn't have to cut out each individual polygon like before (Pepakura actually connected the different faces this time ) That's a lot of cardstock...
-
Thanks bro! All you need is time, patience, some research and it helps to be mentally insane (what other explanation do I have for four unapproved builds in progress). Ugh, I'm splitting this up this time, not going to chug through it all like I did before (I could not feel my hand afterwards...)
-
Alright I think I'll try to knock this one out then move onto my last two projects then take an armor break for a bit . Pretty much I need to rebuild the upper torso armor since it kind of disintegrated... So I'll try to get that done in the next couple weeks. I also need to redo the feet a little bit more so they flow into the legs better. The legs and helmet have been improved and have been sitting around in primer since late August so I'll try to get some white on them soon. My goal is to have it ready by the end of December for another round of pictures (if not earlier).
-
You mean tightened them up to ab plate? Because that's what I did by adjusting the strapping and cutting a little plastic off. If you meant tightened them up as in bringing them closer to my legs, that can't happen due to my massive thigh muscles...
-
Oh I forgot to mention that I needed to work on some black armor (it had been so long, i forgot how good the black is ) as that white stuff for the EVO started making my hands break out with strange rashes....
-
Thanks again for the comments everyone! Glad everyone's liking it!!! My GML looked them over real quick last night, but he has a very busy weekend (It is Halloween weekend after all) and won't be able to get them posted for the LMOs to look at for a couple days. His only worries were the weathering (he thought it was a bit much as well) and the brow trim was a bit wonky on the helmet. Both of these are very easy fixes if they become issues. A little bit (okay well a lot) of rubbing alcohol should tone that weathering down no problem. ELP, I should have some time now that I don't have to work on this thing. I do plan to take a small break from armor builds (unless I get extremely bored). Once it's approved though, I'll start rolling on pictures for ya (I forgot that approval=another CRL). Also after it's approved I'll post up a details thread that shows how I did everything and how all the little details were made.
-
Wow, it's been awhile... So with all my crazy builds the last couple months I've neglected my poor Novas! So after my first couple troops, I noticed the legs needed a little work since my kneeplate kept getting stuck underneath the thigh. That and it was a little tough to walk around in. Situation resolved: I moved the elastic straps down on the thighs to pull them up to the ab plate in addition to cutting about a quarter inch off of the thighs further making them come up higher. I also adjusted the arms since they were acting a little screwy after my first troop (however those fixes were awhile ago). So this is a testament to the fact that you are never done working on your armor. Fivezero
-
Alright here's the full 360 pics for you guys. Front: Right Side: Back: Left Side: Some minor things to work on. The belt needs to be secured some way, those pouches really drag it down. The legs need to be adjusted a bit so I don't keep popping the kneeplates off. Finally I need to find a better way for the hoses to run into the chest box (I'm thinking some rare earth magnets). But they are just minor things I noticed after wearing this (yes these are pics of the very first test fit). Overall I am extremely pleased with how it turned out (looks like you guys are too!). I was mostly worried about the weathering and that maybe I had done a little too much. But it looks like it all tied in together very nicely. Hopefully I'll hear back in the next few days on this thing.
-
Thanks a bunch guys!!!! I'm so flippin excited I woke up at 3 AM (the time of this post) because I wanted to see if my GML sent the pics along, but it looks like he hasn't quite yet (considering I sent them to him late at night I wouldn't expect him to) I probably won't be able to get the other pics up until later since I have class today then straight off to work. Unfortunately you all will probably have to wait a bit. ELP, I did a new build for the pack. Some of the parts are blue like the Sandtrooper packs and it would have been a pain to switch out and the hose running around also made things worse. Finally the weathering complicated things too. I'm so excited!!!!!
-
So I present my EVO Trooper, the result of the secret build I had going on! Here's the pic, hehe I'm so excited! FIvezero :D :D :D EDIT: I just realized that this was my 200th post!
-
So now that my secret little build is just about done, it's time to get back to my other projects. So I whipped up this kama for this build real quick. I think I'll use some Underarmor as well for the shirt and pant base then make some mods from there. Fivezero
-
Here's a mock up of the front of the boot. I'm thinking there is going to be a hard part for the front and a soft, fabric portion for the back of the boot with a piece of armor for the shins.
-
Worked on this a little more since I was bored. After hurting my brain thinking about sewing I made a mock up of the chest pieces and the ab/belt box. Also did some doodling to wrap my head around some of the other parts. I'm considering making a cut along that line on the right side of the chest to make it closer in shape. Maybe I'll start actually making some armor tomorrow while I repaint some Darktrooper pieces.
-
Nice blaster, I especially like the weathering on it! I'm going to let mine get naturally weathered as it gets beat up. I might do a pipe build someday, depending on how I feel about trooping with this heavy thing (I'm a big guy so this thing isn't too heavy for me, but I haven't held it for a couple hours yet). And I already have my eyes on my next "real deal" build, just need to save some money up for it......
-
The only resin bit is the counter (until I find a counter at a decent price) and it came from Doopydoos. Everything else is a real part.
-
Thanks for the comments guys! Got some paint on it this morning. Top view The bolt can be cocked back, but I still have some things I want to add later.... T-tracks! And the magazine can still be removed (took me a bit to figure out the mag release). The rear cap somehow turned really glossy when I painted it.. So that'll be repainted later. That and I still have to figure out a retainer ring for the rear cap (after that I can put the springs on the bolt and have better functionality). All in all, I'm very pleased with it. :D Oh and I just weighed it too. 11 pounds (that's more than my M1 Garand rifle from WWII ).
-
And minus the final paint job, this thing is done!!! Now to get some new Nova Medic pics taken...
-
Well the magazine has successfully been modified. Now just to add some t-tracks and paint!