

Fivezero
-
Posts
1,259 -
Joined
-
Last visited
-
Days Won
70
Content Type
Profiles
Forums
Events
Everything posted by Fivezero
-
Thanks! I’ll get the ab photo taken tonight and drop that in the folder. Got a few tweaks to make and then I can get the full shots taken! I’ll also get that description written tonight too.
-
So here's a big update, basically a lot of trimming and painting! And here's a bunch of pictures of me trimming out the smaller pieces this morning, getting them ready for the primer/paint above. Belts before and belts after. Trimmed the thigh ammo belt and squared off the ends. Still have to trim just a little more off one side (the belt in game is slightly longer on one side). For the main belt face, I matched the cuts seen in the model, but the belt ends are supposed to be longer on all TFU troopers. I had one good pull on my Jumptrooper belt, but it needs a lot more work to get consistent results. In the mean time, the included belt with the AM kit will work (getting the CRL finished is the main task right now, the perfect belt will come later). And paint! Plan is to work on the biceps and thighs this week (yeah I changed my plan this morning ). I've also got a few ideas on how to tackle the TD, it's a little different and might do something new with it.
-
Oh yeah! Excited to see this build!
-
So here's the helmet after a few days of letting it rest, the color has gotten much richer. Still didn't quite as glossy as my test piece, but I'm still pleased with the result. Also trimmed up the torso armor and finally got a chance to prime it just now. So we're moving right along! Going to sand down the primer and paint the armor tomorrow. This weekend I plan to tackle the biceps and thighs this weekend and get those ready for paint.
-
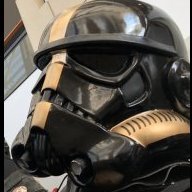
Got the helmet painted yesterday. First I had to make it like the false Shadow Stormtroopers roaming around by painting it with gloss black. Then painted on the aluminum paint, to turn it into the true Shadow Stormtrooper. Also the armor showed up yesterday, excited for the fresh start on this trooper.
-
Based on our conversation @IcyTrooper, here is a quick edit of the ab plate allowing the separated cod. The cod plate must match reference photos. The cod plate may be integrated with the abdomen armor or a separate piece. If separated any gap must be fully concealed by the belt. How's that? Just for context for anyone else wondering what started this, my cod plate is separated as it is unique, while the ab plate is existing TK-style. No reason to reinvent the wheel and sculpt/form more than I had to. Technically, the TFU troopers have a separated ab & cod since there's no geometry behind the belt (really this is to reduce polygon counts on the models), if we really needed to justify it.
-
Yeah, I decided to stick with Rustoleum. Like I said, it's what I originally used- I'm also trying a few more tricks that help enhance that shiny aluminum look on this trooper. Namely throwing some gloss black then the aluminum paint. Here's a test part I did a while ago compared to my existing kidney plate. The black seemed to give it a little more depth and a better gloss. And after looking through the reference pics, the new paint job matches pretty closely. Anyway, did a little more cleaning up on the helmet and started spraying primer! Going to sand it with 400 up to 800 grit tomorrow and then hit it with the gloss black. After that the metallic aluminum paint will go on!
-
Sergeant Kreel WIP. Comic Star Wars (2015) Issue #59&60
Fivezero replied to darthRivera's topic in Sergeant Kreel
It looks good to me! I took a look through the photos I have and I see the color as being anywhere from orange to a redder orange to a light red. So I think you'll be alright there. But I agree with you, a darker orange might be better. Color is always a tricky thing to get right, but I think it looks great. -
Not much today, just got the other side cut out. Gotta do some light sanding/scuffing and I'll probably start priming the helmet tomorrow. Haven't decided on the silver, I used Rustoleum Metallic Aluminum on the original build. Might try Rub N Buff this time around.
-
Yep been loving that Angelus, going to redo my Jumptrooper boots after we get the CRL together. Anyway, got the helmet together over the weekend. Made up some masks for the tube stripes. And proceeded to cut out the tube stripes. Still have to do the other side. After the helmet is painted, I will place some fogged clear plastic behind it to diffuse the light and give it the proper glow. ^Even after 8 years messing with this trooper, this never gets old.
-
Sergeant Kreel WIP. Comic Star Wars (2015) Issue #59&60
Fivezero replied to darthRivera's topic in Sergeant Kreel
Looks great! I was going to suggest some magnets to hold that on, but it looks like you're ahead of me! Keep up the great work! -
And boots are done. Probably could have gone a little lighter on the gray, and a tad darker on the red, but it's close enough for me. It's one of those, looks a little different IRL vs. in pictures. Have to do some work on my truck tomorrow. But I've got a helmet to build on Saturday, and I'll get my electronics buy list together and will probably start purchasing everything for the lights.
-
Sergeant Kreel WIP. Comic Star Wars (2015) Issue #59&60
Fivezero replied to darthRivera's topic in Sergeant Kreel
Build looks great so far! Overall, this is kinda what I'm seeing on that shoulder piece, just a quick sketch below. I think you're fine as is, but if you wanted to cut another pattern out, might try this and see how it looks. -
Yep, and that was just the first coat (and using a brush...) Overall, didn't need very much at all. The small 1oz bottle would have been plenty. Very, very pleased with this Angelus paint, definitely going to be the go to if I need a custom color. Here's a quick picture in case anyone wants to try out for something. I forgot to order the red paint for the stripes, but that's on its way now. Also decided to tear apart the helmet to repaint it, unfortunately it didn't quite make it. So I guess I need a new helmet now... Eh whatever, not too bummed about it. Just another reason for a true fresh start.
-
Alright so tried out Angelus leather paint on the boots and so far it's great! We'll see how it holds up when I start wearing the boots. But I feel much better about this stuff then what I originally used. It's also nice to see the boots relax and get back to shape, that old paint really did some damage to them. So here's the paint/flexibility test! Painted a few small patches just to see how I liked the color (had to make my own gray). Was pleased with the results and just got done painting them! So I still have to get some red paint for the stripes, but I'm pleased with how the boots look so far! Much better than how they looked a week ago... Also got some AM armor on the way! Time to buy some paint...
-
So here it is, starting to rebuild my TFU Shadow Stormtrooper. Even though this guy has been approved, I'm starting fresh on this trooper. Even though I have some CRL pics ready to go, I'm completely starting over. New build thread, new lighting system, new armor, new paint, everything. First off, gonna get a new AM kit and make the necessary clear parts myself. Going to look at getting new LEDs all the way around. Finally the all important battery. On my original build, I used small 12v batteries for each part. Now I've decided I'm going to have a central battery for the whole thing. There weren't very many options available back when I started my original build in 2012(?), but thankfully battery technology has changed drastically since them. Probably going to end up with a unique undersuit with the wires running through it as well. One of the few components that will be salvaged are my boots. Despite using a "flexible" paint, it wasn't. There were a lot of cracks, and it looked ugly. So stripped them and have some leather paint on the way that hopefully will work a bit better. So here we go! TFU Shadow V2!
-
Welp, here's a quick update. Got the second back plate together and weathered. I finished up the jetpack touch ups and got that weathered. Finally spent a couple hours taking CRL photos today. Still have to do the full suit-up pics, but all of the individual part pics are done.
-
Shoulder bells and belt for army troopers?
Fivezero replied to That one guy's topic in Imperial Army Trooper
Unfortunately Awakening of the Rebellion is a fan-made mod for Empire at War (mid-2000's PC game). So sadly can't use that as a reference. But like @Blackwatch mentioned, don't let a lack of references/Legion eligibility stop you. Make what you want, maybe try to find an existing Legion costume that you can use as a base for membership and wear that for the official events. Then stick on the extras at the more open troops. -
Well after struggling with the shins all week, they're finally done. Never had something so stubborn to not get painted. The paint job still isn't perfect, but it's good enough... First the primer cracked the spot putty, then the paint had a reaction with the paint. So had to strip it back to bare plastic, broke out the real filler and redid the ammo belt. Finally was able to get some paint on it Friday night. Then I accidentally knocked my forearms off the bench. Yep, never doing 3D printed armor again... These are getting molded and I'm casting new ones after the CRL is done. But they're repaired and ready to go (again)! Next big project is getting my second back plate ready with the rectangular details in the middle. Oh yeah, almost forgot, got the armor weathered yesterday. Still have to do the jetpack after I finish touching it up. Gonna start taking CRL pics this week!
-
Alright, thanks guys!! Will get the changes made in a minute. Got the armor weathered and final detailing done on most of it, so I'll start taking CRL pics this week.
-
So opening up this back up for discussion... Got a couple notes now that everything is just about assembled. Abdomen Armor, specifically the black plate. So I'm proposing that we move the line below (in red) to L2. Basically, me being a tall guy, I'm going to have problems with the chest plate overlapping the small plate while the small plate overlaps the buttons. Personally, I think having the chest plate overlap the small plate is more important than having the button plate covered. Abdomen Armor A smaller, angular plate is mounted on the top of the main abdomen plate. The small plate is flat black in color and features 12 holes 1” (25mm) in diameter. The plate partially obscures the top of the button areas, covering the top buttons. - move to L2 The chest armor partially overlaps this plate. Where it sits while covering the buttons, note the distance between the plate and the top of the ab. All of my chest plates (even my Novas & EVO), barely overlap the ab plate. Just something to help us bigger troopers out. Where I'm thinking it should end up. The other thing is on the boots. The "toe armor" should probably be renamed to something other than armor, just to leave it open ended. I tried making armor molded to the toe, but it looked off and I couldn't get a good result. I took some leftover vinyl from my pouches and they stretched and molded perfectly to the boot. That front patch is the big issue here. Boots Three reinforcement patches (or something else if you guys have suggestions), white in color, are present on the toe of each boot. There is one larger piece at the front, with two smaller pieces at the sides. Let me know what you guys think on these two items!
-
Sergeant Kreel WIP. Comic Star Wars (2015) Issue #59&60
Fivezero replied to darthRivera's topic in Sergeant Kreel
Great looking build! You're definitely on the right track! One thing you may want to try is an EL panel, might give you that look on that communicator. https://www.adafruit.com/product/414 -
Here's a quick update, so close now. Aside from a little clean up and some weathering, the boots are done! Painted the thighs and they are ready to go! The shins belt was giving me some issues, still have a little more filling but should have it painted tomorrow. Finally got the chest plate together. Going to repaint the hose ports, not crazy about that gray. Only a few things left to do! Mount small black plate on ab armor. Paint shin ammo belt. Attach knee plates. A few touch-ups on the jet pack. Start weathering! Start taking CRL photos this weekend hopefully.
-
Alright cruising along, getting the final details added. Mounted the shin ammo belt this weekend and glued on some cover strips today. Painted the ab buttons, added the belt and glued on the belt buttons. Finally got the shoulder straps out, glued some plastic on the underside to give them some rigidity. They're ready to paint now! Tomorrow - I plan to get the thighs and shoulder straps painted and I have some light filler work to do on the shin belt. Thursday - Paint the shin ammo belt/cover strip. Friday - Chest armor. Mount the chest tube, get the hose inlets together and painted, and cut the hoses to length and paint accordingly. Sat/Sun - Boots, we'll see how it goes. Maybe get some knee plates mounted on the shins too. Next week - Weathering, weathering and more weathering.
-
Alright, main post updated. So onto weapons. The main weapon is the "Rail Detonator" in the game. The figure comes with an E-11, and has some artwork showing this as well. You can see the Rail Detonator on the cardback as well. So E-11 and Rail Detonator, that sound like a plan? Unfortunately, I won't have my detonator done by the time I get the armor done. So should we just stick with the E-11 until I can get my rail detonator finished and add that later? Or do it all at once, even if we have to delay the CRL a bit?


