

Fivezero
-
Posts
1,259 -
Joined
-
Last visited
-
Days Won
70
Content Type
Profiles
Forums
Events
Everything posted by Fivezero
-
Shadow Stormtrooper (Force Unleashed) CRL Proposal
Fivezero replied to Fivezero's topic in TFU Shadow Trooper
Alright, glad we got that figured out. And yes that's exactly what it is, a CRL update essentially. When I shot you that message last week to get the ball rolling on this, I had no idea the new costume approval process had changed. And like I mentioned I stumbled across the new process while checking out all the new costumes that have been added to the Legion in the last couple years, especially the Spec Ops stuff. I was wondering why you guys were holding off on that BF2 Rocket Trooper... I'm still getting back up to speed myself. Anyway as for L2 stuff, I've got a list of items. Between helping my Dad with his TIE Pilot and a new vehicle project fell into our laps (just what we need) over the weekend, so been busy with that and haven't had a chance to write anything yet. I'll set aside some time tonight to get something written up. -
Shadow Stormtrooper (Force Unleashed) CRL Proposal
Fivezero replied to Fivezero's topic in TFU Shadow Trooper
Alright, I'm back. Sorry, I've been sick the last few days and I got exactly zero sleep last night. So if I sounded a bit agitated earlier, that's why, wasn't intentional. Wasn't expecting to see that this morning. So to address the concerns, yes this trooper is approved for me and I can freely troop with it. If there's any doubt, here the link to my profile page. https://www.501st.com/members/displaymember.php?userID=12879&costumeID=337 To expand on what Steve mentioned, the "New to the Legion" process used to go something like this. Finish the build, submit to LMO, wait to hear back and make changes if needed (my EVO Trooper in particular had some back and forth), then once approved by the LMO we would write the CRL, take pictures of the components and submit the finished CRL. If I recall correctly, we eventually started to send in the CRL text along with the initial submission (for me, started with the Novatrooper Sentinel and then the TFU Shadow). After the EVO, I decided to take pictures after the trooper was approved to avoid having to take more pictures and thus more editing if changes had to be made. For this trooper I was expecting the back and forth that accompanied the EVO Trooper, but there really wasn't any and the CRL text was eventually posted and we just needed the pictures. Life happened, and I forgot about it and parts broke and LEDs burned out, as well as coming up with new ideas, etc. Just to add some context. Now I understand, the process is different now, I was reading up on it the other day. We won't have this confusion with the Jumptrooper when it's ready to send in. So initially I wanted to bring this trooper back in to the light to look at the getting the CRL finally finished up with photos. I initially wanted to use the existing photos as placeholders, but I've rethought that and we should just wait until I get this guy rebuilt. I decided to take a look at the reference pictures and re-familiarize myself, saw some new things I missed years ago, and wrote up the new draft. Just want to make sure we're all on the same page. This one is a bit different than the usual process, you guys are probably used to. Like I mentioned, I have no problem making changes or adding details and such, but the core of the CRL shouldn't need a whole lot right now. -
Shadow Stormtrooper (Force Unleashed) CRL Proposal
Fivezero replied to Fivezero's topic in TFU Shadow Trooper
Woah, woah, we need to pump the brakes a little here. At least let me respond before a decision is made. I politely, but strongly disagree with that decision regarding the lights. This trooper needs two different lighting methods which consist of light that shine through armor in certain parts (helmet, shoulders, forearms, TD and shines) and lights that shine over armor. Just to be clear, my suit uses both of these methods to achieve an effect that matches in-game as closely as I could. This shine-through effect can be achieved using clear armor or in the case of the helmet, simply having the teeth and tube stripes cut out. But the parts in question absolutely need the lights to propagate from "within" the armor. Simply hiding a blue light underneath a solid shoulder bell won't give you the blue light you need underneath the black stripe. I tried it when I first started building it, and it looked terrible and I quickly moved on to trying other things. We need to have both styles at Level 1 for this CRL. This is how this trooper was when I was approved with it. I completely understand that this will make this build harder for people in the future, but clear parts are a necessity even at the basic level. There is simply no other way to achieve the desired effect that matches the game. I am looking into ways to help people in the future more easily have access to clear armor (either by making and providing 3D print files, or forming my own clear parts for kits). Regarding the photos I posted, ignore them. I've decided that those CRL photos are no good going forward, even as placeholder photos. We just need to wait until I get this trooper rebuilt and get new photos taken. I should have removed the LED strip for the kidney plate photo, but didn't for some reason. Please, please don't assume that because one piece of armor is lit one way, that they can all be lit with that method and match the trooper from the game. -
Shadow Stormtrooper (Force Unleashed) CRL Proposal
Fivezero replied to Fivezero's topic in TFU Shadow Trooper
Alright, fired up the game earlier and have some quick notes. Concerning the knee plate, the front face/hexagon is definitely the medium gray instead of the silver like the rest of the shin armor. Screenshots below. What really sold me was the texture file from this trooper (did some digging around the game files). The front of the knee is clearly a different gray and matches the other armor parts that are gray. Also took another look at the kidney, butt and cod armor, just to be sure. It looks like they both do lack the edge gaskets. It looks like it's a graphical glitch where the texture meets the edge of the 3D model, so I say we keep it off. The side and upper edge of the ab definitely has the trim though. -
Shadow Stormtrooper (Force Unleashed) CRL Proposal
Fivezero replied to Fivezero's topic in TFU Shadow Trooper
Unfortunately, got busy so didn't get a chance to get the level 2 stuff written out. But I did get the game downloaded and reinstalled, so I'll take a look at this trooper in-game tomorrow. Some of these details that I'm on the fence about will really jump when seeing the trooper in a dynamic environment vs. still pictures. Just to clarify on the knee plate, I'm thinking that the whole front face might be gray, not just the recessed area below the ridge. It would look similar to the Novatrooper knee plates (without the ridges on the side being painted). I'm still undecided on this detail as it's hard to tell, I'll see how it looks in-game and try to get some good shots of the knee plate before we make a decision on that. -
Unfortunately another busy week, but was able do some sanding on the jetpack nozzles and nozzle tubes. Also gave the main tank a pass with the angle grinder to knock down the big ugly stuff with a follow up pass with the sander to smooth it out a bit. Definitely found a few things that I'm going to change on the model/3D print files, for any future Jumptroopers. Next step is body filler on the main tank and then fitting the tops for the nozzle tubes.
-
More part printing fun! This is the swiss cheese shroud for the muzzle as well as the smaller detail pieces. Now on to the main body of the blaster!
-
@CrookKnight Let me know if you want or need the model for reference, I would be happy to send it along.
-
Shadow Stormtrooper (Force Unleashed) CRL Proposal
Fivezero replied to Fivezero's topic in TFU Shadow Trooper
So as I noted above in the draft, I think the center "hexagon" of the knee plate might be the semi-gloss gray vs. metallic silver like the rest of the shin and knee plate. It's something I noticed while I was looking over the reference pictures again. This center part doesn't quite shine like the silver does. The pictures below especially show what I'm thinking. What thoughts do we have about this? I'll try to get in game and take some new pictures around this potential detail. -
Shadow Stormtrooper (Force Unleashed) CRL Proposal
Fivezero replied to Fivezero's topic in TFU Shadow Trooper
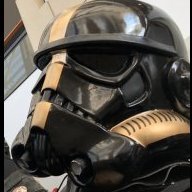
Sounds good Janem, thanks for your thoughts and input! I rewrote the CRL last night, mostly focused around adding the new details. I also reworded much of the wording regarding the blue lights to add some clarity (hopefully). I also updated some of the terminology to bring them in line with other CRLs. So here's the next draft of the CRL with changes in red text, take a look and let me know if anything needs to be reworded or changed. I still need to add the level 2 text, I should be able to do that tonight. Helmet For 501st approval: Lenses must be sufficiently dark enough to obscure the costumer's eyes. They may be flat or bubbled. Blue lighting shines around and on to the lenses. The body of the "ears" is metallic silver. The bars have three or four bumps and are dark gray in color. The frown must have 8 teeth cut out. Blue lighting shines through the spaces between the teeth. The tube stripes may number between 9 and 15 per side with the curve bends extending backwards. Blue lighting shines through the tube stripes. If helmet is not made from clear plastic, the tube stripes must be cut out to allow the light to shine through. Vocoder (vertically ribbed chin detail) is black. The aerators (cylinders on either side of the vocoder) are black, and screening is silver. Traps (trapezoids on dome of helmet) and tears (area beneath the corners of eye lenses) may be hand painted or decals and are dark gray in color. Rear traps and tears have vertical black lines. Note: The helmet is accurate in detail and proportion to official references. Many commercially available helmets or those considered disproportionate in size or shape are ineligible. Neck Seal For 501st approval: Black with horizontal ribs, fitted to the wearer, and extending from the base of the neck to the top of the Adam's apple. Shoulder Straps For 501st approval: These must be securely mounted in front and may free float in back. The shoulder straps are metallic silver in color Shoulder Armor For 501st approval: One on each shoulder. The shoulder bells are considered effectively symmetrical; they may be worn interchangeably on the left and right shoulders. The shoulder bells are constructed of clear plastic with a broad gloss black stripe covering much of the shoulder bell. The shoulder bells have broad blue lighting that shines through the sides of the shoulder bell and a thin strip of blue lighting that shines through the bottom edge of the shoulder bell. Upper Arm Armor For 501st approval: Biceps are fully closed. Biceps are metallic silver in color. Forearm Armor For 501st approval: Forearms must appear to be fully sealed and enclosed. Forearms are metallic silver in color and may be constructed of clear plastic or opaque plastic. Blue lighting shines through the top and bottom circumference and through the depressions along the top ridge. If the forearm is made from opaque plastic, the ridge depressions need to be cut to allow the light to shine through. Handplates For 501st approval: Roughly pentagonal in shape, the hand plates are mounted securely over the back of the glove. As an alternative to plastic, these may be made out of latex or latex-like material. The handplates are metallic silver in color. Gloves For 501st approval: Black in color made of rubber, nomex, leather, or leather-like material, with no visible straps or logos/designs. The fingers are enclosed, non-textured. Chest Armor For 501st approval: Chest plate overlaps the abdominal plate. The top of the chest plate is semi-gloss medium gray while the bottom is metallic silver in color. Blue lighting is present along the bottom edge and shines on to the abdominal plate. A metallic silver, flexible U-shaped gasket or molded lip is present around all edges. Back Armor For 501st approval: Back plate contains a "O II" design with little or no overlap of the kidney plate. Back plate is metallic silver in color. A metallic silver, flexible U shaped gasket or molded lip is present around all edges. Under Suit For 501st approval: · Black non-textured material, either one-piece or two-piece construction with no visible zippers or logos. Abdomen Armor For 501st approval: The abdomen armor is semi-gloss medium gray in color. The abdomen armor has a button area with 10 black buttons of approximately 7/16" in diameter. Abdomen armor button detail is inverted compared to ANH/ESB. A metallic silver, flexible U shaped gasket or molded lip is present around the sides and top of the abdomen plate, but does not extend around the cod plate. Kidney Armor For 501st approval: It is allowable to have a single kidney/posterior armor for 501st requirements. If a separate kidney plate is used, it should line up with the ab plate, with the top of the kidney plate being flush to or under the back plate. The kidney plate is metallic silver in color. Posterior Armor For 501st approval: · It is allowable to have a single kidney/posterior armor for 501st requirements. If a separate butt plate is used, it should line up below the bottom of the belt with the ab plate, with minimal gap between it and the kidney plate. · The butt plate is semi-gloss medium gray in color. Belt For 501st approval: · Belt face is made of plastic (ammo belt). It is comprised of 6 rectangular boxes, with two square buttons, one on each end. · On the ends of the belt face, there is a curved cut along the bottom edge and a small 45° cut at the top. · Belt proper is metallic silver and color and must be 3 to 3.5" wide and can be made with plastic or fabric in metallic silver. · Back of the belt has blue lighting that shines onto the posterior armor. · The drop boxes dangle from the sides of the plastic belt face via black straps and are aligned under the square button of the ammo belt. These are semi-gloss medium gray in color. Thermal Detonator For 501st approval: · (a.k.a. O2 canister) attaches to the back of the belt. This is a cylinder 2 to 2.5" in diameter with metallic silver end caps and a metallic silver control panel pad, with controls closest to the right end cap. · Blue lighting shines through the main cylinder body. Thigh Armor For 501st approval: The thigh armor may open and firmly close in the back allowing the two halves to appear sealed when viewed by spectators. The thigh armor is semi-gloss medium gray in color. The ammo belt is installed on the bottom of the right thigh and is metallic silver in color. The ammo belt has blue lighting behind it, shining on to the thigh. Lower Leg Armor For 501st approval: The shin armor is able to open and firmly close in the back allowing the two halves to appear sealed when viewed by spectators. The trapezoid knee plate is affixed to the top of the left shin and is metallic silver, with the central hexagon being semi-gloss medium gray. (a new detail that I may have found, see post below). The shin armor is metallic silver in color. Blue lighting shines through and along the bottom edge of the armor. Boots For 501st approval: Dark gray leather or leather-like, above ankle height, with a flat sole, and small U-shaped elastic sections on both sides of the ankle with no buckles or laces. Jodphur-type boots or an equivalent style. All stitching must be dark gray, and unnecessary or decorative stitching must not be present. Elvis / Mariachi boots are not acceptable. A red stripe is present around the front of the boot. White or other color boots may be painted dark gray so long as the boots are maintained to remain the proper color. -
Shadow Stormtrooper (Force Unleashed) CRL Proposal
Fivezero replied to Fivezero's topic in TFU Shadow Trooper
So I was able to find the 3D model (albeit with a low res texture) from the game for this trooper and took a look at the geometry of the model. The belt face definitely has the curved cut at the bottom and the small 45° cut at the top. So the question is do we want to have it at the basic level, and have the correct cuts for Specialist? Also the actual belt around the back is significantly thinner than the belt face, while being mounted much higher than traditional belt placement. Again do we want it at basic or Specialist (i.e. regular sized belt at the basic level, thinner belt for Specialist). And for the edge trim, it looks like the only the upper edge and sides of the ab plate has it modeled in (along with the chest and back). The kidney, butt and cod armor has just a flat edge with no raised geometry above the surface of the armor to look like the edge gaskets. So I propose we add it only for the ab plate (but not the cod) and the chest and back. So let me know what you guys think of this and I'll write up a revised CRL. -
Well after all these years, finally getting to build the last and final piece for my EVO Trooper, the FA-3 Flechette Launcher. Been a long time coming, and very happy to finally get a start on it. I remodeled the weapon about a year and a half ago and prepped it for 3D printing. Then I never did anything with it.... After fighting my printer this past two weeks, it's finally running consistently again. So now that all of my Jumptrooper parts are printed (save for some small detail parts), it's time to start printing this launcher! This is the large muzzle cylinder, the two biggest prints for the weapon.
-
Shadow Stormtrooper (Force Unleashed) CRL Proposal
Fivezero replied to Fivezero's topic in TFU Shadow Trooper
Hey thanks for the input! And no worries, anything to start the discussion! But most of the nitty gritty items above I was going to leave for Specialist requirements, but if want to add them in at the base level, I'm completely fine doing it. Just to give some context/insight to my decisions, when I first started this build (and when it was approved) we didn't care too much about some of the nitty gritty stuff, hence why it's pretty simple and really only mentions what parts are which color and what parts need the blue lights. Also this thing was built from a bunch of spare parts so it's more of a Franken-kit. It has an RT-Mod chest with an FX back, AM style shoulders and ATA for everything else with some parts modified or outright made by myself. And the way I build things, I don't base them off any one style of kit (i.e. ANH or ROTJ), again just to give some insight into my particular build(s). Anyway to address Janem's points: - As for the edge gasket, I really only put it on the chest and back (as you can see). The butt plate, outright doesn't have it at all. And it kind of looks like the kidney or ab/cod might have it in some pictures, but in other pictures it looks like a lighting glitch or something. I partly based this decision off of my EVO Trooper from the same game, which again only has it around the chest and back, so I left it off everything else on the Shadow Stormtrooper. But what does everyone else think? Again I'm not in the camp of making it conform to one style of movie-based armor just based on a couple features. - The statement about the lenses sounds great! - As for the tube stripes that sounds great, maybe also add that the helmet (or specifically the face plate) can be made from clear plastic or if made from an opaque plastic it should have the teeth and tube stripes cut out for the lights (of course written better). - For the belt, I propose something different (maybe have it be Level 2), how about a somewhat unique belt? In the picture below, it looks like there's actually a large curved cut at the bottom with a small 45° at the top. So how about straight cut for level 1 and the large curved cut for the bottom with a small angled cut at the top. What do you guys think? I'm also fine if we just want to adopt the cut at the basic level. I'll track down the 3D model (I should have it somewhere on my computer), and see if I can confirm this feature on the model. - For the shoulder bells, how about instead we say the shoulder bells are clear (vs. gray) with a large black stripe. I don't want people to accidentally paint the area where the light shines through, otherwise I'm fine with adding some more detail to the text. And it shouldn't need any paint beyond the black, the light covers the area just fine. Also just to make sure we're on the same page, the bottom edge also has a tiny strip of lighting, not just solely the left and right edges. So those are my thoughts regarding Janem's ideas, overall I like them! I'm very open to anything to improve my own build and the CRL. I'm going to get the game reinstalled tonight and do some digging in regards to things like the belt and edge gaskets. Of course whatever we decide upon will guide my rebuild. So what does everyone else think? Let me know and I'll be happy to make changes to the text. -
Shadow Stormtrooper (TFU) Reference Pictures
Fivezero replied to DeathMOS30's topic in TFU Shadow Trooper
Dredging this up to post the pics I had used for my build, mostly just two sets of 360° pics. -
Shadow Stormtrooper (Force Unleashed) CRL Proposal
Fivezero replied to Fivezero's topic in TFU Shadow Trooper
I plan to review the text myself tonight and make any changes if need be, but always good to have someone double checking stuff. Been meaning to look it over the last couple days, but the 3D printer has been fighting me tooth and nail (thankfully it's running now and can get back to other things). Also it looks like my reference photos never got posted either, I'll get those posted up tonight as well! -
Shadow Stormtrooper (Force Unleashed) CRL Proposal
Fivezero replied to Fivezero's topic in TFU Shadow Trooper
Thanks for digging it out! Let me know what you think about the pictures and if you want to use them. I propose we post it up as interim photos, just to get the CRL greenlit, but if we want to wait for new photos that's fine. I plan on getting back to the rebuild of this trooper once my 3D printer is running again, and then taking entirely new photos (especially the main shot). I see there was some discussion revolving the lightsaber a while ago.... My thoughts are to leave it out (I firmly believe FISD shouldn't have included it with their troopers). Simply put, the troopers in the game never use a lightsaber against you. They always have a blaster or their signature weapon (FA-3 Flechette for EVO Trooper, Rail Detonator for Jumptrooper, etc.). The only time we see the troopers with the lightsaber is when you select them as a skin for Starkiller (which requires a cheat code, unlike the regular costumes in game), it's just an easy way to get good pictures of the armor. The LMO at the time even questioned the validity of my screenshots, due to the saber and requested additional photos to prove it wasn't just a custom skin that was added to the game. -
Welp, I got out into the shop to get back on the Jumptrooper! Hit the chest plate with the angle grinder to smooth out the hard edges/geometry. Then came the body filler and sanding routine. Still needs some work around the sides and a couple other small spots. Also sanded the tubes and nozzles for the jetpack and laid down a small layer of filler and spot putty.
-
Here's the dimensions for the pack, as a quick note these are approximate with maybe a 10% margin of error. I scaled the full trooper model as close as I could based on the helmet and back plate. So it's not exact, but it's in the ball park. So I have the whole pack being about 438.1mm tall, 299.1mm wide and 166.1mm deep. The tube at the top is about 273mm wide with a diameter of 114.1mm down and reduces down to about 97.2mm. The diameter of the large circular section that is part of the main body is 135mm.
-
Absolutely, can do! I'll play around with it later tonight and get back with dimensions.
-
The printer just doesn't want to extrude plastic out the nozzle. Which is just odd since it was working fine with a few hiccups here and there and then out of nowhere, no plastic moving out of the nozzle. So I spent the free time this week tearing it apart and fixing other things and trying some stuff to get it to work. I've got a new hot end and some upgrade parts coming, which should get it running again. As for the TIE stuff, yeah hopefully we get it together in time... My dad is still waiting on the jumpsuit and belt (supposedly 2-3 weeks he'll have it). It'll be tight, but he should be approved in time.
-
Unfortunately I got bogged down messing with the 3D printer, which is sadly deadlined for the moment. Got some parts on the way which should fix all the problems. Also been helping my dad the last couple days, he's building a TIE Pilot so been helping get it together (trying to get it together and approved before Celebration). We should get everything wrapped up today, and I can get back to the Jumptrooper tomorrow.
-
I have the 3D model for this trooper (been thinking about building this one) and I can get it scaled correctly and I can get measurements of the parts in question, if you guys want or need it.
-
I didn't get too much done today, just reinforced the back of the chest. And don't worry too much about the chest, I'll use an angle grinder to knock down the majority of the hard edges to smooth it out (yeah a bit overkill, but it'll make quick work of the plastic). Anyway I mostly just fiddled with the 3D printer tonight since it's been giving me more issues. But got it back up and running and printing out the insert for the back plate right now.
-
Sanded all the armor parts today! I focused on the knee plates and the shoulders in particular as these parts need multiple layers of filler to refine the shape. Everything else (like the biceps, forearms, etc.) just needs some spot putty to finish it off. Finally glued all the chest plate parts together, wasn't too bad actually! However I do think it's probably going to turn into a vacuum forming buck, not too confident about it's ability to hold up long term (and it's a bit too rigid for my tastes).
-
Great work, looks fantastic (and comfy)!

