IcyTrooper
-
Posts
4,109 -
Joined
-
Last visited
-
Days Won
378
Content Type
Profiles
Forums
Events
Everything posted by IcyTrooper
-
Here is the proposed text for the Abdomen Armor: Abdomen Armor The abdomen and cod piece may be combined/fused to a single plate/one piece or separate. Cod piece is white in color. There are two raised lines which run up the center of the abdomen armor up under the chest armor. This center section of the armor is white which splits black towards the sides of the abdomen armor diagonally getting wider the further up armor it goes and narrows as it goes towards the cod piece. There are no visible snaps or rivets. Abdomen armor must match in-comic references. OPTIONAL Level two certification (if applicable): There should be no gap between the ab and kidney plate, a single visible seam line is ideal. Any gap between the abdomen and kidney armor shall be no more than 1/2” (12.5mm). Any shims used to achieve this effect shall have a similar material and color as with the abdomen and kidney armor. Shims should be flush and seams are allowed. There shall be no visible rivets or snaps on the exterior of the armor.
-
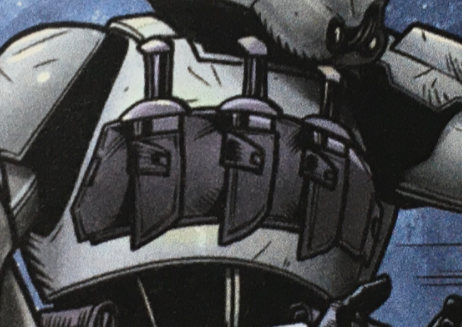
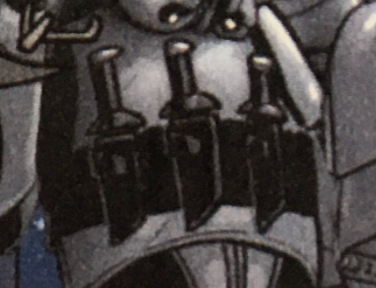
Here is the finalized Chest Armor text: Chest Armor Chest armor overlaps abdominal armor. Chest is smooth in appearance. There is a knives sheath/chest pad in the center of the chest that is made out of leather or leather-like material and has an irregular hexagon shape with the following details: The bottom of the knives sheath is curved following the bottom of the chest armor. There are three (3) knife sheaths equally spaced along the chest pad and house each knife's blade. On each sheath there is a strap on the right side with a black snap in the middle. The snap does not need to be functional. Within each pouch there is a knife or if local law prohibits the use of prop knives then the following details are present: Each sheath has the appearance of being full with a knife. Each sheath has the only the handle part of the knife and affixed to the pouch. OPTIONAL Level two certification (if applicable): Chest plate shall have return edges all around, maximum width of 3/8" (10mm). Chest and back shall be connected with a white fabric (preferably elastic) that does not stick out or show under the shoulder plastic straps. Here is the text for the Back Armor, Kidney Armor and Posterior Armor since there is nothing special with them either: Back Armor Back plate contains a “O II” design with little or no overlap of the kidney plate. OPTIONAL Level two certification (if applicable): Back plate shall have return edges all around, maximum width of 3/8 inches (0.9cm). Kidney Armor The kidney armor is separate from the posterior armor (ANH style) and lines up with the abdomen armor. The top of the kidney armor is flush to or under the back armor. Posterior Armor The posterior armor is separate from the kidney armor (ANH style). We should be able to also finalize the Thermal Detonator (TD) text with the following as it is the same as our other TK-based costumes, especially Sgt. Kreel: Thermal Detonator (A.K.A O2 canister) is attached to the center back of the belt. Detonator consists of a gray cylinder with 2 to 2.68 inches (5 to 6.8cm) in diameter with white end caps on each end and a white control panel pad. The white control panel pad faces upwards, with the controls/round washer-style detail closest to the right end cap. The total length is approximately 7.5 inches (19cm). No silver stickers or silver paint is allowed. The detonator is attached to the white canvas belt with 1 inch (2.5cm) silver metal or metallic-appearing clips. OPTIONAL Level two certification (if applicable): Clips shall be attached with slotted, pan head style screws, and painted black (two per clip). V-head screws are not permitted. Thermal detonator belt clips are positioned with little to no gap between the clips and the end caps. Belt clips shall be made of metal and must be silver.
-
Glad to have you here and to start this journey with you! Welcome to Spec Ops! @Chaos I know will have some good info! He is our DCA for the DTs and @nanotek also can drop some good knowledge! I welcome any other DTs to help as well
-

TK-6682 & TK-86003's Shadow Trooper Build
IcyTrooper replied to tk6682's topic in Shadow Stormtrooper
You don't hahaha, but I know some people have used Turtle Wax black car products to achieve decent results in maintaining shine. I'm about 30 troops deep in mine and have just resigned to the fact it is gonna look like it has been through hell. ? -
TK-6682 & TK-86003's Shadow Trooper Build
IcyTrooper replied to tk6682's topic in Shadow Stormtrooper
Nice! Yeah they are pretty good kits! I've done 3 of em so far and working on another 2 currently. Let us know if you have any questions! -
Vendor Request - Stormtroopers
IcyTrooper replied to IcyTrooper's topic in Spec Ops Stormtrooper Armory
Thanks! I'll get them added. -
TK-6682 & TK-86003's Shadow Trooper Build
IcyTrooper replied to tk6682's topic in Shadow Stormtrooper
Very nice! Super shiny! Is that an Anovos kit? -
Updated for the above from ya! Chest Armor Chest armor overlaps abdominal armor. Chest is smooth in appearance. There is a knives sheath/chest pad in the center of the chest that is made out of leather or leather-like material and has an irregular hexagon shape with the following details: The bottom of the knives sheath is curved following the bottom of the chest armor. There are three (3) knife sheaths equally spaced along the chest pad and house each knife's blade. On each sheath there is a strap on the right side with a black snap in the middle. The snap does not need to be functional. Within each pouch there is a knife or if local law prohibits the use of prop knives then the following details are present: Each sheath has the appearance of being full with a knife. Each sheath has the only the handle part of the knife and affixed to the pouch. OPTIONAL Level two certification (if applicable): Chest plate shall have return edges all around, maximum width of 3/8" (10mm). Chest and back shall be connected with a white fabric (preferably elastic) that does not stick out or show under the shoulder plastic straps.

-
I think the slashes turned out great! I didn't even think to recommend that before painting as it'd chip away probably, but you can't tell!
-
Definitely let us know!
-
That backpack text was a doozy! You'll have to bear with me on this one because there is a lot for the Backpack text: Backpack Backpack is similar to that of a Snowtrooper in a rounded-wedge shape but with unique details. It is painted a white or off-white color unless stated otherwise. Styled after the pack as seen in the Star Wars: Jedi Fallen Order videogame. A loose interpretation is allowed, but screen accuracy is encouraged. The backside of the backpack facing the wearer’s back is flat. The front of the backpack has two sides that have an approximate 1” (25.4mm) orange stripe which starts at the top of the pack and runs down to the middle of where the second fuel tank is. At each of the two (2) orange stripes there is a unique detail which resembles a Stormtrooper shoulder strap which wraps from the front of the pack towards the back. There is also a gray rectangular shape on the upper left part of the backpack that is approximately 1.5” (38.1mm) wide and goes up over the top rounded part of the pack. The front of the pack also has a raised rectangular control panel in the upper left corner of the backpack with the following details: There are two rectangular raised shapes in the top left corner of the control panel. The left detail being painted red and the right detail being painted a dark gray. There is a raised rectangular detail in the top right corner of the control panel. In the bottom left corner of that raised detail there is a raised oblong detail. In the middle to top right corner of the raised detail there are three (3) raised circular details/buttons. The left detail is painted red, middle detail white, and right detail gray. Underneath the aforementioned raised rectangular detail in the middle left of the control panel is another raised rectangular detail. In the bottom right corner of this raised rectangular detail is another small raised gray rectangular detail. In the bottom middle to right corner of the control panel there is a raised gray rectangle with a raised white rectangular detail slightly offset to the bottom and in the middle of the gray detail. In the bottom left corner of the control panel there is another raised rectangle with a raised circular detail to the right of it. To the right of the control panel there is fork detail that rises/angels from the bottom of the control panel up towards the top of the pack and control panel and then rounds out. In the middle of the rounded-out portion of this fork detail there is a raised circular detail with another raised circular detail on top of it. At the lower middle to bottom of the backpack there are two (2) cylindrical fuel tanks which run from the left side of the pack through the middle and out the right side of the pack. The fuel tank cylinders have a domed shape on the left side of the backpack and are painted an olive-green color. The fuel tank cylinders have a lesser pronounced dome on the right side where there exists Flamethrower connections. Additionally, there is a raised detail in the bottom left of the top tank. The left and right side of the backpack each has two recessed areas, circular at the top and the other follows the curves of the backpack down to the fuel tanks. In the circular area this is a circular detail with an outer and inner ring. On the right side of the backpack there are two cylindrical greeblies that connect to each other and also each of the fuel tanks on that side: The top cylindrical greeblie matches the reference photos and is black in color. On the side facing outwards from the back of the backpack there are two circular buttons. The top button is red and the bottom button that offsets the larger one is white. On the side that is facing the wearer there is a connection that goes from the top cylindrical black tank to the white tank below it. The bottom cylindrical greeblie matches the reference photos and is white in color. There is a black greeblie attached to the outside of the bottom cylindrical greebie that appears to be a venting pipe. At the bottom of the cylindrical greeblie there is slotted connector. This connector is capped off if there is no attached flamethrower. If there is an attached flamethrower then there will be a 1” (25.4mm) black tube connecting the flamethrower to the backpack. OPTIONAL Level Two certification (if applicable): Fuel tank cylinders are weathered in a manner which exposes a gray or silver undercoat or appearance. Buttons or details are not electronically lit.
-
Here is the proposed text for the Chest Armor: Chest Armor Chest armor overlaps abdominal armor. Chest is smooth in appearance. There is a knives sheath/chest pad in the center of the chest that is made out of leather or leather-like material and has an irregular hexagon shape with the following details: The bottom of the knives sheath is curved following the bottom of the chest armor. There are three (3) knife pouches equally spaced along the chest pad and house each knife's blade. On each pouch there is a strap on the right side with a black snap in the middle. The snap does not need to be functional. Within each pouch there is a knife or if local law prohibits the use of prop knives then the following details are present: Each pouch has the appearance of being full with a knife. Each pouch has the only the handle part of the knife and affixed to the pouch. OPTIONAL Level two certification (if applicable): Chest plate shall have return edges all around, maximum width of 3/8" (10mm). Chest and back shall be connected with a white fabric (preferably elastic) that does not stick out or show under the shoulder plastic straps. I think the knives are an integral part of the costume look so what I did is add a little more text to it to allow for local law's but also protect the integrity of the costume. Would this work??
-
Not sure how I missed that!
-
How does this look? Shoulder Armor Left shoulder is uniquely shaped with the following details: Rounds out at the top closest to the shoulder. On the inside and outside there is a hexagonal section that protrudes out. The bottom is angled and not rounded. On the top of the shoulder there is a raised detail that resembles an intake/scoop that matches the references material. Right shoulder is smooth in appearance similar to a scout trooper shoulder bell. Shoulders have a black elastic strap that wraps around the inside of the bicep. OPTIONAL Level two certification (if applicable): There should be a minimal gap between the shoulder armor and chest/back plate. For the biceps, forearms and hand plates: Biceps Biceps are fully closed. Overlap construction is only allowed for kits that come with the cover strip molded into the part. OPTIONAL Level two certification (if applicable): Must be constructed using the butt plate joint and cover strip method. Overlap construction is not allowed. There shall be a return edge that is present with a maximum width of 3/8" (10mm) width. Forearms Forearms are fully sealed and closed. Overlap construction is only allowed for kits that come with the cover strip molded into the part. OPTIONAL Level two certification (if applicable): Must be constructed using the butt plate joint and cover strip method. Overlap construction is not allowed. There shall be no return edges present on the inside of the front of the forearms. Hand Plates Pentagonal in shape, hand plates should be securely mounted over the back of the glove. These can be made up of plastic, latex or latex-like material. OPTIONAL Level two certification (if applicable): Handguards shall be latex or latex-like, painted white and affixed with adhesive to rubber gloves with no visible strapping or stitching.
-
Yeah I haven't heard of them but they do have that front-facing website which is a good sign to me. The price looks good and the model as well.
-
MKE-Trooper – Rogue One Death Trooper WIP
IcyTrooper replied to MKE-Trooper's topic in Imperial Death Trooper
Getting so close now! -
Go for the T-21!
-
Hello and welcome, Darylee! I'd say the choice of long-arm would come down to method of transportation and how much weight you want to carry around for troops. I do know that the weight will also depend on the material it is made with as well. I'm partial to a DLT-19 only because that is what I have, but it is also resin-cast and a bit on the heavy side. If it was an all 3D print construction it may be better with that department, however you may sacrifice the rigidity and longevity of it. T-21s are sweet and I wish I had one. There is a guy in our garrison who did molds for them and had kits but he doesn't do them anymore. I know some people use actual wood for the stock portion of and it feels great. T-21s are the rarer of the bunch here in our garrison, so if you like rarity I'd go with that!! There are so many 3D print companies out there but the pics in that look pretty legit. That price is outstanding for a fully printed and assembled price! In the US last time I had looked at one they were reaching $500 USD for painted and assembled.
-
Thanks for the review! I'm working on the backpack description and almost have it done for posting hopefully later.
-
There are the same slashes in other arcs but they are pretty similar to what we did for Sgt. Kreel, as well as inconsistent. I'd say we align with what we have for Sgt. Kreel for continuity with the artist who did this one and the previous arc. Here is what I got from the arc 36/37: Granted, if you look at those arcs you'll also see panels where they are missing. I think the overall consensus is that they should be there but may not be able to be present due to the level of detail (LOD) for the comic.
-
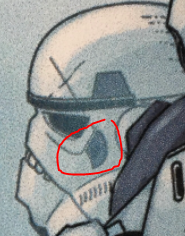
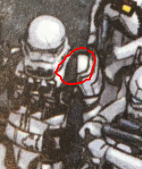
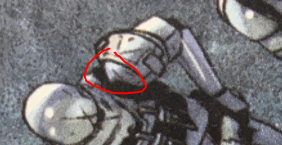
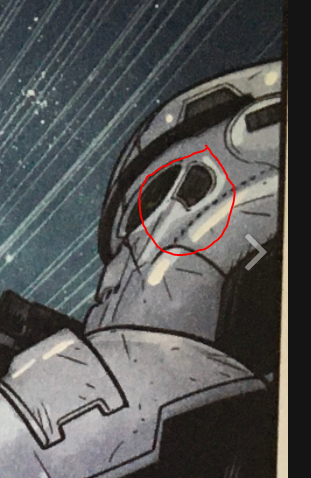
They are appearing larger now for whatever you did. I had to go back and check the references a few, so I circled in red what I think is the "under-bell" for what I'm calling it for the discussion on that left shoulder: If that is what you are seeing as well for support of it then I can see it being visible, but really not having a bearing for L1 or L2. It will need to be white as you said if this is the case with the pics. You definitely don't see it in that side pic: I'll compare them to the Sgt. Kreel one to see if we need to modify that as well. I do see tear lines with this pic: I'll have to see what we have for rear traps.
-
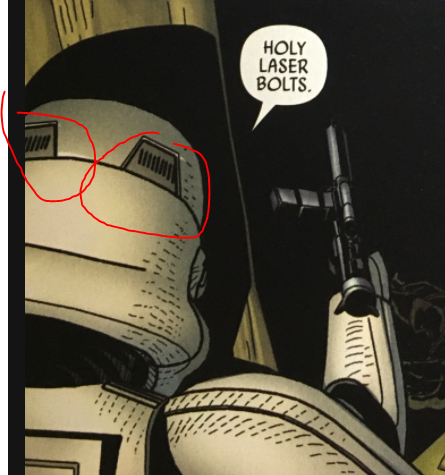
I don't know why when you post some references they appear the size for ants ? I updated that text for the L2 shoulder straps to be "tapered" as it sounds better and removed the "be". I do feel that it is warranted to have the "raised and above the neck line" included in the L1 text. For L2 I think more appropriate would be "the method of raising the shoulder is unseen", whereas be able to see an inner bell would be acceptable for L1. L2 people may want to paint it matte black, etc. to make it not visible. Thoughts?
-
TheFireAwakens1807's Deathtrooper WIP
IcyTrooper replied to TheFireAwakens1807's topic in Imperial Death Trooper
Nice work on that blaster, I can't see any print lines and that is good! Glad to hear you got the armor and fitment is always a challenge on getting armor supplied all together, but that definitely doesn't mean it can't be fixed! May require a little work and some elbow grease. Did they request measurements prior to them making it? Usually you have to account for the undersuit which a lot of people often miss. -
Okay so I finalized that one for now! Here we go for the Shoulder Straps and Shoulder Armor: Shoulder Straps These shall be securely mounted in front and shall free float in the back. They can be affixed with Velcro or adhesive. Straps texture is smooth. No visible rivets are allowed to secure the straps and no elastic is used to secure straps in the back. OPTIONAL Level two certification (if applicable): Straps shall be glued in front. Straps shall taper in thickness, being thinner at the front and back ends. Shoulder Armor Left shoulder is uniquely shaped with the following details: Rounds out at the top closest to the shoulder. On the inside and outside there is a hexagonal section that protrudes out. On the top of the shoulder there is a raised detail that resembles an intake/scoop that matches the references material. Right shoulder is smooth in appearance similar to a scout trooper shoulder bell. Shoulders have a black elastic strap that wraps around the inside of the bicep. OPTIONAL Level two certification (if applicable): There should be a minimal gap between the shoulder armor and chest/back plate.
-
Not sure if that meets the Nomex styling. I finalized the Gloves text for now and moved onto the Chest Armor: Chest Armor Chest armor matches visual references. Accurate shape/design to front of chest. Outer rim has a continuous trim edge, including the raised trim on the recessed box. Shoulder straps are Stormtrooper style and secured to the chest armor and secure to the back armor in the same fashion. The front recessed box includes a few detail pieces: There is a six-sided raised shape in the top left-hand corner. There is a raised upside-down T-shaped detail offset from the center with part of the T fitting into the cut-out part of the aforementioned six-sided shape. Right-hand side of chest has a raised section with an elongated rectangular strip of metal attached to it with the following details: There are three evenly spaced red rectangular LED light cover/caps. Left-hand side of the chest has two oblong shaped detail which protrude outwards and are staggered from one another, one being more forward. There is an off-white fabric/elastic strap on each side of the chest armor which runs under the bicep and around the wearer securing the chest plate to the wearer’s chest and back. OPTIONAL Level Two certification (if applicable): The six-sided raised shape in the top left-hand corner of the front recessed box has an additional recessed rectangle on the left side as well as two smaller recessed squares on the right side just above where the cut-out starts.