IcyTrooper
-
Posts
4,109 -
Joined
-
Last visited
-
Days Won
378
Content Type
Profiles
Forums
Events
Everything posted by IcyTrooper
-
 I have updated the text on the first page for the abdomen armor as well as on the wiki with the new text. It has been pushed over to the Legion side.
 -
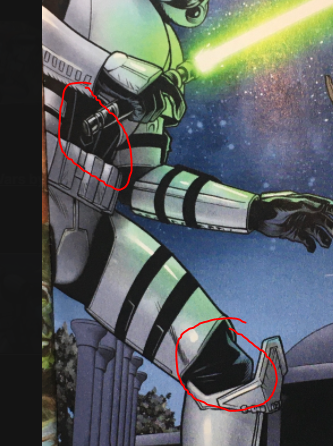
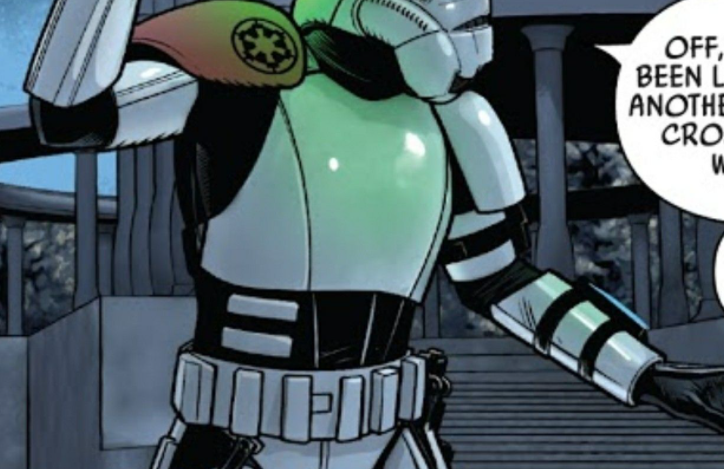
It is a two-way street, again, due to the limitations (maybe?) and artist techniques which always makes it a challenge for costume development. I really hope this doesn't negatively effect how costumes are processed going forwards with the LMOs as far as using comics as a viable reference. The best shots we have of the ab with any relation to lighting, other armor, similar colors, etc. are here: The first image that we have to me clearly has the sheen that would illustrate it is a hard armor option. It looks like that on the R1 tank driver as far as the black goes and the raised white part. The second image shows a shine on the knee of a cloth from the lighting source but not necessarily on the ab, again could be due to lightning, but may also be because the ab plate is a different material than let's say the undersuit at the knee. Could be armor could be soft, or a bodysuit, who knows. That third and last pic you see a little something just above the center square button that I'm not sure is trying to illustrate shading or shine of sorts or what. -------------------- When looking at the L2 bullet and the question about doesn't really have anything to do with the abdomen being one or two piece, but rather how it meets at the sides of the armor (e.g., the kidney meeting the abdomen). If the abdomen part was indeed part of the undersuit and the armor plates and lines were rather just attached to the undersuit and the lines were sewn on or were pieces of armored plastic stuck on then that L2 point would probably not exist because there would be no meeting place for the abdomen plate (which doesn't exist) and the kidney plate. To me, I do believe that the abdomen was meant to be a solid armor painted black.

-
Here is what we have now (yellow are the changes): Abdomen Armor The abdomen and cod piece may combined/fused to a single plate/one piece or separate. Cod piece is white in color. The abdomen is black in color. There are three white lines, one vertical up the center with a diagonal line on each side. The distance between the vertical and diagonal lines is smallest where the abdomen meets the cod and extend diagonally to align with the recessed lines of the chest armor. There are two rectangular armor plates on each side of the abdomen approximately 3/32" to 1/8" (3-4mm) thick. The dimensions of each of the armor plates is approximately 4" x 1.75" x 0.30" (105mm x 45mm x 8mm). There are no visible snaps or rivets. Abdomen armor must match in-comic references. OPTIONAL Level two certification (if applicable): The cod piece is separate from the abdomen armor. There should be no gap between the ab and kidney plate, a single visible seam line is ideal. Any gap between the abdomen and kidney armor shall be no more than 1/2” (12.5mm). Any shims used to achieve this effect shall have a similar material and color as with the abdomen and kidney armor. Shims should be flush and seams are allowed.
-
We all agree on changing the verbiage for the raised rectangular sections on the ab plate, though? I think it is a good idea to have a measurement there and change the wording.
-
Hello, Todd! Yeah that is an interesting design that is for sure, I'm wondering if that was one of the first run 850 DTs that is out there. That gasket should go all the way down and if I remember right those should be solid all the way around. @nanotek and @Chaos?
-
I think we may have done it as a L2 for inclusion across the basic level, but I honestly can't remember. I know that some members do separate the ab and cod on regular kits if they are very tall or short in order to make it look like it fits better. I don't think it is a very visible difference in the kit and thus the reason for L2. You can't make that out from a casual look but someone who is very into the detail would notice it.
-
In going through the review @nanotek and I had a discussion about enhancing the details and clarify for certain parts of the abdomen armor. Mainly there were 2 things: The outer two abdomen armor lines that line up with the chest angle more diagonally rather than vertical so that we don't end up with lines that are straight up and down for each of them. Only the center line should be straight up and down vertically. The rectangular blocks on the abdomen armor we are taking a look at if we add rectangular armor plates instead of just calling them white rectangles.
-
Here is the latest discussion thread with the updates: I don't think that we specifically discussed the bolts, but it is in the L1 details as "blue-gray" on the current CRL.
-
For the entire kit, or what? @CrookKnight may do them.
-
Imperial Flametrooper (Jedi Fallen Order)
IcyTrooper replied to stevechewbacca's topic in Imperial Flametrooper (JFO)
Much better!!! -
Very nice!!
-
Looks good! I think with Rust-Oleum it may be issues with which "plants" they are manufactured or batches is my guess. When I did my R1 tank driver I had the literal same brand and code Rust-Oleum white but one can had a yellow label on it and the other did not and the yellow label stuff was terrible. To this day I have no idea what the issue was because the environment was the same for both types of cans. I just did a Royal Guard helmet not too long ago with Rust-Oleum again and it worked just fine.
-
The CRL page has been completed with text and images. It is being sent for final review and publishing.
-
We'll be revisiting this again soon to align it with the base Novatrooper CRL on shared parts on both L1 and L2 details.
-
Excellent! I can't wait to see the pics and we'll be so close!
-
@TX-20113 I do believe we did that for continuity as well with other CRLs when it comes to higher level.
-
Welcome back @Fivezero! Those are some neat projects you had going! That Jumptrooper is looking bomb!
-
I like it!
-
3D prints are always going to have the sharper details. We have both types of DTs in my garrison that I've approved and the ASP one looks a lot more solid than the 850. The guy with the 850 though was able to put some work into his and it doesn't look bad, but the ASP guy didn't really have to do too much.
-
Man, that looks good!
-
Very nice!!
-
I'd say that the larger scale wise seems good. In that first panel it looks like if it was lowered down the shoulder would cover most of the bicep. I also agree with that raised detail not swooping up.
-
I believe that we should go with the detail on the largest panel for what detail was trying to be achieved as the smaller panels probably had some of the weirdness added to make it appear stand-out as opposed to looking like a normal TK shoulder bell. My honest opinion is that you nailed the look with what you have thus far. I'd assume the other side of that shoulder bell raised part looks like that of the 1st pic you have?
-
Just to post the update here for the rest of the membership to see, we are currently working on getting the proper pics uploaded to the drive so that we can start editing the CRL pics. We are also going to request the CRL to be built within the main CRL pages so that when we have the pics we are good to go. Just giving you a heads up here as well @ionicdesign
-
Shadow Stormtrooper Assembly Entry 1
IcyTrooper replied to Grand_Commander_Umbra's topic in Armor Assembly and Trimming
Welcome, Alexander! Thickness for the hand plates really depends on how comfortable they are for you. I'd say probably 1/2" would be good, some people do a lot less so it sits flat, but I like the depth to make it seem thick. The lower legs you should really try on with your undersuit and see how they stack up against your shins and position to your knee before trimming anything from the bottom up.