IcyTrooper
-
Posts
4,138 -
Joined
-
Last visited
-
Days Won
383
Content Type
Profiles
Forums
Events
Everything posted by IcyTrooper
-
I'll get this thread started for Del Meeko CRL edit discussion that was started on June 21st.
-
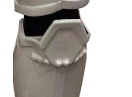
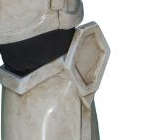
Good to hear! CA glue is good but if it is your first set of armor be careful. It allows super quick building but once it starts the chemical process of fusing there is nothing that is going to break it apart. E6000 can keep the parts together and it can come off pretty easily if something isn't right, the only downside is the dry time and strengthening time, if you are racing to put something together. Depending on the maker of your kit, it could have come with two different types of sniper knees. One is for regular stormtroopers and the other is for sandtroopers. The one that looks more like a diamond is for sandtroopers. Here they are below: Regular stormtrooper & shadow stormtrooper: Sandtrooper:

-
Agreed, CRL's are definitely "living and breathing" documents so as long as we have the references we'll always push those!
-

Imperial Flametrooper (Jedi Fallen Order)
IcyTrooper replied to stevechewbacca's topic in Imperial Flametrooper (JFO)
Very nice! I need to get back on the text again soon. -
Awwwwww yeaaaaaaaaaaa!
-
The color is poppin'!
-
That silver looks soooooooo good, same with the LED on the TD.
-
I may have misspoke, I think I thought it was filler primer The filler that I used for my ROTJ royal guard was Evercoat Poly-Flex Flexible Polyester Glazing Putty (https://www.amazon.com/Fibreglass-Evercoat-411-Poly-Flex-Polyester/dp/B000P6US6A). It is expensive but flexes pretty well without cracking at all. I know that it can add some weight though because @RAIDER was using it for his Cav and then ended up switching halfway through. I think it just depends on how much you wanna use of it.
-
Imperial Flametrooper (Jedi Fallen Order)
IcyTrooper replied to stevechewbacca's topic in Imperial Flametrooper (JFO)
Excellent!! -
Right on! I can't wait to see the final result!
-
For the shoulder bells I'd wait until you have your biceps together and glued before doing anything. Often times if you take that return edge off the bottom of the shoulder bells then they can often fit better over the biceps.
-
Yep, that works better! Your left bicep and right shin armor look a little larger than the other sides but other than that I can't really see anything that looks off. Once you get the biceps together and then raise them up a bit then the shoulder bell will come in and around it to make it not look "as large". I also fixed your pics above. Just had to right-click the pic and click "Copy image address" and then paste it. All good!
-
Yeah those should be good from what I can see! The part I was talking about with the grooves was here: However, it looks like that stripe or groove is just a painted detail and not an actual groove. As long as everything is black you'll be good. These images are really small when I try to launch them. Are you able to host them on an image sharing website such as Flickr and then link in the URL here? It'll automatically convert them to pics we can enlarge.
-
That spray putty actually looks like it did a solid job! I have used similar here in the US and it is pretty awesome.
-
Very nice! You're moving right along!
-
Imperial Flametrooper (Jedi Fallen Order)
IcyTrooper replied to stevechewbacca's topic in Imperial Flametrooper (JFO)
I like the look of those!! -
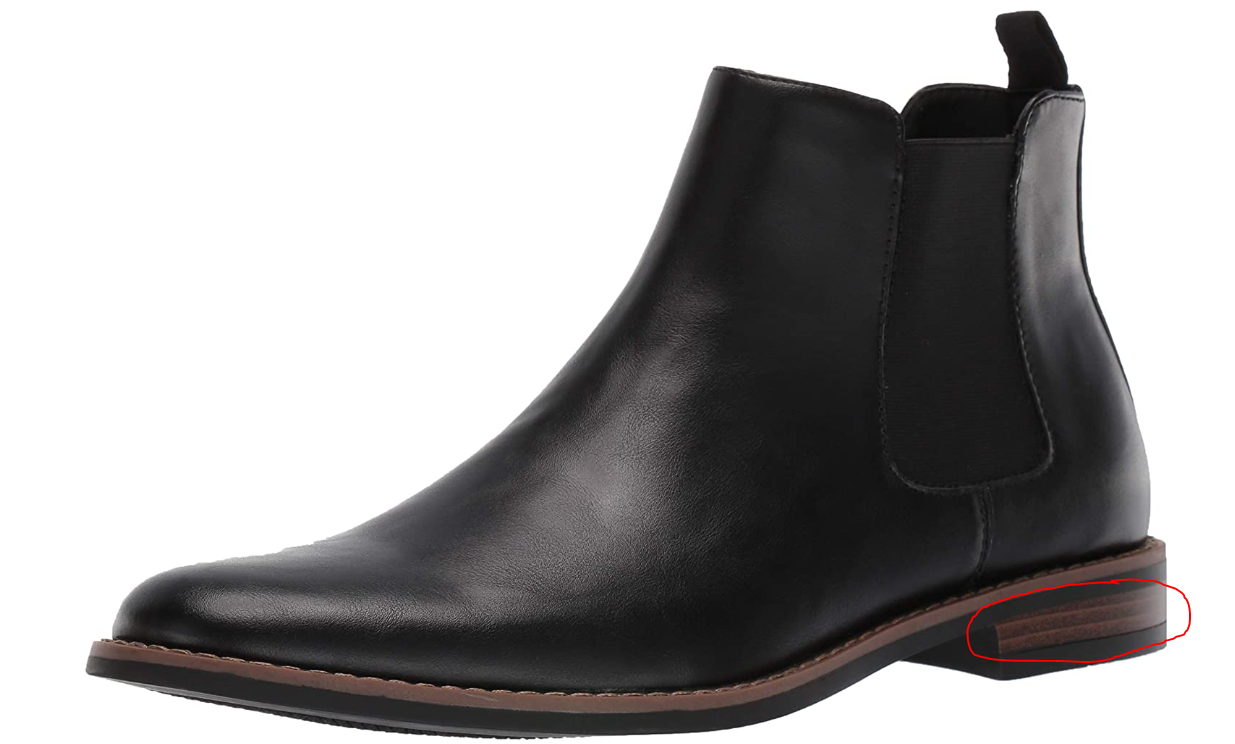
Nice on the armor party! A pro-tip here, make sure you get all the plastic covering off before you glue the stuff, especially on the cover strips (don't ask me how I know ?). Those boots should work, but you'll obviously need to recolor the brown to black and make sure the grooves running along the edge of the sole don't exist. I think you can slowly shave them down; although, they could just be painted to look like there are two lines.
-
Sergeant kreel soft parts
IcyTrooper replied to Playmaker's topic in Armor/Soft Parts and Where to Find Them
@Playmaker that pauldron is light-orange as per the CRL. That thread that @tipperaryred posted is excellent! -
General Weir is such a cool costume!
-
The Anovos kit is now a rare find and has some great shine to it! (I may be partial though ). Let us know if you need any help and we'll do what we can do help!
-
Hello, Dustin! I'd assume you are talking about the SW Rebels version?
-
Congrats on the approval!
-
Shawn, I saw the images on your FB and they looked good! The images on here though aren't showing up.
-
Imperial Flametrooper (Jedi Fallen Order)
IcyTrooper replied to stevechewbacca's topic in Imperial Flametrooper (JFO)
No worries, friend! I'm glad to see you moving right along with this -
Great start! I'll see if I can answer some of these questions: 1st - I'll defer this to @Hoda @Blackwatch @Kessel and their thoughts on that, but I can't see why they wouldn't be approved by shortening them. 2nd - You can use either the ROTJ/ANH belt for L1. 3rd - I'd say probably 1.5" (38.1 mm) or around that from the top stitch of shoulder to the top of the patch, roughly. Take a look here and approximate it to look similar and you'll be set!