Chaos
-
Posts
1,469 -
Joined
-
Last visited
-
Days Won
111
Content Type
Profiles
Forums
Events
Everything posted by Chaos
-

Anyone making the Ab/kidney gasket from the new CRL yet?
Chaos replied to nocjef's topic in Imperial Death Trooper
Making a corset set up is do-able, if you come up with some ideas / drawings, post them up here, we have a lot of people who like to solve challenges here. myself included. -
Anyone making the Ab/kidney gasket from the new CRL yet?
Chaos replied to nocjef's topic in Imperial Death Trooper
@Chucklovesfood Almost all of the current gasket makers: Jim AS, Darkside, Pinky, etc qualify for Level 2, as their gaskets meet the requirement OPTIONAL Level two certification (if applicable): ● The ribs must be stitched/sewn and not stamped or fake stitching and must continue to show sewn ribs when the gaskets are bent. -
Anyone making the Ab/kidney gasket from the new CRL yet?
Chaos replied to nocjef's topic in Imperial Death Trooper
@nocjef Jef, the ab/kidney gasket has not changed from the original CRL, the only thing that has been added is the Level 2. There are makers of the gaskets who have each section seperate and there are other makers who have the gaskets integrated into the body suit. There are people discussing the method in which the ab/kidney gasket has the abdomen armor and the rear kidney/TD canister attached to each other and the system is set up much like a corset design. However, since the "how it's set up "doesn't effect the "how it looks" we will not be making that part of the CRL. I have Jim's under suit which has the gaskets incorporated into the shirt and pants, I may look at seperating the ab/kidney and try attaching the armor to the gasket, but with the way I have my pieces strapped now, it really would not be an improvement. -
So this whole corset thing keeps coming up, I believe that the TKs and the Shores had the abdomen and kidney sections under slung with straps, it makes sense, the armor creates a complete shell around the abdomen. The DT, however, would have been trickier as the sides do not completely wrap around, to the kidney piece to create a "shell". Maybe the ribbed abdomen could have been designed like the woman's draw tight corset and then the abdomen and the kidney/TD plate somehow attached to the ribbed material. But when I watch the DTs run and move in R1 and The Mandalorian it looks to me like the undersuit is separate from the armor and the armor is "floating" over the undersuit/abdomen gasket. Either way, we have held stead fast that what goes on underneath the "outward appearance" shouldn't be a CRL requirement. We see things like buckles and clips showing up every once in a while and to be honest, wardrobe malfunctions, IMHO shouldn't be necessarily considered for screen accuracy. I still think that if someone finds something that shows the "actual how" the pieces were put together, that it would be a great addition to the history of the DT and if they would be kind enough to share that information with the community, it would be awesome. On a side note, The CRL Update is about to lock 9 days, I am pretty sure that I have been updating the few minor things we have as CRL items as we went along. One last Lookie Louie by everyone and then we should be ready to start compiling the photos etc on the database. The photos are in the works, I have Tom and Daniel working getting me updated photos for the Variant 1 and Variant 2 sections. Also I am doing well and am appreciative of everyone's support and kind words, fortunately for me, this was a little wake up call, and nothing major. I am out of Afghanistan and back at home. The Doc says not to do anything "too strenuous" for the next week so I think I will take this time to give my DT armor an overhaul. Over the last few months I have been able to find some Jared's in my size and snag an Anovos helmet. So I am shooting ultimately for Level 2 on both Variants Everyone enjoy their weekend
-
Greg, Congratulations Trooper! Looks amazing!
-
That would be great, I'd like to see you what you have come up with
-
@RMGFitness Ryan good questions, I too have been following the discussion of how some people want to make like a "corset" style ab/kidney gasket piece to attach the armor to. The new CRL says this: "The following shall be rubber or a smooth semi-gloss black material with sewn ribs" so your choice of rubber or molded plastic is OK, If you look closely at the abdomen there is no appearance of "threading" so we added in "Sewn lines are acceptable" to accommodate those maker's under suits that are sewn. If you go with the molded gasket as long as when it is worn, the "ribbing" retains it's appearance and doesn't flatten out when your torso twists, you will be good all the way up to Level 2. Hope this answers your question.
-
@DHKnecht No worries ... any time
-
@DHKnecht @nanotek is correct. You can see two pictures below, the first one I tried to explain what we are looking for and the second is the Why? we want the straps to be as form fitting as possible.
-
DHKnecht's Death Trooper Armor Build WIP
Chaos replied to DHKnecht's topic in Imperial Death Trooper
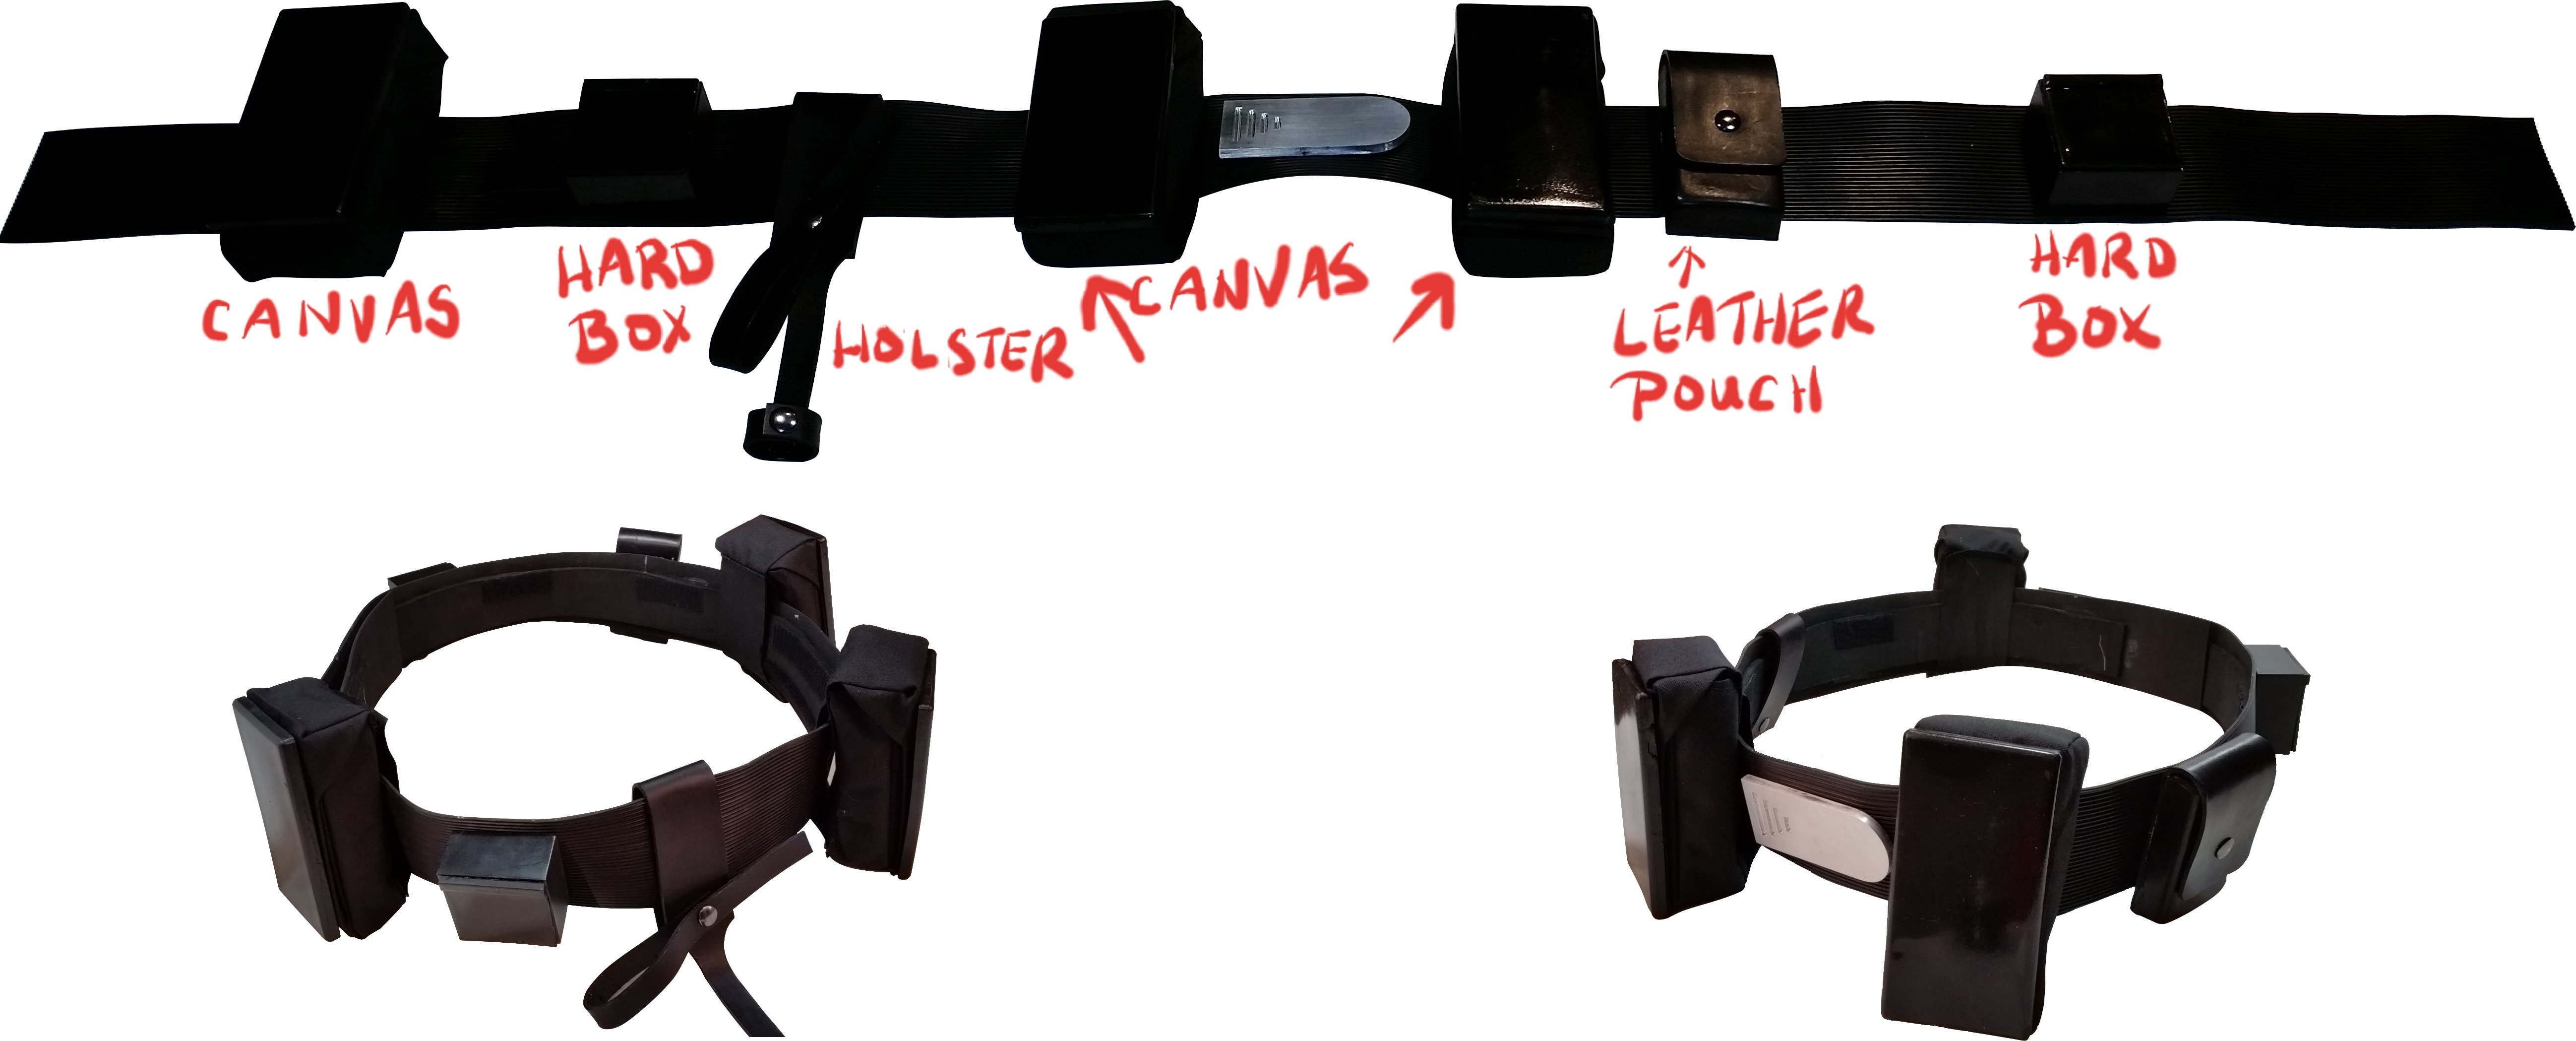
@DHKnecht The picture I posted is the CRL belt photo. The full front and back photos were taken of Tom Campbell. He does use another pouch on his belt to carry Trading Cards. That is what you are seeing. We didn't bother redoing the photos or editing the extra pouch out since we have individual items photos for reference. Hope this clears up the confusion. -
DHKnecht's Death Trooper Armor Build WIP
Chaos replied to DHKnecht's topic in Imperial Death Trooper
Awesome WIP post, a recommendation for photos is to create a free account over at imgr.com once you upload a photo you can get a BCC code to paste in your posts. It really much easier Also there is only one leather pouch on the belt. There are 3 larger canvas pouches, two smaller square hard boxes, and a leather drop holster for the pistol
-
@DHKnecht Hey man I am in the hospital, had a minor heart attack and am being evacuated out of Afghanistan within the next couple of days. When I can get access to my laptop in a few days I'll show you what I've got. Hopefully someone else posts the photos before I can. Apologies for not being able to answer your question right away.
-
Gotcha, I'm tracking now
-
I already made the change. I think that is the correct thing to do. Preserve the integrity of the costume. After all many people LFL and Disnet Prop and Costume workers shed a lot of sweat and tears to bring us this awesome and intimidating character! OPTIONAL Level two certification (if applicable): ● There is a raised strip that begins at the rear vertical cover strip angled up and around the left outside shin and joins the front vertical cover strip. The top edge of the raised strip is angled and aligned as if it is an extension of the raised angular extension or flap just above the inside ankle ● There is an indented groove approximately 1/2 inch (13 mm) wide that runs along the inside bottom of both shins from the rear center to the beginning of the front boot arc. This detail is partially covered by the triangular closure flap.
-
@eddiechang Good luck!
-
Concur, and it is an easy fix if a kit doesn't have it. For instance, the shin's inside triangular flap closure on the screen suits is a part of the outer shin that wraps around the inner shin to allow for the shins to open and close at the ankle (Some makers modified their original designs after better photos came out) but on my kit from Jim, that piece is molded into the inner shin, so I took a dremel and grooved out the inside edges to give the appearance of it being a separate piece. I am planning on doing the same with the small groove we just mentioned, I'll grind down just enough of the surface to create the indentation. Eezy Peezy!
-
@DarmanFG I have seen that on the kits that are were displayed at LFL and noticed that the belts were thicker than the original ones that were on the SWC kits. The SWC kits were just the rubber matting with some kind of belted support underneath. Maybe as they moved kits around for displays they found that the belts were sliding down so they added a strip of foam weathering striping tape to help hold them in place. I don't think that since there are differences in the display belts from one set of photos to another that we need to change anything on the belt. That kind of thing sort of falls under "strapping and assembly" since it is possible they only used the foam tape on the displays. If you take a look at the Sideshow 1:1 statue (which was modeled/made from the set kits) you can see that the belt is thin just like the SWC belts. We don't use toys or statues as references when we have the screen shots and actual used suit displays, but it does have a lineage just like the Anovos helmet.
-
@DarmanFG Julien, Good eye on the detail. I was aware of the detail (actually noticed it one day when I was working on the boots Level 2 info), and had considered including it. I decided not to include it based upon the fact that most makers produce "one sizes fits all." This means that people with shorter lower legs have to do some type of trimming to make the shins the correct fit and length. The top details are such that you can't trim from that area as it would be very noticeable so the only other place to trim off length is at the bottoms, which if done, could possibly take the grooved detail completely out. 3D printed kits can be sized and that detail can be included in as the shins can be scaled to fit the wearer. We can (if @nanotek and @Raider agree) put that detail in as a Level 2, after all that is what Level 2 is for; adding in the finer details for accuracy. You can see when I was doing my research for the CRL update I made a note. Once again Thank you for your feedback and your eye for detail. If you wouldn't mind, can you post a photo of your shin with the detail and a brief "how you made it"? Just in case others out there may want to add it in. "Chaos" Death Trooper/Shadowtrooper/FO TIE Pilot (in-progress)/FO Sith Trooper (in-progress)
-
Thanks @nanotek and @DHKnecht, I have been meaning to reply to his question but have been overcome with work events and this stupid DoD Covid "The Sky is falling" reactions. LOL Ok off my soapbox. Since you both answered his question I will go back to working on my latest project. @SrtWnab Austin, I got my box from Denis in less than 10 days last week (Russia to North Carolina) when he shipped my FO TIE chest and back. It arrived in perfect condition. Best of luck with your build,
-
Thanks for the update Glen, I'm liking the modifications.
-
@Andrew B Andrew, as Ryan said we are working on updating the Vendor's list for the Shadow Trooper, This is an older list that has many of the vendors. https://forum.specops501st.com/topic/3358-hard-parts-armor-and-helmets/ You'll have to contact each one and see what they are doing at the moment. I can confirm that Walt's and 850 are still doing pulls in black ABS, however not sure of how their back log is, another option is to get a standard TK (white) and assemble it to the Shadow specs and paint it gloss black. The Death Trooper kit, in most cases, has to be painted as well so its not that hard of a task. I am in the NC Garrison but am not in the states right now, there may be someone in the Garrison that has recently done a Shadow Trooper and can help you out. Best of luck Welcome to the darker side of The Darkside! "Chaos" Death Trooper/Shadowtrooper/FO TIE Pilot (in-progress)/FO Sith Trooper (in-progress)
-
@AgentDarthMando Ben, Thank you for your feedback, the current CRL says "Worn on left shoulder" the intent was to make sure it was positioned correctly on the front and not too high up on the shoulder and to do away with an extra strap that some people were wearing, they had the ammo pouch slung over the shoulder with an extra strap that ran across their chest. (I have seen it twice and since it says "worn on left shoulder" technically it isn't wrong. So what we did was make it essentially a part of the chest rig assembly, we can modify the statement to this "Worn on left upper chest and attached to either the chest rig vertical strap or the left shoulder strap D-ring." That should make it clearer. Thanks again for your feedback.
-
@RMGFitness the corset style strapping that has been worked on by some is definitely acceptable now and after the update. So you can rest assured. Just be cognizant of any strapping components that are visible. For example; the black vertical thigh straps being visible is OK, but a black buckle exposed on the side is not. Good point to bring up, thank you for your feed back, it is much appreciated.
-
@Atraxas Aston, appreciate the feedback. Talibs have always been and will continue to be acceptable for Level 1 approval. Level 2 items are always the same for any CRL, they are the items that take the costume to the next higher level of detail and or screen accuracy. Because the horizontal seam and some ankle padding is seen on the Jereds at the ankle even when the shin armor is worn it becomes part of the higher level detail, much the same way that those pesky little "split rivots" are on the TKs and Shadow Troopers. Though Talibs have the correct toe and sole, the rear part of the Talib has an additional piece of leather on the heel and the leather pull tab is located at the top of the boot. There is stitching on the Jered that resembles the extra piece on the talib heel but the extra piece of leather is narrow and is part of the pull tab on the Jereds. It is for that reason we chose the Jered or replica boot as a Level 2 requirement. I myself have the Talibs and am fully aware that if I wanted to shoot for Level 2 that I must either modify my Talibs to look like the Jereds or purchase replicas. Also there are a few other things I will have to tweak or change on my own set if I want to reach Level 2. I fully understand your opinion but to be realistic, there are many CRLs that have Level 2 or 3 requirements where the items are no longer in original production and are hard to find so we have to resort to replicas. Thank you again for your feedback, it is appreciated. "Chaos" Death Trooper/Shadowtrooper/FO TIE Pilot (in-progress)/FO Sith Trooper (in-progress)
-
Thanks for the correction, best of luck on your build!