Chaos
-
Posts
1,472 -
Joined
-
Last visited
-
Days Won
111
Content Type
Profiles
Forums
Events
Everything posted by Chaos
-
 I actually was thinking about a color scheme guide to standardise the metallic black and silver to align with the DT. If we use a paint code people are more likely to not use what they have sitting in the garage. Let's keep it and make a scheme.
 -
@IcyTrooper since you added a "color scheme guide" I guess we will have to come up with one. The DT is the only costume we have that has one, I think.
-
Congratulations on your approval. I would not worry about the "weathering" of the silver. The CRL says "slightly weathered with black matt paint" the definition of "slightly" is open to interpretation. The Anovos helmet (made from having a screen used helmet) is pretty much the standard as far as paint scheme reference.
-
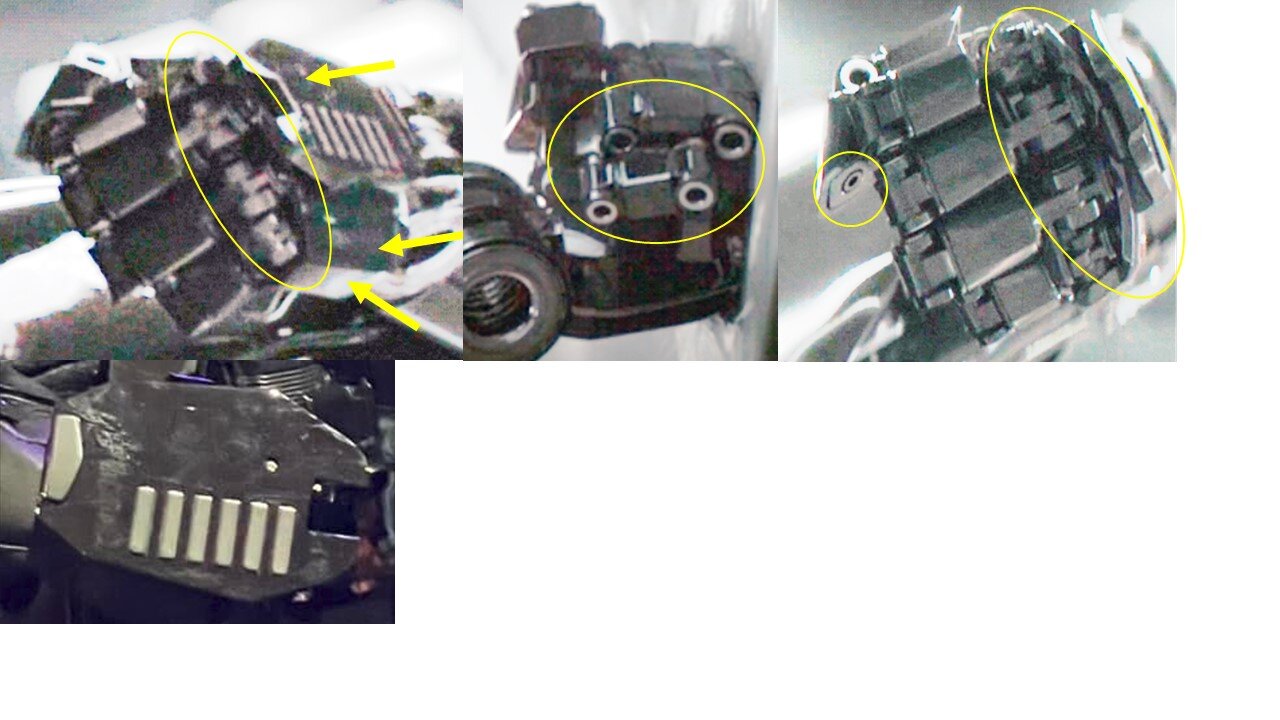
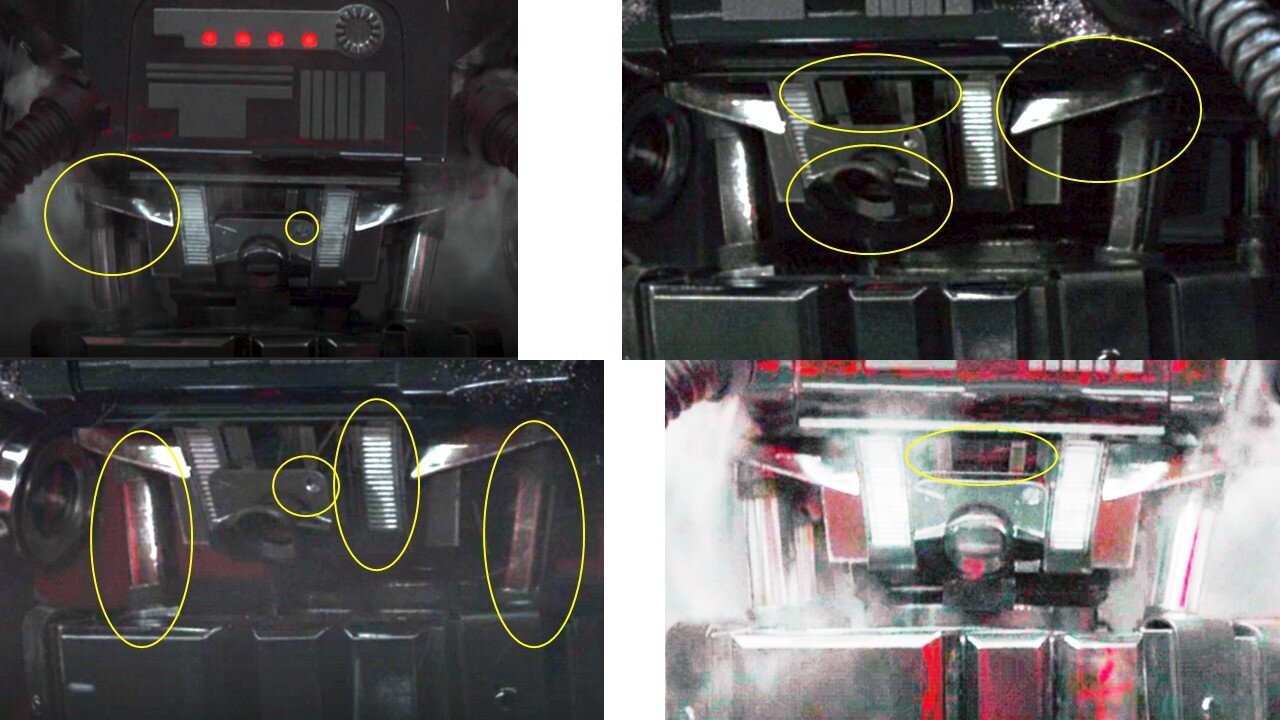
Next up! Revision 0 Abdomen Armor Gloss black in color except where noted below. Shall be centered under the chest. The outer upper corners are tapered and angled up and out from the center. There are two vertical details that are angled outward and have 18-20 raised horizontal ridges. They are positioned outside a raised center section. Details are painted metallic black, silver, or dark gray. There is a raised center section which has a raised circular ring. There is a half spherical recess in the upper right corner of the center section. There are two small elongated vertical rectangles along the top of the raised center section. The Abdomen and Lower Back side extensions, if any, may meet flush at the sides. Two pistons may be present. If present, the ends must have the appearance of being attached to the abdomen and extended to be hidden by the belt. Pistons shafts will be painted metallic black or silver. Abdomen section may be slightly weathered but must be uniform with the rest of the costume.

-
Actually, the CRL is quite specific on all the color schemes. Here is the link. https://databank.501st.com/databank/CRL_Gallery:Imp_Death_Trooper
-
What's the Group consensus? Are we OK with this? Does it need any modifications?
-
I think the posted CRL wording adequately provides the details to present the costume close to "screen accurate" as possible. We can further define L2 requirements later on.
-
Plastic Arms Dealer sells the belt material and metal buckle. He no longer produces any of the armor portions. https://plasticarmsdealer.com/shop/24450541/death-trooper-parts The two small square boxes are the boxes that are attached to the belt and located at the wearer's hips. Gerald @DoggyDoc may have made his own 3D file, check with him.
-
Revision 1 Hand Amor and Fingers Hand armor and fingers are gloss black except where annotated. May be separate from or attached to the gloves. The hand armor consists of two distinct pieces; a base piece and handplate. The base piece which sits over the back of the hand is slightly curved across the back of the hand. May have an outside (pinky) edge which is angled down and wrapped around to the palm. May have an inside (thumb) edge which is shorter beginning just aft of the thumb joint and wrapped to the palm. The handplate is flat and elongated with eight sides. There is a square notch in the fingives end of the handplate. There are six raised elongated rectangles along the outside edgand. There is a raised pentagon on the back edge near the wrist. Raised details are painted metallic black, matte black, or dark gray. Fingers are armored in 2-3 rigid pieces per finger, proportionate in size to the fingers, with the fingertips ending in contoured trapezoids. There may be small circles on the fingertip pads. The joints between the pieces are segmented to allow movement and have a circle detail resembling a mechanical joint. Mechanical pieces may be present giving the appearance of the finger pieces being attached to the hand base piece. The palms may have flat armor plates attached to the glove’s palm. Hand armor may be slightly weathered thist got be uniform with the rest of the costume.
-
@Andreas Funk yes the fingers and hands should be functional. My wording did not specify as I assumed it was obvious. I'll clarify below.
-
Just thought I would add this. Not so much a "reference" photo, but it is what my 3D hand files currently look like. This project was a "FUN" one.
-
@IcyTrooper You are correct Sir! Revision 0 Gloves Gloves are black in color, made of either rubber, Nomex, fabric, leather, or leather-like material, with no visible straps or logos/ designs. The fingers are enclosed, non-textured. Extend underneath the forearm armor. Revision 0 Hand Amor and Fingers Hand armor and fingers are gloss black except where annotated. May be separate from or attached to the gloves. The hand armor consists of two distinct pieces; a base piece and handplate. The base piece which sits over the back of the hand is slightly curved across the back of the hand. May have an outside (pinky) edge which is angled down and wrapped around to the palm. May have an inside (thumb) edge which is shorter beginning just aft of the thumb joint and wrapped to the palm. The handplate is flat and elongated with eight sides. There is a square notch in the finger end of the handplate. There are six raised elongated rectangles along the outside edge. There is a raised pentagon on the back edge near the wrist. Raised details are painted metallic black, matte black, or dark gray. Fingers are armored in 2-3 rigid pieces per finger, proportionate in size to the fingers, with the fingertips ending in contoured trapezoids. There may be small circles on the fingertip pads. The joints between the pieces have a circle detail resembling a mechanical joint. Mechanical pieces may be present giving the appearance of the finger pieces being attached to the hand base piece. The palms may have flat armor plates attached to the glove’s palm. Hand armor may be slightly weathered but must be uniform with the rest of the costume.
-
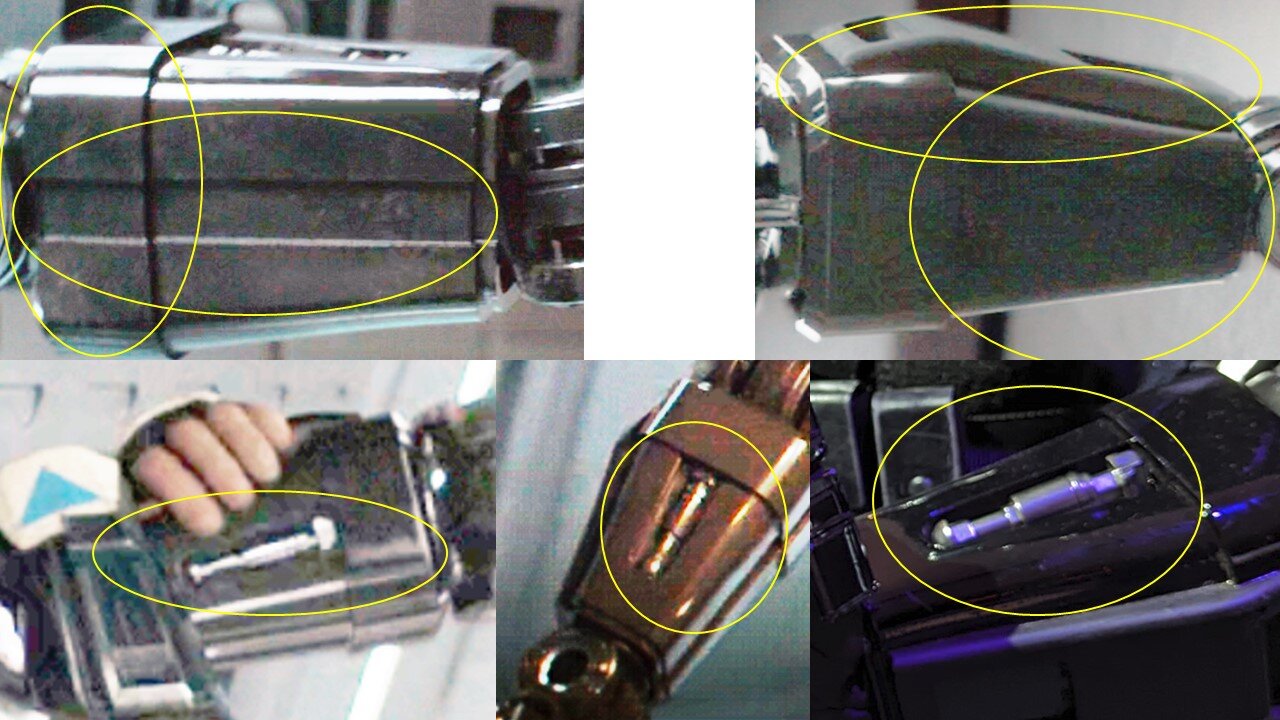
Forearm Armor (revision 1) Gloss black in color unless noted below. May be painted in accordance with the Color Scheme Guide. If used, all armor pieces must be painted using the Color Scheme Guide. Proportional to the rest of the costume. Forearms may be slightly weathered but must be uniform with the rest of the costume. One on each forearm, they are not interchangeable. Each forearm is a mirror image of the other. Forearms have an elongated rectangular appearance with the upper (elbow) end wider than the lower (wrist) end. There is a raised band around the upper section approximately 1/5th the length of the total forearm. The rear panel is smooth with no details. The front panel has an elongated rectangular recess with a piston like detail insert. The insert is painted metallic black or silver. The inside panel has an elongated rectangular recess approximately 3/4" to 1 1/5" (20mm to 30mm) wide which starts at the raised band and runs the length of the forearm ending at the wrist. The outside panel has a raised panel detail. The panel has a horizontal rectangle cut out positioned in the upper 1/3rd of the panel and a square cut out positioned in the bottom half similar in appearance to the bicep raised panel. The raised panel is painted metallic black, matte black, or dark gray. Both have a horizontal rectangle cut out positioned in the upper 1/3rd of the panel and a square cut out positioned in the bottom half.
-
Not a double negative at all. When worn and the arms are straight down, the piston greeblie faces forwards with the raised elongated rectangle greeblie on the outside of the forearm and the recessed rectangle on the inside. Thus the forearms are not interchangeable as that would reverse the positioning of the raised and recessed details. They are however identical in details so there is no difference in appearance other than them being mirrored. Don't know if you use Armorsmith but when you add a piece to the avatar and you select "mirror" it takes the piece and flips it to the opposite arm or leg etc. I did notice that I used the term "front panel" twice. The second usage should be "outside panel" ... changed below.
-
@IcyTrooper No worries Brother, no apologies needed!
-
@IcyTrooper any input?
-
Next up: Revision 0 Forearm Armor Gloss black in color except as noted below. One on each forearm and are not interchangeable. Each forearm is a mirror image of the other. Forearms have an elongated rectangular appearance with the upper (elbow) end wider than the lower (wrist) end. There is a raised band around the upper section approximately 1/5th the length of the total forearm. The rear panel is smooth with no details. The front panel has an elongated rectangular recess with a piston like detail insert. The insert is painted metallic black or silver. The inside panel has an elongated rectangular recess approximately 20-30mm wide which starts at the raised band and runs the length of the forearm ending at the wrist. The front panel has a raised panel detail. The panel has a horizontal rectangle cut out positioned in the upper 1/3rd of the panel and a square cut out positioned in the bottom half similar in appearance to the bicep raised panel. The raised panel is painted metallic black, matte black, or dark gray. Both have a horizontal rectangle cut out positioned in the upper 1/3rd of the panel and a square cut out positioned in the bottom half. Forearms may be slightly weathered but must be uniform with the rest of the costume.
-
I'm good with that.
-
First Order Jet Trooper CRL Discussion
Chaos replied to IcyTrooper's topic in First Order Jet Trooper
@Oldracer27 Greg, the CRL has not been posted yet as no one has built any kits to the CRL. We require model photos of an actual built kit when submission is made to the Legion for approval. If your builder can build the suit to the CRL spec, you could provide a set of detail photos like the other CRLs. You would be the "model trooper" for the CRL @IcyTrooper -
@Aesmodan I would think the CRL 1" specialist requirement is easily accomplished. Eventually space the boxes per the CRL and align them so the strap and slots are even and then either tack them in place with hot glue or E6000. That way if you even have to make adjustments they can be easily moved.
-
Congratulations! Post up some final photos the next time you suit up or attend a Trooping! Well done Tropper!
-
I made a two sound files to be used with my @ukswrath wireless DT helmet audio system. I like his set up as I don't have any wires running to my helmet, the system is compact, easy to use, and loud enough to hear. The speakers are mounted in the helmet under the nose side vents. The system uses a Bluetooth mini mp3 player. The two sound files are set up so that one has a 1-2 second gap between the chatter to enable a Play/Pause function, this allows me to carry on as if I am conversing with fans. The second has variable gaps much like the TK sound loop. This allows me to just walk around and it plays at random intervals. One thing I really like about the system is that I can load different sound files and cycle thru the mp3 player to play them. Example I have the Imperial March, AC/DC Hells Bells and my favorite to play when I walk into a room is AC/DC's "Back in Black" LOL The two sound files come preloaded in @ukswrath's system. I made the files available for everyone's use and have noticed a lot of people who are selling DT chatter devices are using my files (I can't tell you how I know this ... trade secret 😎) If you go with the glove you can get the files here and edit out what you want to use.
- 1 reply
-
- 2
-

-
Updated the links to these files Loop: https://www.dropbox.com/scl/fi/pmqcd5ju86xwt5hf7fq5q/2-Deathtrooper-Voice-Lines-with-segments-Loop-track.mp3?rlkey=held2gs9g67jblxghyss1ip8a&st=gjbmj0rt&dl=0 Play/Pause: https://www.dropbox.com/scl/fi/f6dfcccx81mmo2aelraov/1-Updated-Deathtrooper-Voice-Lines-Play-Pause-track.mp3?rlkey=jugv272t3wax10ld22wdz7bw7&st=uu4ecm82&dl=0
-
Yes, as long as the cut edges butt up against each other so there is no gap.
-
Looking good Dan, I made some constructive comments which will help with some "fitment" issues. Your GML may not mention anything about them, but they will help with the overall aesthetics of your costume. Let me know if you have any questions. Suit up Look.pdf

.png.05c44f239dc216a5d0866f756ceeb970.png)