-
Posts
1,473 -
Joined
-
Last visited
-
Days Won
111
Content Type
Profiles
Forums
Events
Everything posted by Chaos
-
Alex, @DoggyDoc made his own, he may be able to help. Here is a link to his post about them. click the gray box with the arrow pointing upper right
-
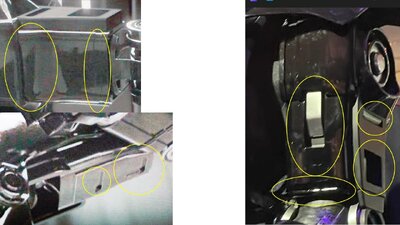
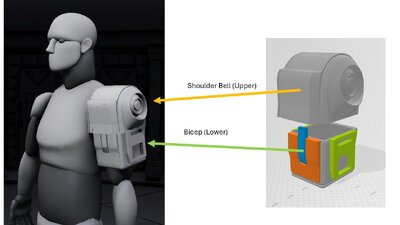
I know we discussed the biceps with the shoulder bell armor, but they are two sperate pieces ergo why I said in the shoulder and in now in the bicep that they can be one piece, but we need to define them both separately just in case someone builds them separated: Revision 0 Bicep Armor Gloss black in color unless noted below. May be painted IAW the Color Scheme Guide. If used, all armor pieces must be painted using the Color Scheme Guide. One on each shoulder and are not interchangeable. Each bicep is a mirror image of the other. Is overlapped by the shoulder bell. May be incorporated with the shoulder bell as one single piece. The bicep has an overall square appearance with the rear panel flaring out slightly the last 1/3rd to 1/4th at the top. There are two raised panel details on the inside and outside of the bicep. Both have a horizontal rectangle cut out positioned in the upper 1/3rd of the panel and a square cut out positioned in the bottom half. The upper rear corner of each panel is angled to mimic the bicep rear panel flare. See CRL Photo. The forward lower corner of each panel is angled rearward. See CRL Photo. Panels are painted metallic black, matte black, or dark gray. The outer raised panel is raised out more than the inside panel. There is a raised panel on the front side of the bicep which is flared thicker at the top half. There is a vertical rectangular cutout in the center of the panel. There is a vertical rectangular insert with a beveled lower end in the center of the cutout. The top of the insert extends underneath the shoulder bell. There is a recessed grove approximately 10mm wide around the lower edges of the bicep. This recess is offset slightly upward from the lower edges. Biceps may be slightly weathered but must be uniform with the rest of the costume.
-
Check ogleprops.com, their visors are L2 compliant
-
I had to pull out the lining and install a hardhat liner. Once I did, I was able to have plenty of room for my fans and LED battery packs. Plus it allows for more air flow. I wear a 7 1/4 hat for reference.
-
We have previously discussed the chest and back armor which has a "shoulder plate" similar to a pauldron. I named it Shoulder bell armor to align with other "shoulder bells." Below it is another section that I have named as "Bicep Armor" The onscreen suit appearance presents itself as an upper piece which overlaps a lower piece. We can name it what ever we want but I was just sticking with previous naming conventions.
-
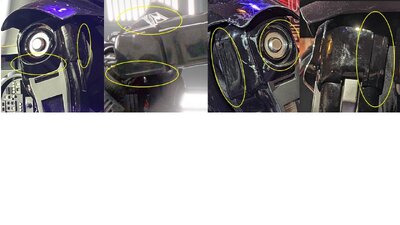
Alright! Moving right along ..... another quick and easy one. Revision 0 Shoulder Bell Armor Gloss black in color unless noted below. May be painted in accordance with the Color Scheme Guide. If used, all armor pieces must be painted using the Color Scheme Guide. Shoulder bells may be slightly weathered but must be uniform with the rest of the costume. One on each shoulder and are not interchangeable. Each shoulder bell is a mirror image of the other. Overlaps the bicep armor or may be incorporated with the bicep as one single piece. There is a notch for the bicep armor greeblie in the front lower edge. There is a raised beveled circular detail on the outside of the shoulder bell. (See CRL Photo for reference) Inside the detail is a raised circle ring which has a flat disc painted metallic black or silver. There is a raised cylinder in the middle of the disc painted metallic black or silver. There is a vertical recess approximately 20mm / 0.75 inch wide along the inside edges of the front and rear faces. This band is offset slightly inward from the inside edge.
-
Blue Bantha's 3D Printed MCM Death Trooper
Chaos replied to bluebantha's topic in Imperial Death Trooper
@bluebantha Carter! Welcome back. I remembered your Shadow Trooper thread and did not realize you were never approved. I look forward to helping you "GML bomb proof" your Death Trooper. As you build it, I recommend that you build to Level 2 standards and get approved at L1 and then turn around and request an L2 look. The Detachment makes that decision. Best of luck and please reach out if you have any questioned. -
Which type of cloth should I use to hand buff it out? I have a sponge drill attachment, but last time I tried buffing it out, I burned the clear coat. When I have to polish any paint or clearcoat on any of my armors I use an orbital hand buffer. You have to take it slow and use very little pressure when doing it as to not generate any friction heat. https://www.amazon.com/DECKER-WP900-6-Inch-Random-Polisher/dp/B000077CPT/?th=1 If you want to hand buff with the polishing compound, I have used the sponge that comes with the Turtle Wax cans.
-
"Is there a way to buff this out, or am I just going to have to sand it down with high grit sand paper again and repaint/clear coat it?" "Tis but a scratch!" 😆 As long as its only in the clear coat or paint you can buff it out with auto rubbing compound, then hit it with a polishing compound. If it's into the primer or material, it will definitely need to be wet sanded and repainted. I assume the placement looks good? I just need to secure the left most box, the leather pouch and attach the hidden 2" plastic clip on the other end to make it a functional belt. Placements look good. Good idea to wait on the rear pouch until you can put it on and position it correctly before affixing it. I can't tell you how many times I have seen DTs with their rear pouch way out of alignment.
-

DT - Jim Tripon Calves and Forearms HELP
Chaos replied to productionsbykyle's topic in Imperial Death Trooper
Great idea. -

DT - Jim Tripon Calves and Forearms HELP
Chaos replied to productionsbykyle's topic in Imperial Death Trooper
They turned our great! Nice job Trooper! -
Looking good so far! You are on track with your self assessment of adjustments. A helpful hint: for pieces that are duplicates but have a left or right location, Paint an "L" or "R" on the inside so when you suit up they are in the correct location. (Hand plates) 😉
-
😄 yes it was!
-
Extend as in length or circumference? Length is not really as issue as there is no CRL required gap between the thighs and shins. If you are referring to circumference, I believe @DoggyDoc increased his and I did a quick info sheet as well. https://imgur.com/a/shins-eMUq0
-
Looking good Trooper! Word of advice on Jim's shins. There will be a gap on the top front seam. Depending on how large it is you may have to fill it in. Most of us with Jim's kit have done this. I have found that if Bondo is used, overtime as the Bondo cures, it shrinks and or will separate from the shin material due to the opening/closing flexing of the shin. I used Devcon Plastic Weld to fill in the gap. Its a pain to sand smooth but it does not shrink after it has cured completely and bonds very well to the shin material.
-

DT - Jim Tripon Calves and Forearms HELP
Chaos replied to productionsbykyle's topic in Imperial Death Trooper
-

DT - Jim Tripon Calves and Forearms HELP
Chaos replied to productionsbykyle's topic in Imperial Death Trooper
Ok I got the forearm info done, this should keep you busy while I finish up the shins info. Let me know if you have any questions. Slow and meticulous are the words of the day for this. Hot Water Bath Shaping.pdf -
@SketchyGTI Collin, Welcome to the darker side of The Darkside! Awesome choice on your kit, I look forward to your progress. Best of luck on your build. Reach out to the community if you have any questions or issues.
-
Next section. This should be a quick one: Revision 0 Lower Back Gloss black in color unless noted below. May be painted IAW the Color Scheme Guide. If used, all armor pieces must be painted using the Color Scheme Guide. Fitted centered and under the back plate and extends to below the top of the belt. The Lower Back and Abdomen side extensions, if any, may meet flush at the sides. Has a general “T” shape design with the top being flat across. Each top corner section is extended outward with the bottom edge angling and widening downward to the center section. There are two proportional horizontal recesses that may be present. The center section has a recessed area which has two raised circular ring type hose connectors positioned offset with the larger one located in the upper right corner and the smaller one located in the lower left corner. Connectors may be painted metallic black or silver. Two pistons may be present. If present, the ends must have the appearance of being attached to the lower back and extended to be hidden by the belt. Pistons shafts will be painted metallic black or silver. Lower back armor may be slightly weathered but must be uniform with the rest of the costume.
-

Death Trooper building in Germany (Jim Tripon kit)
Chaos replied to Deathwatch's topic in Imperial Death Trooper
I too had the issue with my Shadow Trooper paint job, what ever I wrapped my pieces in left a slight impression in the paint, it'll buff out with auto polish. Eventually it stopped doing it so I can assume the clear coat finally cured. I have noticed with the 2K Clear coat cans, if you don't get the "hardener" thoroughly mixed the clear coat will take a will to harden. That's why when I repainted my DT I used the Appliance Enamel, its hard as nails and cures that way in about 3-4 days. Don't stow the pieces for a while if you can help it, put them in a cool dry place with good airflow. -

DT - Jim Tripon Calves and Forearms HELP
Chaos replied to productionsbykyle's topic in Imperial Death Trooper
Kyle, before you get too far with the bondo, I would not do any bondo work before you water bath the pieces. I am just about done with a "how to" for the forearms and calves for you. -

DT - Jim Tripon Calves and Forearms HELP
Chaos replied to productionsbykyle's topic in Imperial Death Trooper
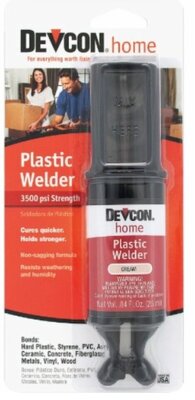
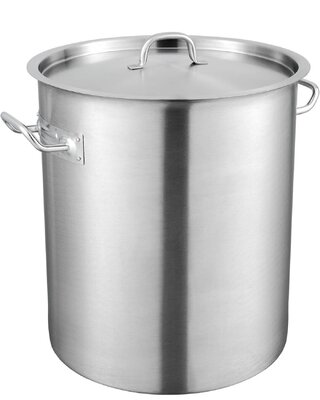
Oh and go purchase yourself some tubes of Devon Plastic Welder. It holds very well and won't seperate in a hot water bath. Also go buy you a tall inexpensive soup/stock pot 32 quarts or more.You'll need these for my suggestions

