nanotek
-
Posts
2,238 -
Joined
-
Last visited
-
Days Won
155
Content Type
Profiles
Forums
Events
Everything posted by nanotek
-
I looked at the files and at first glance it appears they are pretty sharp, but I am getting more and more examples of other people's work with Chris's files and they look ok. Hard to tell with such low quality examples and I am trying to get a contact for someone who built this example who may be able to assist

-
I have access to the 3D files so will have a look tomorrow to make sure there’s nothing that sticks out. As long as they adhere to the look and feel of the ANH kit you should be fine. If it’s the sharp features of the R1/Solo kit then it will be a no. As stated by @IcyTrooperall the print lines will need to be smoothed out etc But if the files check out looking forward to see it built.
-
 Ok. I am happy to go with the consensus. Let’s update the CRL with the latest text and I’ll get it pushed through. Again thanks everyone, outstanding job
 -
Likewise I am the opposite, I don't see anything that indicates it is hard. Thanks for your insight @RAIDER and entertaining my questions. I guess question still remains, is the abdomen a separate distinguishable part, or can you go the under-suit route with pieces armor on the sides? I have one extra question about the second L2 bullet point, I assume that this only applies if you decided to go the hard abdomen route? Ignore if we are saying that the abdomen is a separate armour part. There should be no gap between the ab and kidney plate, a single visible seam line is ideal. Any gap between the abdomen and kidney armor shall be no more than 1/2” (12.5mm). Any shims used to achieve this effect shall have a similar material and color as with the abdomen and kidney armor. Shims should be flush and seams are allowed. BTW I'd like to also say thanks to you all, you guys have done a great job and the costume looks great.
-
Looking at the abdomen section I would be more inclined to think it was soft material over hard armour. Stylistically in comics if something has a hard surface you would see some kind of sheen, and often materials with a porous surface will be flat. The higher the gloss, the whiter the sheen. In this comic I see some materials have a sheen like the black straps around the forearms or legs, but consistently nothing on the abdomen (similar to the under-suit sections). Sometimes lighter colour is applied to black sections to denote crumpled up material like the inside elbows. This is my interpretation of what I can see... so then: If we go by the logic of "no definitive way to 100% tell..." then shouldn't both options be offered to empower future builders to make their own choice? If we have a soft abdomen then we would have a separate codpiece as well. To your point of showing a split beneath the belt: I get what you are saying, but I don't think it matters if you show them as separate pieces in a CRL. We have no way of telling if the Death Trooper's cod is separate from the abdomen, yet we still show them as separate pieces as is the same with many other costumes. At the end of the day it's up to the majority to come to an agreement, I totally get what you are all saying, I'm not saying you're wrong, I am trying to allow for this to be as flexible and clear as possible based on what I can see. When I looked at this with a fresh set of eyes - references, CRL text etc - I had questions, just throwing em up for discussion.
-
I'm not overly familiar with this piece of kit, but yes the ribbed gasket material should extend the whole gap, but also (and I just realised it's not expressly stated in the CRL text) but the rib size should be about 5-6mm like the rest of the gaskets. Interesting how whoever built it, left the opening free-floating, (and again it's not expressly stated in the CRL text, but it is in the pics) it should probably be closed up/glued if possible. What is the alignment like? If it cannot be done I do not think it will be a major issue as long as it still looks the part (no discernible gaps). @Chaos any thoughts?
-
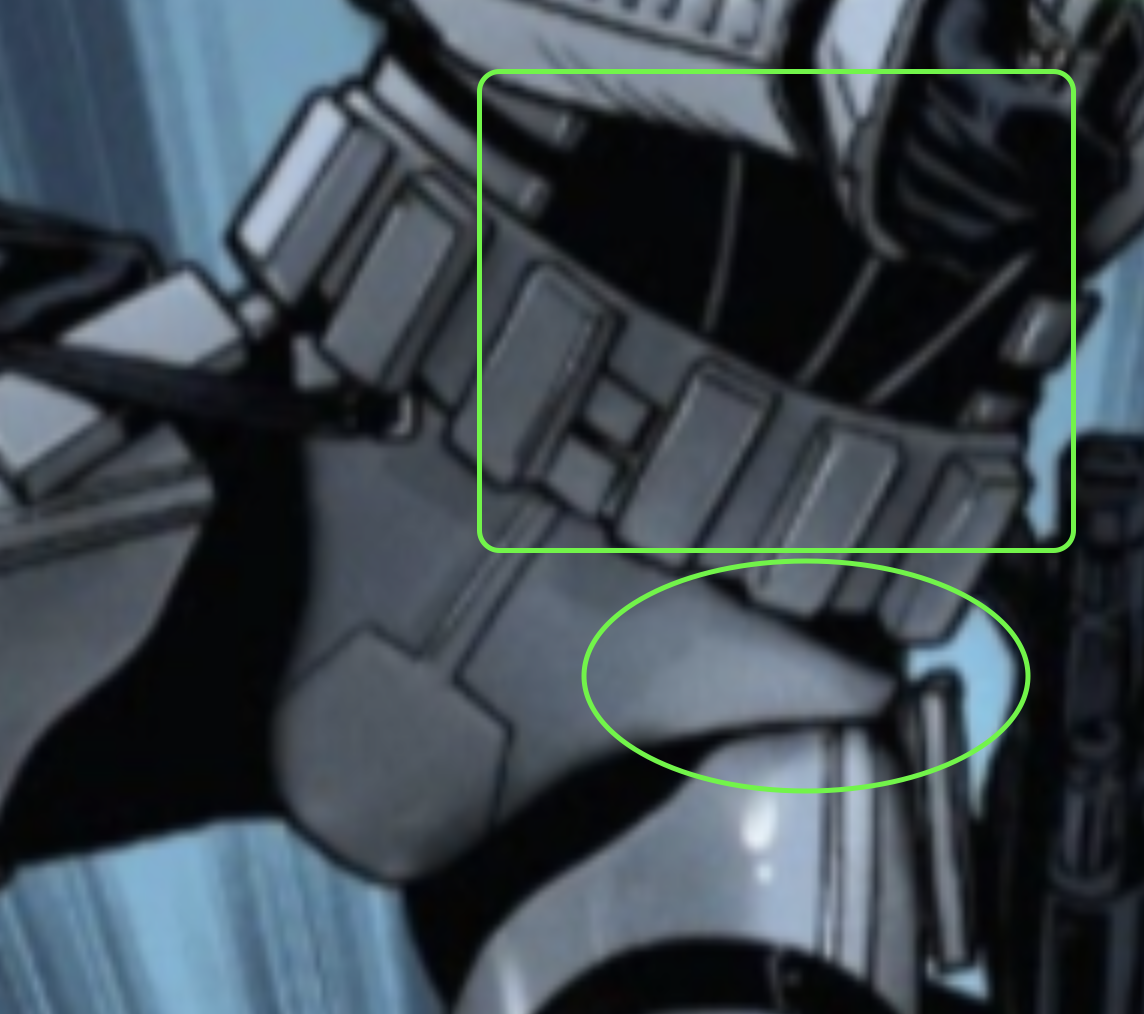
I guess I’m more interested in why it’s a level 2 requirement if it can be clearly seen as a separate piece? If it is a separate piece the two points highlighted red would be moved. Not contesting that the white part is wrong. To me the way it is drawn is that it is slightly overlapping the thigh and the very edge of the cod extends well away from the abdomen (circled). There is some very subtle shading of the belt on the cod also. To me the abdomen is almost like they removed the armour plate and exposed the under-suit (ie there is no abdomen) and added some additional armour plating on the sides (rectangular armour)
-
Good morning team I missed a couple of things when we were discussing the abdomen/cod from earlier. There is one major thing that jumped out at me that I would like to open up for discussion The cod and abdomen are separate pieces as shown by this panel. The area circled shows the cod lifting away from the abdomen/thigh and the rectangular box highlights how the cod is no longer aligned with the abdomen (due to the twist in the body) indicating that this is a separate piece. I have highlighted the cod/abdomen text for discussion in red, and some proposed text in yellow. The white lines could use some simplification. For some reason my brain can calculate some things but not others. Abdomen Armor The abdomen and cod piece are combined/fused to a single plate/one piece. Cod piece is white in color. The abdomen is black in color. There are 3 white lines, one vertical up the centre with a diagonal line on each side. The distance between the vertical and diagonal lines is smallest where the abdomen meets the cod and extend diagonally to align with the recessed lines of the chest armor. 2 rectangular armour plates on each side of the abdomen approximately 3/32"-1/8" (3-4mm) thick There are no visible snaps or rivets. Abdomen armor must match in-comic references.
-
@RAIDERis ?. So for your two questions the answer is “yes” Looking great so far!
-
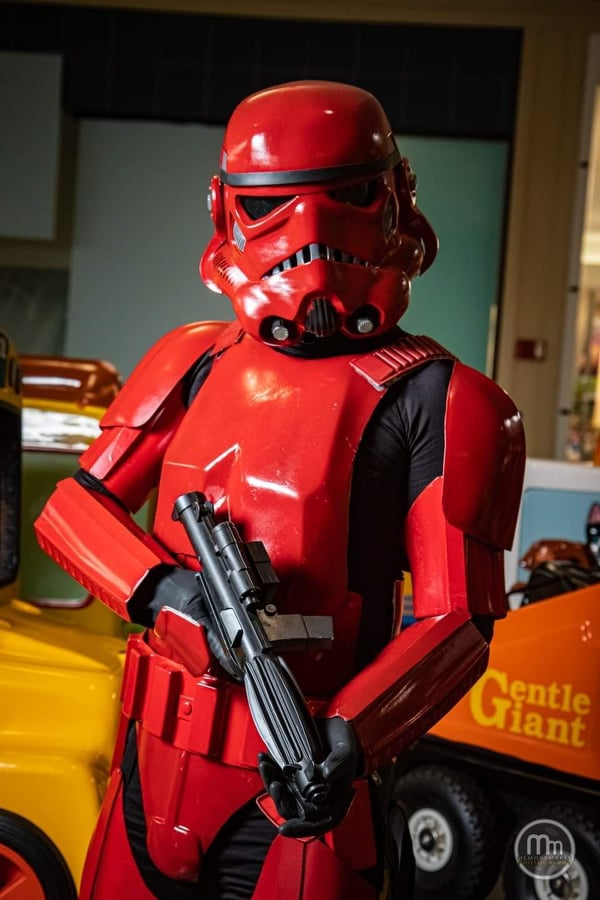
Imperial Flametrooper (Jedi Fallen Order)
nanotek replied to stevechewbacca's topic in Imperial Flametrooper (JFO)
The colour looks great, too blurry to see the details just under the nose bridge part -
I did a quick google for polish in Sweden and came across this https://www.ubuy.com.se/en/product/NKKROK-meguiars-15-2oz-ultimate-quik-car-wax Mequiars products are available there.
-
I used CA Glue for both my kits. E6000 is more forgiving if you make a mistake
-
I agree with @RAIDER on re-tailoring the cod as it definitely shouldn't bunch up like that. Also for mine I shaped a 4mm thick piece of ABS using a hairdryer and sewed it into the bottom part of the cod. I think this is a similar approach that others have used in the past.
-
Once the armour is painted should be fine. I have trooped 40+ degree Celsius days in direct sunlight with no trouble other than I feel like I’m being microwaved
-
I also had a number of parts warp in the sun while I was prepping towards paint. All I can say is when using any spray putty, do not leave in the sun - period! I only applied Fibreglass to the areas that I thought needed it. Thighs, butt (I thought it would need reinforcement but it doesn’t really) ab, shoulders, etc I did apply Fibreglass resin to everything though, inside and out. I think i applied at least two coats to get a nice workable surface before filler/primer. Just have to be careful not to get runs, globs etc in the detail bits. I used a more expensive paint brush to do the detailed areas
-
-
No problem, feel free to reach out any time
-
Hi @LondonValient, yes I am Detachment Leader but I I don't know everything about the DT, it's always a process of discovery @Chaos is my go to guy for DT stuff now, is our Detachment Costume Advisor for the DT aaaand also our first ever Specialist ranked Deathtrooper Specialist. I will throw stuff in from time to time, but Chris is probably more active in the DT space
-
I agree with the comments above
-
Imperial Flametrooper (Jedi Fallen Order)
nanotek replied to stevechewbacca's topic in Imperial Flametrooper (JFO)
Looking great. I am concerned with one thing, and maybe you’re still working this out, and that’s the details just under the nose on the skirting I also assume you’re going to be weathering the helmet and armour to match the skirting material?
-
I think this is good, but I also think you should mention something about the blade being green if it is going to be used as it is a key difference from the Sith Lords. Make sure the L2 meets some of the same standards as the other CRL's in terms of high quality replica maybe? In answer to the question, if the lightsaber is a prominent feature of the costume and is visible most of the time (which I believe it is), then it is a requirement.
-
Remember to request detachment access here https://forum.specops501st.com/forum/130-access-requests/
-
PM'd
-
Imperial Flametrooper (Jedi Fallen Order)
nanotek replied to stevechewbacca's topic in Imperial Flametrooper (JFO)
Another option might be to 3D model the parts for assembly, so instead of one big model and slicing it, you manufacture components that slot together for a more solid build. Just thinking out loud I don't know if you plan on selling/sharing your files at the end of the build, but it might be worth considering either way as the majority of people probably don't have the larger printers. Me personally I don't mind the larger files because of 500x500x500 build volume -
Yeah mate, looking great!