IcyTrooper
-
Posts
4,136 -
Joined
-
Last visited
-
Days Won
383
Content Type
Profiles
Forums
Events
Everything posted by IcyTrooper
-
On the first page and post of this thread I went in and update the "Special Notes" section to say the following: When specified, costume parts will be painted in a camouflage similar to that found in the reference photos: Tan base base coat (see note about white showing through below). Camo patterns colored dark green and dark brown . May be slightly weathered to look as if white is showing through with minor scuffs/dirt We can specify Pantones or like colors and hex codes as needed for general guidelines as well.
-
Going to do the Shoulder and Upper Arm Armor together. I agree with it being the same as we have seen with the other scout costumes. I'm moving any text about "painted to match the rest of the armor" as the first bullet for pieces: Shoulder Armor Painted to match the rest of the armor. Black elastic is used to secure the armor around upper arm. Shoulder pieces do not have any adornment. OPTIONAL Level two certification (if applicable): Armor is secured around bicep with a 0.5" (12mm) black elastic strap. Bottom corners are rounded. Optional: Affix top of shoulder bells to shoulder bridge loops. ------------- Upper Arm Armor Painted to match the rest of the armor. Armor has a recessed area with a contrasting black "T-bit" detail attached within. Black elastic is used to secure the armor around upper arm. OPTIONAL Level two certification (if applicable): Armor is secured around the arm with a 1.5" (40mm) black elastic strap. Accurate "T-bit" detail is mounted to the armor. T-bit circle detail piece faces forward on each arm.
-

Imperial Security Trooper - Andor - CRL Discussion
IcyTrooper replied to nanotek's topic in Imperial Security Trooper - Andor
Just an update to this that the text is being entered and images are still being edited. -
The Balaclava should be good with the standard text here: Balaclava A balaclava is a black head sock/hood that is worn under the helmet and is used primarily to hide any view of the wearer’s skin and/or facial hair. So, the Flight Suit is the next piece and I agree with the higher level requiring the removal of thigh patches. I made some corrections for consistency: Flight Suit The undersuit is a one or two-piece black textile suit, such as military flightsuits, motorcycle racing suits, industrial work clothing (Dickies), or similar suit modified appropriately. Stand-up collar conceals the neck with an enclosing strap to keep the collar closed. Must have a suede or faux suede butt flap attached above the waist hidden by the cummerbund and is rectangular in shape. The flap is slightly narrower than the width of the trooper and stops slightly higher than the bottom edge of the troopers backside. Suede or faux suede thigh patches may be present, extending over the flight suit crotch and down the front finishing above the knee armor. The thigh patches must be secured by 2" (50mm) black elastic, sewn in under the front and back of the thigh patch. See the Scout Trooper Flight Suit page for detailed images of the patches described below. Suit must not have any visible labels, logos or zippers (including built in flight suit pockets). OPTIONAL Level two certification (if applicable): Suit is fairly fitted and not baggy. Black suede or faux suede thigh riding patch is removed. The 2" (50mm) black elastic runs completely around the leg/thigh. Real black suede square/rectangular butt patch is attached to flight suit at the rear under where cummerbund sits. No external visible stitching. Size will differ slightly from scout to scout, but correct scale is maintained.
-
Back to the Helmet again. From the reference images I think we should only allow black or dark green lenses and not mirrored for the purposes of this costume (similar to what was done for the Swamp Trooper, from this game). I agree with the rest of the text that was proposed here, especially the snout being gray, squad emblem on both sides and removal of lower right rear vent details/indentions. We should go with a Special Notes section for the painting notes and then just state "...is painted to match armor" on most pieces that have it. That would allow for better consistency. Helmet Helmet is painted to match armor. Scout style helmet accurate in shape and form. Eye lens is black or dark green. Flat or concave elevator bolts. Snout is gray with black details. OPTIONAL Level two certification (if applicable): Details are the correct color and placed as shown. Scout style details are present, either painted or decals. Ear holes are correctly shaped and have no mesh. Black 3M Speedglas bolts or replicas mount the faceplate to the helmet. (Visible bolt head diameter of 22mm). Accurate snout detail and aerator with accurate parts, mounted onto a plate and painted gray with black details. Accurate squared emblem located on the left and right faceplate "blinder". Accurate rear helmet "bar code" striping pattern. Accurate three lines on center of forehead area. No visible seams on the dome. No visible "vent" detail/indentions on lower right of back of helmet.
-
This would be what we are looking at now: Boots and Boot Shafts Marine vinyl which is not too glossy in appearance, used to construct the boot shaft, and is painted/weathered to match the rest of the armor. Each boot shaft has the following details: Two (2) black straps, made of leather, leather-like material, or marine vinyl and are approximately 1" (25.4mm) wide. Each strap wraps completely around the leg, beginning and ending at the back of the boot. The seam of each strap closure terminates on the rear of the boot shaft. Boot shaft terminates just below the knee armor and a seam may be present on the back of the leg of each boot shaft. The soles of the boots are gray. A "dog bone" shaped strap covers the bridge of the foot and is black in color. Marine vinyl is also used. Toe of the boot is black marine vinyl, leather or leather-like material. The boots are secured up the back using 1" (25.4mm) black hook and loop fastener. Slightly textured vinyl, leather or leather-like material is acceptable. No holster is present on the boot. OPTIONAL Level two certification (if applicable): The boots have a flat sole with notches accurate to the visual model cut in. The boot sole is a single gray color with no visible stitching. Boot shaft closure is inside over outside, opposite of normal scout boots. Boot shaft black strap closure seams are offset of that of the rear seam from the boot shaft closure. Boots that are constructed too wrinkled (i.e., not stretched/fitted correctly prior to gluing) or poor in appearance will be refused. Stitching, if any, used for the boot should be colored or painted to blend in to the area they are used.
-
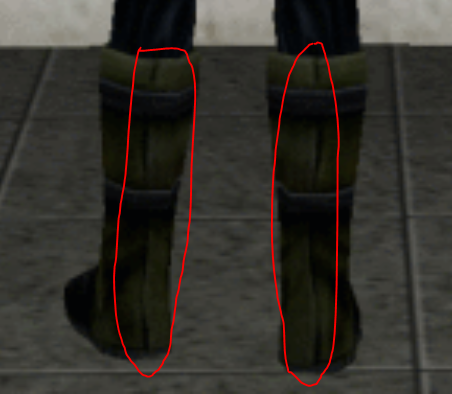
I see what you mean now, I think that we just state that the straps close on the rear of the boot shaft and not get hyper-specific unless for L2. On the right leg is to the left of the boot shaft seam as well?
-
I may need to clarify it in the post and for the straps themselves, but the seam I'm talking about is the one for the boot shaft here:

-
That is a very interesting pull. Often times you can even it out by cutting into the other piece but honestly, I don't think that is going to work this time around and would make the helmet very small and disproportionate.
-
Going to try and finalize this Boot text here: Boots and Boot Shafts Marine vinyl which is not too glossy in appearance, used to construct the boot shaft, and is painted/weathered to match the rest of the armor. Each boot shaft has the following details: Two (2) black straps, made of leather, leather-like material, or marine vinyl and are approximately 1" (25.4mm) wide. Each strap wraps completely around the leg, beginning and ending at the back of the boot. A seam may be present on the back of the leg of each boot shaft. Boot shaft terminates just below the knee armor. The soles of the boots are gray. A "dog bone" shaped strap covers the bridge of the foot and is black in color. Marine vinyl is also used. Toe of the boot is black marine vinyl, leather or leather-like material. The boots are secured up the back using 1" (25.4mm) black hook and loop fastener. Slightly textured vinyl, leather or leather-like material is acceptable. No holster is present on the boot. OPTIONAL Level two certification (if applicable): The boots have a flat sole with notches accurate to the visual model cut in. The boot sole is a single gray color with no visible stitching. Boot shaft closure is inside over outside, opposite of normal scout boots. Boots that are constructed too wrinkled (i.e., not stretched/fitted correctly prior to gluing) or poor in appearance will be refused. Stitching, if any, used for the boot should be colored or painted to blend in to the area they are used.
-
I agree, this looks great!
-
Gree's in the Tree's!!! A Forest Trooper Build story...
IcyTrooper replied to Gree23's topic in Forest Trooper
Looking at the reference images, it looks like the sides of the soles have some texturing like an outdoor boot. We haven't finalized the boot text on the CRL discussion thread yet to my knowledge, that is something I'm going to dive into this week (had a death in the family). It may be worth discussion on L2 detail to have that detail on the side of the sole, kind of like how scout boots are cut out. -
Imperial Flametrooper (Jedi Fallen Order)
IcyTrooper replied to stevechewbacca's topic in Imperial Flametrooper (JFO)
That may be a little update, but it is a great one!! -
Exactly as @DoggyDoc said! The wrist removal is quite the welcomed removal
-
Attention Vendors, If you wish to be added to our Stormtroopers Parts Vendor List please follow the below instructions: Format your information as below, this allows for us to be able to copy and paste into our master tracking sheet and to be able to verify you as a Vendor. When filling in information just copy and paste the below example format into a new “reply” window or into a word processing file of your choice. Once pasted, delete the example information and add in any information that you might have. If don’t produce an item listed, leave it blank or put N/A. Thank you for your assistance in helping us keep our Troopers up to date. Example: Costume Name: Shadow Stormtrooper, Novatrooper, Novatrooper Elite, Magma Trooper, etc. Helmet: - Mickey’s Trooper Factory web site - www.mickeystrooperfactory.com, Facebook – www.facebook.com/12345678, Etsy – www.etsy.com/MTF, email – info@MTF.org - Canyon Road Armory – www.CRA.de, etc etc etc. Armor: Same format as above Neck Seal Gloves: Undersuit/Gaskets included: Belt: Holster: Boots: Field Backpack: Optional Accessories: Ammo packs: Pauldron: Blasters: E-11: DLT-19: T-21: RT-97C: Electronics: Notes: You can make any annotations which pertain to your shop in this section, such as “MTF only takes Paypal,” "Custom fit." etc. Once you send or post your information we will check and verify and then update our Vendor List. Thank you in advance!
-
IMPORTANT INFO: The Spec Ops Detachment does not endorse any Vendor over any others. It is up to you the Trooper to do the research and exercise due diligence when purchasing any products from Vendors. The Spec Ops Detachment does not get involved in any disputes that a customer may have with a Vendor and even though these Vendors are considered to be in “Good Standing,” it is not uncommon for issues to arise that must be worked out between the buyer and seller. The Spec Ops Detachment endorses a “Buyer Beware” philosophy on any and all transactions. Last updated: TBD XX, XXXX ------------------------------------------------ Purge Trooper Phase I: Commander Helmet: ------------------------------------------------ Purge Trooper Phase I: Electrostaff Specialist Helmet: ------------------------------------------------ Purge Trooper Phase II Helmet:
-
Purge Trooper Phase 2 build
IcyTrooper replied to Snowball's topic in Purge Trooper Phase II (Kenobi)
@dewannawanga and @smoszer you guys have any input as well? Thanks @Kenyon -
Imperial Security Trooper - Andor - CRL Discussion
IcyTrooper replied to nanotek's topic in Imperial Security Trooper - Andor
I think we are done! I put the finalized text one the 1st page. The images are being edited now, so we can start putting the text in with image placeholders until we get those uploads down on the wiki. -
Purge Trooper (Phase II) - Kenobi - Discussion
IcyTrooper replied to nanotek's topic in Purge Trooper Phase II (Kenobi)
The CRL is live! https://databank.501st.com/databank/Costuming:Purge_trooper_p2 -
Purge Trooper (Phase II) - Kenobi - Discussion
IcyTrooper replied to nanotek's topic in Purge Trooper Phase II (Kenobi)
There is going to be a small correction to the helmet text about the LED. The changes are in orange: Symmetrical rectangular greebles (communicators/range finders) with semi-circular ridges underneath, present at the back of each side of the brow band, situated on top of the point where the front band meets the rear groove. The greeblie contains two raised and stacked squares, each with a circular LED or sculpted imitation located near the front, and a single recessed line in the shape of a square outlining the back two thirds of the greeble. If LEDs are used, the top LED must be a warm pale yellow (similar to a warm incandescent bulb) and the bottom LED must be red. There are 2 small pill shaped double indentation in the bottom corners of the faceplate, under each ear. The rear indentation is vertical and slightly longer than the front indentation that angles toward the front of the helmet. OPTIONAL Level two certification (if applicable): The central vocoder (chin detail) shall be molded as a separate piece and is inserted into a recess in the mouth plate. The aforementioned greeblie on the back of each side of the brow band must have the top and bottom lit using LEDs. The top LED must be a warm pale yellow (similar to a warm incandescent bulb), the bottom LED must be red. -
Nice!! I'd have to look at my kit, but I know one of the arms has more of the "grooves" than the other. I want to say it is the left arm, but I'd have to check.
-
Dark Trooper Gen III Weapon designation?
IcyTrooper replied to Chaos's topic in Dark Trooper - Generation 3 - Mandalorian
I'm struggling to figure out the name as well. I thought it would be identified correctly in the Star Wars Legion miniatures game, but they call it a E-11D, which is totally not correct. I then checked the Star Wars Shatterpoint skirmish miniatures game and they call it the Dark Trooper Blaster -
I want to echo this, I was trying to take a look at the Pathfinders CRL for the KT and it is down at the moment, but they do have some good text for the camo that we can build upon. I spoke with the Pathfinders DL and if we need anything or clarification on text they'll be happy to help. If we look at the edges of the helmet in the reference images it has the "appearance" that there is a base tone of a lighter color (whether it is white or a very light tan/almost white, that is up to who is looking). Having the possibility of white showing gives the costume longevity as it naturally weathers through wearing it.
-
Imperial Security Trooper - Andor - CRL Discussion
IcyTrooper replied to nanotek's topic in Imperial Security Trooper - Andor
I looked at this a bit more and definitely see the two colors of the zap rod, that could prove to be a bit of a challenge text wise. There is the all black handle version in the one pic and the other version has the white handle with the contoured grip that doesn't go all around the rod. Personally, I believe that we go with the mostly black one as we have clear evidence that that is the one the ISTs are carrying in the scenes (not the Narkina ones). Zap Rod Roughly 36" (91.4cm) in length. The base features a tip on top of a 2" (5.08mm) cylinder with two rings as seen in the reference photo. The tip and cylinder will be metal or have the appearance of being metal. The hand grip is black and extends up to a raised black ring, about 2" (5.08mm) wide going around the circumference of the zap rod. After the raised black ring there are two sets of pill shaped recessed on each side of the zap rod for a total of eight recessed areas. These recessed areas are closer to the raised black ring than the top of the zap rod near the shock prods. There is another raised black ring, about 1/2" (1.27mm) wide going around the circumference of the zap rod. The tip of the zap rod is cylindrical from the base to the tip and is roughly 4" (10.16mm) long and features a ring closest to the base and two prongs that are triangular shaped. The shock prod portion of the zap rod will be metal or have the appearance of being metal. OPTIONAL Level two certification (if applicable): The base cylinder with two rings is made from metal. The shock prod portion of the zap rod is made from metal. -
Imperial Security Trooper - Andor - CRL Discussion
IcyTrooper replied to nanotek's topic in Imperial Security Trooper - Andor
All good, I added the finalized E-11 Blaster text to the first page: E-11 Blaster Manufactured by BlasTech Industries, the E-11 is standard-issue for many Imperial Troops. Light, compact yet powerful, the E-11 blaster is always in high demand throughout the galaxy. Note, the E-11 holster as seen in the Original Trilogy movies is not authorized accessory for this costume. Based on a real or replica Sterling Airsoft Gun, Sterling Sub-Machine Gun, scratch-built, or a modified commercial toy Stormtrooper blaster to depict the Rogue One style E-11 blaster. OPTIONAL Level two certification (if applicable): Blaster shall be based on a real or replica S&T Sterling L2A1 AEG Airsoft Gun or accurate 3d print file. (Folding Stock does not need to function) D-Ring shall be present on the rear end cap. M38 Telescope. 1943 model is preferred. Power Cylinders shall be mounted on top of the magazine well. R1 style power cylinders are preferred over ANH style. 6 rows of T-Tracks cover the Sterling receiver holes except for the lower left row with the bayonet lug. Counter shall be a real or replica Hengstler 400 Series counter with Small eagle logo. Power Cylinders shall be R1 style, ANH style is not allowed. Scope shall be a real or replica M.H.R.