IcyTrooper
-
Posts
4,136 -
Joined
-
Last visited
-
Days Won
383
Content Type
Profiles
Forums
Events
Everything posted by IcyTrooper
-
I split this into another thread as the CRL discussion thread is for creating the CRL. I agree with @Gree23, I think there is that base olive-green undertone but the forest green and brown is more earthy rubbed/blended in I'd say. Almost like it is brushed on perhaps?
-
 I'm good with this.
 -
Just a side note here, the LMOs have officially approved this costume as a NTTL costume with placement in our detachment. We can continue CRL development and any building!
-
Good news, the LMOs have approved this as a NTTL costume for placement with us, we can continue the CRL development and costume refinements!
-
Great job on the painting! I agree, that magnet/metal setup for the mask is great to have for the convenience, that is how my TIE pilot is setup.
-
Onto the Belt and Detonator text. I updated the drop box straps for L1 to allow for a slide release buckle or the T-buckle/clamp buckle style and then in L2 requiring the T-buckle/clamp buckle style as the reference images show something different from a standard plastic slide one. I Google'd T-buckle and found some hits that show it somewhat similar to that one the reference images. I'm not sure about the rest of the text, we have a copy over from the Shadow Scout and Swamp Trooper. Belt and Detonator Belt and TD are painted to match the rest of the armor. The front and four "boxes" of the belt are made of hard material. Hanging from the sides of the belt are hip boxes (drop boxes) connected to the belt by 1.5" (40mm) black textile straps. Each drop box strap is threaded behind a black side release buckle, or T-buckle/clamp buckle, centered on the strap. Attached to the back of the belt is a rectangular thermal detonator box with short black corrugated hose. Accurate thermal detonator greeblies are attached to the box. The rectangular part of the thermal detonator greeblie, fixed on the left side of the detonator, is the same as used in the rebel Endor trooper rank badge. On the right hand side is the same round greeblie as used on the Scout tank topper. See the detonator detail page for a close up image of the greeblies. The TD box is secured by one single black tie wrap, with side buckle to fasten belt hidden under the box out of sight, or velcro fastening attached with 2" (50mm) black cotton or nylon belt secured on each end of the belt with a single rivet painted to match the rest of the armor. OPTIONAL Level two certification (if applicable): The belt is made from a one-piece construction with no visible gaps, and not separated with fabric in between sections, apart from at the back where the TD box sits. Making any joins in a 3 part belt seamless, is highly recommended. The straps attached to the drop boxes to the belt are made from 1.5" (40mm) black cotton webbing. Drop boxes hang the correct distance from the belt. Nylon webbing is inaccurate. The buckle on each drop box strap are a T-buckle/clamp buckle style, matching the reference photos. Thermal Detonator end caps to be concave and not flat. Optional: Thermal Detonator must have visible black clips attaching it to the web belt. Optional: Thermal Detonator tube to be wire wrapped and not ribbed tube. Optional: Thermal Detornator may have Hex shaped cap with a center "nipple" detail.
-
Still waiting to hear back from the LMOs on inclusion of this new-to-the-legion (NTTL) costume into the 501st and placement (if able) into Spec Ops. We should hear any day now.
-
For the Cummerbund, I have been trying to find any differences in it, and so far I found that the front part of ribbing shows 7 ribs, so I adjusted that. I also adjusted the color to say olive-green in L1 details and for L2 we should do like we did for the chest-to-back shoulder bridge fabric being dyed or painted to match that of the armor it connects to: Cummerbund Made from black fabric. Closes in back with 2" (50mm) hook and loop fastener. Extends from just under the chest armor down to the waist. There is no gap between the belt and cummerbund. Cummerbund should be made of same or similar fabric to the vest. Has a tapered cod section with inverted curve sewn in detail (not a chevron). Cod is olive-green in color and made of the same type of fabric/material as the cummerbund. Connects between the legs to the back of the cummerbund by a 2" (50mm) black elastic strap. Front of cummerbund has 5-7 equal ribs stitched, centered between the two black fabric pouches. Ribs are of equal width. Ribs are completely visible between the pouches. Cummerbund touches the bottom of the chest armor. Cummerbund slightly overlaps the belt. OPTIONAL Level two certification (if applicable): Made from the Cummerbund tutorial page. The cummerbund is separate from the flight suit and vest. There is no visible external edge stitching on the cummerbund, the cod or pouch flaps. Pouches are made from a matte black heavy cotton or canvas like material. Bottom edge of the pouch flap must be less than half the overall width of the pouch. Pouch size to conform to individual size; should fit in gap between chest armor and belt with minimal overhang. Codpiece must conform to shape pictured in the CRL and source art, and is dyed or painted to match that of the armor. Cod strap runs between the legs, but attaches to the flightsuit or some other area under the butt flap, and does not show overtop. Codpiece must not have excessive bunching around groin area. Optional: Codpiece is separate from the cummerbund and attached to either the vest or the flight suit.
-
Here is the final text for the Back Armor with that updated rivet: Back Armor Back and tank are painted to match the rest of the armor. The back armor has a center tank attached and may feature a single bottom attachment rivet. The top of the tank is flat with a detail piece painted black. Top detail piece uses the same greeblies as seen on the screen-used ROTJ Biker Scout armor. Top detail piece is painted matte black. The tank has black stripe detail. Optional: Additional "rank indicators", present on the right side of the tank, can number between 0 to 7 stripes. OPTIONAL Level two certification (if applicable): Back and Tank must be two separate parts, no single part back/tank plates will be admissible. Has 7 stripes details on both sides on tank. Bullet tank on the back armor has NO tank topper greebles detail. Rear tank has properly placed pin striping and if a single bottom attachment rivet is present, it must be painted to blend in with armor. Blinking lights or LED's on the bullet tank are not acceptable.
-
I didn't catch that initially, yeah there really is no way to tell if that is there. However, that may be something that is required to keep the tank on the armor yeah? If so, maybe we change the text that if that rivet is present it is painted to match the color of the rest of the armor?
-
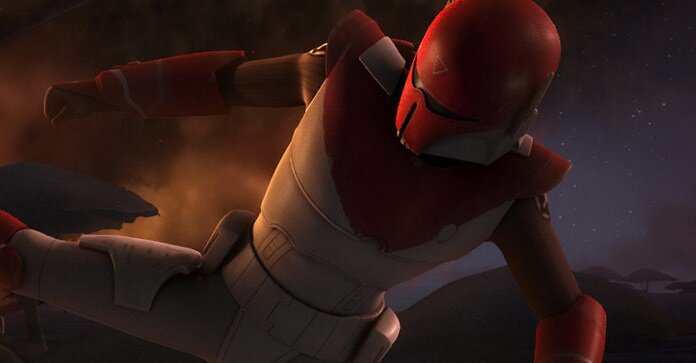
I agree with this assessment as well, as evident in these shots:

-
Yes we can! I have put them on the first page as such. Onto the Back Armor text, some changes in L2 to show no tank topper greeblies. Back Armor Back and tank are painted to match the rest of the armor. The back armor has a center tank attached. The top of the tank is flat with a detail piece painted black. Top detail piece uses the same greeblies as seen on the screen-used ROTJ Biker Scout armor. Top detail piece is painted matte black. The tank has black stripe detail. Optional: Additional "rank indicators", present on the right side of the tank, can number between 0 to 7 stripes. OPTIONAL Level two certification (if applicable): Back and Tank must be two separate parts, no single part back/tank plates will be admissible. Has 7 stripes details on both sides on tank. Bullet tank on the back armor has NO tank topper greebles detail. Rear tank has properly placed pin striping and a single bottom attachment rivet, painted to blend in with armor. Blinking lights or LED's on the bullet tank are not acceptable.
-
I agree with most of that, low-poly has given us a good ability to upscale some stuff on our end. I mentioned that to the LMOs in the past to ensure that we have good quality on what we see. We could refine our costumes for that for sure, it would be a grandfathered scenario as you suggested.
-
I agree with texture limitations nowt allowing for it to sit like it would the other patches, but I tried to go back and see the in-game models on our reference thread for the Swamp Trooper, as it most likely had the same pants. That is speculation on my part as the reference images we have for the Swamp Trooper are very dark on the pants part, so we can't see any texture on it. That may also be the reason why we kept it the same text as the Shadow Scout. To me it looks like the texturing is different from that of the rest of the bunching around it, indicative of suede or the like, so I'd personally lean towards having the flap there.
-
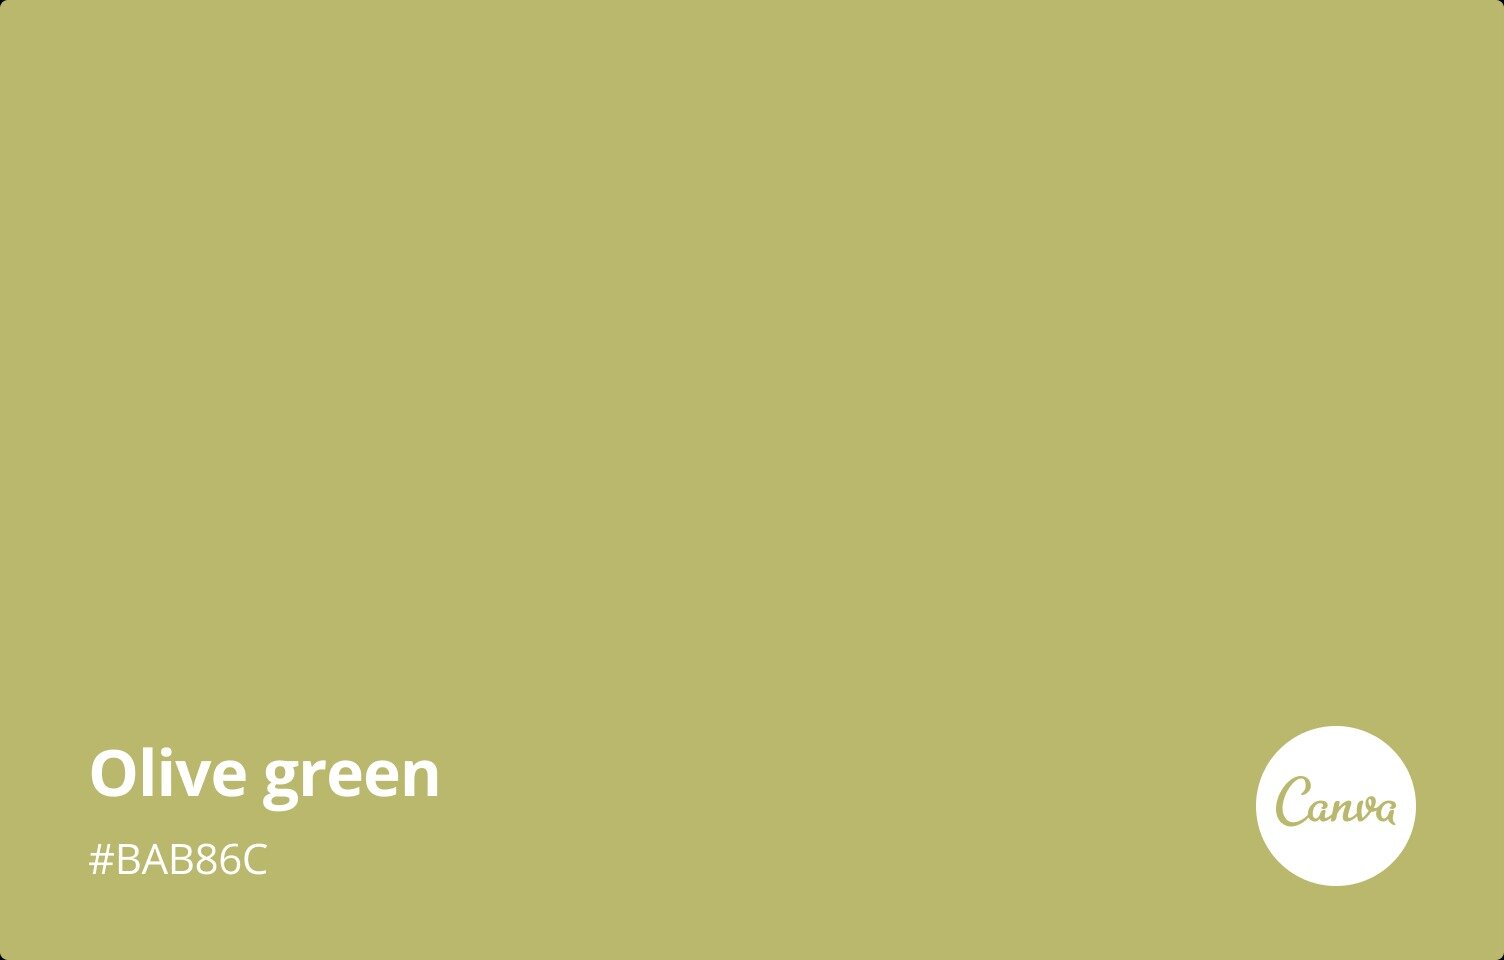
Okay, finally have a chance to get back on this after working some stuff out with some of the questions we have out for placement. Addressing the question about the side connection color for the chest to back armor pieces: This connection should be "black" as it already specifies in the text, that is what I'm seeing. Addressing the question about the shoulder connection color for the chest to back armor pieces: Looking back, the only reason I suggested black is because of the color match issue we may have between the armor pieces and the fabric, and wanted to have a consistency there, however, I think perhaps just doing the black would draw more attention to it other than pointing out what I had original put. The original post was "olive-green" and I threw in "forest green" and then in L2 I said that it must be colored to match the armor. I think we should probably go with the original "olive-green" to match as close to the armor coloration as possible. Looking at swatches, this seems a closer match than forest green: This would bring the text to this now: Chest Armor Painted to match the rest of the armor. There is a recessed rectangular area present over the right breast that must be painted black. The chest and back armor join together over the shoulder and the gap covered with a loop of olive-green fabric. The sides of the chest armor are attached to the back armor with black webbing or elastic. OPTIONAL Level two certification (if applicable): Shoulder bridge covers, covering the join between the front and back of the armor, are made of fabric that is dyed or painted to match that of the armor it connects. Nylon webbing is inaccurate. Side under arm chest/back straps are made from 1.5" (40mm) black webbing or elastic strap.
-
I feel like since this was already a thread talking about version 3 with the helmet, I'm happy to announce that we have a CRL model for that one and we'll be getting ready to unlock that CRL to add the version 3 helmeted w/ armor option.
-
Are we good with the fabric that attaches the chest and back armor? I was going to allow for both options but we did have olive-green in there before, maybe forest green if we want to do a singular color? We did something similar with the Swamp Trooper by saying it is green fabric.
-
Imperial Security Trooper - Andor - CRL Discussion
IcyTrooper replied to nanotek's topic in Imperial Security Trooper - Andor
The text has been entered into the wiki and getting those images finished up. -
Imperial Flametrooper (Jedi Fallen Order)
IcyTrooper replied to stevechewbacca's topic in Imperial Flametrooper (JFO)
Subtle, yet refined 🤩 -
Onto the Vest and Chest Armor text and looks to be standard at least with the Vest. The Chest Armor we'll need to take a look on the shoulder connections, as it isn't easy to see the connection. Vest Made out of black fabric. Sleeves are padded and contain ribbing similar to the front of the cummerbund. The sleeves are just slightly longer than the bottom edge of the shoulder armor. Vest has a much wider neck opening than the flight suit. Secured at the back using 2" (50mm) black hook and loop fastener. Vest should be made of same or similar fabric to the cummerbund. OPTIONAL Level two certification (if applicable): The vest is separate from the flight suit and cummerbund. Made using the Vest tutorial. ------------------------------------ Chest Armor Painted to match the rest of the armor. There is a recessed rectangular area present over the right breast that must be painted black. The chest and back armor join together over the shoulder and the gap covered with a loop of black fabric or olive-green fabric. The sides of the chest armor are attached to the back armor with black webbing or elastic. OPTIONAL Level two certification (if applicable): Shoulder bridge covers, covering the join between the front and back of the armor, are made of fabric that is dyed or painted to match that of the armor it connects. Nylon webbing is inaccurate. Side under arm chest/back straps are made from 1.5" (40mm) black webbing or elastic strap.
-
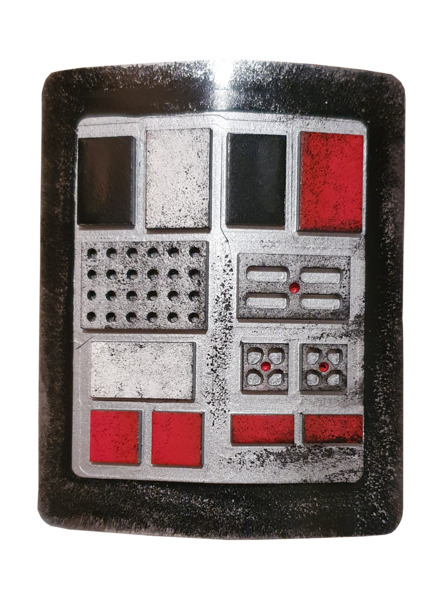
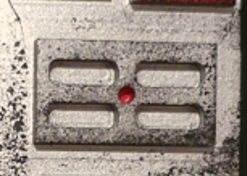
Good day, Jeremy. Here is the compad from the CRL: Ultimately, the call is up to your GML, but I'd say it is fine for basic approval. On the small block there are 4 drilled out holes for the LEDs which isn't on the CRL compad, but again, I don't think that should hold up approval for basic.
-
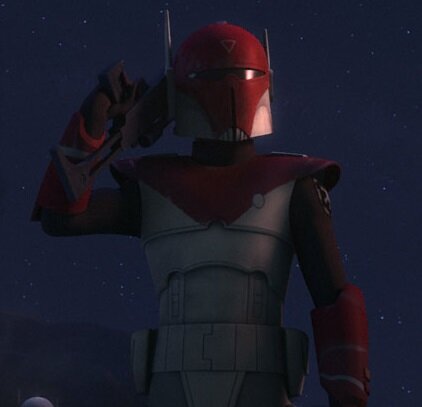
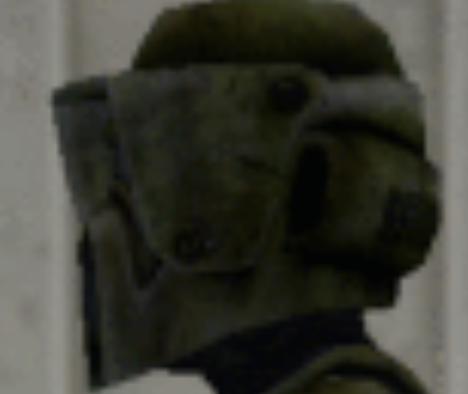
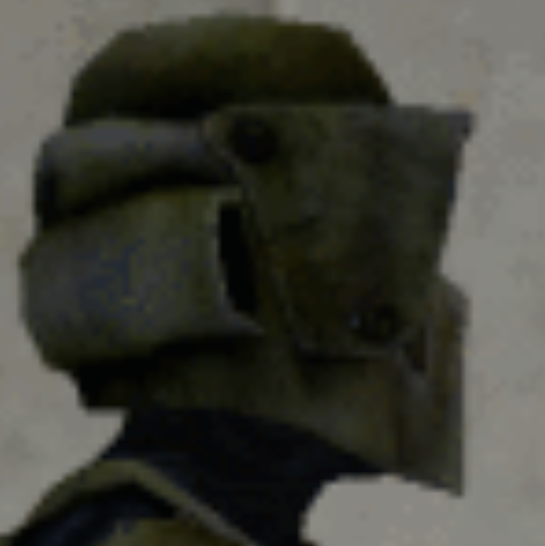
Correcting the finalized text for the Helmet and Boots: Helmet Helmet is painted to match armor. Scout style helmet accurate in shape and form. Eye lens is black or dark green. Flat or concave elevator bolts. Accurate squared emblem is located on the left faceplate "blinder". A mirrored accurate squared emblem may also be located on the right faceplate "blinder". Snout is gray with black details. OPTIONAL Level two certification (if applicable): Details are the correct color and placed as shown. Scout style details are present, either painted or decals. Ear holes are correctly shaped and have no mesh. Black 3M Speedglas bolts or replicas mount the faceplate to the helmet. (Visible bolt head diameter of 22mm). Accurate snout detail and aerator with accurate parts, mounted onto a plate and painted gray with black details. Please see the gallery for the accurate in-game snout. Accurate squared emblem located on the left faceplate "blinder" and a mirrored accurate squared emblem located on the right faceplate "blinder". Accurate rear helmet "bar code" striping pattern. Accurate three lines on center of forehead area. No visible seams on the dome. No visible "vent" detail/indentions on lower right of back of helmet. ------------------------------- Boots and Boot Shafts Marine vinyl which is not too glossy in appearance, used to construct the boot shaft, and is painted/weathered to match the rest of the armor. Each boot shaft has the following details: Two (2) black straps, made of leather, leather-like material, or marine vinyl and are approximately 1" (25.4mm) wide. Each strap wraps completely around the leg, beginning and ending at the back of the boot. The seam of each strap closure terminates on the rear of the boot shaft. Boot shaft terminates just below the knee armor and a seam may be present on the back of the leg of each boot shaft. The soles of the boots are gray. A "dog bone" shaped strap covers the bridge of the foot and is black in color. Marine vinyl is also used. Toe of the boot is black marine vinyl, leather or leather-like material. The boots are secured up the back using 1" (25.4mm) black hook and loop fastener. Slightly textured vinyl, leather or leather-like material is acceptable. No holster is present on the boot. OPTIONAL Level two certification (if applicable): The boots have slots cut into the sides and sole, but not on the toe part of the boot. The boot sole is a single gray color with no visible stitching. Boot shaft closure is inside over outside, opposite of normal scout boots. Boot shaft black strap closure seams are offset of that of the rear seam from the boot shaft closure. Boots that are constructed too wrinkled (i.e., not stretched/fitted correctly prior to gluing) or poor in appearance will be refused. Stitching, if any, used for the boot should be colored or painted to blend in to the area they are used.
-
I do understand what you are saying about the snout now I think a good way to do this would be to update both the Swamp Trooper and this text to have a gallery image of the helmet on the CRL that persons aiming for L2 can reference, especially if the model doesn't have it. I'd like to keep L1 for an either or and then L2 need to one from in the game. ------------------ For the decal on both sides of the blinder, I went to the Swamp Trooper reference photos as it is a reskin from what I can tell: vs I just don't think there is enough to conclusively say one or the either since it is so low-poly. I'd be inclined to utilize the "C" decal for both sides and mirror them from each other under L2. We may need to update the text on both the Swamp Trooper to specifically talk about the decal only needing to be present on the left side for L1 and for L2 that it needs to be on both and mirrored for the right. This is a super good discussion.
-
We could make the L2 details for the boots to state that the slots are only present on the sides and not the toes. The boots have slots cut into the sides and sole, but not on the toe part of the boot. So, we do have the fish hook on both sides in the L2 text: Accurate squared emblem located on the left and right faceplate "blinder". We could add that it is mirrored on the right faceplate "blinder": Accurate squared emblem located on the left and right faceplate "blinder". The emblem is mirrored on the right faceplate "blinder". I do agree with the snout being accurate in the L2 side, so we did put that in there. We have a variation of that text in both the Swamp Trooper and the Shadow Scout as well: Accurate snout detail and aerator with accurate parts, mounted onto a plate and painted gray with black details. Are you saying that it needs to be less detailed? The Swamp Trooper has the same text that we used for this one minus adding the part about painting the upper armor to match the rest of the armor. This is our current text: Upper Arm Armor Painted to match the rest of the armor. Armor has a recessed area with a contrasting black "T-bit" detail attached within. Black elastic is used to secure the armor around upper arm. OPTIONAL Level two certification (if applicable): Armor is secured around the arm with a 1.5" (40mm) black elastic strap. Accurate "T-bit" detail is mounted to the armor. T-bit circle detail piece faces forward on each arm.
-
Got another two easy ones from the looks of it for the Forearm Armor and Gloves: Forearm Armor Painted to match the rest of the armor. Black elastic is used to secure the armor around forearm. OPTIONAL Level two certification (if applicable): Armor is secured around the arm with a 1" (25.4mm) black elastic strap. ------------------------------- Gloves Black leather and gauntlet length. Detailed gloves include: Black suede or faux suede patches on top of the middle finger, index finger, and thumb. Four tightly spaced ribs that span the knuckles. There are no labels/logos, clips, or external straps. OPTIONAL Level two certification (if applicable): Suede or faux suede padding on fingers and inside of thumb and correct gauntlet stitching.