IcyTrooper
-
Posts
4,136 -
Joined
-
Last visited
-
Days Won
383
Content Type
Profiles
Forums
Events
Everything posted by IcyTrooper
-

Imperial Security Trooper - Andor - CRL Discussion
IcyTrooper replied to nanotek's topic in Imperial Security Trooper - Andor
@BigJasoni I know that we are going to be updating some of the weapon text and we have our DM but do you have additional reference pics of that zap rod? -
This will be a thread for discussion of the Forest Trooper found in the Star Wars: Galaxies video game. This will be the main listing and we'll tackle each part piece by piece (green is done, yellow is WIP, and red is not finalized): Helmet Balaclava Flight Suit Shoulder Armor Upper Arm Armor Forearm Armor Gloves Vest Chest Armor Back Armor Cummerbund Belt and Detonator Knee Armor Boots and Boot Shafts Neck Seal Hold-out Blaster E-11 Blaster DLT-19 Heavy Blaster Rifle DLT-19x Targeting Rifle DLT-20a Blaster Rifle ----------FINALIZED TEXT GOES BELOW THIS LINE------------ Description: Forest Trooper Prefix: TX Detachment: Spec Ops Detachment Context: Star Wars Galaxies Forest Troopers operated in limited numbers equipped with a recently developed camouflaged armor from Imperial Ordnance. This was a stark contrast to the white armored scout troopers that were easily spotted and targeted in the Battle of Endor and allowed these troopers to blend in for more efficient reconnaissance. Special Notes: When specified, costume parts will be painted in a camouflage similar to that found in the reference photos: Tan base base coat (see note about white showing through below). Camo patterns colored dark green and dark brown . May be slightly weathered to look as if white is showing through with minor scuffs/dirt. The armor parts shall be made from one of these (or similar) types of materials: Fiberglass ABS (Acrylonitrile Butadiene Styrene) HIPS (High Impact Polystyrene) PLA, ABS, PETG (3D Printing) Polyurethane Rubber Blasters are not required for legion membership per our weapons policy 3D Printed parts are permitted but all print lines and other artifacts must be removed. Helmet Helmet is painted to match armor. Scout style helmet accurate in shape and form. Eye lens is black or dark green. Flat or concave elevator bolts. Accurate squared emblem is located on the left faceplate "blinder". A mirrored accurate squared emblem may also be located on the right faceplate "blinder". Snout is gray with black details. OPTIONAL Level two certification (if applicable): Details are the correct color and placed as shown. Scout style details are present, either painted or decals. Ear holes are correctly shaped and have no mesh. Black 3M Speedglas bolts or replicas mount the faceplate to the helmet. (Visible bolt head diameter of 22mm). Accurate snout detail and aerator with accurate parts, mounted onto a plate and painted gray with black details. Please see the gallery for the accurate in-game snout. Accurate squared emblem located on the left faceplate "blinder" and a mirrored accurate squared emblem located on the right faceplate "blinder". Accurate rear helmet "bar code" striping pattern. Accurate three lines on center of forehead area. No visible seams on the dome. No visible "vent" detail/indentions on lower right of back of helmet. Balaclava A balaclava is a black head sock/hood that is worn under the helmet and is used primarily to hide any view of the wearer’s skin and/or facial hair. Flight Suit The undersuit is a one or two-piece black textile suit, such as military flightsuits, motorcycle racing suits, industrial work clothing (Dickies), or similar suit modified appropriately. Stand-up collar conceals the neck with an enclosing strap to keep the collar closed. Must have a suede or faux suede butt flap attached above the waist hidden by the cummerbund and is rectangular in shape. The flap is slightly narrower than the width of the trooper and stops slightly higher than the bottom edge of the troopers backside. Suede or faux suede thigh patches may be present, extending over the flight suit crotch and down the front finishing above the knee armor. The thigh patches must be secured by 2" (50mm) black elastic, sewn in under the front and back of the thigh patch. See the Scout Trooper Flight Suit page for detailed images of the patches described below. Suit must not have any visible labels, logos or zippers (including built in flight suit pockets). OPTIONAL Level two certification (if applicable): Suit is fairly fitted and not baggy. Black suede or faux suede thigh riding patch is removed. The 2" (50mm) black elastic runs completely around the leg/thigh. Real black suede square/rectangular butt patch is attached to flight suit at the rear under where cummerbund sits. No external visible stitching. Size will differ slightly from scout to scout, but correct scale is maintained. Shoulder Armor Painted to match the rest of the armor. Black elastic is used to secure the armor around upper arm. Shoulder pieces do not have any adornment. OPTIONAL Level two certification (if applicable): Armor is secured around bicep with a 0.5" (12mm) black elastic strap. Bottom corners are rounded. Optional: Affix top of shoulder bells to shoulder bridge loops Upper Arm Armor Painted to match the rest of the armor. Armor has a recessed area with a contrasting black "T-bit" detail attached within. Black elastic is used to secure the armor around upper arm. OPTIONAL Level two certification (if applicable): Armor is secured around the arm with a 1.5" (40mm) black elastic strap. Accurate "T-bit" detail is mounted to the armor. T-bit circle detail piece faces forward on each arm. Forearm Armor Painted to match the rest of the armor. Black elastic is used to secure the armor around forearm. OPTIONAL Level two certification (if applicable): Armor is secured around the arm with a 1" (25.4mm) black elastic strap. Gloves Black leather and gauntlet length. Detailed gloves include: Black suede or faux suede patches on top of the middle finger, index finger, and thumb. Four tightly spaced ribs that span the knuckles. There are no labels/logos, clips, or external straps. OPTIONAL Level two certification (if applicable): Suede or faux suede padding on fingers and inside of thumb and correct gauntlet stitching. Vest Made out of black fabric. Sleeves are padded and contain ribbing similar to the front of the cummerbund. The sleeves are just slightly longer than the bottom edge of the shoulder armor. Vest has a much wider neck opening than the flight suit. Secured at the back using 2" (50mm) black hook and loop fastener. Vest should be made of same or similar fabric to the cummerbund. OPTIONAL Level two certification (if applicable): The vest is separate from the flight suit and cummerbund. Made using the Vest tutorial. Chest Armor Painted to match the rest of the armor. There is a recessed rectangular area present over the right breast that must be painted black. The chest and back armor join together over the shoulder and the gap covered with a loop of olive-green fabric. The sides of the chest armor are attached to the back armor with black webbing or elastic. OPTIONAL Level two certification (if applicable): Shoulder bridge covers, covering the join between the front and back of the armor, are made of fabric that is dyed or painted to match that of the armor it connects. Nylon webbing is inaccurate. Side under arm chest/back straps are made from 1.5" (40mm) black webbing or elastic strap. Back Armor Back and tank are painted to match the rest of the armor. The back armor has a center tank attached and may feature a single bottom attachment rivet. The top of the tank is flat with a detail piece painted black. Top detail piece uses the same greeblies as seen on the screen-used ROTJ Biker Scout armor. Top detail piece is painted matte black. The tank has black stripe detail. Optional: Additional "rank indicators", present on the right side of the tank, can number between 0 to 7 stripes. OPTIONAL Level two certification (if applicable): Back and Tank must be two separate parts, no single part back/tank plates will be admissible. Has 7 stripes details on both sides on tank. Bullet tank on the back armor has NO tank topper greebles detail. Rear tank has properly placed pin striping and if a single bottom attachment rivet is present, it must be painted to blend in with armor. Blinking lights or LED's on the bullet tank are not acceptable. Cummerbund Made from black fabric. Closes in back with 2" (50mm) hook and loop fastener. Extends from just under the chest armor down to the waist. There is no gap between the belt and cummerbund. Cummerbund should be made of same or similar fabric to the vest. Has a tapered cod section with inverted curve sewn in detail (not a chevron). Cod is olive-green in color and made of the same type of fabric/material as the cummerbund. Connects between the legs to the back of the cummerbund by a 2" (50mm) black elastic strap. Front of cummerbund has 5-7 equal ribs stitched, centered between the two black fabric pouches. Ribs are of equal width. Ribs are completely visible between the pouches. Cummerbund touches the bottom of the chest armor. Cummerbund slightly overlaps the belt. OPTIONAL Level two certification (if applicable): Made from the Cummerbund tutorial page. The cummerbund is separate from the flight suit and vest. There is no visible external edge stitching on the cummerbund, the cod or pouch flaps. Pouches are made from a matte black heavy cotton or canvas like material. Bottom edge of the pouch flap must be less than half the overall width of the pouch. Pouch size to conform to individual size; should fit in gap between chest armor and belt with minimal overhang. Codpiece must conform to shape pictured in the CRL and source art, and is dyed or painted to match that of the armor. Cod strap runs between the legs, but attaches to the flightsuit or some other area under the butt flap, and does not show overtop. Codpiece must not have excessive bunching around groin area. Optional: Codpiece is separate from the cummerbund and attached to either the vest or the flight suit. Belt and Detonator Belt and TD are painted to match the rest of the armor. The front and four "boxes" of the belt are made of hard material. Hanging from the sides of the belt are hip boxes (drop boxes) connected to the belt by 1.5" (40mm) black textile straps. Each drop box strap is threaded behind a black side release buckle, or T-buckle/clamp buckle, centered on the strap. Attached to the back of the belt is a rectangular thermal detonator box with short black corrugated hose. Accurate thermal detonator greeblies are attached to the box. The rectangular part of the thermal detonator greeblie, fixed on the left side of the detonator, is the same as used in the rebel Endor trooper rank badge. On the right hand side is the same round greeblie as used on the Scout tank topper. See the detonator detail page for a close up image of the greeblies. The TD box is secured by one single black tie wrap, with side buckle to fasten belt hidden under the box out of sight, or velcro fastening attached with 2" (50mm) black cotton or nylon belt secured on each end of the belt with a single rivet painted to match the rest of the armor. OPTIONAL Level two certification (if applicable): The belt is made from a one-piece construction with no visible gaps, and not separated with fabric in between sections, apart from at the back where the TD box sits. Making any joins in a 3 part belt seamless, is highly recommended. The straps attached to the drop boxes to the belt are made from 1.5" (40mm) black cotton webbing. Drop boxes hang the correct distance from the belt. Nylon webbing is inaccurate. The buckle on each drop box strap are a T-buckle/clamp buckle style, matching the reference photos. Thermal Detonator end caps to be concave and not flat. Optional: Thermal Detonator must have visible black clips attaching it to the web belt. Optional: Thermal Detonator tube to be wire wrapped and not ribbed tube. Optional: Thermal Detornator may have Hex shaped cap with a center "nipple" detail. Knee Armor Knees are painted to match the rest of the armor. Black elastic is used to secure the armor around the leg. Knee may have 2 elastic straps securing the knee armor in place, with the top strap being smaller than the bottom, about 1/2" (12.7mm). If a rivet is used to secure the second strap, it must be painted to match the rest of the armor, blending in with the knee paint. OPTIONAL Level two certification (if applicable): Knee armor has only one elastic strap measuring 1" (25.4mm) wide and passes through the bottom of the knee armor. Boots and Boot Shafts Marine vinyl which is not too glossy in appearance, used to construct the boot shaft, and is painted/weathered to match the rest of the armor. Each boot shaft has the following details: Two (2) black straps, made of leather, leather-like material, or marine vinyl and are approximately 1" (25.4mm) wide. Each strap wraps completely around the leg, beginning and ending at the back of the boot. The seam of each strap closure terminates on the rear of the boot shaft. Boot shaft terminates just below the knee armor and a seam may be present on the back of the leg of each boot shaft. The soles of the boots are gray. A "dog bone" shaped strap covers the bridge of the foot and is black in color. Marine vinyl is also used. Toe of the boot is black marine vinyl, leather or leather-like material. The boots are secured up the back using 1" (25.4mm) black hook and loop fastener. Slightly textured vinyl, leather or leather-like material is acceptable. No holster is present on the boot. OPTIONAL Level two certification (if applicable): The boots have slots cut into the sides and sole, but not on the toe part of the boot. The boot sole is a single gray color with no visible stitching. Boot shaft closure is inside over outside, opposite of normal scout boots. Boot shaft black strap closure seams are offset of that of the rear seam from the boot shaft closure. Boots that are constructed too wrinkled (i.e., not stretched/fitted correctly prior to gluing) or poor in appearance will be refused. Stitching, if any, used for the boot should be colored or painted to blend in to the area they are used. Neck Seal Black with horizontal ribs, fitted to the wearer, and extending from the base of the neck to conceal the entire neck. OPTIONAL Level two certification (if applicable): Prohibited for an accurate style costume. Hold-out Blaster Flat or semi-gloss black. Blaster does not have any visible trigger. Blaster is lightly weathered. OPTIONAL Level two certification (if applicable): The scope has lens discs cut into the scope for a more realistic appearance. No decals representing cross hairs or similar. No drilled barrels. The screen used blasters did not have drilled barrels. Kenner toy blasters, modified Kenner toy blasters or resin recasts of Kenner toy blasters are not acceptable due to the fact they are approximately 10% larger in scale than an accurate style blaster. E-11 Blaster Manufactured by BlasTech Industries, the E-11 is standard-issue for many Imperial troops. Light, compact yet powerful, the E-11 blaster is always in high demand throughout the galaxy. Based on a real or replica Sterling sub-machine gun, scratch-built, or a modified commercial toy Stormtrooper blaster. OPTIONAL Level two certification (if applicable): Folding stock. Stock does not need to function. A real or replica ammo counter - based off of a Hengstler counter - should be present. D-ring mounted on the rear. Correct style scope. Two power cylinders on the magazine. Scratch-built, resin cast, Hyperfirm rubber cast blasters should have a total of 6 t-racks on blaster (leaving the lowest row on the Hengstler side un-covered). If using the Hasbro E11 toy blaster, it is modified to have the correct number of T-tracks (6 total), with a lower row of open vent holes on the magazine housing side. This is accomplished by covering the pre-existing rows of holes with T-tracks, then grinding off the lower integrated T-track on the magazine housing side, and drilling a new row of holes in its place. 3D printed blasters can not contain visible print lines and must be sanded smooth for a more realistic appearance. DLT-19 Heavy Blaster Rifle Manufactured by BlasTech Industries, the DLT-19 heavy blaster rifle is much more powerful with a much greater range than the E-11 blaster. Because of its powerful, long range capabilities, this rifle is commonly used on Imperial controlled planets with large, clear, open areas. Based on a real or replica MG-34 machine gun. OPTIONAL Level two certification (if applicable): A DLT-19 is an MG-34 with T-tracks on the barrel, ejection port cover added, and a small disk on left side. 3D printed blasters can not contain visible print lines and must be sanded smooth for a more realistic appearance. DLT-19x Targeting Rifle Manufactured by BlasTech Industries, the DLT-19x targeting blaster was a blaster rifle, and a variation of the DLT-19 heavy blaster rifle. Unlike the DLT-19, the DLT-19x released all of its power in one shot before it would need to cool down. The DLT-19x was a very powerful weapon, and could take down most enemies in one shot. The weapon had a scope which could be zoomed in farther than most scopes. The DLT-19x was a weapon of choice for many snipers, and was very effective. Based on a real or replica MG-34 machine gun. Real or prop scope. Flat or semi-gloss black. Blaster is lightly weathered. OPTIONAL Level two certification (if applicable): T-tracks present on the barrel. Ejection port cover added. Real or prop SinglePoint scope with modifications. Small disk on left side. DLT-20a Blaster Rifle The BlasTech DLT-20A blaster rifle was a long-barreled rifle (sometimes referred to as a "longblaster") with a top-mounted rangefinder and electronic sight. It had automatic and semiautomatic settings and a rate of fire very close to that of the DC-15A blaster rifle and other longblasters. This was one of the few blaster models produced with a magnatomic adhesion grip, keeping the weapon firmly in the wielder's grip and making him or her more difficult to disarm. With additional collimating rings and longer conduits of galven circuitry, these rifles have improved consistency in their shots. Based on a real or replica STG-44 machine gun, with parts from the Browning M1919. Real or prop scope. Flat or semi-gloss black. Blaster is lightly weathered
-
Imperial Security Trooper - Andor - CRL Discussion
IcyTrooper replied to nanotek's topic in Imperial Security Trooper - Andor
Good morning! Boot weathering will be a requirement for L2 and an option on L1. As for the CRL image, I believe that the helmeted version is going to be version 1 and any additional versions will be subsequently numbered for if. We currently have the CRL page being worked on in the background and are making textual corrections as we see them (if needed). The images are almost all uploaded from the model and the editing of the images has been assigned. Thanks for all the participation! -
Imperial Security Trooper - Andor - CRL Discussion
IcyTrooper replied to nanotek's topic in Imperial Security Trooper - Andor
It is in the Special Notes, all of our newer CRLs (old ones are getting updated as time allows) and says: 3D Printed parts are permitted but all print lines and other artifacts must be removed.
-
Imperial Security Trooper - Andor - CRL Discussion
IcyTrooper replied to nanotek's topic in Imperial Security Trooper - Andor
I like the v1.2 text to allow the 3D print option on it for local law compliance and flexibility. We may be able to actually remove the part about "3D printed" text since we have a general requirements disclaimer about 3D prints now. Thanks for your dedication on this! In the home stretch. -
Imperial Security Trooper - Andor - CRL Discussion
IcyTrooper replied to nanotek's topic in Imperial Security Trooper - Andor
No worries, we got the text drafted and I came to the realization that we didn't fully identify the model for this. I'll provide you with a link via PM (including the rest of the team) for uploading the unedited CRL pictures (we'll do the edits). I do believe that we are planning on using the R1 blaster text for the E-11. -
Imperial Security Trooper - Andor - CRL Discussion
IcyTrooper replied to nanotek's topic in Imperial Security Trooper - Andor
I think that info looks good on the weaponry, but we'll take the L3 stuff and consolidate it into the L2 requirements. I'm going to look at the first page and see that all that text makes sense. We can get the CRL wiki started on this and loading when that first page gets validated. @BigJasoni are you our model for this? -
I will be looking at the current progress this week, might be Wednesday afternoon/evening before I can dive in. Major thanks to @tipperaryred for leading the way on the text from the CRL team!
-
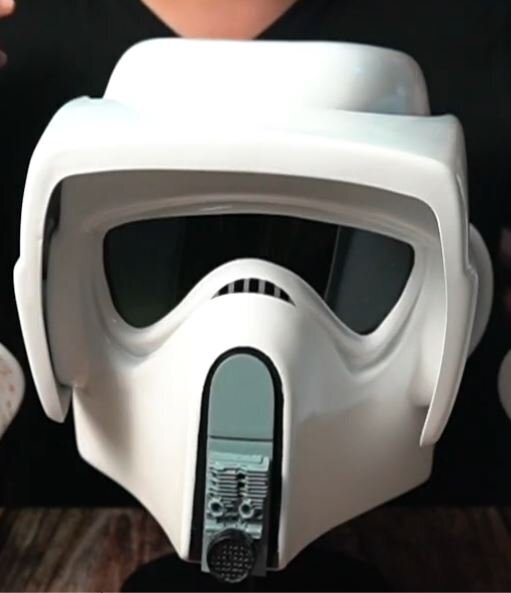
Just an update to this that we will be moving forward with following the Pathfinders detachment to effectively prohibit Walt's Trooper Factory (WTF) version 1 (v1) helmet (as seen below) for basic approval on the following costumes after a 6-month grace period (detailed below): General Weir Shadow Scout Swamp Trooper An image of the WTF V1 helmet that will no longer be approvable: We are going to allow a 6-month grace period from today's date for the approval of any costumes that are currently being worked on with this helmet. The last day to get approval will be November 19, 2024. After this date the CRLs will have text added to it stating that the WTF v1 scout helmet is no longer approvable for basic approval. I'm sure there are other questions related to this, so we'll break it out like the Pathfinders did: What if I already have an approved kit? You will not need to do anything. Any costume that has been approved within the 501st Legion is grandfathered in, so long as the member remains active. What if I have the helmet but don't have the kit yet finished? You will have until November 19, 2024 to get everything completed and approved by your GML. What if I have the helmet and was retired from the 501st Legion and wish to be reactivated? You will have until November 19, 2024 to get your costume approved by your GML to move you back to active status (this is just like initial approval for the costume)
-
Purge Trooper (Phase II) - Kenobi - Discussion
IcyTrooper replied to nanotek's topic in Purge Trooper Phase II (Kenobi)
This has been submitted for LMO review. -
Night Death Trooper - CRL Discussion
IcyTrooper replied to IcyTrooper's topic in Night Death Trooper
Now that we are getting that Purge Trooper Phase 2 from Kenobi over to the LMOs on the final review we can get some resources over to this one. I know that we are going to push the Imperial Security Trooper to get across the finish line. I'll take a look at what has been suggested here and we can work it methodically as we have done with the other ones! I'm going to check with FISD on how they are going with their Night Troopers and how they are handling the variations of colors (creative liberty). I can also see if they are requiring those areas to be recessed (I don't believe so), or rather just painted on top. I am also in agreement with the no gloss for it, everything that I have seen has been that matte/satin finish. Since the Neuro-Saav Macromotion (NSM) Monitor is on both of the DTs in the scene, I can support it being a requirement. -
Well done!
-
Night Death Trooper - CRL Discussion
IcyTrooper replied to IcyTrooper's topic in Night Death Trooper
I think we'll be able to do both versions, but I second @Chaos that we check for additional damage on that one on other parts of the costume. I'm fairly certain we're going to have to put the disclaimer on that one with the exposed jaw like they do for the "Death Trooper" zombie TK. The disclaimer would be: Please note: This particular costume may not be welcome at all 501st events. This is not recommended as a primary Legion membership costume. Please contact your garrison CO/GML with any questions if you are planning to create one. -
Congrats on the approval!!
-
Purge Trooper (Phase II) - Kenobi - Discussion
IcyTrooper replied to nanotek's topic in Purge Trooper Phase II (Kenobi)
We have the CRL text loaded into the wiki and are preparing the final images before LMO review -
The Imperial Army in the field? Post your photos here!
IcyTrooper replied to vonmoen's topic in Imperial Army Units
Great job representing the detachment! @SirCalcium -
I'd say that dye job is a job well done!
-
Imperial Flametrooper (Jedi Fallen Order)
IcyTrooper replied to stevechewbacca's topic in Imperial Flametrooper (JFO)
I love seeing resin prints, they are always soooo smooth! -
We can use this thread for 3D modeling questions and the like. @HidingInCosplay @Chaos @Andreas Funk
-
@Chaos thanks for the tag in on it! I'm a little hesitant on using this thread to work on the 3D modeling of the costume. I'd like to keep this thread for pulling the reference images out and then drafting the text. I'll go ahead and create a 3D modeling development thread for the past few questions. @Andreas Funk
-
As @Gree23 mentioned, all black. We also have some alternate angle images in the CRL gallery as well: https://databank.501st.com/databank/CRL_Gallery:Shadow_Scout
-
Congrats!
-
This has been completed.
- 1 reply
-
- 1
-

-
Imperial Flametrooper (Jedi Fallen Order)
IcyTrooper replied to stevechewbacca's topic in Imperial Flametrooper (JFO)
Dang, that is looking solid!!! 🖤 -
Congrats!