gmrhodes13
-
Posts
243 -
Joined
-
Last visited
-
Days Won
15
Content Type
Profiles
Forums
Events
Everything posted by gmrhodes13
-
Weather has been turning cold here but great timing a nice warm weekend and managed to get the painting done.
-

complete Sithtrooper Shoulder Bells - Draft CRL Discussion
gmrhodes13 replied to nanotek's topic in CRL Discussion Archive
Looks good -
complete Sithtrooper Cod - CRL Development Discussion
gmrhodes13 replied to nanotek's topic in CRL Discussion Archive
Looks good -
complete Sithtrooper Posterior - CRL Development Discussion
gmrhodes13 replied to nanotek's topic in CRL Discussion Archive
Looks good -
complete Sithtrooper Biceps - Draft CRL Development Discussion
gmrhodes13 replied to nanotek's topic in CRL Discussion Archive
Looks good, found a typo One on each bicepand are mirror opposites of each other One on each bicep and are mirror opposites of each other -
Looks good to me
-
complete Sithtrooper Spats - CRL Development Discussion
gmrhodes13 replied to nanotek's topic in CRL Discussion Archive
Looks good to me -
Looks good
-
Thanks Mark
-
Thanks @ukswrath will do, nice warm couple of days coming up perfect for painting
-
Thanks @Raider Here you go Tony Part Number: CWRC901 JB weld completely dried, clamps off, looks messy but JB weld is pretty wet to apply so can move and run a little. Hit it with Dremel and drum sander attachment then sandpaper. Also trimmed the inner edge so it matched all way round, to get the same spacing I used a scrap piece of plastic, drilled a hole in one end, held a marker in the hole and pushed the plastic around the inner edge. Spray putty applied, needs a touch more sanding in the lower inner rim and I have a couple of air holes to fill.
-
Thanks @Chaos So it's time to test these boots and see who the vinyl wrap spray has gone, really happy with the results, have dried great, very shiny, tried flexing and it appears it's a winner, it is quite rubbery and will stretch. As I've still got a lot of spray left over I thought I would see how hard it is to remove, it sticks really well and you need to give a lot of pressure to pull away but once it starts it comes off easily. For now I think this is the option to go with, not sure how they will go with trooping, obviously the more movement and getting scuffs it may start to peel but it will just be a case of peel off, tape sole and apply another few coats of spray.
-
Long break but underwent two hand operations, time for an update. Some details on the chest/shoulders had been missing from Jim's original kit and he made some modifications and sent out updated pieces, I was all ready to repaint the updated chest/shoulder when I noticed compared to references the angled ridges had been placed in the wrong spot, they should actually mostly meet with the ones coming upwards, 4 to 5 ridges overlap. So had two options, fill in these ridges and recut or modify my original chest/shoulder and add the ridges to that, here goes nothing. Mark out position, pencil and bent ruler. Pretty happy with the placement and gaps, time for the Dremel, which I'm really not looking forward too. Decided to use the ruler as a guide and cut along the edge. Cleaned up with files and sandpaper and here is the comparison Comparison to updated chest/shoulder OOPS top thigh clips not included with the initial kit, don't know how I missed that, thanks to Jim for giving me the 3d files, printed, sanded, painted and applied. Ok another updated needed to the small box on the left shin, originally it was very rounded and stepped, so attacked this with the Dremel, files and sandpaper and now ready for paint. While I'm on the shins I wasn't happy with the Velcro closure so decided to remove that and add magnets, glue magnet directly to inside of the outer pieces, then recess magnet on the insides of the inner pieces, some shims had to be used as the thickness of armor varied, a much better close now. Now this little bugger, the collar/gorget, I still really can't do anything with the split at the rear, I was going to move it to the top BUT after marking with a pencil and trying on it is really noticeable from the front and I'd prefer if I have to have a split that it's mostly not seen which is the back, so that stays how it is BUT it was mentioned that it should not have a bent up section next to the neck. Thought long and hard about this one, oh well come here Dremel Step cut out and a sheet of plastic place inside, also run a piece of tape around the inside to get approximate width. Trim to size Check alignment Glue with JB weld, sticks to anything and easy to sand, lots of clamps to get it sitting nice and tight. Will wait for this to dry then see if any bondo will be needed, then it's on to primer and paint. I have tried all sorts of things on the boots trying to get a gloss finish, wax's, polishes, leather shine but no luck, I had thought of a clear vinyl spray but off course nothing local, then I came across some automotive vinyl wrap spray, which isn't permanent and can be peeled off if damaged, you apply 5 to 6 coats and allow to dry, I haven't applied much on the shaft of the boots more just the bases as the tops are going to be covered anyway. I'm going to leave them overnight to make sure they are completely dry before trying the flex test, here's hoping this works.
-
Correct but that CRL has just had an update, when the CRL went live OT ANH/ESB boots were allowable due to boot availability
-
Sounds good
-
Looks good, I would still like to see "high gloss" for boots as L2 as commonly available boots don't have that finish
-
complete Sithtrooper Helmet - Draft CRL Development Discussion
gmrhodes13 replied to nanotek's topic in CRL Discussion Archive
Nothing to add -
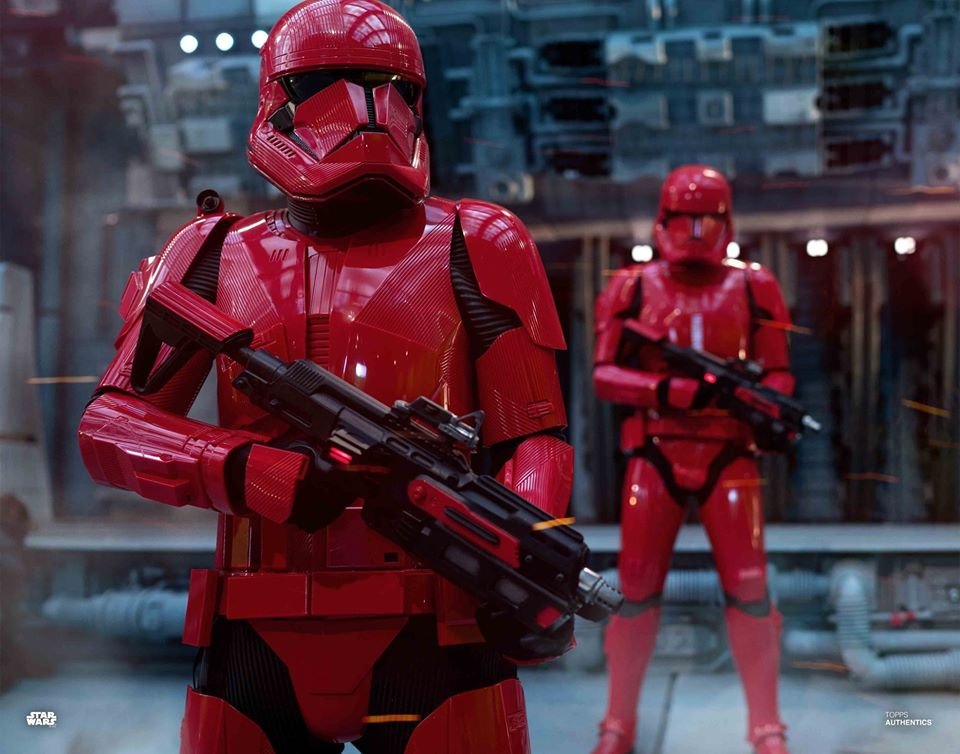
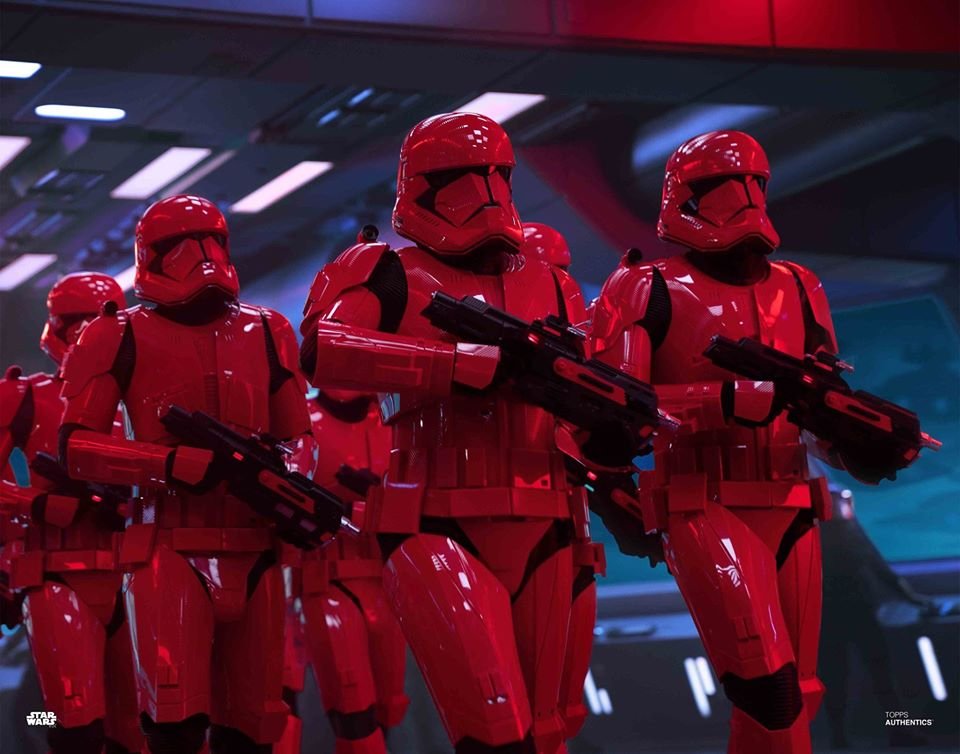
sithtrooper Sith Trooper reference pictures
gmrhodes13 replied to gmrhodes13's topic in First Order Sith Trooper
Couple of images shard in the FB group
-
sithtrooper Sith Trooper reference pictures
gmrhodes13 replied to gmrhodes13's topic in First Order Sith Trooper
A few more pics Can see the red tab from the shoulder strap holding the shoulder bell at the same height Lights in magazine end plate. And that's why they use tape, left thigh inner. -
sithtrooper Sith Trooper reference pictures
gmrhodes13 replied to gmrhodes13's topic in First Order Sith Trooper
Don't forget to add the screen accurate tape to your build list ? -
Sorry just undergone hand operation so typing hard, like Mark I just don't have time to vet others work, perhaps go through reference material, post in FB sith groups also.
-
First Order Jet Trooper References
gmrhodes13 replied to gmrhodes13's topic in First Order Jet Trooper
I would think it would be metal the same as used on FOTK's colored to match. There would still be elastic used but the tab keeps the shoulder height the same as the top of the shoulder bridge. FOTK has 2 strips of elastic (one either side of the tab) as it appears the Sith may also BUT the Jet trooper appears only to have one top connection on the inside of the shoulder bell, the elastic may run under the tap to shoulder bell if that makes sense. I didn't want any week spots on my FOTK so I didn't cut a section out for the tab to sit in, I heat and folded strips of ABS and used the same thing on my Sith. -
First Order Jet Trooper References
gmrhodes13 replied to gmrhodes13's topic in First Order Jet Trooper
Shoulder tab reference, similar to FOTK's -
sithtrooper Sith Trooper reference pictures
gmrhodes13 replied to gmrhodes13's topic in First Order Sith Trooper
Looking through some more details found the shoulder tab on Sith Trooper LFL display, also on Jet Trooper -
WOW you have been busy, will be doing some comparisons today