Chaos
-
Posts
1,472 -
Joined
-
Last visited
-
Days Won
111
Content Type
Profiles
Forums
Events
Everything posted by Chaos
-
Wow! No other words available!
-

Plastic covers for specialist chest rig?
Chaos replied to Tiderion's topic in Imperial Death Trooper
@Tiderion Here ya go. https://www.facebook.com/groups/DeathTroopersBG/permalink/5763673860337549 -
Plastic covers for specialist chest rig?
Chaos replied to Tiderion's topic in Imperial Death Trooper
@Tiderion Yes I do, I'll send them to you later today. -
Some Questions about a Death trooper build
Chaos replied to DoggyDoc's topic in Imperial Death Trooper
Gerald, Welcome to the Darker Side of the Darkside! You're going to love this build! It's going to challenge you, but in the end you'll be amazed at the wonder you've created. To answer your questions; Yes Jim's undersuit will meet Level 2 requirements provided you have it sized properly. Good choice on Tom's files. You can get all 3 blasters from him at a great price. Here's his FB profile. Send him a message that way. https://www.facebook.com/profile.php?id=100007031235190 If you are going to build your Jimmi kit to Level 2 specs, make sure you take a look at the CRL requirements and use the Specialist submissions for more visual references. It'll save you a lot of time. Best of luck and we are here to help! -
Plastic covers for specialist chest rig?
Chaos replied to Tiderion's topic in Imperial Death Trooper
@Tiderion Ethan,, do you have access to a 3D printer? -
SWEET! Excellent work Sal, your dedication has paid off!
-
@Tiderion Here is a shot of one of the screen used helmet's and also of my Anovos helmet. The screen material can be any heavy gauged window screen or like material. The black backing material is used to simply block the screen from being see thru. I can't show you how it looks from the inside as I have Tony's helmet sound system installed which uses the vents to allow the sound to pass thru. However, its pretty simple. cut the screen to fit, epoxy or hot glue, then cut any type of black fabric to fit and epoxy or hot glue behind the screen. As with most CRLs they are written as a "guide" for GMLs to approve costumes and as a general visual reference. Specific "how to" resources are generally found in each Detachment user's WIP threads. Hope this helps.

-
I have been following the conversation over in the Council forums. From a military perspective (of which I have many many years’ experience) Many off shoots of the military's branches or specialized units have been formed out of a need for Command and Control. Looking at the history of the Imperial Troopers first seen in Solo and knowing that no other Detachment wanted to take them, we took them under our wing so to speak. I think as this progresses further we should have oversight until a satisfactory outcome can be arranged. Initially we gave them guidance and purpose and fostered recruitment. I have read many comments that some believe IA should not have been placed under Spec Ops, but in actuality, specialty jobs such as SAPPERS, Combat Engineers etc., were formed as "Specialized Entities" and they were few in numbers and spread out as "specialty support" troops for various operations that required their expertise. With that being said, it did make sense that they initially landed with us. Now that they are becoming more of a "grunt type character" and in larger numbers, it may be time for them to have their own "home" like the TKs (they are basically the same but with armor) but how should that occur? In the real world when a sub-unit grew to a point that it required its own C&C, the originating service developed and implemented the transition. Just like Space Command is now its own branch, it had its origins in the Air Force, also the Air Force began its path as the Army Air Corp. So as the IAs transition to their own branch (Detachment, etc) they should be kept under our guidance until they are ready to stand on their own. I do not concur that they belong under the IOC, they do have "Officers" leading them, but they are not an Officer Corp, they are grunts.
-
Chaos' Dark Trooper Gen 3 Pre-Build Thread
Chaos replied to Chaos's topic in Dark Trooper - Generation 3 - Mandalorian
I have considered that. Currently I'm making the parts match the screen CGI images. If that becomes too difficult then I may lean towards the stunt suit joints we saw at the Mando exhibit. The screen CGI fingers and the stunt suit fingers are totally different. I wish they would have used the same design. -
Are there any sources of references for turned down collars on the Shadow Scout? I have not seen any.
-
Chaos' Dark Trooper Gen 3 Pre-Build Thread
Chaos replied to Chaos's topic in Dark Trooper - Generation 3 - Mandalorian
I had to take a break from designing 3D files so I decided to play around with some electronics I had delivered. Wait for it to load. AUDIO ON. Dark Trooper Test.mp4 -
Chaos' Dark Trooper Gen 3 Pre-Build Thread
Chaos replied to Chaos's topic in Dark Trooper - Generation 3 - Mandalorian
I have had a chance to put the elbow and forearm together in virtual to test fit things. Now I am in the process of printing the pieces for the left side to see if they will work in practical application. Hard part is waiting the long hours and days to get them all printed. I am hoping that I took enough time in designing them that after the printing I won't have to make any major modifications. If anyone sees anything I missed or might need to tweak please let me know. I am still not sure about the internal coverings for the elbow joint. I want to make them look more like the screen shots than the Mando exhibit.
-
Chaos' Dark Trooper Gen 3 Pre-Build Thread
Chaos replied to Chaos's topic in Dark Trooper - Generation 3 - Mandalorian
Yeah me too! The tactile feel makes it easier to manipulate triggers and buttons on my electronics. -
Chaos' Dark Trooper Gen 3 Pre-Build Thread
Chaos replied to Chaos's topic in Dark Trooper - Generation 3 - Mandalorian
The forearms are done to include the greeblies. Now I just need to finish the hands so I can make the joint between them and the forearm. I may use the same design I have for the elbows, just scaled down and simplified.
-
Chaos' Dark Trooper Gen 3 Pre-Build Thread
Chaos replied to Chaos's topic in Dark Trooper - Generation 3 - Mandalorian
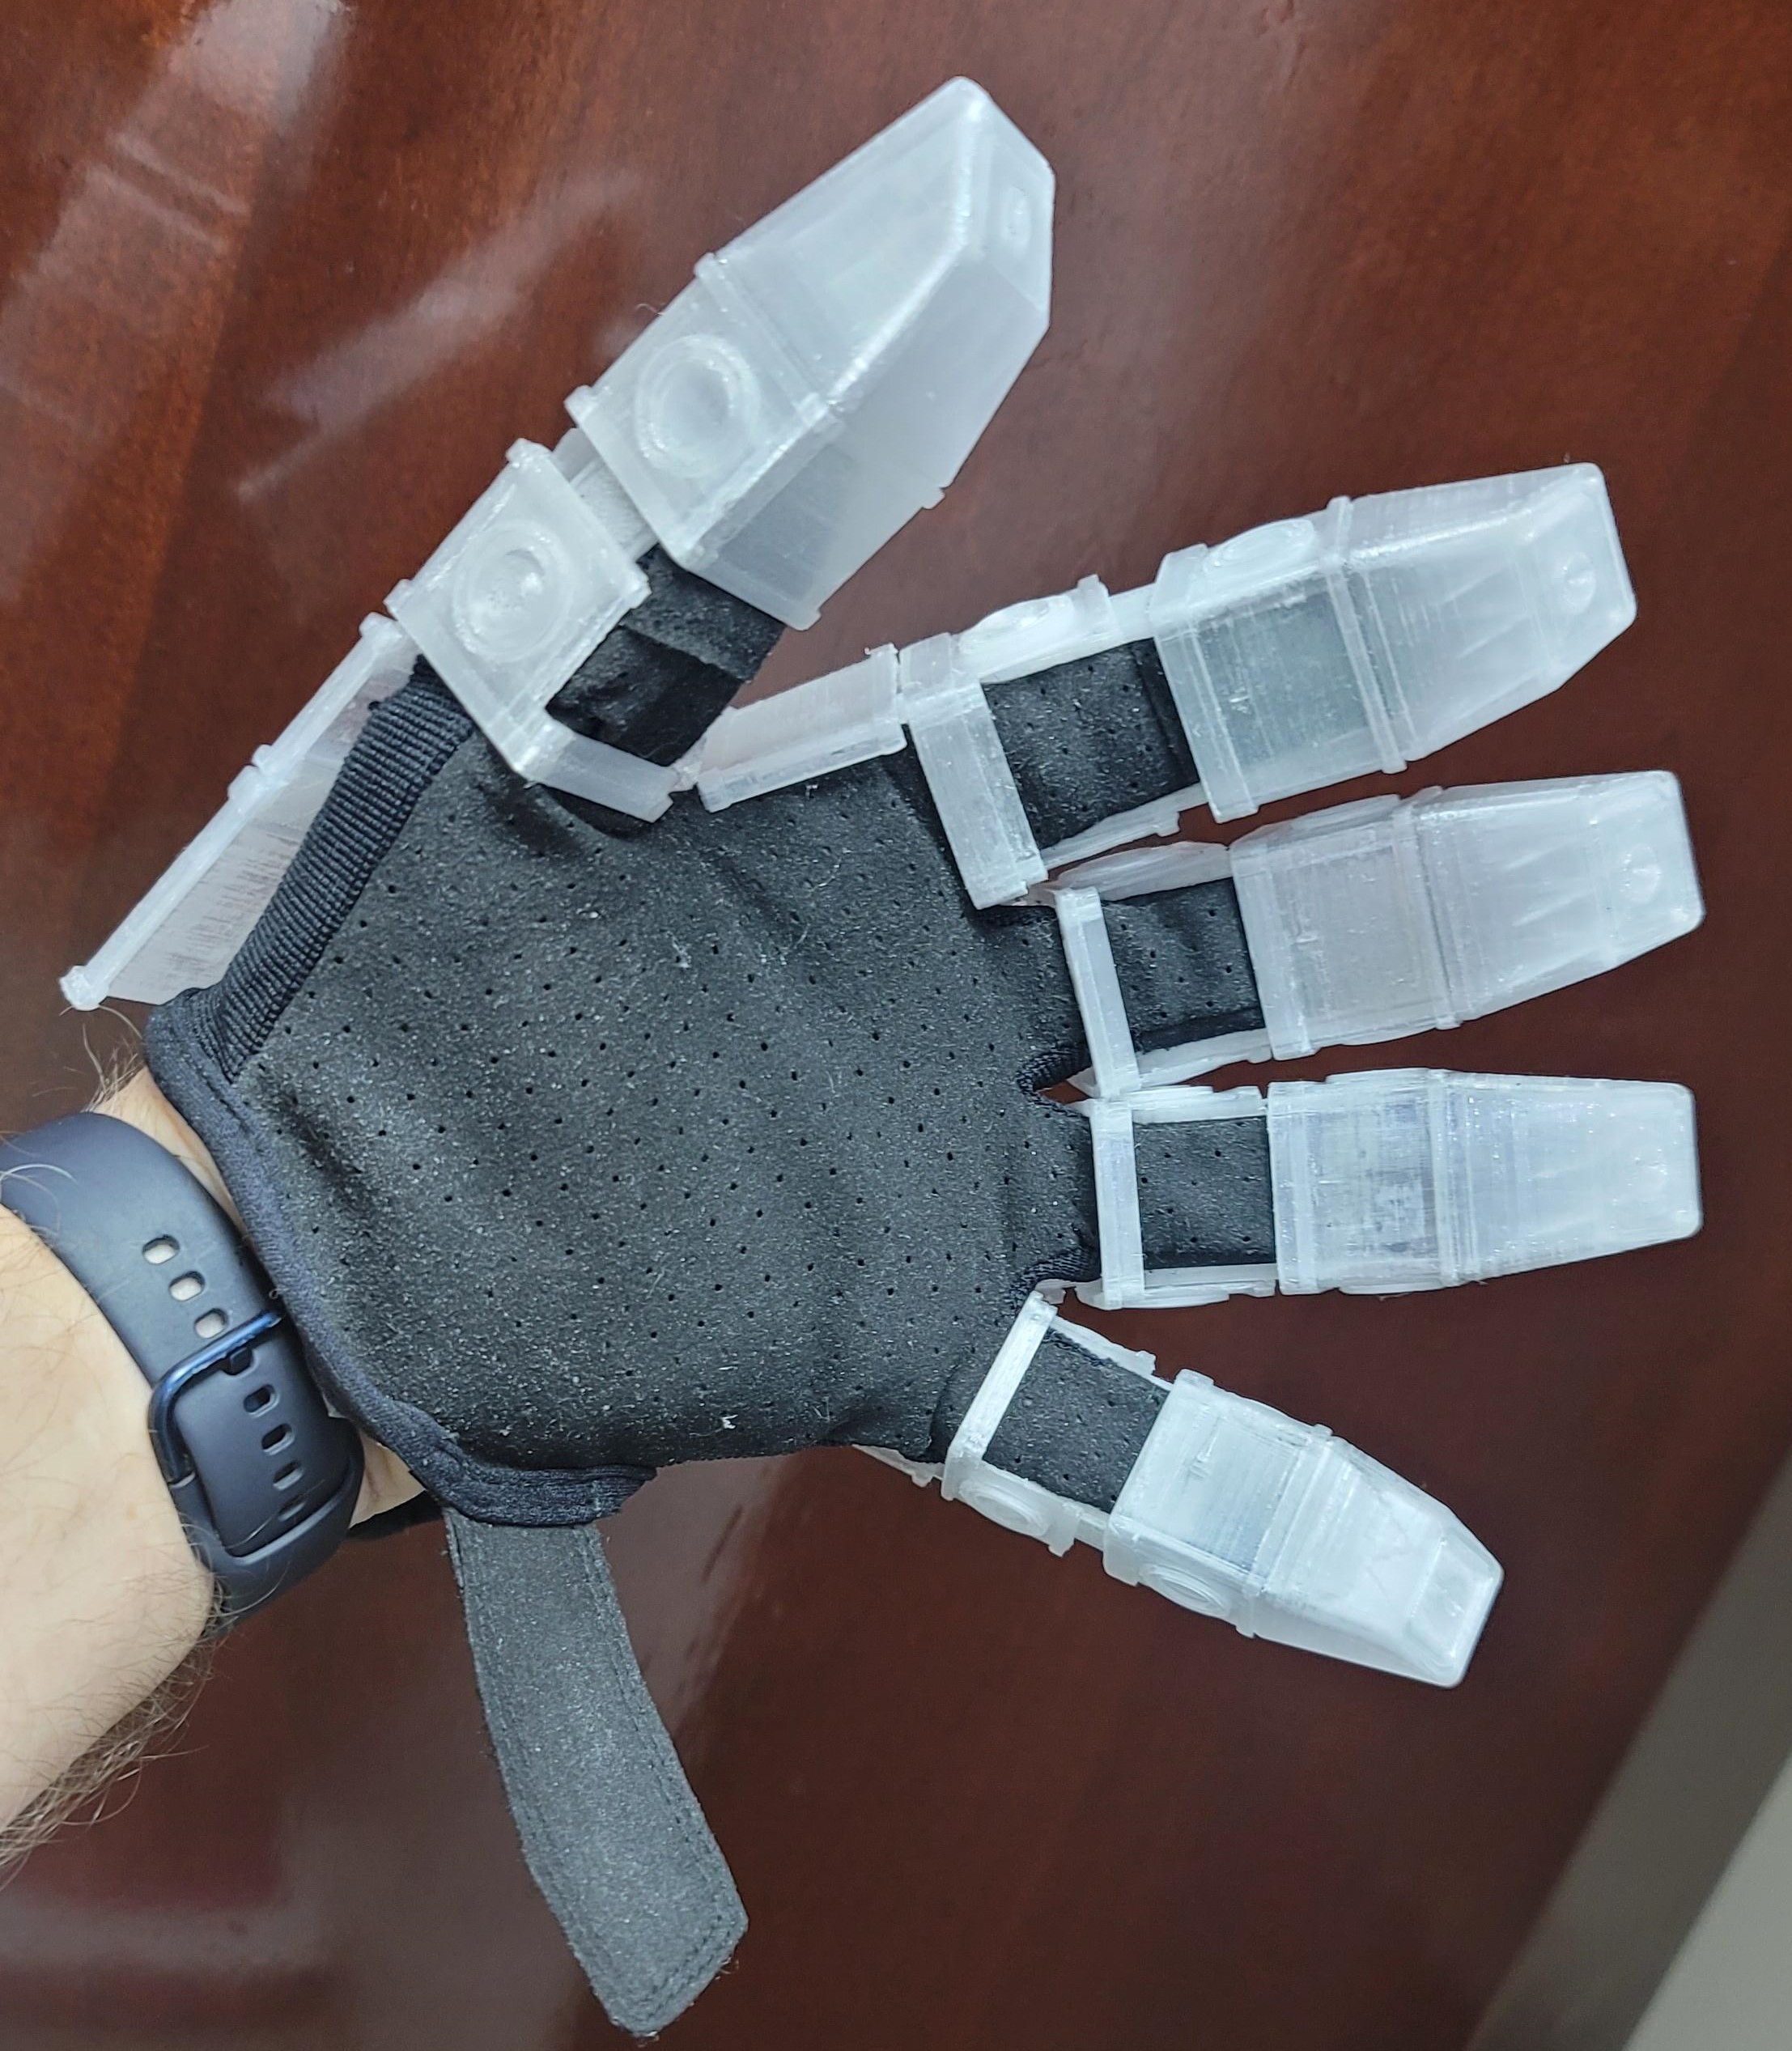
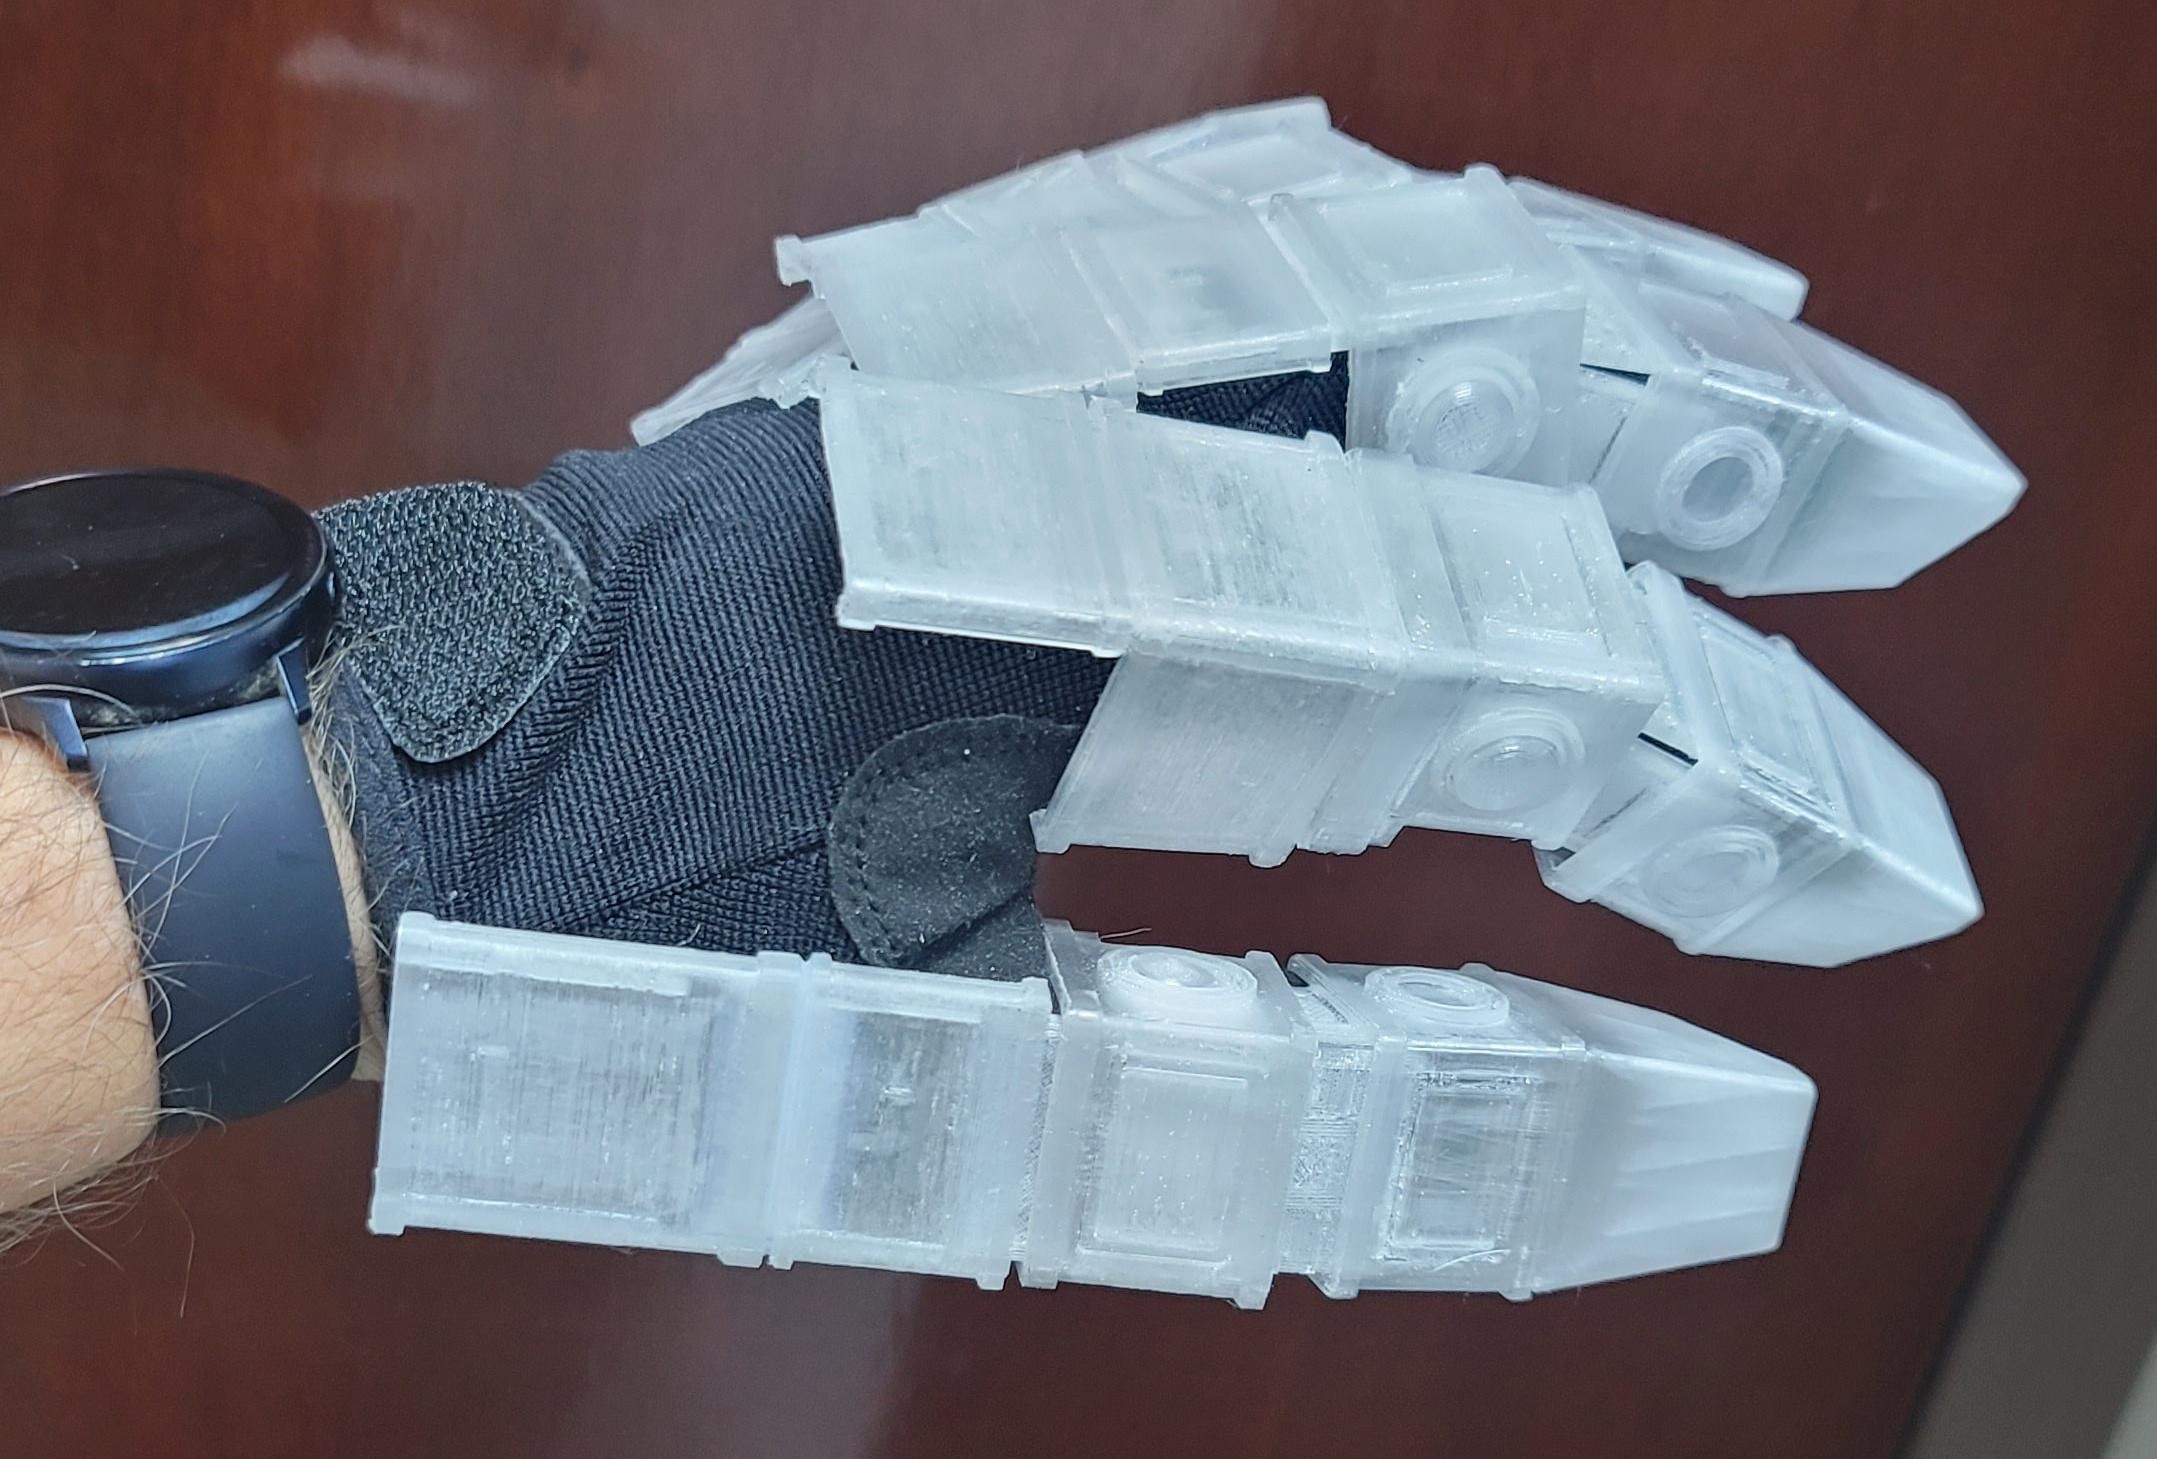
Update on the fingers and hands. I decided to attach the individual joints and covers with heavy duty elastic. I found the stiffness of the glued covers made it difficult for them to stay in place under the back hand plates. After I paint the fingers I will attach the elastic and try out the new design with the hand plates and gloves. By the way the black flyer's Nomex gloves came in and I honestly think they are the best way to go. They fit well and the cuffs are long enough to go completely under the forearms. I'll post photos when I get them assembled. -
Chaos' Dark Trooper Gen 3 Pre-Build Thread
Chaos replied to Chaos's topic in Dark Trooper - Generation 3 - Mandalorian
Well I changed the design of the elbow joint. I went back through all the photos and decided to go in a new direction. I think this design will be much better and I can get almost 80 degrees of range of motion. I am printing the parts for one elbow now to test fit and see if my design will be feasible.
-
Looking into making a death trooper
Chaos replied to EC-17 Holdout Blaster's topic in Imperial Death Trooper
Logan, welcome to Spec Ops. You have picked a great costume to build. There are plenty of build threads in this Imperial Death Trooper section of the forums. You will find everything you need to get started and along your journey to the Darkerside of the Darkside. I recommend reading through each person's thread. You will find plenty of Pros and Cons for each type of kit you are thinking about using. The search function works very well to quickly find specific questions you may have. As always, we are also a great source of information when you can't find something or have a question that may or may not have been asked before. Best of luck on your build.- 1 reply
-
- 1
-

-
Chaos' Dark Trooper Gen 3 Pre-Build Thread
Chaos replied to Chaos's topic in Dark Trooper - Generation 3 - Mandalorian
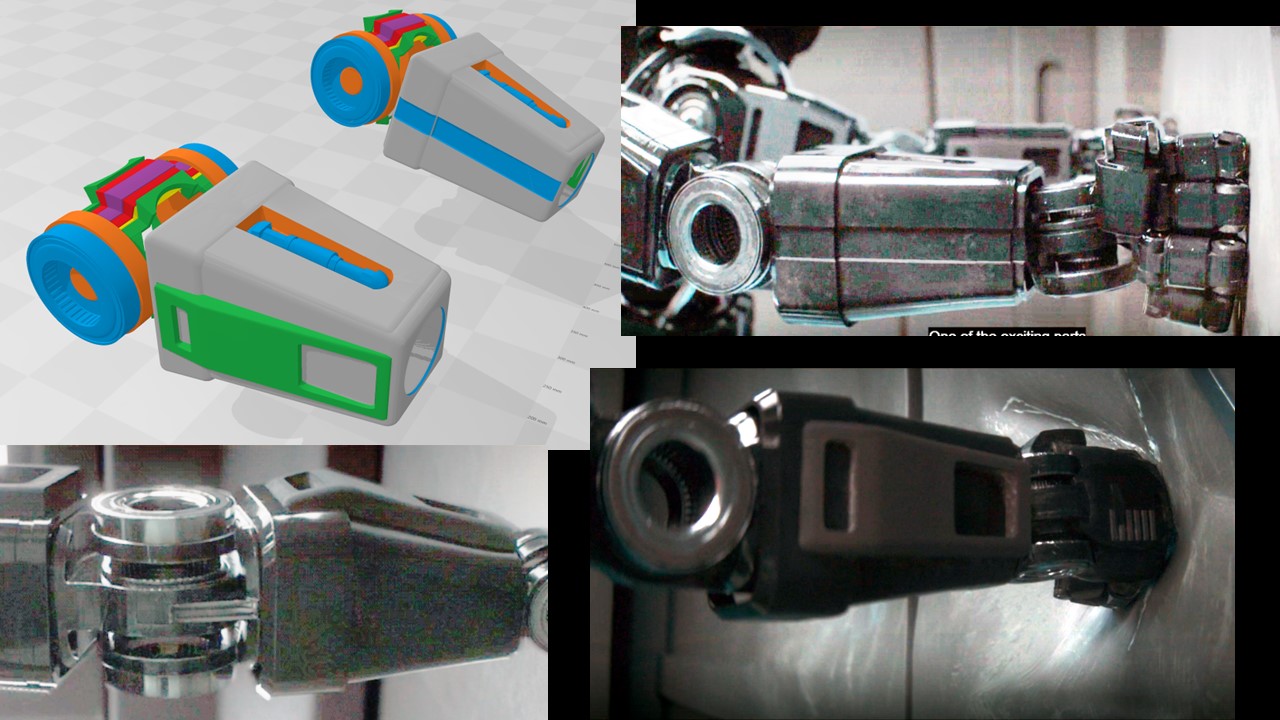
I also started on the elbow joint, I thought about printing a Ninja Flex type piece and model it like the Stunt elbow joint but decided if I could get it to look like the CGI geared joint it would be best. I have been playing around with just how to do that. I have looked at medieval suits of armor and other cosplayers ideas and right now this is the best that I can come up with. It consists of an upper opening for the bicep and a lower opening for the forearm. Between each are a set of interlocking / overlapping plates that when the arm is moved from straight down to a bend up, the plates collapse upon themselves. So far I have been able to get the total bend angle to around 38 degrees and with the gap between my actual arm and the openings I can get an additional movement of my arm itself by about 12 degrees more. That's only about 40 degrees total but I think it might be enough to have a decent range of motion. Of course after I work out the mechanics of it all I will go back and work on the cosmetics to make each section look like the CGI gears in the joint. The photos show only the front side of the joint but the back plates will be arranged and work the same way.
-
Chaos' Dark Trooper Gen 3 Pre-Build Thread
Chaos replied to Chaos's topic in Dark Trooper - Generation 3 - Mandalorian
I have been working with the finger files and think I have got the right look etc., for the fingers based upon a combination of the CGI and the Stunt costume hands from the Mando Exhibit. I added some back extensions to the fingers so that they would nestle up under the back hand plate. So far so good. I will need to work out the layering of the back extensions so they fit under the hand back plate. I'm waiting on some black Nomex flight gloves to arrive as I think they will work better than the ST and DT gloves (they are too bulky) plus the cuffs extend farther back making it easy to tuck under the forearm and wrist joint. More to follow on that later. Slow and steady!
-
Does your kit come with the 3D printed laser? If so people have drilled out and installed something like this: https://www.tvc-mall.com/details/650nm-250mw-red-dot-laser-head-cnc-engraver-focusing-module-laser-engraving-head-diy-part-red-dot-laser-point-skutp10310354275a.html Or like mine, I bought this laser pointed and modified it to look like the one in R1: https://m.ar.aliexpress.com/item/1005003713738612.html?spm=a2g0n.detail.1000014.3.668fpWwOpWwOxF&gps-id=platformRecommendH5&scm=1007.18499.280016.0&scm_id=1007.18499.280016.0&scm-url=1007.18499.280016.0&pvid=4950345c-4d19-4759-b236-9aaa0b1fed36&_t=gps-id:platformRecommendH5,scm-url:1007.18499.280016.0,pvid:4950345c-4d19-4759-b236-9aaa0b1fed36,tpp_buckets:668%232846%238113%231998&pdp_npi=2%40dis!SAR!7.56!6.44!!!!!%400b0a23a916619286091191453e19bd!12000026906959028!rec
-
Chaos' Dark Trooper Gen 3 Pre-Build Thread
Chaos replied to Chaos's topic in Dark Trooper - Generation 3 - Mandalorian
They could use the design concept but the actual design and details would have to match what we end up using for a CRL photo. I looked at a lot of 3D printed hand designs. I even thought about making the hands look like the CGI and running wire pulls up into a modified forearm like this guy did for a costume he built. I may end up trying this later. -
I really like this character, anything with lights, bells, and whistles is badass!
-
Chaos' Dark Trooper Gen 3 Pre-Build Thread
Chaos replied to Chaos's topic in Dark Trooper - Generation 3 - Mandalorian
First attempt at design and functionality. -
Chaos' Dark Trooper Gen 3 Pre-Build Thread
Chaos replied to Chaos's topic in Dark Trooper - Generation 3 - Mandalorian
I could do that but the "armor" pieces might loose rigidity and possibly flex out of shape. Its something to consider though. -
Chaos' Dark Trooper Gen 3 Pre-Build Thread
Chaos replied to Chaos's topic in Dark Trooper - Generation 3 - Mandalorian

.png.e0784b29b632bc13a94e11c0225e09c7.png)
.png.c37db4611d896b3f43be37d8049a7d2b.png)
.png.58d9896a7471c00641d894c1900ecc33.png)
.png.a710667d96b99293a5c46070c02c5597.png)
.png.019a05751a48808a67383c2b8fd1ee9a.png)
.png.a31e2c8a8e1b374342e62d3b48e0502d.png)
.png.cd021269a127cfe11b219f4480bd50f6.png)