-
Posts
1,472 -
Joined
-
Last visited
-
Days Won
111
Content Type
Profiles
Forums
Events
Everything posted by Chaos
-
I decided to jump into this costume as I enjoy a challenge. I will post up various photos as I compare screen grabs and SWC suit photos and think through possible ways to make these pieces and parts into a wearable and easily constructed item. There is a place for reference photos in this forum so I ask that you don't post them here unless you are highlighting something of interest or expressing an idea. If you quote me and the quoted entry has photos please go in and edit the quote to remove the photos. This will keep the thread neat and organized and easier to read through. With that being said, if you do happen to accidently post something mentioned above, please don't be offended if I remove it. I will be kind enough to send you a PM with a reason as to why. I anticipate that this will take a while as I am working full time and only doing this during my down time. There is another thread in here that @nanotek started where we can discus ways to convince the LMOs to accept this costume as a viable CRL Spec Ops character. Please post any ideas you might have or information that will help reinforce references over there. Quoting Michael Vale in that famous 1984 DD commercial "Time to make the doughnuts!"
-
As I start my two day weekend, I have begun looking at the Droid files Nikko Industries made as examples as to how the hell I am going to attempt to 3D model my own pieces. (I have lots of coffee and aspirin on hand LOL) I think we can argue that even though they used CGI on a lot of the joints and abdomen areas, that it is probably safe to assume that they also constructed wearable joints and abdomen areas for some of the quick shot scenes such as the hands grabbing Grogu scene @Trachta mentioned, AND that the suit we have seen at the SWC Mandalorian Exhibit is viable as wearable since Jon Favreau even said they were screen used props and costumes in the exhibit. There are enough photos of the SWC suit, and good resolution screen grabs that we have references for almost 98%of the costume. LOL wish we had a close up of the bottom of the feet, that would take us to 99%. Since there are Legion costumes that exists now that some "creative and logical assumptions" were made on the construction for some characters in comics and games, I don't think it would be too difficult to apply that same assumption and thought process to the joints and abdomen areas for this costume. After all, the overall intent of creating a costume is to present the character so that the average person who has seen a movie, comic book, or game will immediately recognize the character. I will tell you right now, this costume will have to be a built with a combination of materials and techniques. I am going to start a Pre-Build thread where I will throw ideas around comparing screen CGI and SWC pieces and parts in an attempt to narrow down just how this costume can be produced easily and still retain the enough authenticity to meet the Legions intent on CRL requirements. I have no clue why I always lean towards the most difficult costumes to build. Wish me luck .... I am going to need it! PS. At the same time I am also printing Nikko's Droid files which eventually I plan on making a display statue.
-
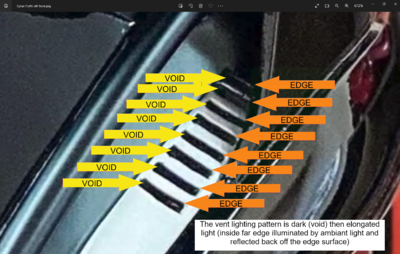
@Lt. Dan This is why I say I believe it has 8 vents, hopefully, like you said, someone will buy one and get us a definitive answer.
-
A question was raised over in the Death Trooper's Build Group Facebook page about a Death Trooper helmet being offered by a company called Cyber Crafts. I did a comparison of the Anovos vs Screen Used vs Cyber Crafts' helmets and create a PDF document. If anyone is interested it can be found/downloaded here: https://www.dropbox.com/s/lo7up1lmrj8nxl9/Cyber Crafts' Death Trooper Helmet verses Anovos and Screen Used Helmets Comparison.pdf?dl=0 Hope it helps.
-
If I'm not mistaken, Jim Tripon makes a tall kit, if you send him your measurements he can make sure the kit pieces match your body needs. His is a fiberglass type resin kit that is really easy to work with. My kit is from him, and a lot of others on here have his kit. I agree with Greg, the details are more crisper in a cast kit than they are in ABS, even with the resin add on details in 850's latest kit, the ABS pulled biceps, shoulder bells, forearms, etc, lack the crispness that is the DT appearance.
-
https://www.dropbox.com/s/r5081olaqarzbyu/1 Updated Deathtrooper Voice Lines (Play %26 Pause track).mp3?dl=0 https://www.dropbox.com/s/vvkqlzdum8fv2ew/2 Deathtrooper Voice Lines with segments (Loop track).mp3?dl=0 The first one is set up to press play and pause, the second has gaps so you can play it on loop
-
Since you are tall, when you think about your next costume, I suggest the Death Trooper. I'd love to see more badass DTs in our ranks. Hold your head up with pride, you did a great job on your kit! Your Shadow is way better than my first Shadow, hands down.
-
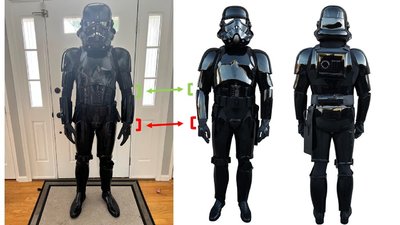
Oh that's horse poop! You're telling us that the gap between your forearms and biceps is too much? What Garrison are you in? I'd go look at the other Shadows in your Garrison and I bet you see some worse looking suits than yours? Body size should not be a discriminator! Put some foam in your forearms and move them up closer to your biceps and your photo will look just like the CRL photo. Same gap at the elbows and at the wrists.
-
I have Jim's kit, I built it back in July 2021 and have about 21 two hours or longer troopings in it. I have modified how it is strapped several times. My latest will be my final as I don't think I can perfect it too much more. Through out it all Jim's kit has held up great, I had two small stress cracks on the front chest upper shoulder extensions, but a little bit of resin and fiber glass to strengthen the back side and I haven't had any more cracks. Having an ABS Shadow trooper, I can honestly say Jim's kit will hold up way better than any ABS, plus the details are way crisper overall. Don't be afraid of working with fiberglass. Any fiberglass auto body repair kit will work and it's super easy. You'll be pleased. Good luck and I can't wait to see your progress. We are always here for any questions you might have.
-
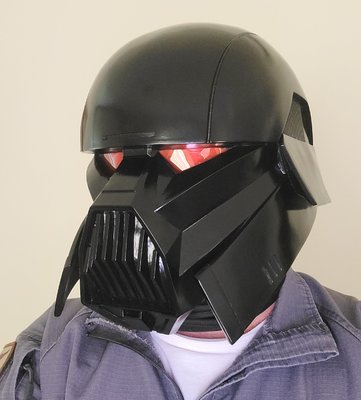
Holy Cow! That's AWESOME! I'm thinking I might need to make silicone joints and a waist area when I start my Dark Trooper Gen 3 build, the screen suits were CGI'd at those spots so I'm going to have to be creative. I might hit you up for your color ratios. Your's turned out perfect!
-
https://forum.specops501st.com/topic/7425-death-trooper-parts-vendors-as-of-25-feb-2020/
-
Not really, the current CRL is pretty straight forward and the changes that were made from the last one were mostly Level 2 items. As far as what needs to be modified on 3D files, there are a few build threads that describe what other Troopers did during their builds. The best part about building any costume is the journey of research and discovery. So when you finally finish and put it on you can stand back and say "Yeah.... I did that!"
-
Yes, but just to make sure you will need to go thru each piece and compare it to the current CRL. The CRL changed a little last year. Let us know if you have any questions as you go thru the process.
-

Death Trooper Upper/Lower Torso and Arm Armor Rigging
Chaos replied to Chaos's topic in Imperial Death Trooper
No worries! I have used 3 or 4 different set ups for strapping and each modification was made after trooping in my DT for extended periods of time. I think I may have even put something together for another Trooper as a visual example. I will go take a look and if I can find it I will post it here. -
Great news! I can't wait to see how your DT progresses.
-
@kishdr Brother if you were able to get those "behind the scenes model stuff" I'd be interested in seeing anything you might like to share. Going to need all that is out there to start the possible CRL process. And figure out a way to add in wearable items to account for the CGI effects they used on the actors.
-
-

Need help assembling and rigging up my armor
Chaos replied to GeorgiosHD's topic in Imperial Death Trooper
@wook1138 has an 850 kit build thread that is very good. https://forum.specops501st.com/topic/6097-wook’s-dt-build-850-armorworks-and-armoryshop/#comment-81731 -
@0igrez Pants and or shorts and shirt on first, neck seal and bib, then poncho. The poncho covers the front of the bib. Hope that helps.
-

Need help assembling and rigging up my armor
Chaos replied to GeorgiosHD's topic in Imperial Death Trooper
@GeorgiosHD There are WIPs and build threads for every known kit. Who made your kit? Is it precut/assembled or is it raw? -
@IcyTrooper nailed it! Also be aware that what ever color you decide on, flat black or grey, is used on all the details for uniformity.
-
@Lee_C_77 Any update?
-

TheFireAwakens1807's Deathtrooper WIP
Chaos replied to TheFireAwakens1807's topic in Imperial Death Trooper
I wouldn't use the hammered silver, I used Testors model paint (I think it was aluminum) and just used a thinned out black to "black wash" the weathered silver look. Also, I hand painted the flat black in my grooves and other flat black details. I hate having to mask off all that and run the chance of over spray or painters tape messing up my gloss black. -
Congratulations! Now get out there and start killing some Rebels!


