Chaos
-
Posts
1,469 -
Joined
-
Last visited
-
Days Won
111
Content Type
Profiles
Forums
Events
Everything posted by Chaos
-
 I'll give @IcyTrooper a chance to chime in before I move on to the next section.
 -
New Member - Death Trooper Soft Parts help
Chaos replied to itskub's topic in Imperial Death Trooper
@itskub Jakub, Welcome to the darker side of The Dark Side. Excellent choice of costume. It is a rather tedious and time consuming build but way worth it when completed. The piping you are looking at texturally and size, look like it might work (that would be up to your GML's interpretation of the CRL requirement): Shall be rubber or a smooth semi-gloss black material with sewn ribs. Horizontal ribs approximately 3/16" to 1/4" (5-6mm) wide. As Dan mentioned, Jim Tripon is about the only source of the undersuit and soft parts complete sets. IMO the cost and quality of Jim's undersuit verses DIY construction time and material sourcing is well worth it. Don't get me wrong, it can be done with the right material. My under suit is from Jim, however I did do some major modifications to it as I made it a one piece similar to a diver's wetsuit so that I could use the abdomen ribbing to make a corset style gasket. I posted a thread in the DT forums on how I modified it. jimmiroquai@yahoo.com , www.facebook.com/jim.tripon Best of luck, there is a plethora of builds and knowledge here to assist you as you move forward with your build. -
That looks great. I thought about using EL Panels, but when I took a look at the Anovos helmet, it had the 5mm holes drilled out in the tusks and the "concept" art for the DT had the green light as a single point with radiation (like an LED) so I opted to used the LED path. We never saw the tusks illuminated in the movie or Mando series. There was a screen that was cut out when they were in the cave looking for Jyn where the tusks were lit.
-
DT - Jim Tripon Calves and Forearms HELP
Chaos replied to productionsbykyle's topic in Imperial Death Trooper
Kyle, my kit is a Jimmi one. Tomorrow at work I will put together something for you. If could take some photos of your forearms and shins so I can see what we are working with. -
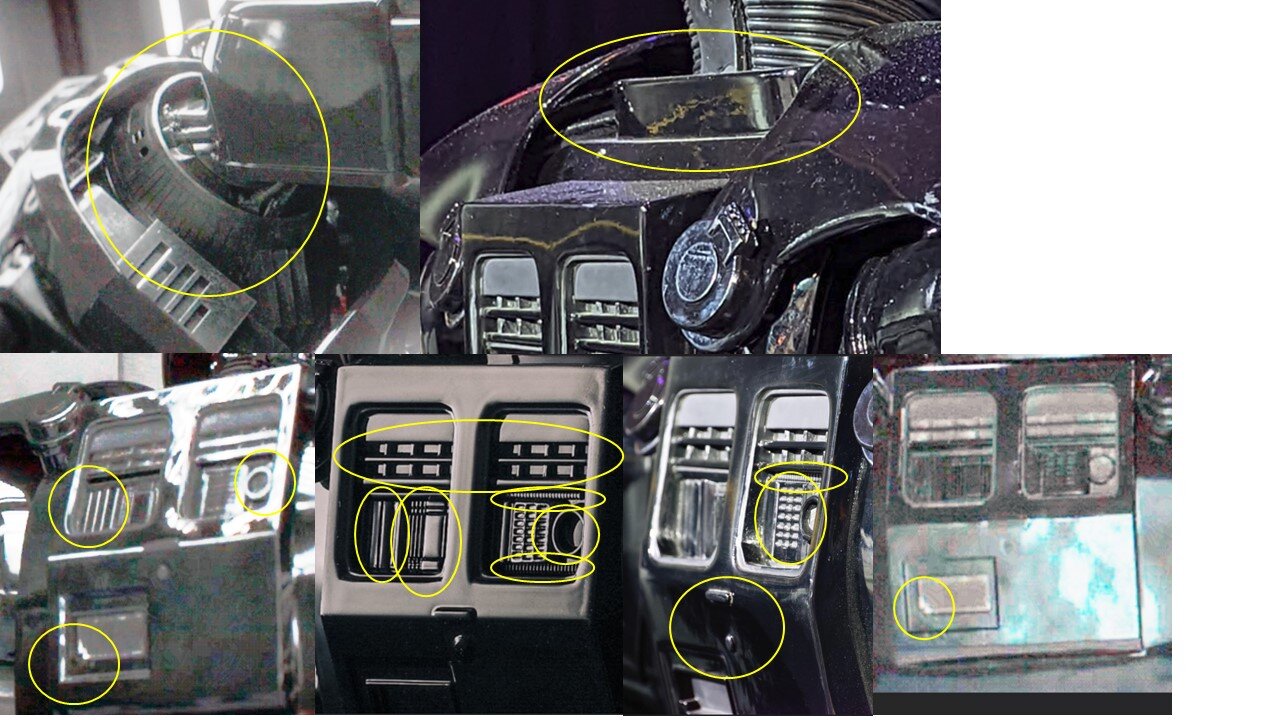
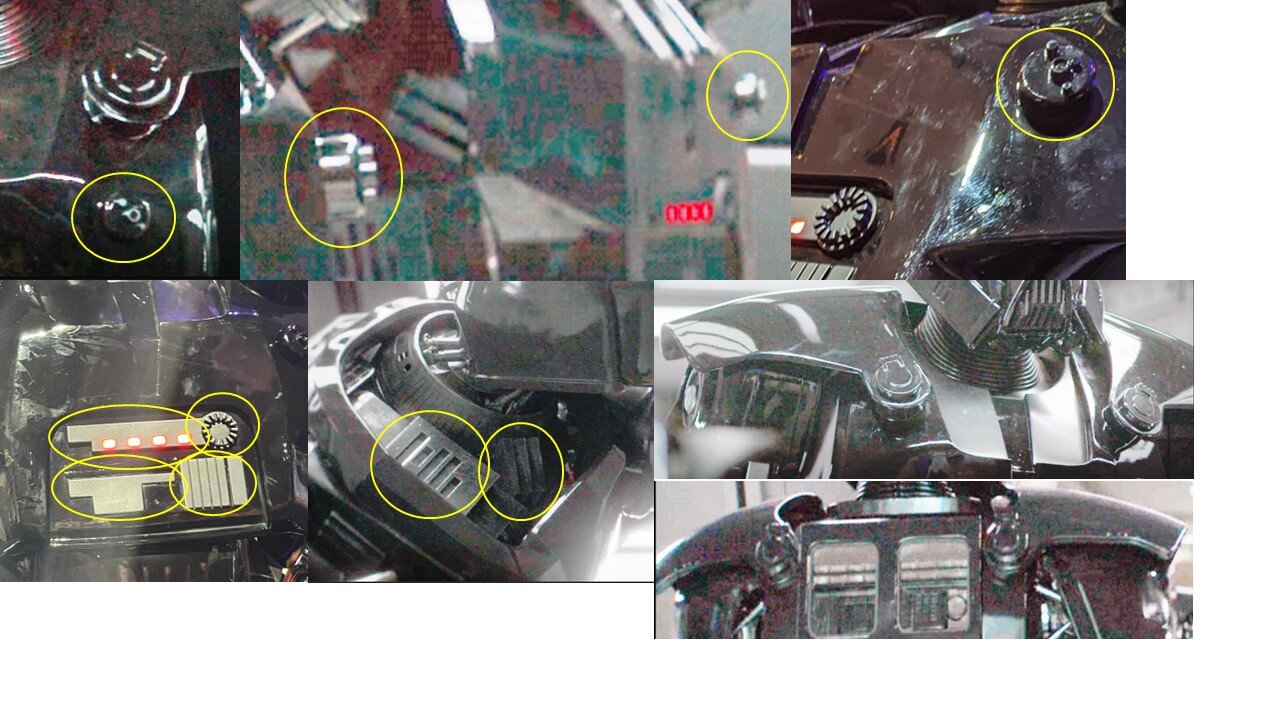
Next up: Revision 0 Back Armor Gloss black in color unless noted below. May be painted IAW the Color Scheme Guide. If used, all armor pieces must be painted using the Color Scheme Guide. Is in proportion to the rest of the costume. Overlaps the abdominal plate. Extends over shoulders to meet chest plate. The chest and back plate meet flush at the sides. The arm area of the back plate has a raised tapered ring that joins with a matching detail on the front plate. The collar extends upward and tapers to the chest plate. The back plate has two large cut out recesses with vent details and greeblies inside. The vent details above the greeblies are cut out and backed with black material. Each recess has a different and specific set of greeblies inside: Left side recess: A rectangle shape greeblie with an angled right side end with 5 panels. On the right side a heat sink greeblie is fitted. Right side recess: Along the top is a long thin strip with flat ends with approximately 30 cylinder shaped teeth in the middle. Along the bottom is a long thin strip that has angled ends with approximately 28 cylinder shaped teeth in the middle. Below it on the left is a rectangle shape greeblie. Approximately 1/8th of the left side is flat followed by a thin line recess and 7x3 rows of oblong-shaped indents. On the right side is a raised circular ring type hose connector. Below that, along the bottom is a long thin strip that has angled ends with approximately 28 cylinder shaped teeth in the middle. There is an oblong greeblie centered below the 2 large recesses. There is a small, raised circle greeblie centered below the oblong greeblie. Bottom left has a rectangle cut out with the left side stepped. The recesses may be matte or metallic black. There are solid pauldron type shoulder plates that sit on top of each of the shoulders and extend slightly past the shoulder/bicep armor and are attached to a single point on the chest and the back armor. Shoulder plates may be stationary or pivot with shoulder movement. The attachment greeblie is present twice on each shoulder armor (front and back) and is circular in shape with a bracket shaped extension that faces outwards away from the helmet. The bracket shaped extension has four equally spaced raised edges. Within the circular greeblie there is a centered raised circle that is smaller than the circular greeblie it sits on. The back armor may be slightly weathered but must be uniform with the rest of the costume.

-
@Andreas Funk Andreas, "JA" Bauen Sie Ihr Kostüm weiter so auf, dass es zu Ihnen passt. Höchstwahrscheinlich werden Sie unser CRL-Modell sein und wir werden Fotos Ihres fertigen Kostüms als CRL-Beispiele verwenden. Im Moment definieren wir lediglich, welche Details ein Kostüm haben soll. Da es sich um ein „Neu in der Legion“-Kostüm handelt, müssen wir sicherstellen, dass wir im CRL und auf den Fotos genügend Details angeben, um sicherzustellen, dass die Legion unsere Anfrage akzeptiert. Wenn ein Teil Ihres Kostüms zu irgendeinem Zeitpunkt nicht die Details aufweist, die wir in der CRL angegeben haben, lassen Sie es uns wissen und zeigen Sie uns, was Sie haben. Wir besprechen, ob wir die Details ändern oder beibehalten sollen. Ich hoffe, dass dies zur Klärung der Dinge beiträgt und Sie beruhigt. Vielen Dank, dass Sie uns dabei unterstützt haben. Wenn diese CRL genehmigt wird, wird der Dark Trooper Generation 3 genauso „krass“ sein wie der Death Trooper und der Purge Trooper Phase 2. Andreas, “YES” Continue to build your costume to fit you. Most likely you will be our CRL model, and we will use photos of your finished costume as the CRL examples. Right now, we are simply defining what details we want a costume to have. Since this is a “New to the Legion” costume we have to make sure that we provide enough details in the CRL and in the photos in order to ensure that the Legion accepts our request. If at any time a part of your costume does not have the details that we put in the CRL let us know and show us what you do have. We will discuss whether we should change or keep the details. I hope this helps to clarify things and puts you at ease. Thank you for assisting us with this. When this CRL gets approved, the Dark Trooper Generation 3 will just as “badass” as the Death Trooper and Purge Trooper Phase 2.
-
@Andreas Funk @IcyTrooper @tipperaryred What do you think guys? We good with the chest and shoulder armor? If so I can save this and post up the back armor. I am really surprised more people haven't chimed in on this. I guess we will hear from others when we go live with this. They always seem to have comments after all the work is done.
-
Revision 1 Chest Plate and Shoulder Armor Gloss black in color unless noted below. May be painted in accordance with the Color Scheme Guide. If used, all armor pieces must be painted using the Color Scheme Guide. Proportional to the rest of the costume. Chest plate overlaps the abdominal plate. Chest plate extends under the arms and over the shoulders to join with the back plate. Method of connection is not visible. A raised circular greeblie, with the appearance of a hose port, is located on the left middle panel of the chest plate. (See CRL Gallery for reference) There are four raised cylinders of various size on the hose port. The largest one is centered, two are 180 degrees opposite each other, and one is 90 degrees to the other two and shorter. There is a centered wedge shaped recessed area that opens up towards the helmet and narrows and stops at a straight line away from the helmet. There space between this wedge shaped area and the recessed area on the lower center section of the chest plate. There is a recessed area on the lower center section of the chest plate. (Locations/descriptions are as if viewing from the front) There are three greeblies painted metallic black located in the recessed area. Greeblie is located on the top center of the recessed section. An elongated rectangle consists of; four equally spaced small rectangle recesses which are painted red or illuminated, a raised castellated ring on the right side with approximately 15 castellations. The lower left corner is inverted into the center. Greeblie is on the lower right side of the recessed section. Six vertical raised rectangles equally spaced with the far right rectangle being approximately twice the width of the other five. Greeblie is located on the lower left side of the recessed section. Two raised elongated horizontal rectangles sit above a raised uneven “T” shape. The arm area of the chest plate has a raised tapered ring that joins with a matching detail on the back plate. There are three raised elongated narrow trapezoid shapes that extend from the raised tapered ring to the lower front edge of the chest plate There is a raised rectangle with five recessed rectangles of various lengths below the raised tapered ring. There are solid pauldron type shoulder plates that sit on top of each of the shoulders and extend slightly past the shoulder/bicep armor and are attached to a single point on the chest and the back armor. Shoulder plates may be stationary or pivot with shoulder movement. The attachment greeblie is present twice on each shoulder armor (front and back) and is circular in shape with a bracket shaped extension that faces outwards away from the helmet. The bracket shaped extension has four equally spaced raised edges. Within the circular greeblie there is a centered raised circle that is smaller than the circular greeblie it sits on. Chest and shoulder plates may be slightly weathered but must be uniform with the rest of the costume. OPTIONAL Level two certification (if applicable): The chest lower center section’s elongated rectangle consists of four small rectangle recesses which must be illuminated red using LEDs. I'm good with this unless anyone else has anything else to add.
-
The cutouts were designed to be backed with yellow or red acrylic printed panels for illumination from behind by LEDs. Since you are going the decal route, there should have been 2 files included to use to print the acrylic pieces. You can uses those and print in your PLA etc to insert and then place the decals on. The file names are: R1DT Blaster - Hengstler - Acrylic Panel.stl R1DT Blaster - Barrel - Acrylic Display Panel.stl If you don't have these files. I made similar ones when I built my E11D way back when.
-
@Andreas Funk we tabled the gasket discussion. We can come back to it later. I'm fairly sure we will go with hard joints and move away from the rubber knee and elbow joints. We are discussing the chest and shoulder now.
-
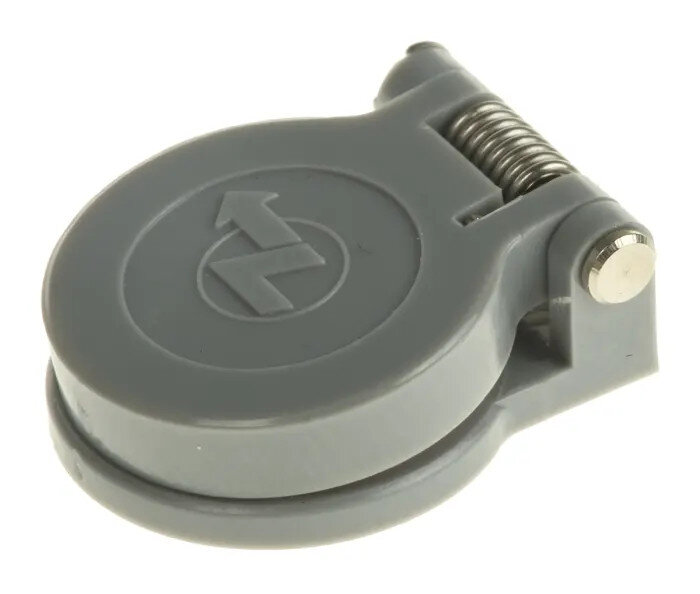
@IcyTrooper Ryan, Looks good to me. The inverted corner verbiage is similar to the rear lower detail on the DT's back. I think if we change it to the same verbiage as the DT it should work better. Greeblie is located on the top center of the recessed section. An elongated rectangle consists of; four equally spaced small rectangle recesses which are painted red or illuminated, a raised castellated ring on the right side with approximately 15 castellations. The lower left corner is inverted into the center. Also I was taking another look at the shoulder armor attachment details and it dawned on me that the four greeblies look like they were intended/designed to be covers, possible for attachment bolts so that the shoulder armor could be removed for maintenance. Something similar to a dust cover. LOL the things we discover when trying to figure out what the heck a greeblie is supposed to be and what was the original idea source.
-
Try by logging out, clearing your cookies and log back in. I don't see any restrictions imposed on your account.
-
Yes we could do that, I'll work up the verbiage tomorrow. Good catch!
-
Next Section up for review: Revision 0 Chest Plate and Shoulder Armor Gloss black in color unless noted below. May be painted IAW the Color Scheme Guide. If used, all armor pieces must be painted using the Color Scheme Guide. Is in proportion to the rest of the costume. Overlaps the abdominal plate. Chest plate extends under the arms and over the shoulders to join with the back plate. Method of connection is not visible. A raise circular greeblie, with the appearance of a hose port, is located on the left middle panel of the chest plate. (See CRL Photo for reference) There are four raised cylinders of various size on the hose port. The largest one is centered, two are 180 degrees opposite each other, and one is 90 degrees to the other two. There is a recessed area on the lower center section of the chest plate. (Locations/descriptions are from frontal view) There are three greeblies painted metallic black located in the recessed area. Greeblie is located on the top center of the recessed section. An elongated rectangle consists of; four small rectangle recesses which are painted red or illuminated, a raise castellated ring on the right side with approximately 15 castellations, and a corner inverted to the center on the lower left side. Greeblie is on the lower right side of the recessed section. Six vertical raised rectangles equally spaced with the far right rectangle being approximately twice the width of the other five Greeblie is located on the lower left side of the recessed section. Two raised elongated horizontal rectangles sit above a raised uneven “T” shape. The arm area of the chest plate has a raised tapered ring that joins with a matching detail on the back plate. There are three raised elongated narrow trapezoid shapes that extend from the raised tapered ring to the lower front edge of the chest plate There is a raised rectangle with five recessed rectangles of various lengths below the raised tapered ring. There are solid pauldron type shoulder plates that sit on top of each of the shoulders and extend slightly past the shoulder/bicep armor and are attached to a single point on the chest and the back armor. Shoulder plates may be stationary or pivot with shoulder movement. Chest and shoulder plates may be slightly weathered but must be uniform with the rest of the costume. OPTIONAL Level two certification (if applicable): The chest lower center section’s elongated rectangle consists of four small rectangle recesses which are illuminated red.
-
We can address the joints when we get to them and modify this on the relook after we decide if we want to require "hard joints"
-
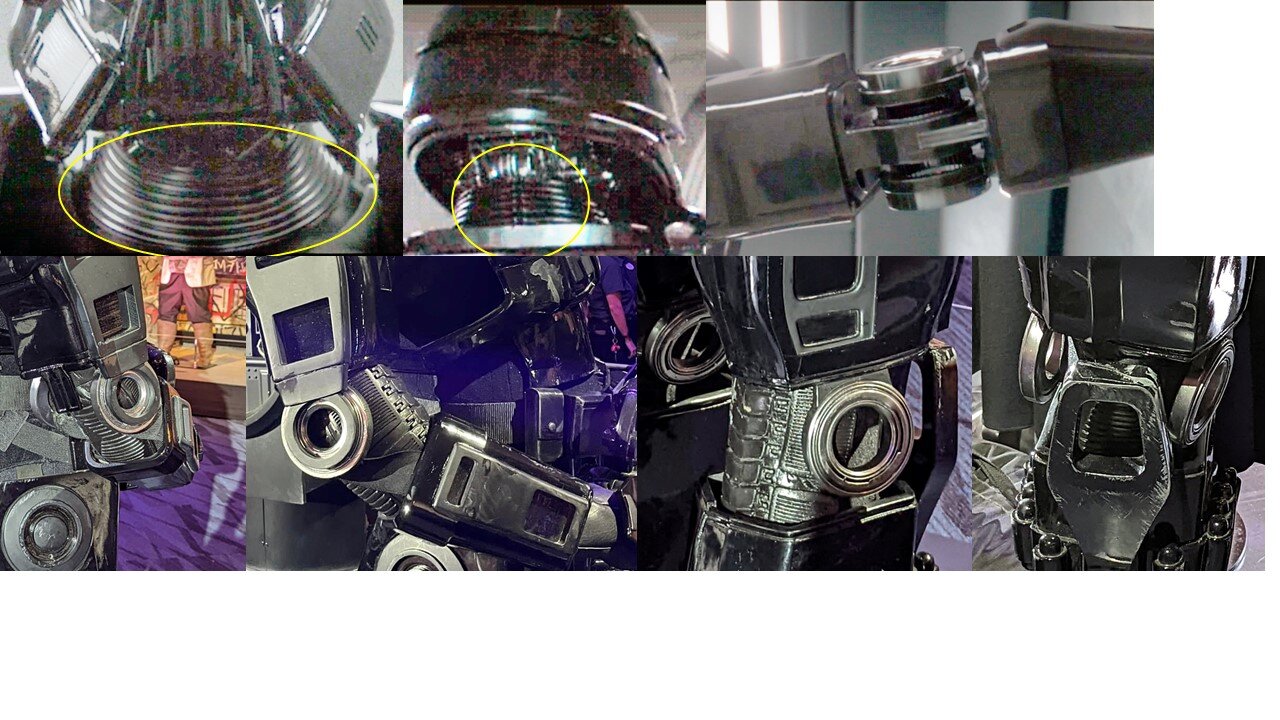
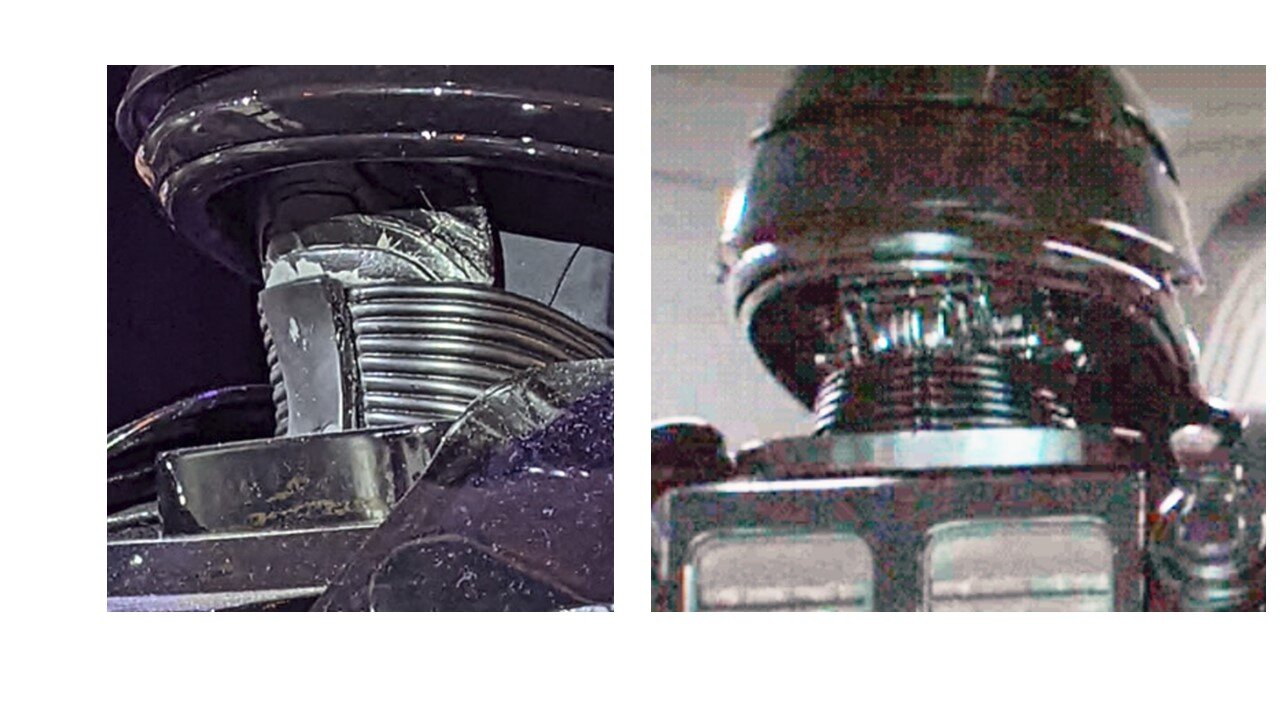
Revision 1 Undersuit Black non-textured material, either one-piece or two-piece construction with no visible zippers or logos. Neck seal and elbow/knee gaskets may be attached to or part of the undersuit. The black material may be shiny or matte. Neck Seal and Apron Neck seal has horizontal ribs. Extends from the base of the neck to conceal the entire neck and is fitted to the wearer. No hair or skin should be visible around the neck area. It has a concealed overlap which joins at the back of the neck. The neck seal may be attached to a smooth black apron which is made of the same or similar material as the neck seal. The apron is worn over the top of the undersuit and under the chest and back armor. Gaskets Elbow, wrist, ankle, and knee gaskets (if used in lieu of a segmented armor joint): The gaskets must cover any area not covered by armor. Gaskets may be rubber or a shiny black material with ridges (similar to the TFA Elite Stormtrooper). May have the appearance of being segmented overlapping armor or similar “mechanical” joint in design and color. OPTIONAL Level two certification (if applicable): The elbow, wrist, knee, and ankle joints are segmented overlapping armor or similar “mechanical” joint in design and color.
-
I think@Andreas Funk and I have concluded that "mechanical joints" can be replicated to the point that they are similar in appearance to the CGI's joints. As far as the waist. I believe it is possible to achieve the desired look with an ab/back section. It could be similar to the the shore trooper abdomen/lower back as it is a "one piece" wrap around like Andreas' or simply as I have done a one piece that looks like the middle section with side pistons and the person's ab/waist area is just the black undersuit (I prefer this) or a ribbed horizontal gasket. We can tweak the joints and abdomen and back when we get to that section.
-
Well it has been 2 1/2 weeks since we posted up the undersuit and "gaskets" with the question if we decided on "gaskets" at the joints or hard armor joints. Andreas and I are leaning to the "hard joint" armor path. Unless someone comes up with any other suggestions, I recommend that we sideline the section and move on to the Chest Plate and Shoulder Armor. We can always circle back around to the undersuit and joints (hard armor or gaskets) at the end. Just so we can keep things moving. Thoughts from the group?
-
-
Death Trooper building in Germany (Jim Tripon kit)
Chaos replied to Deathwatch's topic in Imperial Death Trooper
Make sure that that you use matte or metallic black, matte silver, or dark gray and must match the rest of the armor and make sure that all of the recesses that state "may be painted" are all done to match. There is no "gun metal" color in the Color Scheme but I am going to assume that you are referring to the "metallic dark grey" which is Tamiya Metallic Black - TS40. The silver is a "matte silver" you can dull it down with a "black wash" if using that as a "weathering" it must be consistent with the rest of the armor pieces. -
I would prefer that the elbow, wrists, knee, and ankle joints look like the CGI and Hot Toys, BUT we have to also discuss and decide what path we want to take. Like I said, my vote is for hard joints that resemble the CGI mechanical joints.
-
This is Andreas' comments translated. I will respond later today or tomorrow. Hello I'm not sure if I understood that correctly, so the joints of any kind and hips can be made of rubber or a piece of armor? A piece of armor or a rubber type gasket that looks like segmented armor - This is what we need to discuss and decide on. I agree with Andreas and think the elbow, wrist, knees, and ankle joints need to be attached so that they move and look more like a mechanical joint. The ankles could be just the side disks like Andreas has made, since this area is less noticeable and the movement is pretty simplistic. So the hip should be completely closed, from all sides? I think the hips should not be completely closed like the C3P0 shorts. I think if we use either just the black undersuit or a ribbed gasket like the DT or ST that it would suffice as a concealment. However the "if used" comment was if someone wanted to include a greeblie attached to the thigh armor that looks like the silver mechanical ball joint that we could consider it as a Level 2. I am saying this because I have been working on the 3D files for the thighs and hips and have managed to incorporate a design that mimics the CGI appearance and does not bind the wearer's movement. From my practical experience as a costume maker, this becomes very difficult and no longer wearable for everyone. The Disney doll also has an overlap on the neck seal, where Hot Toys has a smooth connection, I'll have to watch it again to see what it was like in the series. The concealed overlap closure can be seen in the movie. This type of construction hides the zipper. The suit displayed at the Mandalorian exhibit looks like it had been modified for display purposes. I just realized that I did not post up the supporting photos when I posted the proposed CRL text. (I have attached them below) When it comes to the joints, we give everyone free rein in the design or we still determine the look here. The body depends on the joints. If this is not a firm connection, the costume will do what it wants when worn later (my experience) And it will look like that. I am of the opinion that the elbow and knee joints have to be firmly connected in order to do this costume justice. I can already imagine our GMOs discussing back and forth over costume approval and taking the liberty of a personal interpretation of their opinion on this costume (oh my god, this could be something ;-))). I think that, like with the helmet, we should offer clear photos to create very clear requirements and consider the bar very precisely for the basic level, so that this costume can really be implemented by people who are keen on it.
-
To be honest, if you're going for level 2, I recommend getting a Jim Tripon undersuit. That Detachment guy they have reviewing the L2 Specialist's applications is a real stickler for details. Jim has a measuring chart that you measure yourself and his tailor sews it to fit you. If you have a more rounded butt tell him. The time and money you'll spend making your own is more than it'll be to have Jim make you one. Plus he is very responsive.
-
I'll have to translate this when I get home.
-
@Andreas Funk Andreas, Guten Tag. Der nächste Teil, nachdem wir den Unteranzug und die Dichtungen fertiggestellt haben, wird die Brustplatte und die Schulterpanzerung sein. Deine Fotos von der Schaufensterpuppe in Rüstung sehen toll aus! Andreas, Good day. The next part after we finalize the undersuit and gaskets will be the Chest Plate and Shoulder Armor. Your photos of the mannequin in armor looks great!


.png.407f7a2f8d5a6f57a83058b05ee51600.png)

.png.534604c57600485e2b1c8faff95f658c.png)
.png.76d627a3c6c2f346eb6bf24584f48f42.png)
.png.77c5971874486c5b6bc1831d6a754f8d.png)