-
Posts
3,316 -
Joined
-
Last visited
-
Days Won
400
Content Type
Profiles
Forums
Events
Everything posted by RAIDER
-
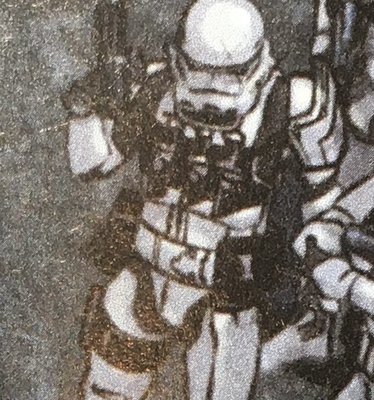
Not sure why I said legs…we still need belt, TD, and holster first. For belt…highlighted some elements to make sure we are good on wording or to make sure we are good on keeping them (particularly the Level 2 reqs). Removed the one L2 req regarding belt placement in relation to ab buttons ('cause none exist). TD…just a few highlights of things to examine or clarify. Holster…likewise just a couple minor details highlighted for verification. @darthRivera if you're able to post some references here to support lines, that'd be great. Belt The ammo belt shall be made of similar material and color matching the overall armor. It is comprised of 6 rectangular boxes, with three square buttons, one centered in the middle and on each end of the belt. The soft belt proper is made of white canvas, or material with a canvas covering and must be 3” to 3.5” (75-90mm) wide. The drop boxes dangle from the sides of the plastic belt face via white straps and are aligned under the plastic tabs of the ammo belt. The belt closes by overlapping in the rear center of the kidney/posterior armor where the thermal detonator is attached. There are two square metal rings that hold the large pouch on the right side. There is a lightsaber holder/hook on the right side of the left drop box. OPTIONAL Level two certification (if applicable): The corners of the black plastic ammo belt shall be trimmed at a 45 degree angle that meets the outer edge of the canvas belt. The top of the ammo belt should sit at or just above the bottom of the central and vertical abdomen button panels. Drop boxes must be attached using white elastic and must have full inner drop boxes to close the back. Flat covers are not allowed. Drop boxes are vertically aligned with the end of the ammo belt with minimal gap between belt and box. Thermal Detonator (A.K.A O2 canister) is attached to the center back of the belt. Detonator consists of a gray cylinder with 2” to 2.68” (50-68mm) in diameter with white end caps on each end and a white control panel pad. The white control panel pad faces upwards, with the controls/round washer-style detail closest to the right end cap. The total length is approximately 7.5” (190.5mm). No silver stickers or silver paint is allowed. The detonator is attached to the white canvas belt with 1” (25mm) silver metal or metallic-appearing clips. OPTIONAL Level two certification (if applicable): Clips shall be attached with slotted, pan head style screws, and painted black (two per clip). V-head screws are not permitted. Thermal detonator belt clips are positioned with little to no gap between the clips and the end caps. Belt clips shall be made of metal and must be silver. Holster It is made of black leather or leather-like material. It is worn on the left side of the canvas belt and is attached via two or four leather or leather-like material straps to the canvas belt from behind. Affixed with only two fasteners at the bottom, one on each side, painted in white. Fasteners may be rivets, snaps or Chicago screws. OPTIONAL Level two certification (if applicable): The Holster is affixed with four fasteners, two of each side, painted in white.
-
it works good. better than bondo…but the amount im needing to use to get that ab smooth was insane n would probably cause snaps to pop or armor to crack at the shoulders/chest w the weight. once i get the 3D print i will start posting on that again
-
Imperial Flametrooper (Jedi Fallen Order)
RAIDER replied to stevechewbacca's topic in Imperial Flametrooper (JFO)
I need ur smoothing technique lol. Nice work! -
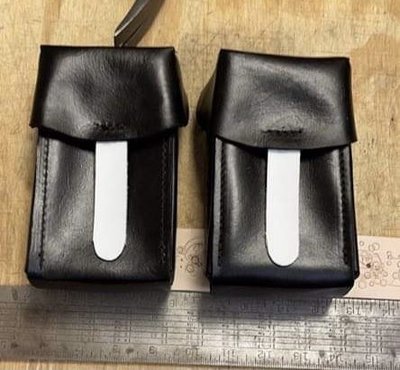
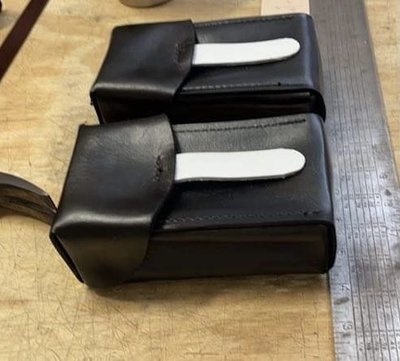
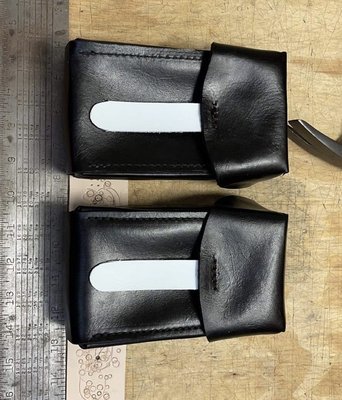
Back with an update! After working an reworking the polyflex on the chest and ab, ive found im just not happy w how its turning out…in particular the weight of it. The armor is really heavy. So for the torso parts I shifted gears and hopefully will have a 3D printed product to work on soon. For now, I received my first pics of the custom Spanish Medium Pouches for the belt! White tabbed per reference!
-
Its tough to say for sure. In earlier issues (which aren’t necessarily our reference point), these guys do use soft parts clearly. Art shows it real clear. But these issues isnt as clear AND if it helps, the issues just before this it appears to definitely be a hard abdomen. I can link pics later. Considering this CRL character might be able to be split into a few versions, I think its safe to do a hard abdomen here. If going for the earliest version, requiring a soft goods abdomen/back. Thinking out loud here.
-
no i think he is referencing the white rectangles as armor and the black as just the undersuit. i can see how u could reach that conclusion. for me i dont see it as definitive…like it could be the intent of the artist…maybe it isnt. the one thing i dont see in any of the panels is “folding” or bend in that area. it always looks prim and stiff…those ridge lines are always perfectly straight
-
no prob. but he and all variants have always been eligible…see the original reference thread from 2017. currently only gar saxon force arena version has been presented as a build by @MrShadow not completed yet tho if u or anyone else takes up another version we can regroup the reference pics into a separate thread as needed
-
Yes, Hark and Tristan Wren are both on the table as well. My advice would be to run each as separate CRLs just as the clones have CRLs for each unit type of different colors. Still…need a first of any of them to proceed further
-
@RobC_TX1138 for the pic…after u insert link just click enter n it should pop up.
-
this thread is pinned to the top of the general Imperial Army section may want to give that section a look as a whole in case theres other items of interest to ya. best wishes on ur build
-
Nice. Moving on then...kidney and posterior. I copied our Shadow text which allows for fused or split kidney/posterior. I would say in this shot, we can see it is split and make that the L2 req as we did the abdomen/cod. We can can also see no crotch snap...I know I removed this from the text for the cod as well...but maybe we can make this L2 explicitly stating they SHOULD NOT have it. I think the more we highlight the differences between these guys and the standard TK the better. I've highlighted the yellow L2 reqs from the Shadow in yellow as potential removals. Thoughts? Kidney Armor The kidney/posterior armor may be either one piece (ROTJ style) or two pieces (ANH style). If a separate kidney plate is used, it lines up with the abdomen armor. The top of the kidney armor is flush to or under the back armor. OPTIONAL Level two certification (if applicable): Three rivets shall be present on the left side of the kidney plate: a total of three fasteners, the heads should be rounded or domed, solid, approximately 5/16” (8mm) in diameter and equally spaced out the depth of the armor and about 3/8" (10mm) from the edge. They should be aligned horizontally with the three rivets on the ab plate. They must be painted black. Paperclip brads are not considered to have a domed head. Note: The original TK armor used the bifurcated rivets or split rivets. Cut-out notches at the bottom of the right and left side of the kidney armor are optional. If present, each notch is approximately 7/8" (22mm) tall and the back of the notch ideally is aligned with the front edges of the posterior armor plate. Posterior Armor The kidney/posterior armor may be either one piece (ROTJ style) or two pieces (ANH style). OPTIONAL Level two certification (if applicable): Two male snaps are present on the lower center tab that are painted black. Snaps do not need to be functional.
-
I posted chest and ab together due to the recessed lines they share...though in the CRL I believe the back will come in between them. I highlighted the center section in yellow...mostly from what I see happening in my own build...that the ab being totally different, I will be using the cod but a a 3D printed ab in its place. It be fused pretty simply I believe and would have no issue doing it, BUT the references may even indicate that they are not fused. The turning of Kreel definitely offsets the ab from the cod and indicates it as a separate piece. I think we can leave fused as an option...but I would suggest that an option to have them as separate pieces be allowed...and potentially the Level 2 req. Thoughts? One other point I'd bring up because it isn't clearly mentioned in the text...but the lines of the ab armor should be a continuation of the lines in the chest armor. We probably should make mention of that. It appears as such in several spots. Will take input on how to word that? That might be something to examine against your build as well @darthRivera EDIT: I also added only the Level 2 bits from the Shadow Stormtrooper I thought applicable. If I missed anything please let me know. Thx! Chest Armor Overlaps the abdominal armor. There are two recessed lines, slightly curved and vertical, on either side of the chest. Width of the lines decreases as they progress to the bottom of the chest armor. Chest armor must match in-comic references. OPTIONAL Level two certification (if applicable): Chest plate shall have return edges all around, maximum width of 3/8" (10mm). Chest and back shall be connected with a white fabric (preferably elastic) that does not stick out or show under the shoulder plastic straps. Abdomen Armor The abdomen and cod piece are combined/fused to a single plate/one piece. Cod piece is white in color. The abdomen is black in color. There are three white vertical lines in the middle. The outer lines are aligned with the two recessed lines of the chest armor. There are four white rectangles. Two on each side in a horizontal and parallel position. The rectangles are slightly elevated above the surface of the abdomen. Rectangles cannot be drawn or hand-painted There are no visible snaps or rivets. Abdomen armor must match in-comic references. OPTIONAL Level two certification (if applicable): There should be no gap between the ab and kidney plate, a single visible seam line is ideal. Any gap between the abdomen and kidney armor shall be no more than 1/2” (12.5mm). Any shims used to achieve this effect shall have a similar material and color as with the abdomen and kidney armor. Shims should be flush and seams are allowed.
-
@darthRivera Thx for the feedback. When he can we will let @IcyTrooper make the final call on the stripes but I think w all of the non-standard TK bits we see, it would seem acceptable to me to do the same here w the black stripes…still allow blue for possible TK conversions but make black the higher standard. For the shoulder, I will move to your WIP thread to troubleshoot some ideas for a hard plate. As far as the standard in the CRL…especially if we target L2, mobility would normally be a non-factor as much as the look. It’s a comic…we will never know (so we can be flexible at L1, but how theyve drawn it really gives me the impression its a hard part. Again, we can finalize these w @IcyTrooper
-
Will be posting chest/ab in a bit but before I move fwd, I wanted to ask 2 questions about previous parts just to be sure… - Helmet on Kreel (I need to check others) has consistently black tube stripes. Add as an L1 option and an L2 req? - Pauldron. Last bullet needs word “affix” fixed to “affixed”. But my question…the more I look at it the more I’m convinced this is an outer hard shell. Im ok to leave what we have as L1 BUT Im wondering if it should be a piece of plastic armor attached over the shoulder bell, at the very least for L2. I think this could be a part 3D modeled fairly easily bu someone who knows how to do that kind of stuff as well. Thoughts?
-

Cummerbund and Soft Parts Source
RAIDER replied to Luthien's topic in Armor/Soft Parts and Where to Find Them
@Luthien what are of florida are you in btw? trying to round up our shadow scouts in central fl cuz we have quite a few now -
Alright @darthRivera @IcyTrooper I've taken the proposal and meshed it with some of our standard TK/TX Level 2 text. I also split the pouch/compad into separate pieces (meaning separate pictures if possible). NOTE: On the pouch/compad there aren't level 2 requirements YET (we can move stuff to Level 2 if needed), though I did add lines for the pouch closure (flap) shape and the rivet there. My wording on what that rivet is may not be correct. @Blackwatch may have a better suggestion on that word. For the compad, I added a bit that the pad must be lit in full. If we need to make further adjustments let me know…then I think we can just use standard hand guard and glove text…so we can move to the chest and ab/cod. Biceps Biceps are fully closed. Overlap construction is only allowed for kits that come with the cover strip molded into the part. OPTIONAL Level two certification (if applicable): Must be constructed using the butt plate joint and cover strip method. Overlap construction is not allowed. There shall be a return edge that is present with a maximum width of 3/8" (10mm) width. Bicep Pouch There is a small pouch on the left bicep held by a strap around the bicep. The pouch is black in color and can be made of leather or leather-like material. Pouch is proportional to the size of the wearer and will match in-comic references. Pouch closure is trapezoidal in shape. Pouch closure has a snap/rivet. The strap is black in color and made of elastic, leather, leather-like material. The strap is approximately 1.5 "(40mm) wide. Forearms Forearms are fully sealed and closed. Overlap construction is only allowed for kits that come with the cover strip molded into the part. OPTIONAL Level two certification (if applicable): Must be constructed using the butt plate joint and cover strip method. Overlap construction is not allowed. There shall be no return edges present on the inside of the front of the forearms. Compad There is a holographic communicator fastened around the left forearm by two straps. Holographic communicator has a rectangular shape and is black in color. It has an aqua or light blue colored screen that must be lit in full. Holographic communicator must match in-comic references and proportions to the wearer. The straps are black in color and are made of elastic, leather, or leather-like material. The straps are approximately 1.5 "(40mm) wide. Black in color made of leather or leather-like material.
-
@darthRivera Looking at your bicep text I just have 2 questions… -Should we separate the pouch text from the bicep text as a separate item? -Your text lists the strap for the pouch as leather. Im wondering if leather/leather-like should be the only material or if elastic would suffice. Thoughts? P.S. These same questions would apply to forearm…as well.

