-
Posts
3,343 -
Joined
-
Last visited
-
Days Won
407
Content Type
Profiles
Forums
Events
Everything posted by RAIDER
-
Right now it is a blank slate. We have no CRL draft…just some compiled references and some people who started builds but never finished the new CRL process. Still looking for someone to cross that bridge and be willing to be the first.
-
@BigJasoni Only 2 approved. Allan is one…and then Christian is the other. He used to be in my garrison (and I think is returning from Japan). He is much shorter than Allan…maybe 5’5” and a very slim frame. Ive seen one other tho I dont think approved. Not sure if it is the guy I have on FB who wears it or his daughter. Anyways…heres Christian and I
-
Shadow Scout Feedback Request - Debating Specialist
RAIDER replied to Syntaxerror's topic in Shadow Scout
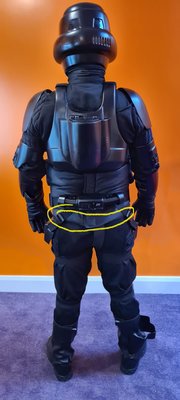
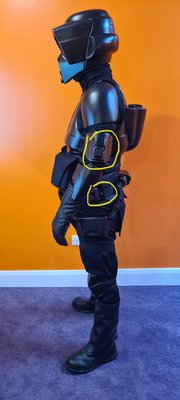
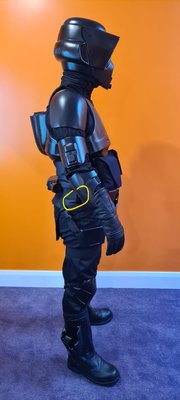
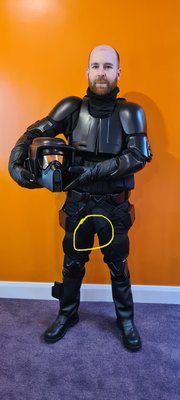
Hey @Syntaxerror! Build looks pretty good! I see a few things to address for Level 1 and a couple things that are hard to make out for both Level 1 and 2. For Level 1: -The bund should not be creeping out below the belt. -I circled both rivets here that need to be painted black. *Not really a requirement at Level 1 but it is for Level 2, but I circled the bicep greeblies…typically the little circle dots should be on the front of the bicep (see the CRL gallery for side images). For Level 1 (cant make out or questionable): -Cant make out the cod here but it looks like the fit could be a bit cleaner. Also, I cant make out if you have the curved stitch (not chevron) detail. Bunching is something considered at Level 2. -And then you may get feedback from your GML about the bunching around the back of your neck for Level 1. I cant tell if you’re using a neck seal or if thats the balaclava not pulled fully up. For Level 2, fit is considered and Id say that would probably be something we address as a team. Additional Level 2: -Cant make out if you have the left side helmet decal (it doesnt appear to be there). -Is the helmet bolt concave? -And then pics would be required to verify all the strap measures, top of the back tank, etc. Overall though I dont think you have a ton of modifications to make…so Id say GO FOR IT!!! -
And thats not on the current CRL right?
-
Nice @Fivezero but hold up hold up hold up lol. What about the Jumptrooper????
-

Sergeant Kreel WIP. Comic Star Wars (2015) Issue #59&60
RAIDER replied to darthRivera's topic in Sergeant Kreel
The CRL model custom built his own. Currents that we are aware of noone sells any of the Task Force 99 specific parts -

Imperial Flametrooper (Jedi Fallen Order)
RAIDER replied to stevechewbacca's topic in Imperial Flametrooper (JFO)
He’s baaaaaack!!! Lets go! -
Cant see the final pics but gratz regardless.
-
This is basically the look you’re going for. An exacto knife (being very careful) works to make the cuts. Id recommend sketching in pencil first so u can get the spacing set before cutting.
-
Cool @CrookKnight! Good to see your close! The only glaring thing that isnt in line w the CRL for basic approval that I see is the cod stitch pattern. It should be a curve and the CRL specifically says “not a chevron” which is what it looks like you have.
-
lol none yet. im tryin to be good
-
Haha yup I saw this. Super cool and very surprised to see it
-
Checked. All looks good. If no other issues @nanotek we can push it over to LMOs for publishing yea?
-
Im good w what you say. The “intake” I feel can be called almost whatever (within reason lol) because that detail will be a “look at the picture” part. The only thing I think missed is from the left shoulder, first bullet, second sub-bullet…the hexagonal protrusion on inside n outside of shoulder Having issues attaching pics but it is more of a trapezoid as @nanotek suggested. Other than that u got it all
-
could mention weathering in each line. i would say follow what other costumes that require weathering throughout do…ie mudtrooper has it in every item. shoulder shape is referring to the side view of the shoulder…it’s not flat/smooth like a typical shoulder but has a section that juts out that section would be more trapezoidal. knife sheaths…that should remain hexagon the line isnt referring to the sheaths but to the pad they rest on which has 6 sides. there are no actual “intake” sections. the emphasis i think was on “resembles” and uses “matches references” If you can think of a better way to describe the raised area go for it…its raised and has angled “U” cutouts on each end Dunno if that helps. and yes left is larger and sits higher than the right (due to larger size). prob good idea to mention both aspects. the larger left shoulder should not sit level w the right…its supposed to be a neck guard like old knight armor…or titan armor in destiny lol.
-
Heck yea! Congrats! Make sure to request access here (read directions thread first)…we have a merch run ending soon u might want in on https://forum.specops501st.com/forum/130-access-requests/ And then when you get to trooping, take part in our Imperial Dragons program… https://forum.specops501st.com/forum/53-imperial-dragons/
-
Good luck! The fit of the bund/crotch is much improved. Keep us posted!
-
@IcyTrooper lol. yea. homeboy has seen some serious action. the others are clean n cute ? looks good now
-
I like it but Im also thinking it needs to be required…not optional. Weathering is required on Sandtroopers, Mudtroopers…etc…this wouldnt be any different. The helmet requires weathering/slashes and we have the line that says the weathering should be uniform…so that would mean if bucket requires it everything else probably should as well. Wanting to avoid someone putting an X on a helmet and calling it done when the references show he has slices all over @IcyTrooper
-
Correct. In the Special Notes header paragraphs can we switch the weathering to required and make a note about the type of weathering (slashes and cuts) so people dont assume they can do sand or dirt/mud?
-
@IcyTrooperOne question before final publishing…i noticed we have weathering as optional. I think slash/cut weathering should be required. Would look off on just the helmet. The helmet X the should be the only required exact cut…everything else should have some creative license but still some present all over nonetheless
-

Visor crack repair, going flat black?
RAIDER replied to Red43j's topic in Miscellaneous Tips and Tricks
So a Shadow Scout then…sorry thats what I meant lol. Yea mine is spray painted. It’s def do-able and much cheaper than finding someone to pro spray (which Ive done as well). -

Visor crack repair, going flat black?
RAIDER replied to Red43j's topic in Miscellaneous Tips and Tricks
Hey Red! First up…what type of kit are we talking about? Spray paint can work just fine. Can also out a clear coat on it to seal it a but more. Thatll be your cheapest approach unless you can find someone who will do a pro paint job kn the cheap -
Sounds good. Im back home tomorrow and sill try to finish that last piece painting so I can take pics this week.
-
@IcyTrooper I just checked n see there are 2 Bad Batchers n I see how they named em…but then we have Kreel already too. Lets just make it match whatever was done for Kreel instead lol. Task Force 99: Cav. Right?

