-
Posts
4,136 -
Joined
-
Last visited
-
Days Won
383
Content Type
Profiles
Forums
Events
Everything posted by IcyTrooper
-
Post up a few more pictures here, but I believe it looks approvable to me. Ultimately it will be up to your GML, so maybe also run it by them as well?
-
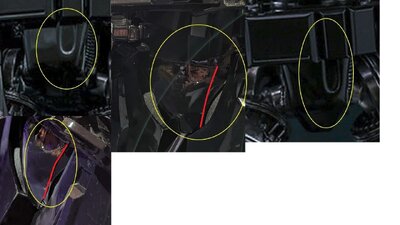
I think that text looks good, some of it derived from the Death Troopers as I've seen you've done. The only thing I'm a little reserved on is the strap in the middle connecting the cod piece to the posterior. I know we have that in the Death Trooper probably because we had a reference for it, so not sure if we want to have it on this one? I'd imagine it would be there to keep the codpiece from flaring out. I did the color scheme guide again in the text, which we should probably put in all of the text if we are making the guide. Looking at the middle and bottom picture in the reference circles you made, should we make a note about that "V" shaped piece looking like there are two levels to it (not L1 or L2), which looks different from the Death Trooper? The red lines make it look like there are two layers to it: Codpiece Gloss black in color unless noted below. May be painted in accordance with the Color Scheme Guide. If used, all armor pieces must be painted using the Color Scheme Guide. Codpiece may be slightly weathered but must be uniform with the rest of the costume. Extends under the belt at the top and may be attached to the lower edge of the abdomen. Has a general "V" shaped appearance with three equal distinctive tapered sections with the bottom of the "V" being a horizontal edge. The side edges are angled slightly back towards the body. The bottom edge has a small section angled back towards the body. Has a “U” shaped recess outline on the left of center as worn. A black elastic strap, approximately 1 - 1 1/4th inches (25mm to 32mm) wide, is to be used to connect the cod and butt plates between the legs.
-
It could be the lighting, but are you talking about the green, the gray, or both? The green looks a little on the light side, but the gray should match that of the snout, so that part depends on the helmet coloration.
-
Any update on this @Fivezero?
-
Welcome @Calisamp! Don't forget to request Spec Ops access here: https://forum.specops501st.com/forum/130-access-requests/
-
@RAIDER I meant to circle back on this awhile back. I agree, the reference images aren't showing the blue in the recessed vents/cut outs. I've adjusted the text accordingly for those specific parts. I adjusted the third level details with the purple text and removed it at the L2 level. I believe that having the blue glow on the thrusters works. @Threeve this looks like this will probably be good for the text. Jump Pack Solid black in color and styled after the comic reference. A loose interpretation is allowed, but reference accuracy is encouraged. There are four levels/sections to the backpack described below: Top level: A four-sided rectangular detail in the upper one-third of the second level near the wearer's helmet. The sides of the rectangle are longer on the outer edges. Second level: A six-sided coffin shaped detail in the upper two-thirds of the third level. The sides of this shape are longer on the outer edges. Third level: A ten-sided uniquely shaped detail, with two sides that that jut out just above the thruster sections. On each of those two sides there are two rectangular cut-outs that match the reference photos. These cut-outs must be backed with material that matches the color of the rest of the jump pack. Fourth level: There are two obtuse triangular-shaped sections on each side of the jump pack. From these triangular shapes there are two slanted sections where the thrusters are mounted. There are two circular thrusters mounted on each of the slanted sections on each side. The circular thrusters have straight or slightly curved pipes with a ringed section, approximately 1/4 inch (6.35mm), near the top. The inner section of the thrusters must be backed with material that is either painted or utilizes LEDs to give a bluish soft glow. OPTIONAL Level two certification (if applicable): Fourth Level: The inner section of the thrusters must be backed with material and utilizes LEDs to give a bluish soft glow.
-

First Order Jet Trooper CRL Discussion
IcyTrooper replied to IcyTrooper's topic in First Order Jet Trooper
Damn, that looks sharp! We have a few other CRLs that are getting finalized at the moment, but I'm going to see about reviewing what we did a few years ago on this one to get it pushed forward. -
@Chaos thanks for keeping it running. If you are ready (you have been....and I'll be) we can make a mad dash with these I checked out the Abdomen Armor and great write-up with this one! Abdomen Armor Gloss black in color except where noted below. May be painted in accordance with the Color Scheme Guide. If used, all armor pieces must be painted using the Color Scheme Guide. Abdomen section may be slightly weathered but must be uniform with the rest of the costume. Shall be centered under the chest. The outer upper corners are tapered and angled up and out from the center. There are two vertical details that are angled outward and have 18-20 raised horizontal ridges. They are positioned outside a raised center section. Details are painted metallic black, silver, or dark gray. There is a raised center section which has a raised circular ring. There is a half spherical recess in the upper right corner of the center section. There are two small elongated vertical rectangles along the top of the raised center section. The Abdomen Armor and Lower Back Armor side extensions, if any, may meet flush at the sides. Two pistons may be present. If present, the ends must have the appearance of being attached to the abdomen and extended to be hidden by the belt. Pistons shafts will be painted metallic black or silver.
-

Imperial Flametrooper (Jedi Fallen Order)
IcyTrooper replied to stevechewbacca's topic in Imperial Flametrooper (JFO)
Niceeeeeeeeeee! 😍 -

Del Meeko CRL Change proposals FEBRUARY 2025
IcyTrooper replied to Blackwatch's topic in Inferno Squad Del Meeko
I feel like the comm pad is fine in the current iteration of the text. -

First Order Jet Trooper CRL Discussion
IcyTrooper replied to IcyTrooper's topic in First Order Jet Trooper
I agree with the requirement of certain color tones for the L1 details, but I think a suggestion of colors will help to guide individuals in the right direction. Red is a notoriously hard color to achieve standardization, photograph and perception amongst individuals. If we have evidence on the on-set colors it is possible to drill down on L2 details. We'll probably need to run through each part of the text section by section again so that we don't miss anything. -

Strapping the Shadow Trooper (Sorry I had Scout on the brain LOL )
IcyTrooper replied to pm07's topic in Shadow Stormtrooper
On mine, it is all elastic and Velcro. The only place I have nylon and Velcro is the part that connects the chest and back plates and then there is an offshoot elastic piece with Velcro that connects to the shoulder armor, it looks like a T. -
Much better from what I can! @tipperaryred has some good info for painting in there.
-

Del Meeko CRL Change proposals FEBRUARY 2025
IcyTrooper replied to Blackwatch's topic in Inferno Squad Del Meeko
Just jumping in to say, thanks for the suggestion and we'll note that overbelt one, but we are systematically tackling the items line by line in order of the CRL. It helps keep from hopping all over the place and making it realllllly busy. -
Did we confirm it is the Merr Sonn Power 5? Is it on an IOC CRL presently that you could link? We are going to be adding the Version 3 helmet option soon. @Dropkick will need to model it, I think we may have gotten the pics but we have to check them out again. I know that we have the text for it prepped. There is a Legion web team CRL backend system transition going on at the moment, so updates to CRLs are sort of in stasis at the moment until that is finalized.
-
I think that sounds good for the Hand & Finger Armor text: Hand & Finger Armor Hand armor and fingers are gloss black except where annotated. May be separate from or attached to the gloves. The hand & finger armor may be slightly weathered but must be uniform with the rest of the costume. The hand armor consists of two distinct pieces; a base piece and hand plate. The base piece which sits over the back of the hand is slightly curved across the back of the hand. May have an outside (pinky) edge which is angled down and wrapped around to the palm. May have an inside (thumb) edge which is shorter beginning just aft of the thumb joint and wrapped to the palm. The handplate is flat and elongated with eight sides. There is a square notch in the fingers end of the hand plate. There are six raised elongated rectangles along the outside edge. There is a raised pentagon on the back edge near the wrist. Raised details are painted metallic black, matte black, or dark gray. Fingers are armored in 2-3 rigid pieces per finger, proportionate in size to the fingers, with the fingertips ending in contoured trapezoids. There may be small circles on the fingertip pads. The joints between the pieces are segmented to allow movement and have a circle detail resembling a mechanical joint. Mechanical pieces may be present giving the appearance of the finger pieces being attached to the hand base piece. The palms may have flat armor plates attached to the glove’s palm.
-

Andor S2 Trailer ISB fast response??
IcyTrooper replied to TreeHuggerMatt's topic in Imperial Security Bureau
It is WAY too early to tell on this one. -
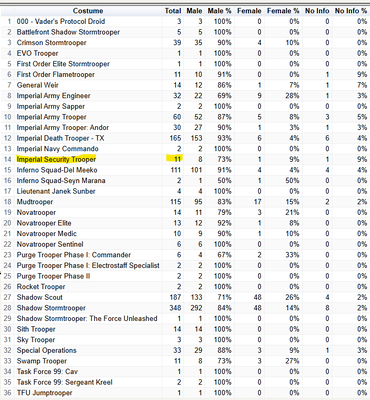
If you check under the Holocron on the 501st website after you log in and click COSTUMES / TOTALS and then Special Operations - TX you'll find this nifty little list: Looks like there are currently 11 total (as of 02/25/2025)
-

First Order Jet Trooper CRL Discussion
IcyTrooper replied to IcyTrooper's topic in First Order Jet Trooper
Glad to see someone is working on it again! We can hopefully get it across the finish line. The CRL text here isn't finalized, so we did the best of what we could on a quick port over, but if the sources show what you are showing (plus the image you linked on another reply), we can still make adjustments and refine it. -
Excellent! We'll be here when you get it rolling
-
In my experience with the straps, they either come as you have as straight straps or they come with the wedge connectors already molded into them. The ones with them molded on allow you to attach them via Velcro or magnets. For yours, I'd probably just trim them down since they are feeding into the back armor and that'd fix the floating issue you have.
-
Have you tried putting a tinting film on the backside of it? That can usually darken it for you.


