IcyTrooper
-
Posts
4,136 -
Joined
-
Last visited
-
Days Won
383
Content Type
Profiles
Forums
Events
Everything posted by IcyTrooper
-
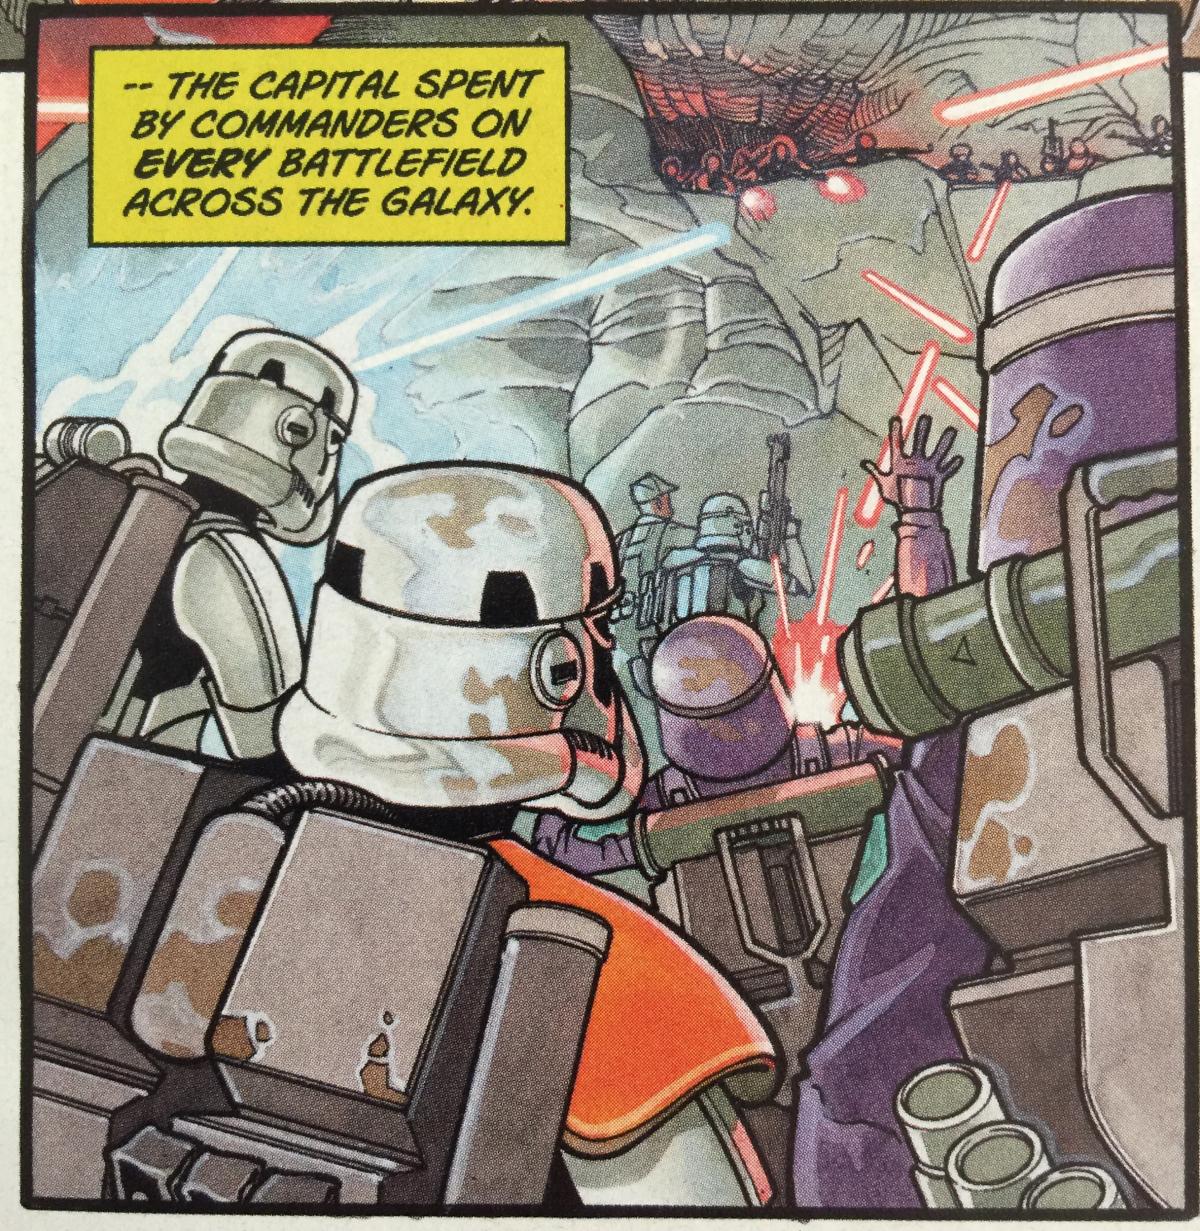
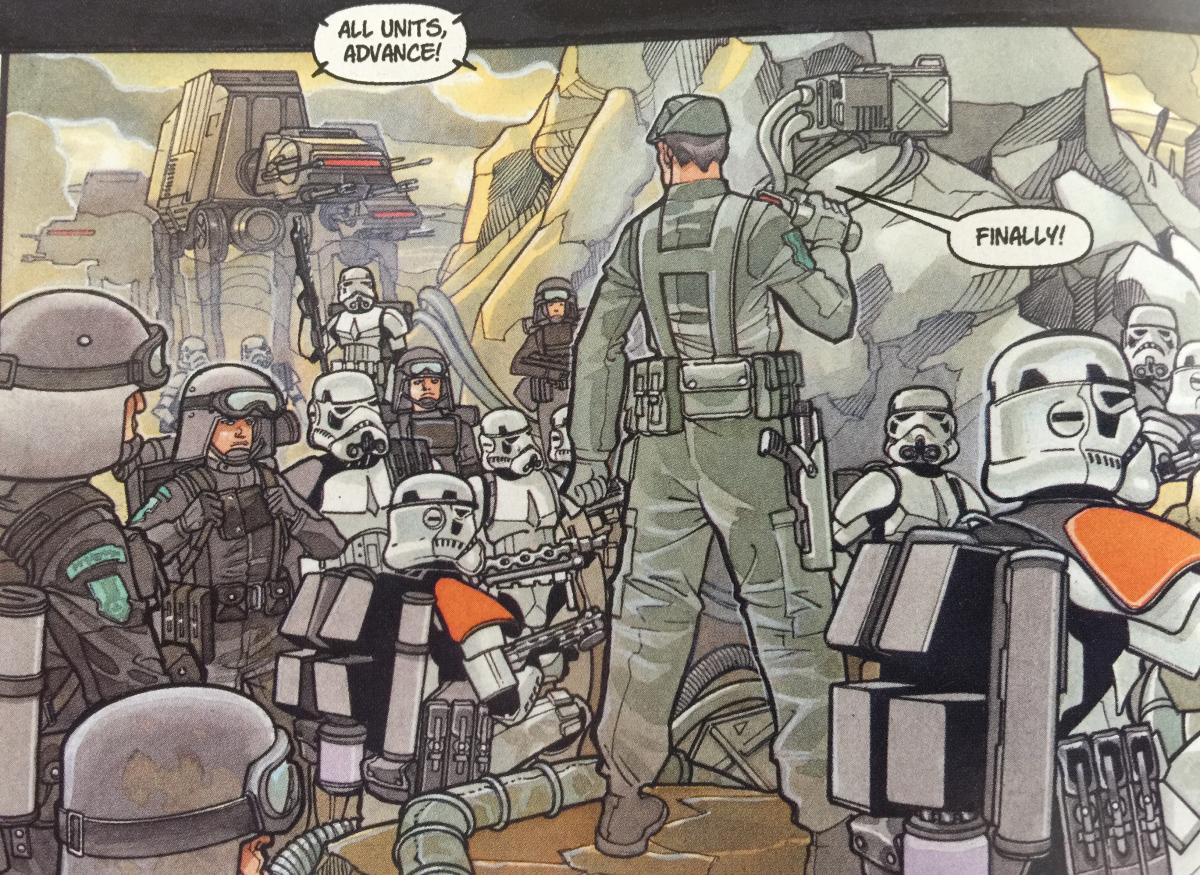
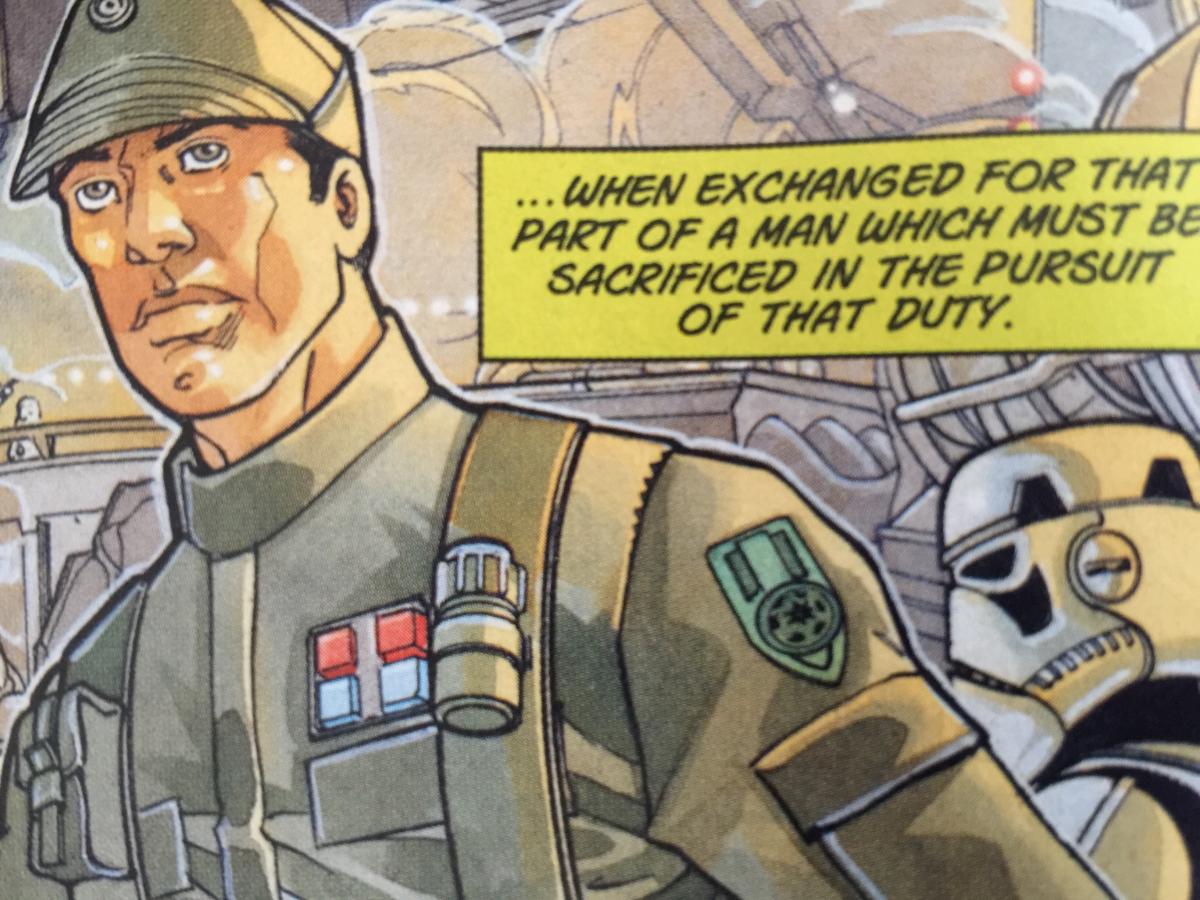
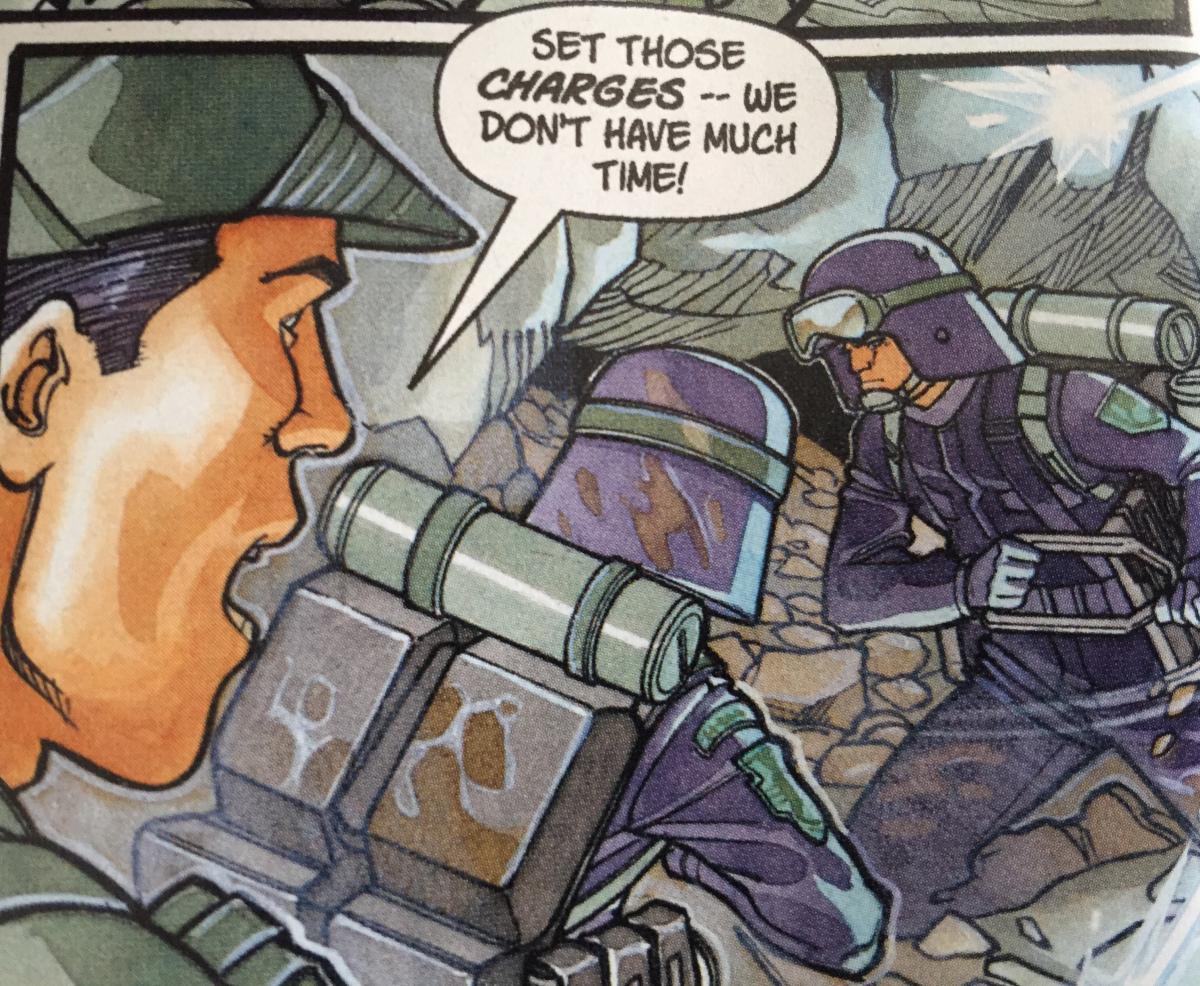
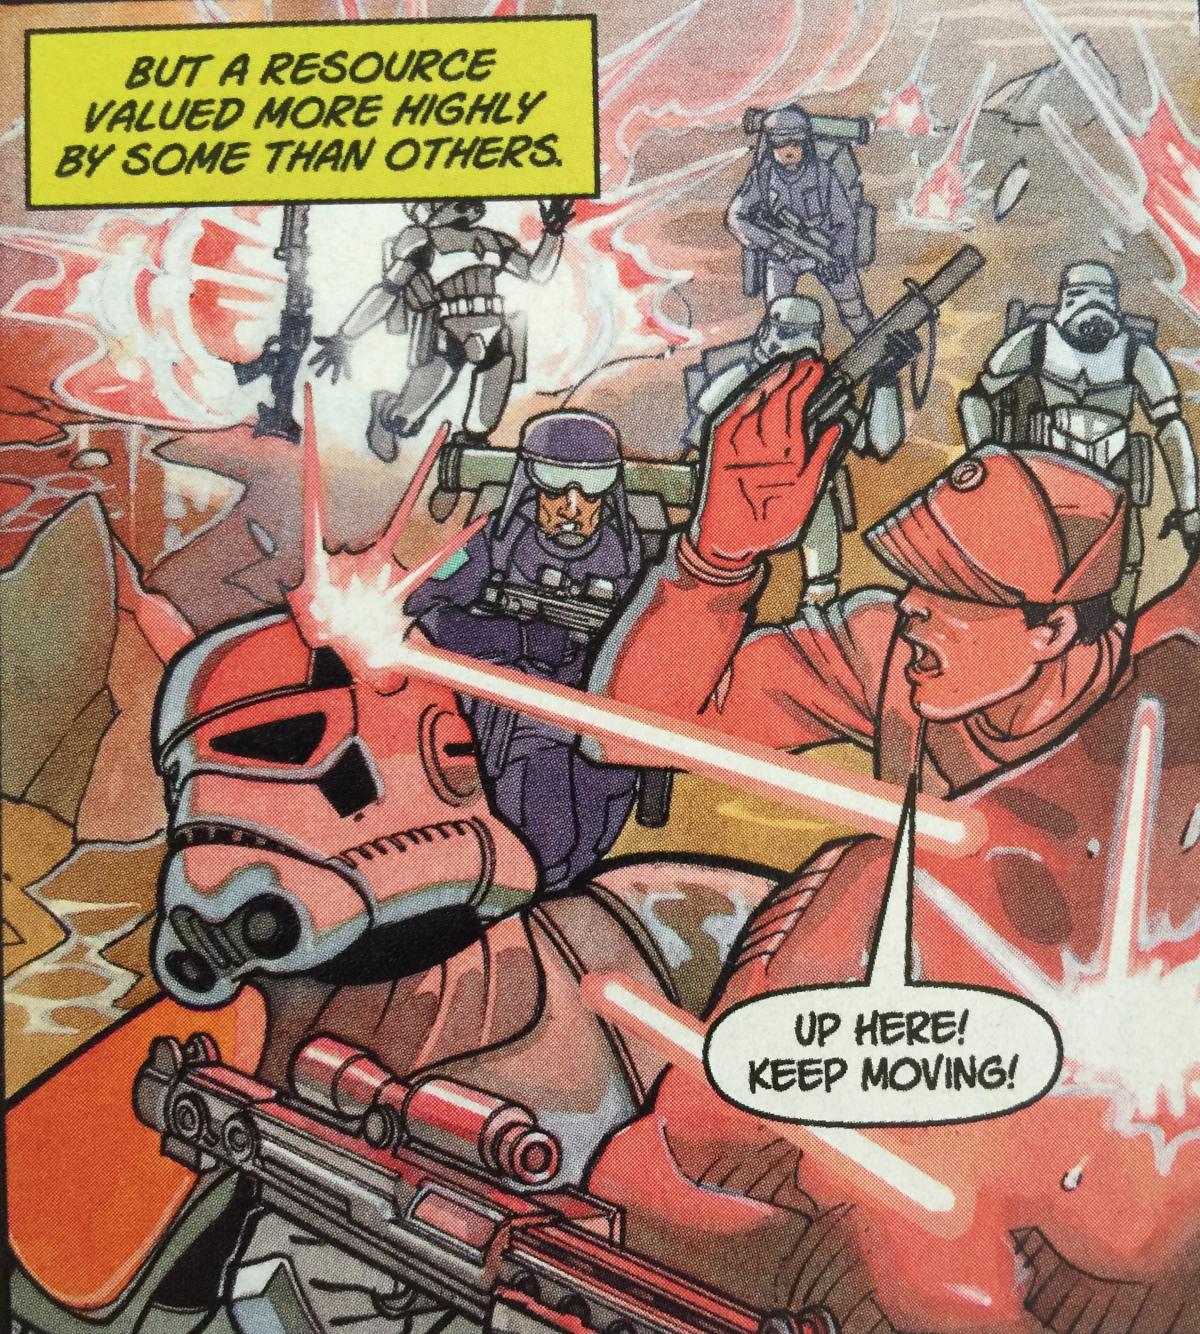
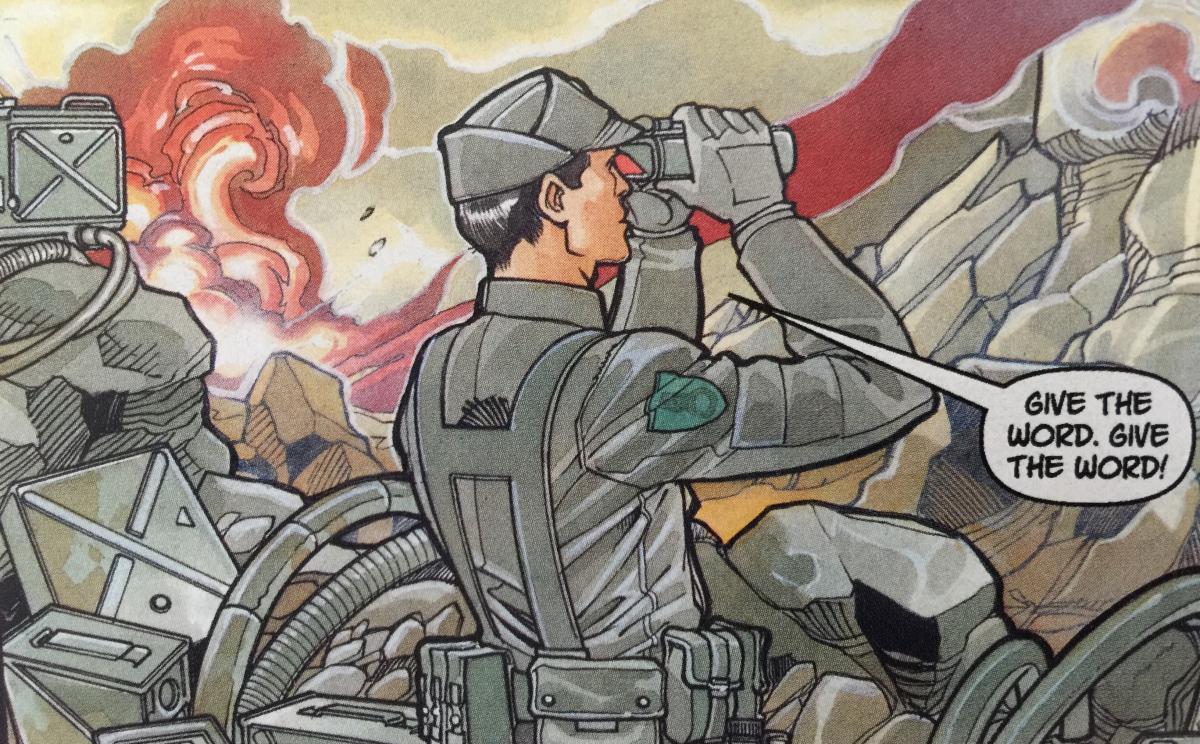
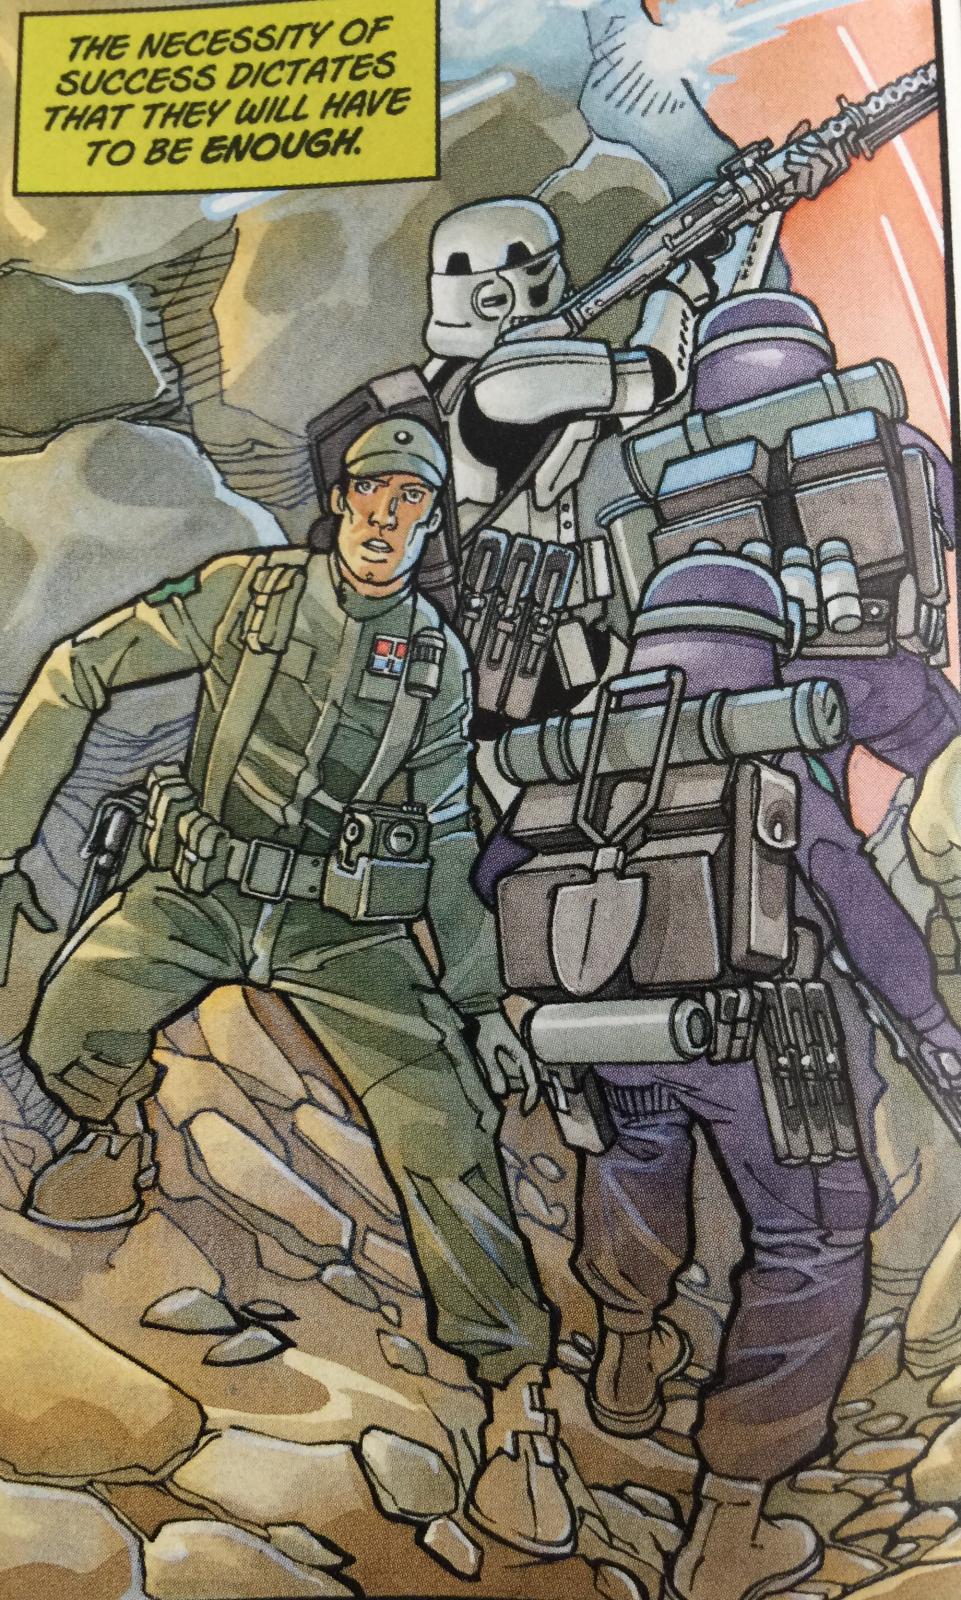
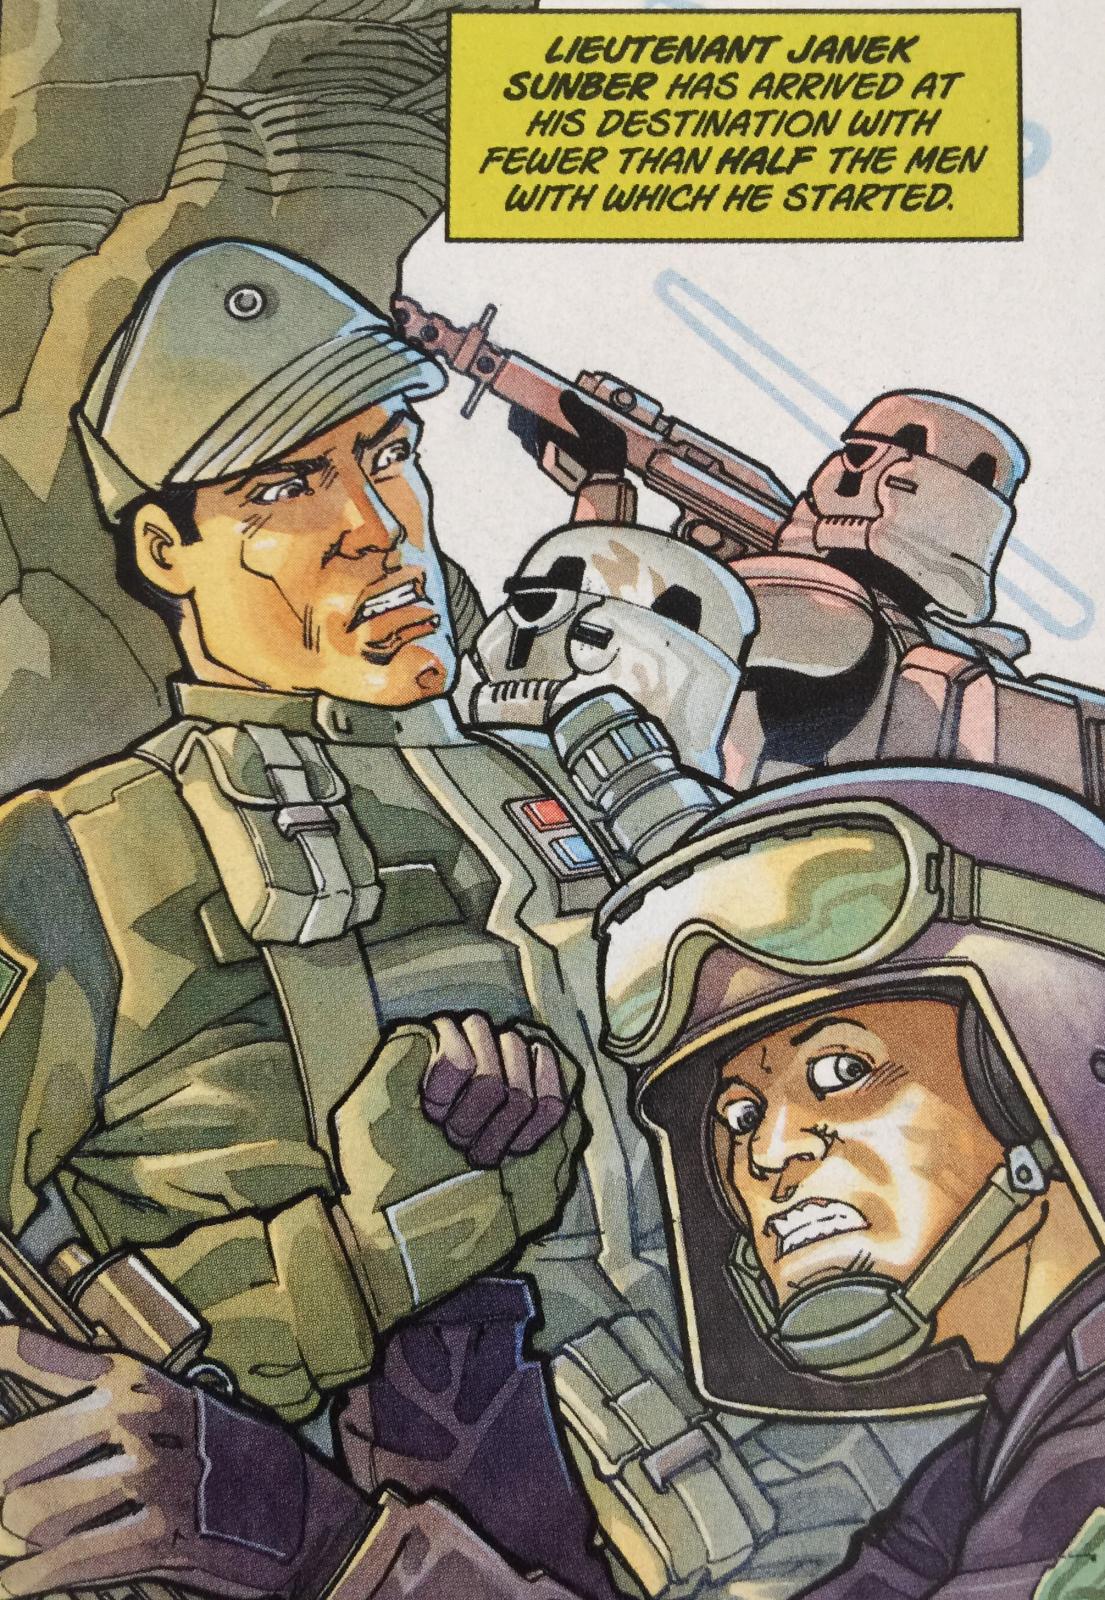
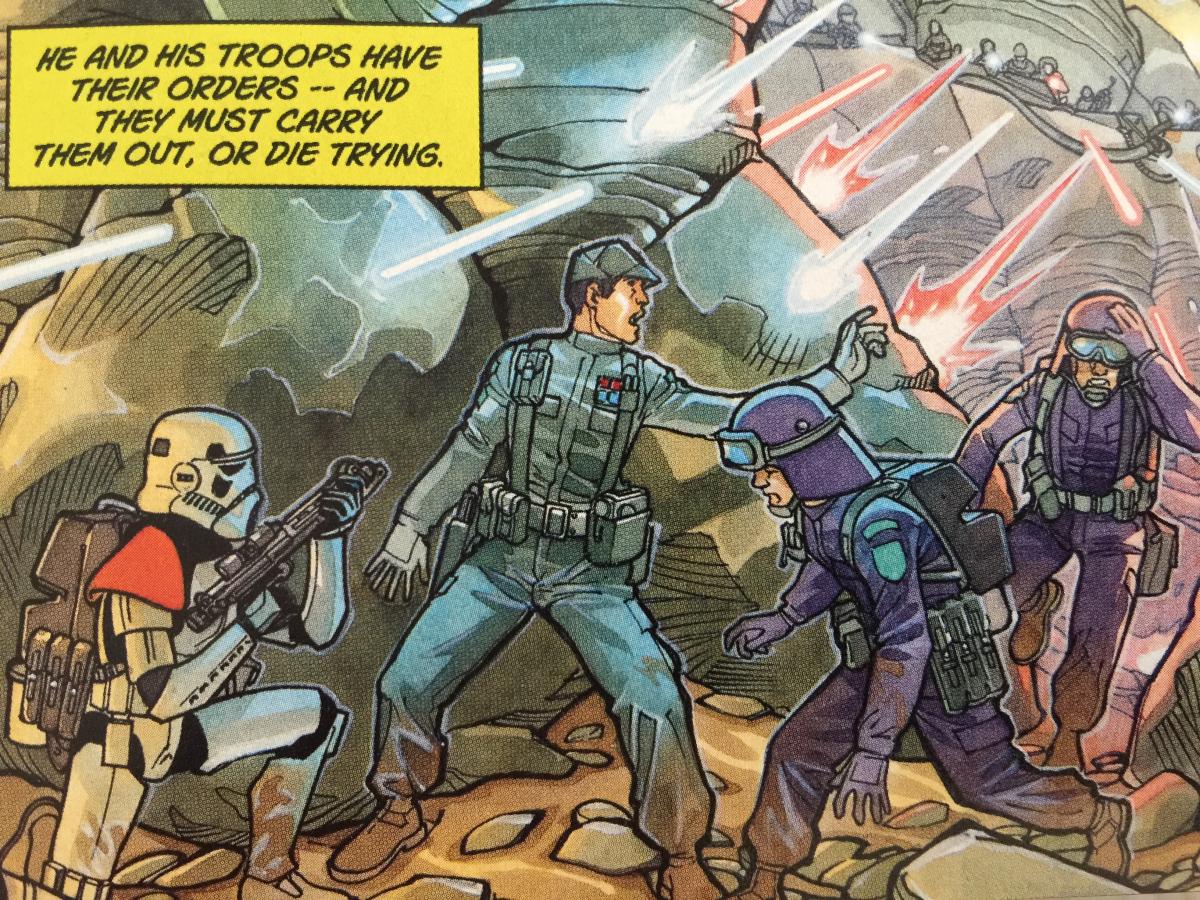
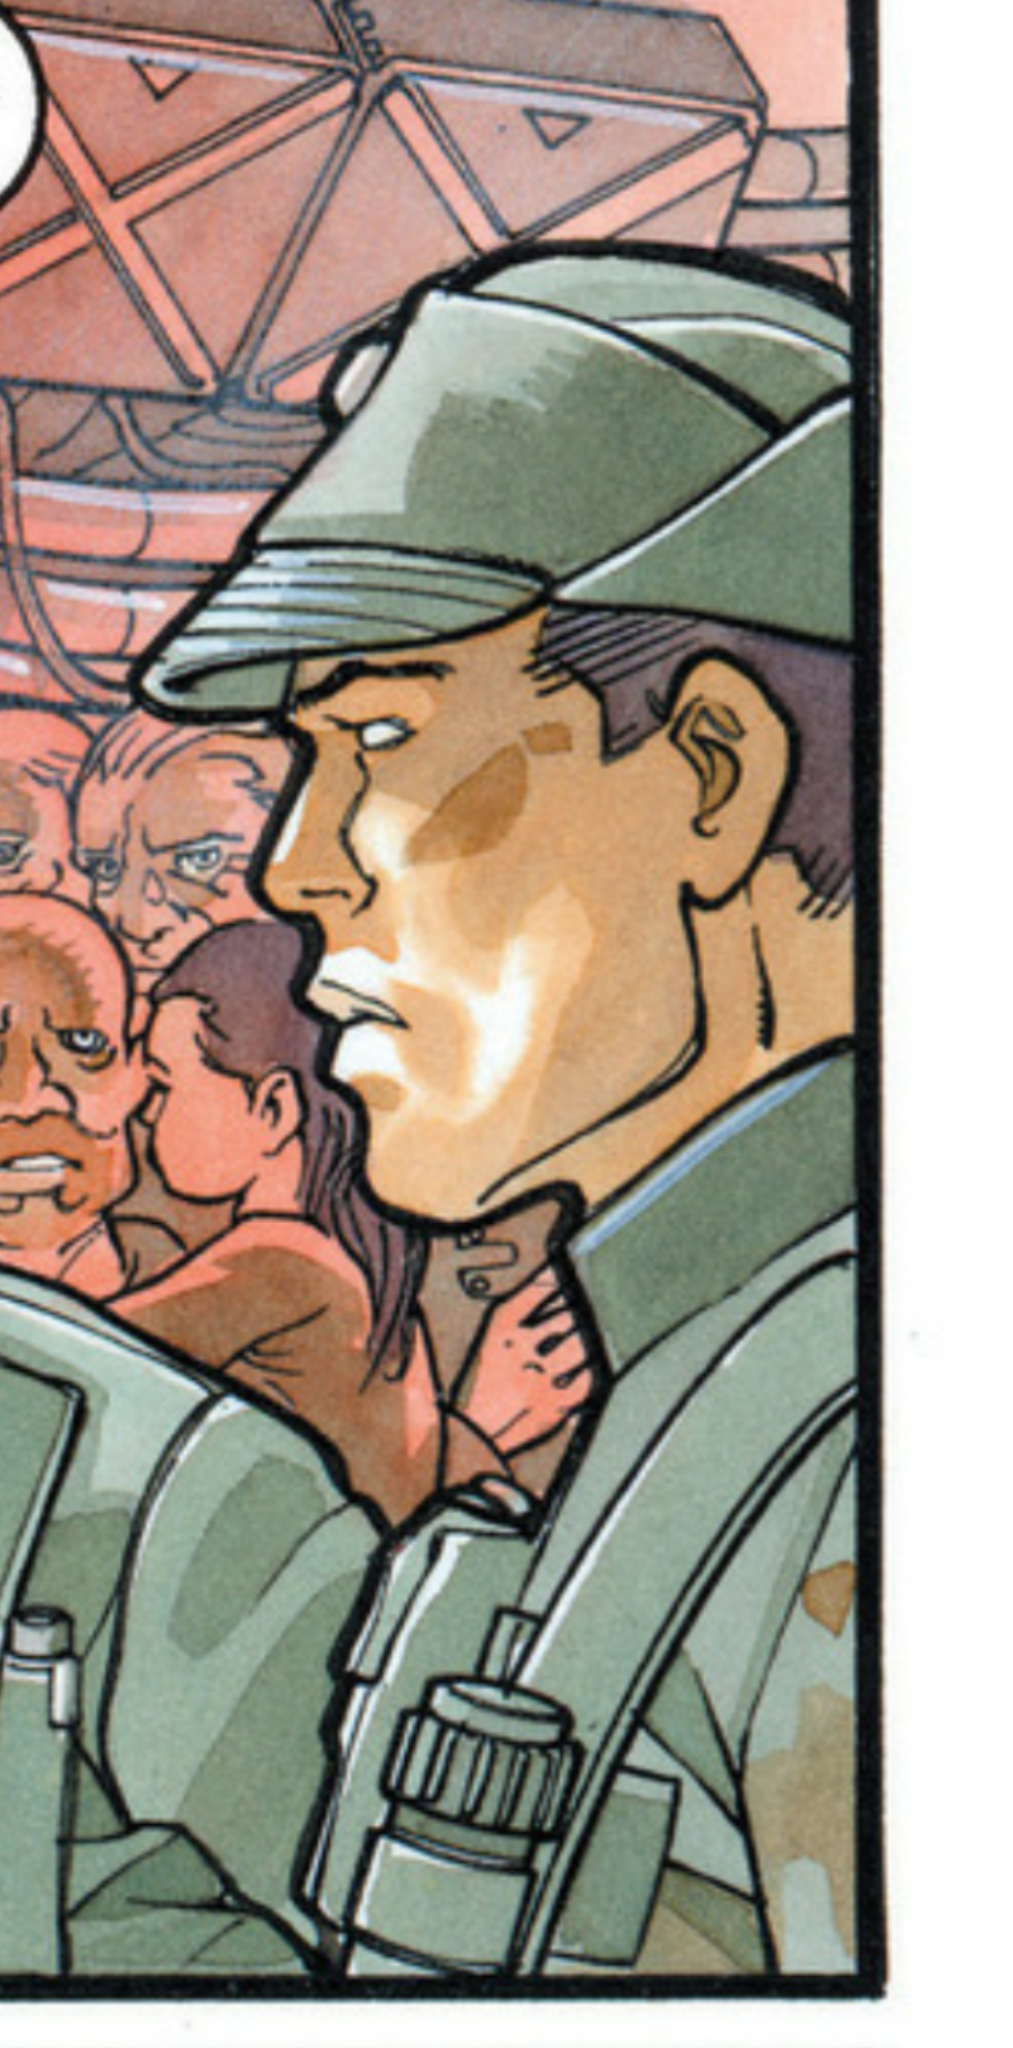
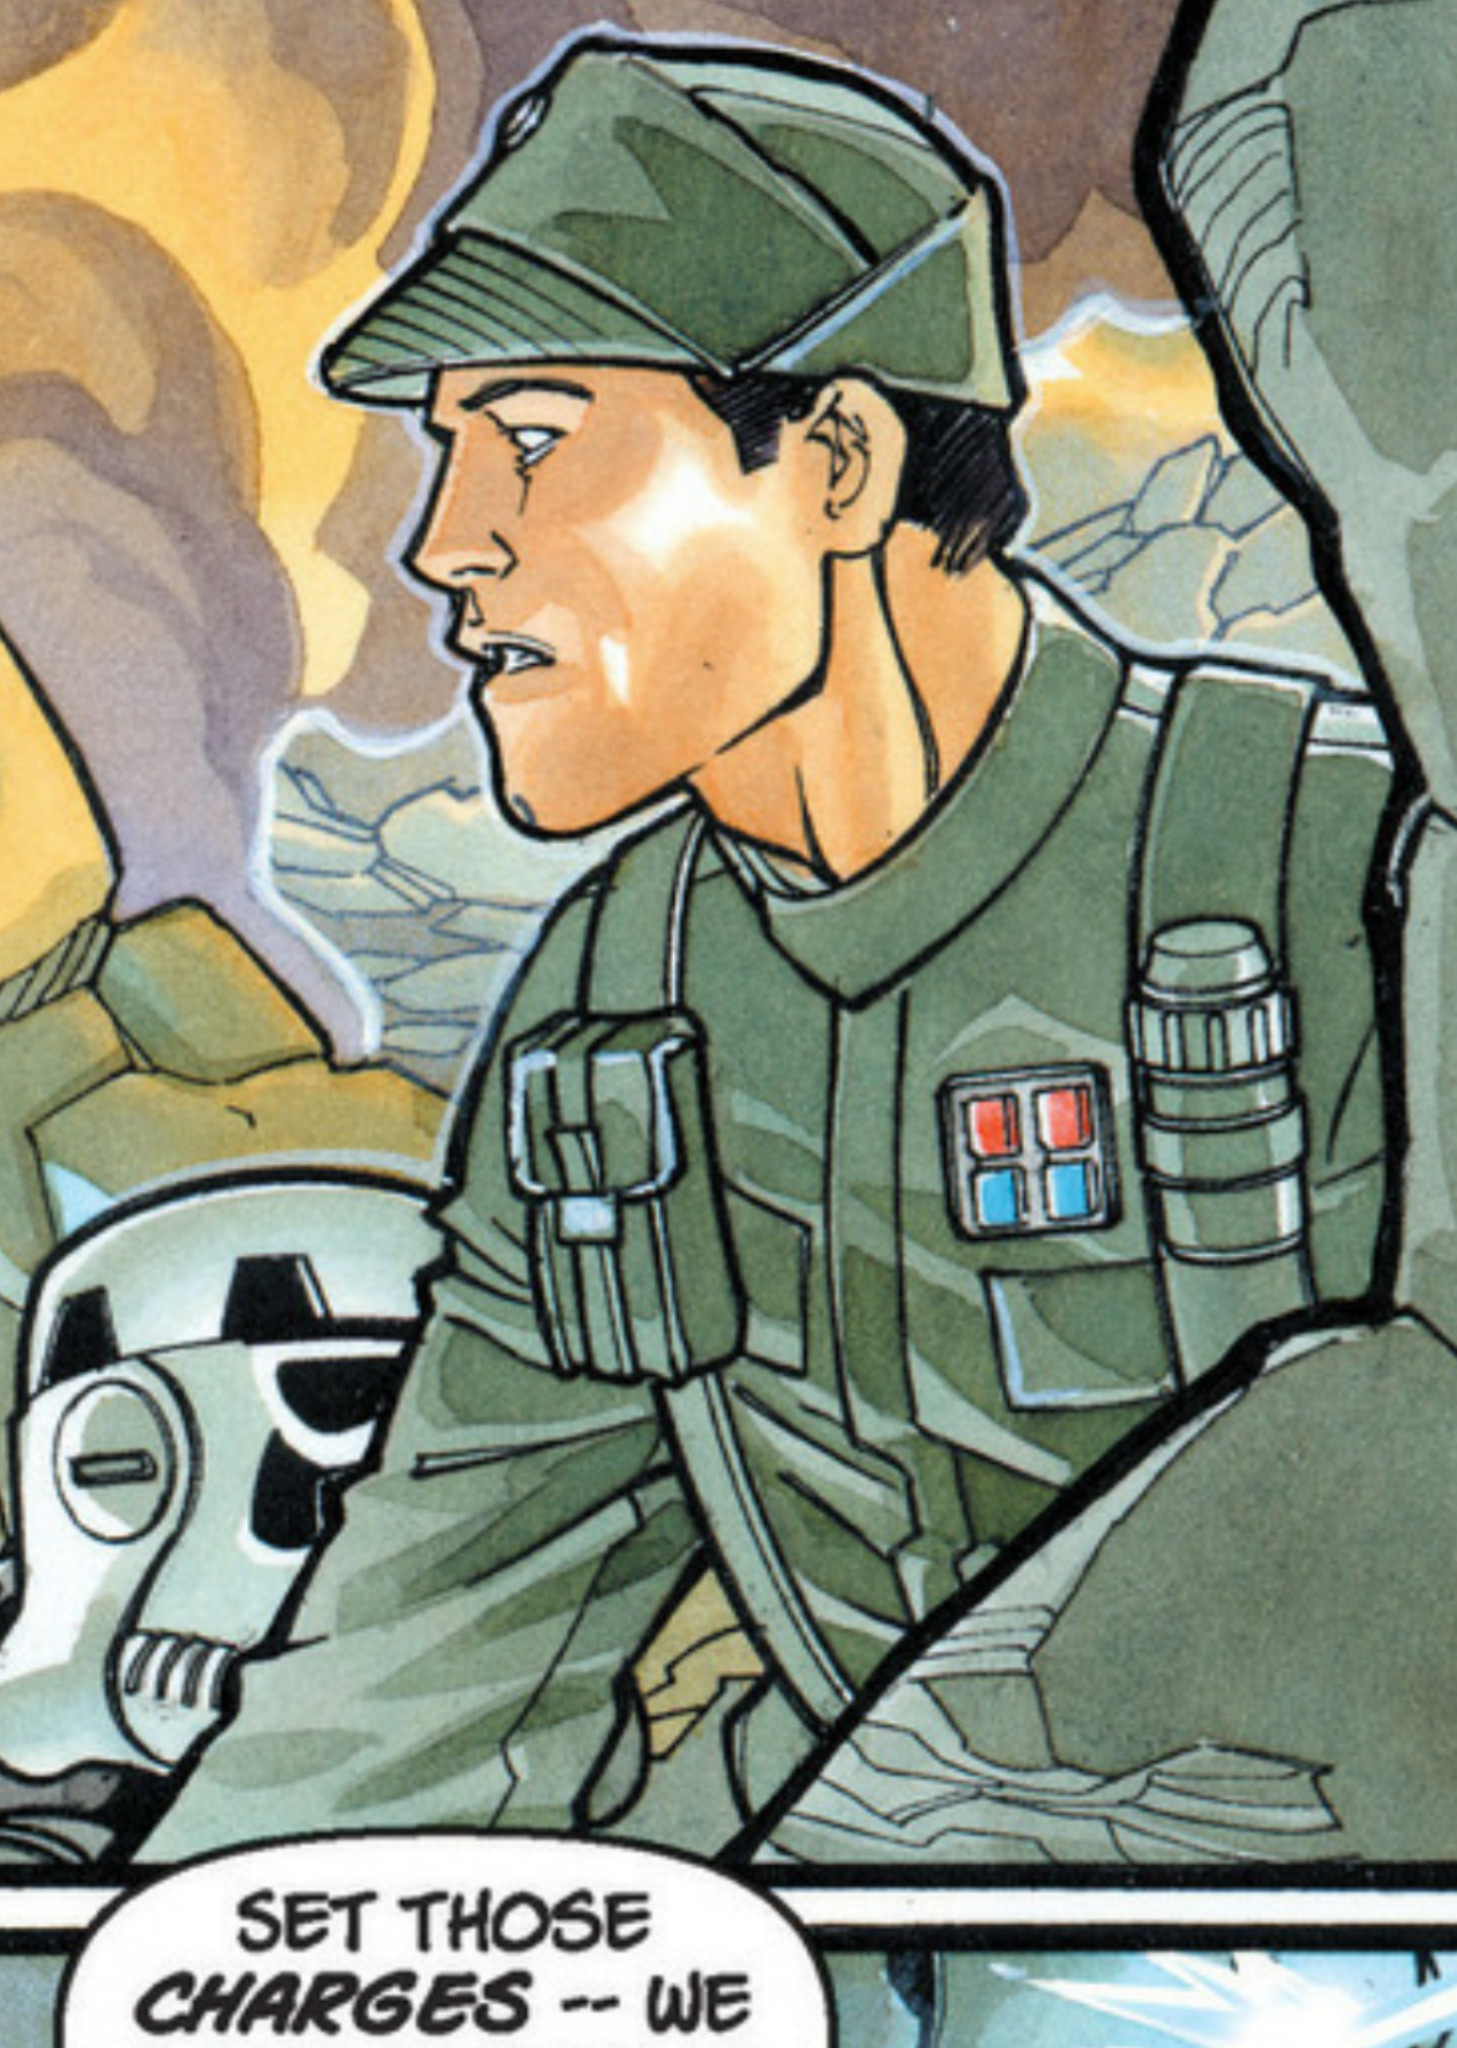
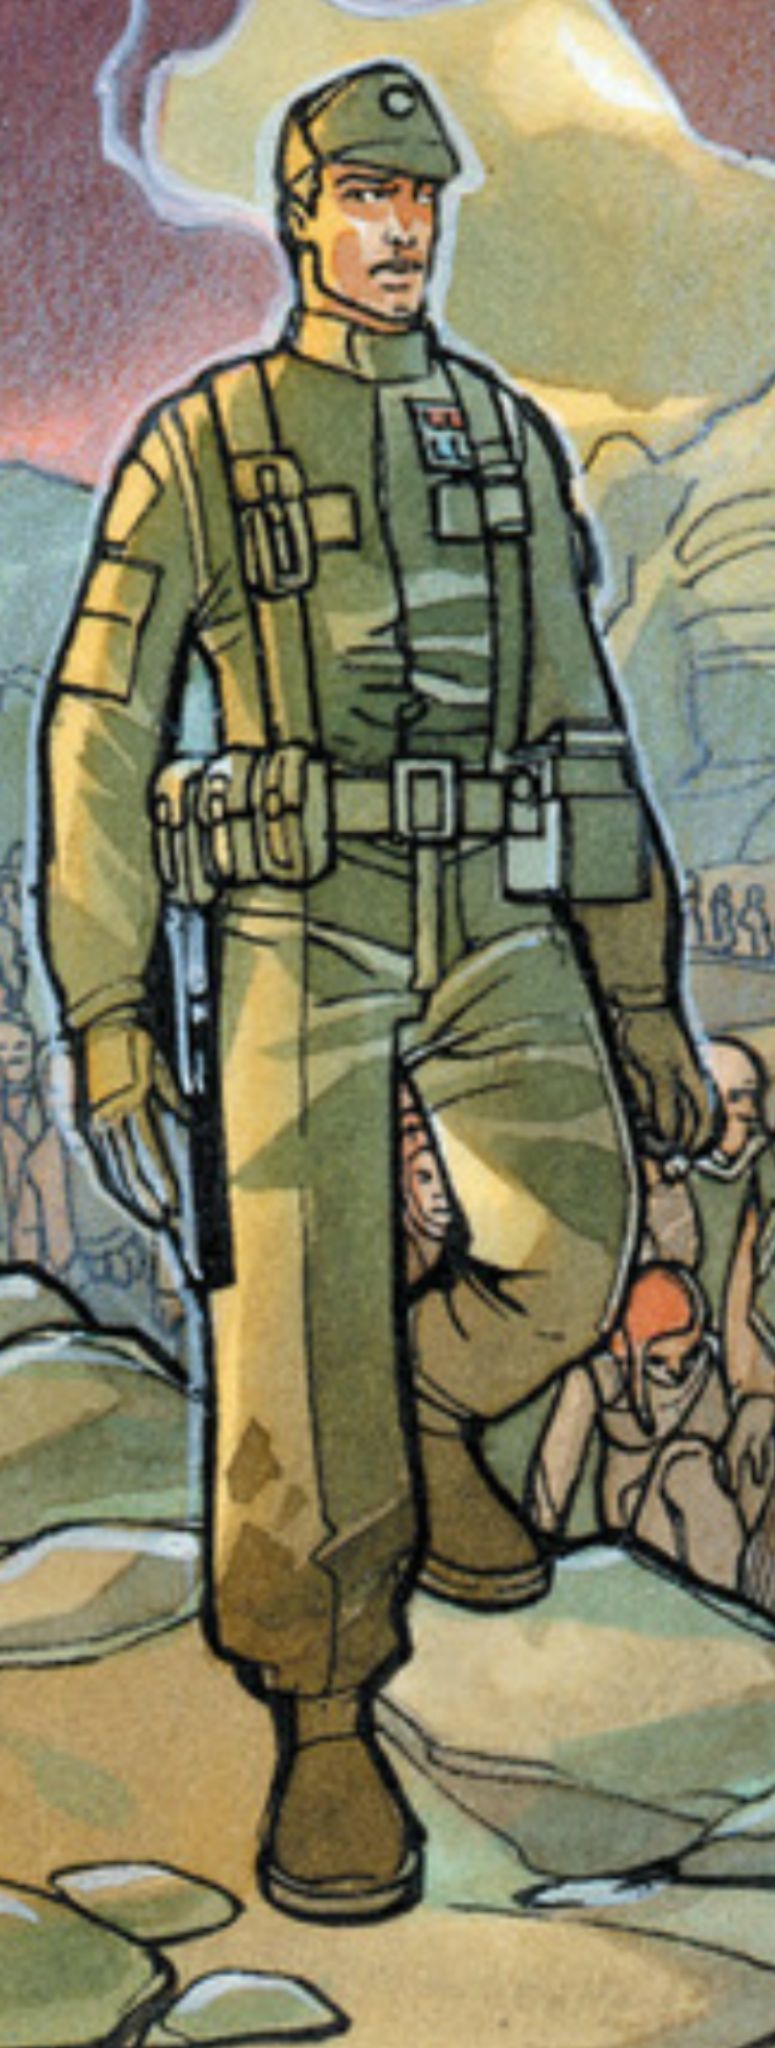
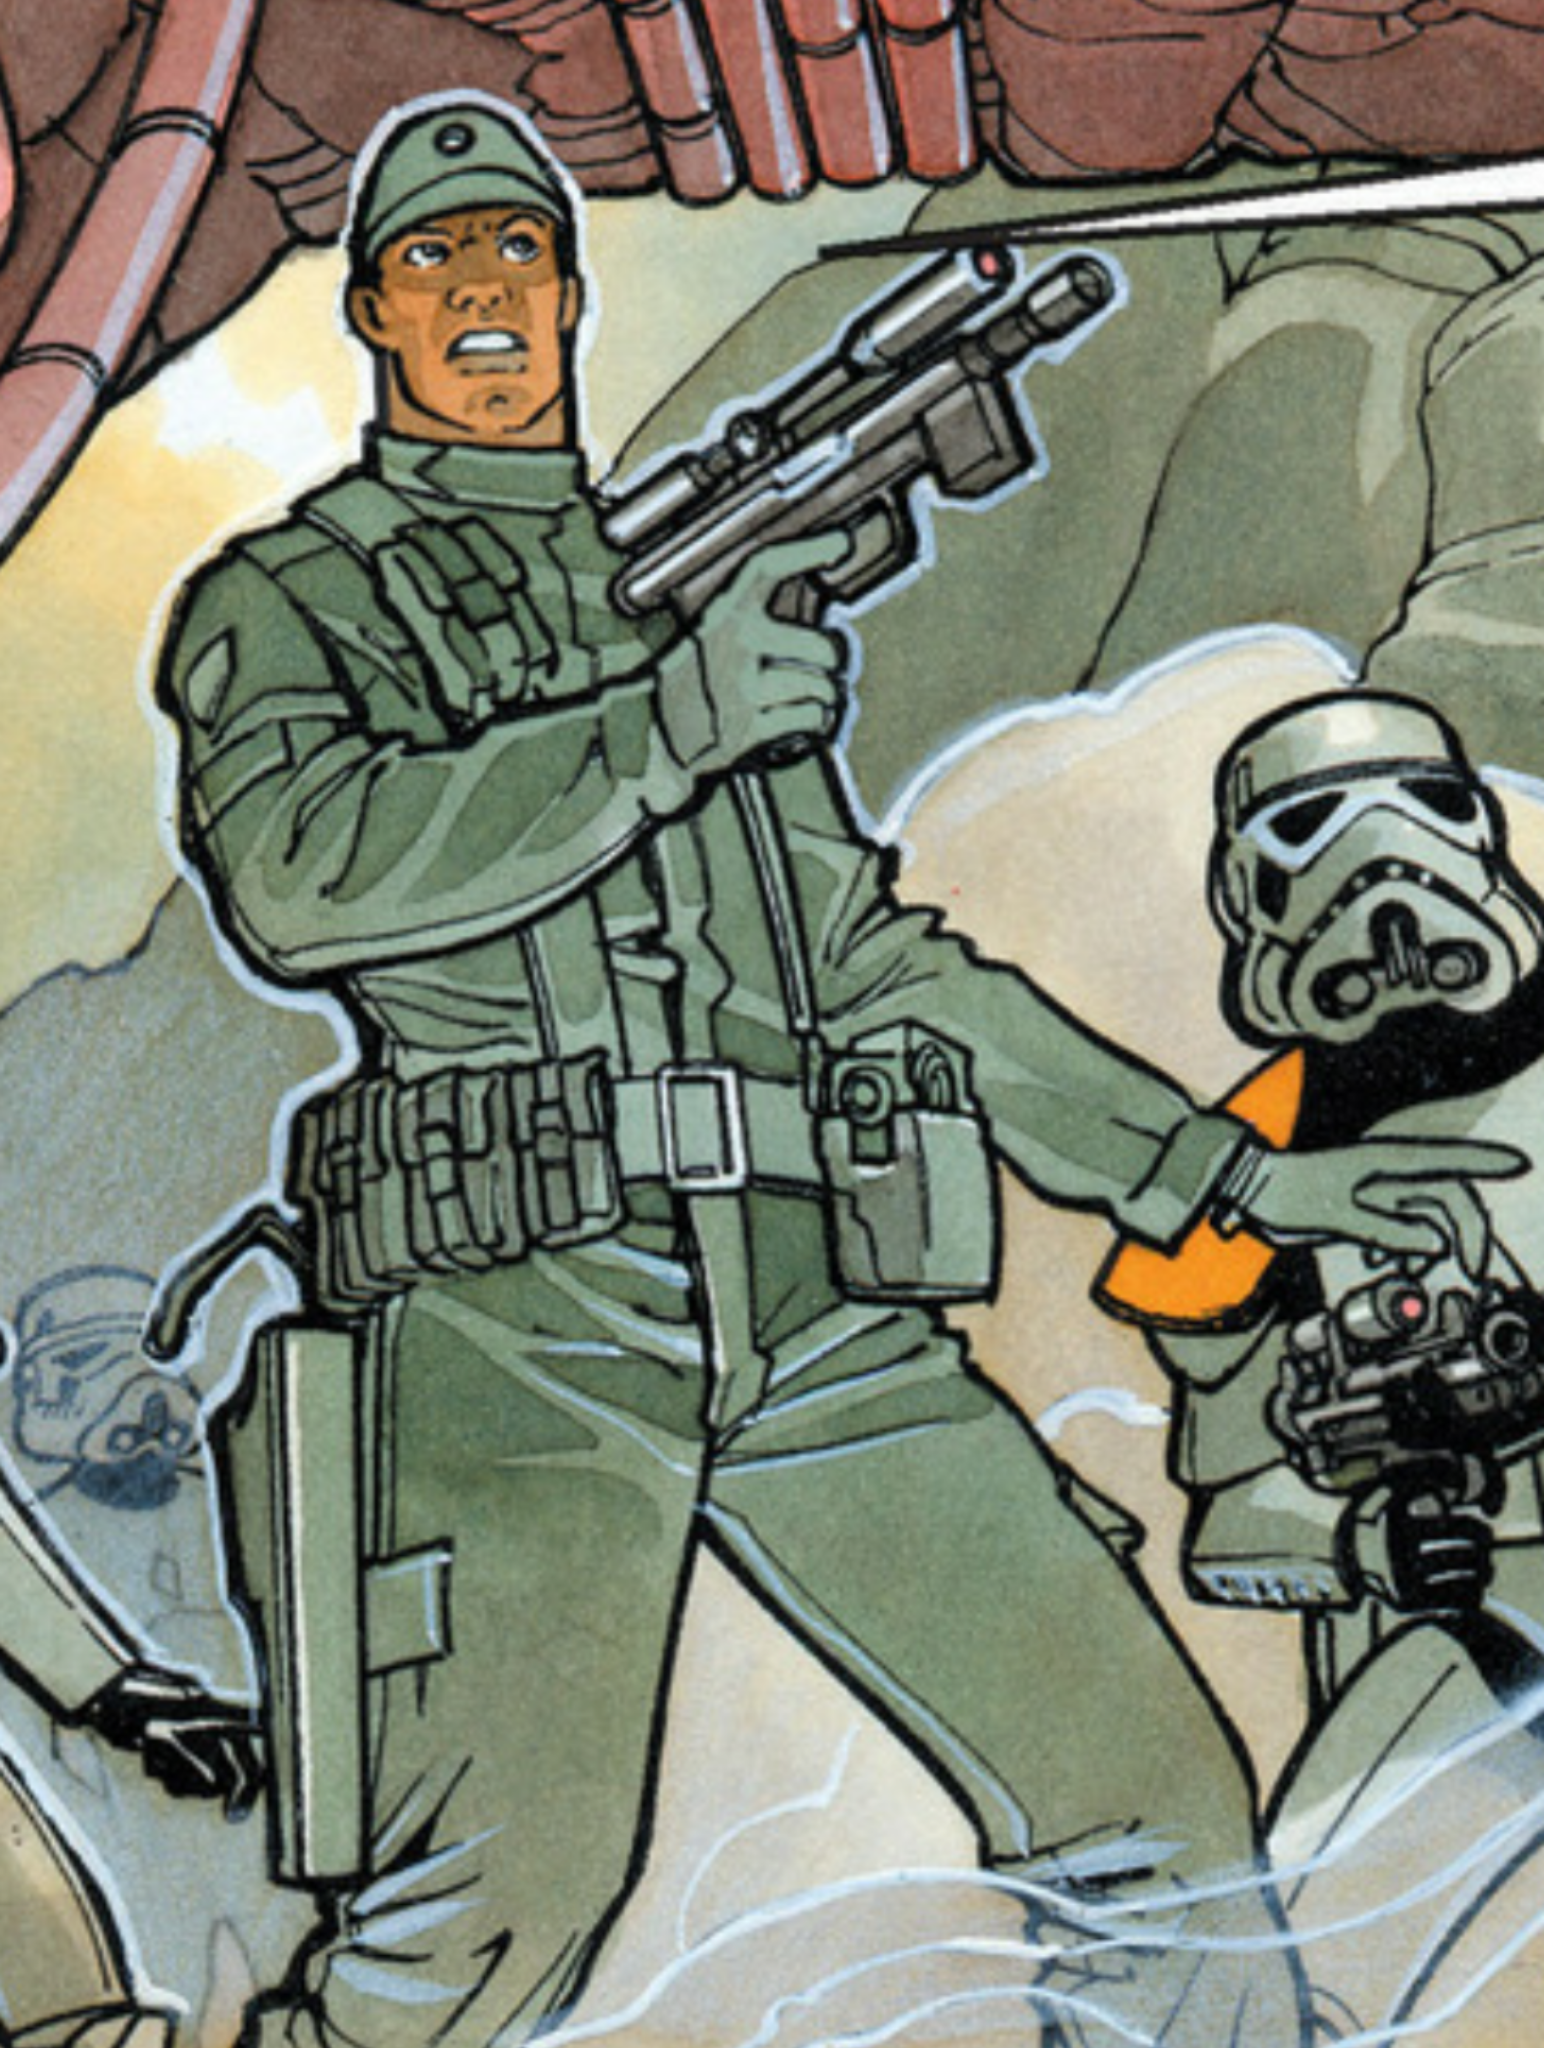
 This will be the main listing and we'll tackle each part piece by piece (green is done, yellow is WIP, and red is not finalized): Hat, Olive Facial Appearance / Hair Style Green Imperial Flight Suit Imperial Army Patch Imperial Rank Bar Olive Gloves Web Harness Comlink Belt Belt Pouches Boots Macrobinoculars (Optional) Holster (Optional) SE-14R Blaster Pistol (Optional) NOTE: Linked below is the original thread where the discussions were being had on the costume started on 02/26/2018. The new discussions will take place in this thread and draw reference from that thread to clean it up: ------------FINALIZED TEXT GOES BELOW THIS LINE------------ Description: Lieutenant Janek Sunber Prefix: TX Detachment: Spec Ops Detachment Context: Star Wars: Empire by Dark Horse Comics / Expanded Universe / Legends Janek Sunber is a lieutenant in the Imperial Army. After spending his youth in Tatooine, Lt. Sunber joined the Academy of Carida in 1 BBY where he was recognized for his performance and transferred to officer training. Sunber is a dedicated and hardworking officer, and was most recognized for his actions at the Battles of Maribun. Special Notes: Soft parts may be slightly weathered with scuffs/dirt. Blasters are not required for legion membership per our weapons policy. -------------------------------------------- Hat, Olive Fabric is a medium weight suiting material of olive green. Base of the hat is conical, with a crown about 4" (107mm) tall. Front and rear “flaps” overlap on the sides and are about 4" (107mm) high. Front bill extends 3" (76mm) down, decorated with (5) (6) or (7) concentric stitches. An Imperial Code Disk is positioned in the center of the front vertical “flap”. Facial Appearance / Hair Style Hair is close-cropped. Basic approval does not require matching facial hair. OPTIONAL Level two certification (if applicable): Hair color is black. Costumer is clean shaven. Green Imperial Flight Suit One-piece olive green coverall / jumpsuit / flight suit with a front invisible zipper and mandarin collar with one of the following: The mandarin collar has no visible method of how it closes, or A single snap near the closing point and olive green in color. Each shoulder has a patch as noted below. Below the patch on each arm there is a small pocket with the rectangular flap closure that is roughly 1.25" (32mm) tall and ends just above the elbow. 2 large chest pockets. The 2 chest pockets feature flap closures made of matching fabric, as wide as the pocket, and roughly 1.25" (32mm) tall. 2 large cargo pockets sit on the outside of each leg from around mid-thigh and not extending past the bottom of the knee, with a rectangular flap covering the top. There are no leg pockets below the knees. Pockets may feature gussets. OPTIONAL Level two certification (if applicable): Mandarin collar is closed by a chevron shaped strap across the neck. The mandarin collar has no visible method of how it closes. Imperial Army Patch A shield shaped patch. The patch has an Imperial cog symbol approximately 2.75" to 3" (70-76mm) in diameter. The background of the patch has a more narrow shield shaped design on top of a box colored a darker shade of green. Imperial Rank Bar Rank consists of colored plastic tiles mounted on a metallic finish square. Rank bar corners are hard angled or slightly rounded. The rank of Lieutenant (2 red tiles on top of 2 blue tiles) is the only acceptable rank. OPTIONAL Level two certification (if applicable): Rank bar corners are slightly rounded, not hard angled. Rank tiles are affixed to a singular rank bar with no line in between the 2 red tiles on top and 2 blue tiles on the bottom. Two rank bars are not permitted. Olive Gloves Olive drab, wrist length gloves constructed of leather, Kevlar or similar material. Enclosed fingers. No buckles, etc. May have square padding on the back of the hand. OPTIONAL Level two certification (if applicable): Square padding is present on back of hand. Web Harness Olive green colored, double strap "H" harness which travels from the lower back, and up over the shoulders. The harness system attaches to the belt. Harness is made of 2" (50mm) olive green nylon webbing. Visible snap-hook style fasteners that attach to belt eyelets are acceptable. Tri-glides may be present on front or back of suspenders. Back of suspenders may be permanently fastened to belt, but not required. Left suspender has a comlink clip/holster with a comlink contained within. The comlink clip/holster is positioned parallel to the rank bar and is form fitting to the comlink. The comlink must meet the details contained within this CRL in its own section. Right suspender has a rectangular pouch attached with the bottom of the pouch positioned with the right chest pouch flap closure. The pouch is olive green in color and should be made of nylon or similar material, with a top flap, and strap from top to bottom securing it shut. OPTIONAL Level two certification (if applicable): Harness fasteners are not seen, and may be hidden behind the belt. Harness is fitted to the wearer and no tri-glides are present. Comlink Styled after the comlink as seen in the Star Wars: Empire (Dark Horse Comics). An interpretation of the comlink is allowed, but comic accuracy is encouraged. The comlink is painted a matching olive green color and has the following details: A raised band around its upper section featuring equally-spaced raised vertical bars with recessed areas between each vertical bar. Underneath the upper section there is a recessed groove before the main body of the comlink. The bottom of the comlink is beveled to a flat bottom. Belt Belt is a nylon military style quick release web belt or a cotton double prong buckle web belt. Belt is olive green in color. Belt buckles may be the following colors: Quick release style may be black or olive green. Double prong style may be olive green or silver. Belt may feature eyelets along both sides of its length, but these are not required for approval. OPTIONAL Level two certification (if applicable): Belt is a nylon or cotton double prong buckle web belt and not the quick release style. Double prong buckle may be olive green or silver. Belt Pouches Belt pouches are olive green in color and should be made of nylon or similar material. 2 rectangular MOLLE style pouches with a top flap, and strap from top to bottom securing it shut, sit to the right of the belt buckle where the harness meets the belt. A large pouch sits on the right of the above pouches. The pouch may be a utility pouch, gas mask pouch, SAW pouch, or other MOLLE style pouch of similar size. A tactical triple AK magazine PALS belt or MOLLE style pouch should be on the rear of the belt. A macrobinoculars pouch sits on the left of the belt buckle where the harness meets the belt. 2 rectangular MOLLE style pouches with a top flap, and strap from top to bottom securing it shut, sit to the left of the macrobinoculars pouch. OPTIONAL Level Two certification (if applicable): The large pouch will make use of a visible double snap closure or appear to have such. Macrobinoculars are present. Boots Below the calf black or green leather or leather-like material. Free of laces, decorative stitching, buckles on the instep or any other embellishments. Zippers on the inside of the boot are acceptable, so long as they are concealed. If the zipper is not covered by vinyl/leather, it is painted black. OPTIONAL Level Two certification (if applicable): Olive green 8” to 9” (20-23cm) high boots. Pants legs shall be tucked into boots and fluffed to give appearance of original source art. Weathering of the boots is encouraged. Macrobinoculars (Optional) Scratch built or high end prop replica that is similar to the reference images. Must be painted olive green in color. OPTIONAL Level Two certification (if applicable): The view lenses are tinted red on the end that is held up to the eyes. Holster (Optional) Retention style open back holster made to fit the SE-14R Blaster Pistol. A strap goes across the top to hold the blaster in place. Holster is made of Nylon, leather or similar material. Black or olive green in color. Holster is worn on the right side so it hangs below all belt pouches. OPTIONAL Level Two certification (if applicable): Holster is olive green in color. SE-14R Blaster Pistol (Optional) High-End Replica. As seen in various promotional material & merchandise.
 -
New CRL Proposal - Lieutenant Janek Sunber (SW:E)
IcyTrooper replied to Tarrif's topic in Lieutenant Janek Sunber
We will create a fresh progress thread to tackle each item piece by piece and link to this thread.- 119 replies
-
- 1
-

-
- Visual References
- CRL Proposal
- (and 1 more)
-
New CRL Proposal - Lieutenant Janek Sunber (SW:E)
IcyTrooper replied to Tarrif's topic in Lieutenant Janek Sunber
You want me to create a new thread and take the thing to that?- 119 replies
-
- 1
-
-
- Visual References
- CRL Proposal
- (and 1 more)
-
New CRL Proposal - Lieutenant Janek Sunber (SW:E)
IcyTrooper replied to Tarrif's topic in Lieutenant Janek Sunber
I can set it up for you! Then you can edit it as you please.- 119 replies
-
- 1
-
-
- Visual References
- CRL Proposal
- (and 1 more)
-
I agree with that, they definitely cannot be black. Have to have at least some shade semblance to the armor color or a touch darker than that. That is what I have pulled from the actual game. I can try and get even more pics of the boots and boot armor if we need them since I have the game on my PC.
-
New CRL Proposal - Lieutenant Janek Sunber (SW:E)
IcyTrooper replied to Tarrif's topic in Lieutenant Janek Sunber
I think the most logical step we could have with this is to create another master post within this thread, similar to what I did with the Phase 0 Dark Trooper, and go through each costume piece by piece and finalize the text as we go. I can get the post added to this one to get us started if you'd like? This discussion has been going awhile and we may not able to edit the initial proposals.- 119 replies
-
- 1
-
-
- Visual References
- CRL Proposal
- (and 1 more)
-
@MrShadow any update on this? Once you start getting the pieces printed and out there can you create a WIP thread to follow along? That way we can keep this thread for the CRL discussion. Just prepping for the future. ?
-
I realized that I forgot to include a reference to the soles being different, which would make the assumption that they match the boot color which states close to armor and I realize that may be hard for the sole. We should probably put in there that the gray should be close to the armor color. In the reference photos it is a contrasting (barely) gray, not black. I'm going to go back to my last post above and make an edit accordingly.
-
Very nice to see this! We still have the CRL open for editing before final draft. I pinged @RAIDER about this post so we can see how we could move forward with the CRL text again.
-
Lieutenant Janek Sunber (SW:E) Reference Images
IcyTrooper posted a topic in Lieutenant Janek Sunber
Star Wars: Empire by Dark Horse Comics
-
That's right, I swore it went all the way around down to the belt on the back but it did end. Not sure how I missed that on the pass I did an hour ago. I think it confused me because some of the panels in the art had some discontinuity.
-
I just checked it out in comparison with previous discussions and applicable reference images and agree with the changes you put in there.
-
Force Unleashed Jumptrooper CRL Discussion
IcyTrooper replied to Fivezero's topic in TFU Jumptrooper
Thank you for those points! 1. I agree with that on the forearms! 2. I can definitely see that as a model limitation. I have made the following change to say "curves downward at the side". 2nd 2 (haha). I see what you meant and have updated a bullet point to this now: "A gray stripe, approximately ¾” (20mm) wide, runs around the midway part of each rocket housing." 3. Another agreement, and I removed it! 4. I can see that as well and agree with it being an issue with the texture mapping so I removed it. -
Hello, Enrique! You may have some luck with Walt's Trooper Factory (WTF) on Facebook.
- 1 reply
-
- 1
-
-
Force Unleashed Jumptrooper CRL Discussion
IcyTrooper replied to Fivezero's topic in TFU Jumptrooper
Styled after the pack as seen in The Force Unleashed video game. An interpretation of the pack is allowed, but screen accuracy is encouraged. The main fuel tank is cylindrical with a rounded conical top and flat black in color. Three white stripes are present on the tank with the top stripe wrapping around the entire tank. The top two stripes are approximately 1.25” (30mm) wide. The bottom stripe is approximately ¾” (20mm) wide. There is a beveled and raised center section that is white in color which starts from the bottom white strip of the main fuel tank to half way between the upper two stripes. This center section has two recessed rectangular sections. Two rocket housings, primarily white in color, are present on each side of the main fuel tank. The upper part of each rocket housing has caps that are flat black in color with a white stripe that is approximately ¾” (20mm) wide. The white part of the rocket housings curves downward at the side of each housing and rounds out at the rear facing side of the housing before going back up again towards the inside of the main fuel tank. A gray stripe, approximately ¾” (20mm) wide, runs around the midway part of each rocket housing. At the bottom of each rocket housing there is a conical exhaust nozzle that is white in color. A curved white pipe that is approximately 1.5" (40mm) in diameter connects each rocket housing to the main fuel tank. A pentagonal plate, white in color, is present that the main fuel tank and rocket housings are mounted upon. Okay so above is what I have made changes with by putting the text in this light orange color. I drew some reference from our Rocket Trooper for descriptors on the pack. -
Force Unleashed Jumptrooper CRL Discussion
IcyTrooper replied to Fivezero's topic in TFU Jumptrooper
This looks good and for a matter of practicality for getting in and out of the suit to allow them to be two-pieces that have to sit flush. We have that with the R1 Imperial Combat Assault Tank Driver and AT-ACT Driver suit. They made it so that you can split it and then have a neck pieces that covers the seam because you wouldn't be able to get your head in otherwise. -
Here is the boot armor and boot text: Boot Armor There is a two-tiered raised armor detail that is flat on top and bends to the sides curving along each side of each boot. The two details have a seam separating them and the following details: The bottom section detail has two black painted details that run horizontally across the boot. The detail closest to the toes is longer than the one above it. The top section detail rounds out on the front boot where laces would be and go around the ankle of the boot stopping just before the end of the boot. Both of these details may be fastened to the boot on each side with Velcro, adhesive or a rivet that is colored the same as the boot. OPTIONAL Level two certification (if applicable): There is no rivet attaching the two-tiered raised armor detail to the boot. The two black details on the bottom section of the armor detail is an actual indention and painted. ------------------------ Boots Boots are made of a vinyl or leather material in a color that matches the gray of the armor and covers the ankle area with no visible undersuit. Boots have flat soles and no visible laces. Some visible tread on side and arch is ok. Sole color must be a slightly contrasting darker gray, as per the reference photos. There are no markings or labels from the shoemaker. OPTIONAL Level two certification (if applicable): There is no visible tread on the sides and arch of the boot. The sole is weathered around the entire boot, heavier at the heel as seen in the reference photos.
-
I'm going to finalize that Lower Leg Armor text and then we can do the boot armor and boots themselves.
-
This would be the update on the notes part of the CRL for the Novas: We would change "The armor is gloss black." to "The armor is gloss black and may be slightly weathered." --------------------------------------------- Thanks for grabbing those, I love the variants!
-
That works for me!
-
Force Unleashed Jumptrooper CRL Discussion
IcyTrooper replied to Fivezero's topic in TFU Jumptrooper
Shoulder Straps: I think the gray works, I can see the shine of it on that photo you provided; looks like the angle in that pic. I checked the other reference photos and it does go with what you said. Shoulders: I believe with the circles we can add a gallery image for each of them to show how they are setup and state that they should match the reference photos or gallery photos as the spacing between circles is not equidistant...or better yet! May be can as a L2 detail have them appear as the reference images or allow for equal spacing for L1? Forearms: I concur with the painting to provide the illusion that they are raised rather than modeling. I have checked over the reference photos and each angle supports them being actually raised. Neck Seal: I'd like to make a motion for this to be optional as there is nothing on the reference images. However, I'd strongly suggest that we do something that prevents the face/head of the wearer being seen in the submission photos as we don't see face textures in the reference images either. -
We could make the case to add the weathering is permissible as per the reference images, in the top notes of each of the CRLs. I don't think it'd warrant a L2 detail or focus. I do agree that the weathering is there though. I know that I posted about trying to obtain SWG but I never did get it. It was pretty expensive on eBay when I had checked.
-
Force Unleashed Jumptrooper CRL Discussion
IcyTrooper replied to Fivezero's topic in TFU Jumptrooper
I'm good with the additions! The only clean-up stuff I'd say is as follows: In the helmet hose section the 20mm needs to read 3/4" (20mm) in the second bullet. In the helmet hose section the I'd say we up those to centimeters since it is a large measurement with the inches. It'd read 10" to 16" (25-40cm) and will align to our CRL editing guide. -
Force Unleashed Jumptrooper CRL Discussion
IcyTrooper replied to Fivezero's topic in TFU Jumptrooper
I'd say the 4-6 teeth cutout is good for the basic for sure and that that cut wouldn't affect it. -
Force Unleashed Jumptrooper CRL Discussion
IcyTrooper replied to Fivezero's topic in TFU Jumptrooper
@RAIDER I'm out of town for work right now so I'll get to it on Friday