IcyTrooper
-
Posts
4,109 -
Joined
-
Last visited
-
Days Won
378
Content Type
Profiles
Forums
Events
Everything posted by IcyTrooper
-
Solid! I need to learn how to do all of this!
-
Fitment is probably going to feel A LOT better now!
-

Del Meeko [Approved], Ireland Garrison
IcyTrooper replied to tipperaryred's topic in Inferno Squad Del Meeko
Congrats on the approval! -
Looks great!
-
I have added the Knee Details to the finalized text list (for now) and we can move onto the Lower Leg Armor: Lower Leg Armor The shin armor is able to open and firmly close in the back allowing the two halves to appear sealed. There shall be the appearance of a cover strip on the front and back. The cover strips will be a darker gray color that is different from the base color. Overlap construction is only allowable for kits that come with the cover strip molded into the part. OPTIONAL Level two certification (if applicable): Must be constructed using the butt joint cover strip method. Overlap construction is not allowed.
-
That is sick!!! Wow! Sooooo if you ever decide to do EVO stuff again let me know (especially helmets)
-
Hello, Gio! When we roll into the boots part of the CRL we'll definitely start working on that CRL text as it relates to the reference photos (from what we have).
-
I see what you mean now, I wasn't following at first. I may be wrong but I think the reason that the Jered's were on there is because that was what was used on-screen; hopefully someone can clarify or correct that for me.
-
All these other requirements that we are discussing and I'm still a little confused on what is up. The only two requirements for L2 are: Original Dr Martens “Jered” shoes or replicas with a leather pull tab midway on the heel. The rectangular panels shall not be wider than the width of the top of the shoe and will lay as flat as possible against the shoe with the front edge not extending past the upper and sole seam. Is the problem the pull tab? The rectangular panels is what the shoe gaskets are on, so that makes sense. You can indeed see some of the details on the back of the boot and on the front and that is what we are specifying. If you meet the requirements of L1 and the two bullet point of L2 then it is good for L2. There is nothing in the text about the rivet head, thus it wouldn't be something that we even bring up in a L2 application. I'm also not seeing anything about pads in the L1 or L2 text.
-
My pleasure!! That is an awesome choice to swap into the Death Trooper!!
-
Spencer, I haven't seen anyone convert a RO kit to ANH kit due to the amount of work and supplies that it'd take. You'd be better off purchasing an ANH kit from Walt's Trooper Factory (WTF) on Facebook, RS Propmasters (UK) or MTK at Trooperbay.
-
Where to find Shadow Stormtrooper Armor
IcyTrooper replied to cartersachse2103's topic in Shadow Stormtrooper
Mike, I sent you a PM response as well. Unless the 850 kit is ANH-style, it wouldn't be approvable under the Rogue One (RO)-style. I'd check Walt's Trooper Factory (WTF) on Facebook, RS Propmasters (UK), or MTK at Trooperbay. -
The only reference to Jered boots are in L2 which is a detachment program. For L1 the boots just need to match the image and text of the CRL for L1. If you can recreate that look I don't see why it would be an issue for a GML. When developing CRLs we take into effect global distribution and parts, etc. for L1 whereas L2 may often require that extra mile or cost for realism.
-
It'll really depend on what color the plastic is that it is coming in and if you are painting it? Walt's Trooper Factory (on Facebook) offers helmets as well.
-
I'd say those eyes turned out very nice!
-
Proposal for Army Trooper CRL Update
IcyTrooper replied to ShovelGuy's topic in Imperial Army Trooper
@Blackwatch I have edited this post https://forum.specops501st.com/topic/7349-proposal-for-army-trooper-crl-update/?do=findComment&comment=97675 with the updates you provided in your recent quoted post. The linked thread in this post should be the main one we edit for pulling to the final CRL text thread on the update to the Wiki. Any other things that I corrected to flow with our other CRLs and @RAIDER's recommendation for measurements I have made in light orange. -
Proposal for Army Trooper CRL Update
IcyTrooper replied to ShovelGuy's topic in Imperial Army Trooper
I'm also going to put (TU) after the first reference of Telemetry Unit so that it is clarified. I know that sounds dumb but it'll be good to establish that. -
As far as L2 goes, that is strictly at the detachment level and the GML should be motioned to refer the applicant to the detachment for consideration. They should only be verifying that it meets the L1 requirements. With costumes that have certain details that are only available when the item itself is not on the costume we will require the applicant send pictures of individual costume pieces to verify the L2 requirements. For example, on stormtrooper-based costumes we'll have them send a separate picture of the helmet to verify the "s-trim" on the bottom of the helmet, or with the shadow scout and mudtrooper we'll have the applicant put a tape measure up against straps, etc. If you can successfully replicate the boot in appearance and meet all guidelines associated with it there should be no issue. This would cover any specified stitching methods, material, method of securing, etc.
-
PROPOSED CRL MODIFICATION: Crimson Stormtrooper / Magma Trooper
IcyTrooper replied to RAIDER's topic in Crimson Stormtrooper
Great work on this everyone! -
Death Trooper 3d print build in Melbourne
IcyTrooper replied to Damo Fett's topic in Imperial Death Trooper
Welcome and very nice! -
Let's continue doing the background research for the boot and spat stuff but get through the details for the knees and the move to the lower leg armor before moving to the boots. That way we can focus on getting down the list.
-
Yeah we are totally able to have a discussion on this and if the consensus is that it is armored and looks it in the reference, we'd definitely not rule it out just yet. The blend part was just that if it is attached to the armor parts via a strip of plastic, etc. that it isn't easily viewable. That'd keep it off the knee itself and from having to be attached to the under suit itself. At least that is what I'm thinking. We just want to keep someone from using white plastic or something highly visible from showing. I like the description for the layering for the boot. I'm definitely not opposed to the armored spat part, we'll just have to see how to word it properly.
-
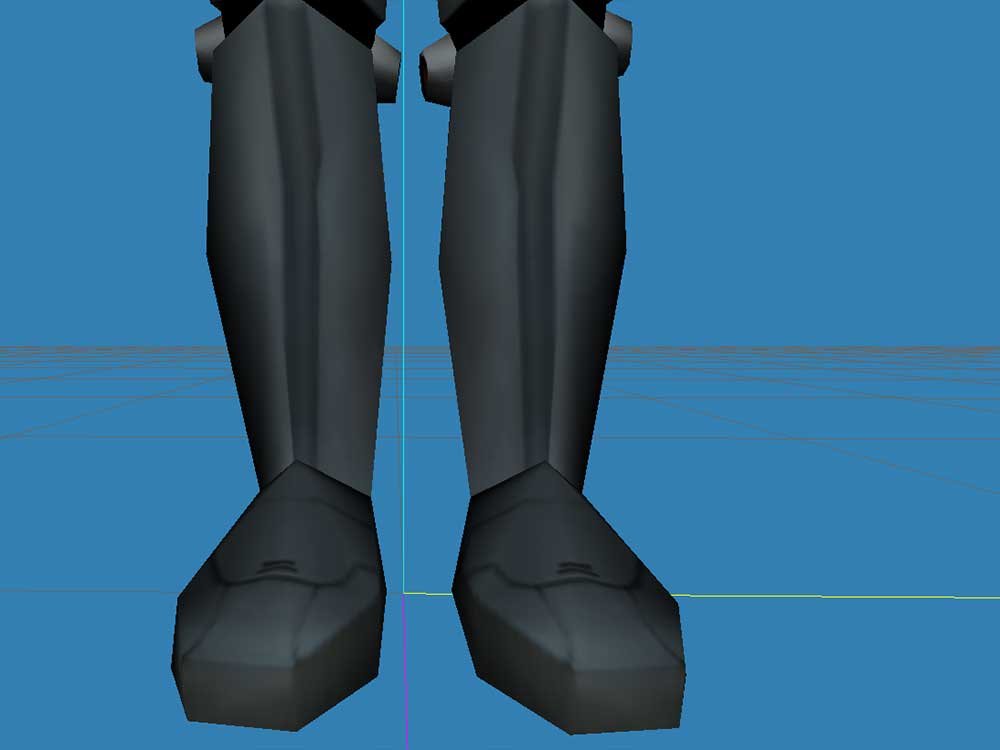
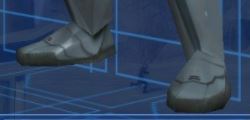
I see what the confusion is, whether or not that flat part with the two indentions is actual armor spats or part of the boot. That is possibly something that we'll have to discuss and may have been a limitation with the texturing of the armor. With a regular boot seam the line is thinner, and I can see that how the thicker line may indicate that it could be an armored spat. However, the thicker line may be caused by the texture wrapping rather than the indication that it is an armored spat. My interpretation is that that is NOT an armored spat but rather part of the boot. Largely in part due to this pic: The texturing of the spot in contention matches much of the texturing color and shadowing around the boot itself. When referencing the lower leg armor, if that boot part was meant to be an armored spat it would have lighter markings and blending similar to that of the lower leg armor. Even when referencing the shine on the boot in this pic you can see it extends down to the raised sole of the side boot, which if we are using the armored spat logic that lighting would indicate that the entire boot is armored; which I do not believe to be the case:

-
They are not the same, it is a much wider patch across there and not those short bars as indicated in the RC boots. I have put some of the reference pictures below; the first two are from the PC version of the game that I took a month or so ago: Since I have the game again I can go back into it any time we need it for references.
-
Beautiful!!