-
Posts
2,238 -
Joined
-
Last visited
-
Days Won
155
Content Type
Profiles
Forums
Events
Everything posted by nanotek
-

Death Trooper Level 2 Reference Material
nanotek replied to Tboy7630's topic in Imperial Death Trooper
Your link isn't working, can you please post the correct link? -
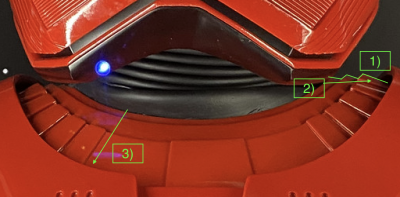
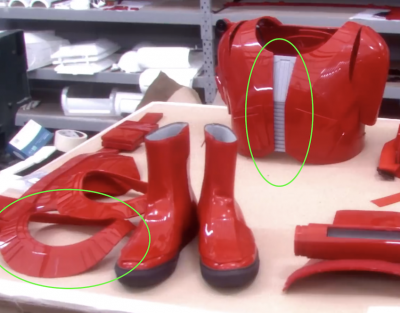
@JoeShoe @Raider @gmrhodes13 and I have been discussing options around the gorget, and whether or not there are other options that will make it more open to others. We have multiple options available to us, whether we choose all or one will have to be balanced and fair for everyone. @gmrhodes13 raised an interesting point about why are we trying to replicate the exact method of production? This opened up another option that may play in favour of more people where there is no gorget for level 1, but instead it's just a chest and back with the gorget details included as a neckline. The seams could then be located on the shoulder line where the buckles are. This would reduce the complication of the costume almost immediately for both makers and builders. However this will make the CRL tricky in terms of going from L1 to L2. In a way this makes more sense to me because; why bother with a gorget at all if you cannot replicate it correctly? Leave that for level 2. But then I am faced with the challenge of writing the CRL correctly, but that's ok I like challenges! However if we decide to move down the path of semi-reproducing the production method and have the gorget for L1, then we need to decide not only the placement and number of seams, but the rules around that seam. i.e the seam should be unnoticeable, securely closed with no overlaps or gap present. The gorget sits flat around the neckline, there are no upward curves. I have locked down the rest of the CRL threads so that we can focus on this set of armor. I will attempt to write out the remaining details for the cuirass in the meantime, as no matter which option we choose the details are still there. With all fo that in mind and with regards to your proposal, I would make the following changes I think the explanation of the raised sections can be better. I'm trying to think of how can I make this easy for both builders and GML's to read and understand
-
LOL you got me before I managed to realize that I had posted content in the wrong discussion, hence my edits So apologies! Yes, there seems to be a lot of discussion outside of here, but it's all lost for the CRL. I kinda get that it's a lot easier to chat via Facebook groups etc, but it doesn't really add anything to the CRL, and it kinda ends up being a little bit like the cart leading the horse. I get that people don't want to make a move until the CRL is written, however it's also the risk we take if we decide to build a costume prior to the CRL being written or confirmed. So yeah catch-22. At the end of the day we all have to be comfortable with what is written and that it is fair and reasonable so we all decide, but we should explore all options fully IMO. With regards to the query around "Failing all of the above the CRL could be written to accommodate for the current issues:" this would be done once we have a complete set of details. Again we all only have so many hours in the day to spare to get the CRL completed, but we can talk about one detail or get the whole costume documented. I'll move the remainder of my conversation to the CRL section. Again I appreciate your patience and contribution to the development of the CRL. My advice is the quicker we get the details from the reference material, the quicker the CRL will get developed.
-
For the paint matching, I commented on Jim's Instagram recommending he try using a plastic adhesion promoter prior to putting paint on it but he never responded. This could potentially resolve everyone's colour matching issues. Plastic adhesion promoter or clear primer for plastic is used by auto painters for bumpers which are made of PU. I have had to do this for other things and had great success. I have also seen people print in flexible filament and just paint the crap out of it and end up with a nice smooth and flexible piece of armor. I saw this on one of the Praetorian Guard builds... Also, based on the pics submitted it looks like the gorget neckline curves up, which I have only seen on the toy, all other reference material points to the neckline sitting flat. Even though it is flexible I have only seen it sitting flat around the neckline. It might be worthwhile that Jim reassess the size of the opening and remove the curling up towards the neck. Widening the neckline could potentially resolve some issues (probably not but you never know). I'm not sure if the current piece of kit you have is alterable without ruining the proportions of the neckline details. Failing all of the above the CRL could be written to accommodate for the current issues: 1. You have a gorget with an opening. The opening will have to be down the back trying to make this as inconspicuous as possible. I'm not entirely sure it is possible to move the gap to the shoulders without fixing to the chest back (see below) Otherwise there might be sagging. If we go down this path it has to be made clear that this gap must be closed at all times, it shall not flex open or overlap and be as inconspicuous . 2. Gorget is split in two (front and back) and attached to the chest/back (effectively becoming the neckline of each piece). The seams will sit on the shoulder line (buckle area) and try to be inconspicuous as possible. (Kind of inline with the toy). This will make it easier on both makers and builders, but makes the CRL a bit more of a pain in terms of L1 > L2.
-
Do you have reference material that supports this? I can only find reference from the evolution of the stormtrooper video that they are separate. I am following up to confirm this detail with someone close to the production staff. As it stands this is the best reference we have. I know you guys want to nut out the L1 & L2 but I think it would be better if we could concentrate on getting all the details captured first and then deciding L1/L2
-
To be honest here, I not comfortable that this argument is stemming around one kit that was produced prior to the film. I am also not comfortable with the idea that because something might be difficult to achieve that we should ignore that and go the easy path. My preference will be no line because it’s a prominent area and you will be filmed/photographed from behind at some point. Regardless of L1 or L2 the CRL photo will eventually show the L2 because people will achieve it. However if we are going to allow a join it is my opinion that it cannot be overlapping or show a gap. It would need to be a very fine line that is barely noticeable. I would like to hear from other members who do not own this kit.
-
You've done a fantastic job of the helmet! Nice work!
-
Congrats Jeff! You look great
-

Soft parts? Undersuit/neckseal/ ribbed pieces
nanotek replied to CaptDunn's topic in Imperial Death Trooper
There are a couple of sources, none are terribly accurate. You have ArmoryShop, Darkside Closet and Jim Tripon. I think Jim's gaskets are the most accurate. Sheev's Emporium did a one off run many moons ago and was probably the most accurate but he won't do them any more. Good luck with your build -
Again thanks for the input, it is very helpful! For me the first part of the exercise is to get as much details as possible, then we look at how we show the details. Getting the text right is first and foremost at this stage, I've been trying to break down a piece of armor into logical sections and then work on each section. Or where possible look for similarities between pieces first, then document the differences. The abdomen was always going to be the hardest because it doesn't appear to be divided into any quantifiable sections, like the thighs or shins for example. I'm going to look at it from an artist/design perspective to see it conforms to golden ratio etc This may help inform the text better. We capture all the lines and angles where we can and will adjust for L1 and L2. L1 might make the amount of lines a little fuzzier as long as it does not affect the overall look of the costume.
-

complete Sithtrooper Thighs - Draft CRL Development Discussion
nanotek replied to nanotek's topic in CRL Discussion Archive
This has been updated to reflect latest information -

Prepping a new ST Helmet. Opinions welcomed
nanotek replied to Huttman's topic in First Order Sith Trooper
Hey Felix, if this model is the one I think it is, it is way off. The modeller based their design off the FOTK helmet instead of the Deathtrooper bucket. There are some comparison pictures in the reference pictures thread somewhere showing an overlay of the Sith with both the FOTK and DT helmets. -
Hi there, this is a complex build and there are a few things you can consider before deciding on your armorer and soft parts. Unfortunately there is no "One size fits all" option and it is ultimately up to you, which means you will have to research, research, research! These suggestions below are not in any real order of significance, but they have an effect on each other. For example if you have no building experience, your costs will go up, but time and effort will go down. If you are building yourself, cost may go down but time will increase (your accuracy may also increase depending on your strategy). 1. Budget - Some kits are more expensive than others. Some are fibreglass, some are 3D printed, some are finished etc. Finished kits are going to be more expensive but less work on your part. If you're building yourself consider items like paint, fillers, fibreglass resin etc (Remember you will still have to add or alter strapping). Where you live will also play a part in how much this will cost you as postage can be super expensive! 2. Build Experience - Are you familiar with how to work with different materials? What is your level of skill? Are you prepared to make mistakes, learn and possibly take months to build? You may have to learn a lot of new skills to complete your build and this will take time to gain research and learn. If you don't know how to paint you will have to rely on others for touch-ups and repairs which can be expensive. 3. Space - depending on how you plan to tackle your build will determine your space requirements. For example if you plan on 3D printing your kit, you will need space to be able to sand, fill, prime and paint. 4. Accuracy - How accurate do you want to go? There are really only a couple of options that come close when it comes to the armor and literally zero options for the undersuit/gaskets. There are also very few accurate leather pouch/holster makers too. 5. Size - The size of your body may determine which armor you will go with. 3D printed offers the greatest flexibility in sizing, where as other kits you may have to make alterations to get it to fit and looking right when strapped. 6. Time - Do you have time constraints? Do you want it now or are prepared to wait? Again (and depending on choice of kit etc) this is a complicated build and no matter which avenue you take there will be some time constraints. Here is some helpful links to get you started: Link to the CRL: https://databank.501st.com/databank/Costuming:TX_deathtrooper Various Resources on the forums: All the best with your build!
-
Ready for review Undersuit Black material racing type suit Neck Seal Gaskets shall be ribbed and made of rubber or a shiny black material Ribs stop at the base of the neck and turns into a smooth section forming the rest of the neckline Conceals the wearer's neck Zip at the back OPTIONAL Level two certification (if applicable): Gaskets are made of rubber. Fabric or sewn gaskets are not acceptable Part of a gasket vest or top comprising of neck, shoulder and elbows. Shoulder Gaskets Gaskets shall be ribbed and made of rubber or a shiny black material A vertical raised shoulder seam may be present in the gap between the shoulder bell and the arm hole of the cuirass. It may sit under the shoulder bell and slope downwards towards the front of the cuirass. Rib direction is horizontal Connect to the top of the bicep armour concealing the wearer's should and top of the bicep area OPTIONAL Level two certification (if applicable): Gaskets are made of rubber. Fabric or sewn gaskets are not acceptable Part of a gasket vest or top comprising of neck, shoulder and elbows. Seam is 20mm (3/4”) wide Elbow Gaskets Gaskets shall be ribbed and made of rubber or a shiny black material Gasket ribs a slightly diagonal sloping downwards from the inside elbow to outside elbow of the wearer Sit underneath the bicep and forearm concealing the wearer's elbows OPTIONAL Level two certification (if applicable): Gaskets are made of rubber. Fabric or sewn gaskets are not acceptable Part of a gasket vest or top comprising of neck, shoulder and elbows. Shorts Gaskets Gaskets shall be ribbed and made of rubber or a shiny black material Front Ribs run a slight angle vertically, sloping downwards from the outside of the hips towards the inner thigh Back Ribs run on a slight angle horizontally, sloping downwards from the outside of the hips towards the inner thigh From the front the gaskets sit underneath the abdomen, codpiece and top of thighs concealing the wearer's groin area From the rear the gaskets sit underneath the abdomen, posterior and top of thighs concealing the wearer's butt area There is a vertical seam on the hips towards the rear where the front and back gasket ribs intersect OPTIONAL Level two certification (if applicable): Gaskets are made of rubber. Fabric or sewn gaskets are not acceptable Part of a set of pants (shorts and knees) Knee Gaskets Gaskets shall be ribbed and made of rubber or a shiny black material Ribs run horizontally Sit underneath the thigh and shin concealing the wearer's knees OPTIONAL Level two certification (if applicable): Gaskets are made of rubber. Fabric or sewn gaskets are not acceptable Part of a set of pants (shorts and knees)
-

complete Sithtrooper Posterior - CRL Development Discussion
nanotek replied to nanotek's topic in CRL Discussion Archive
Thanks. Details added. -

complete Sithtrooper Cod - CRL Development Discussion
nanotek replied to nanotek's topic in CRL Discussion Archive
Thanks. Have added. It is not clear that any cods in TROS were connected to the butt plate due to them flapping about while running. Will wait for DVD release to confirm this detail. -

complete Sithtrooper Belt - CRL Development Discussion
nanotek replied to nanotek's topic in CRL Discussion Archive
We can alter the wording to allow for variation in material for L1. The L2 will most likely be PU rubber as that is what we know to be true. -

complete Sithtrooper Helmet - Draft CRL Development Discussion
nanotek replied to nanotek's topic in CRL Discussion Archive
The Phasma bucket has that similar ledge. The Phasma CRL says that it is flat on the bottom, which I don't think is an accurate description. For the Sith Trooper I have proposed the following: The bottom of the helmet has a black ledge that runs the perimeter of the helmet that extends back into the interior is about 3/4" to 1" wide matches the angles of the helmet, most notable is the jawline -

complete Sithtrooper Gloves & Hand-plates CRL Development Discussion
nanotek replied to nanotek's topic in CRL Discussion Archive
Has been updated -

complete Sithtrooper Belt - CRL Development Discussion
nanotek replied to nanotek's topic in CRL Discussion Archive
I have taken your text and amended it to what I think is correct. -

complete Sithtrooper Helmet - Draft CRL Development Discussion
nanotek replied to nanotek's topic in CRL Discussion Archive
The inside edge of the bucket should be there for L1, it is similar to the Phasma bucket in that respect. Is that what you were referring to? Or is there something I am missing. Please post a reference pic. The detailing under the brow should be included for L1 as it is present even on the 1/6th scale model and considering everyone has accommodated for it... Agree double lens is L2. The teeth don't need to be separate however I think the alternate colour of the teeth should be L1.


