-
Posts
2,238 -
Joined
-
Last visited
-
Days Won
155
Content Type
Profiles
Forums
Events
Everything posted by nanotek
-
complete Sithtrooper Cod - CRL Development Discussion
nanotek posted a topic in CRL Discussion Archive
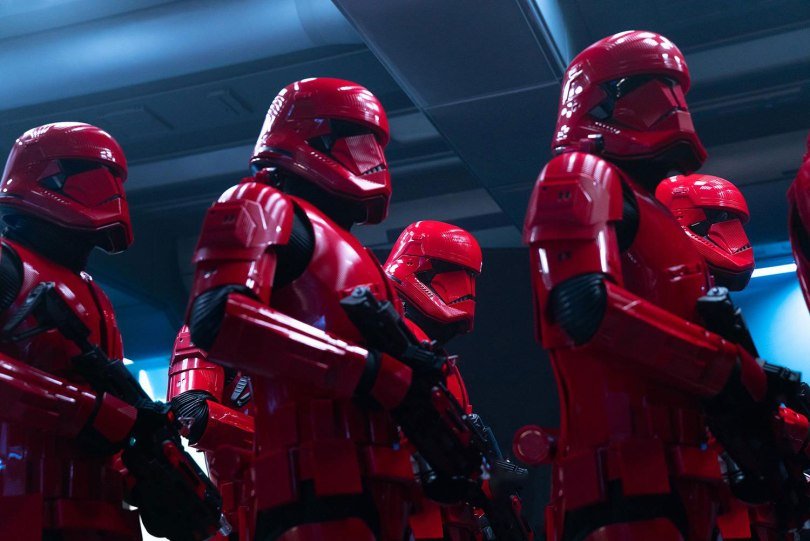
Up for agreement now Cod Finished in a high gloss deep red that matches the colors of the entire costume Has the appearance of being connected to the abdomen belt assembly Sits directly under the belt Has the appearance of two separate pieces joined together upper section is a trapezoid shape roughly 3-4" in length and terminates about 1 1/2" into the lower section lower section is curved and extends down to cover the wearer's groin OPTIONAL Level two certification (if applicable): There is no connecting material between the cod and the posterior -
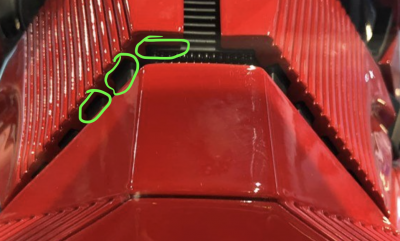
Ready for agreement Abdomen Section Finished in a high gloss deep red that matches the colors of the entire costume The abdomen section must wrap around the wearer's body without a visible seam, the opening is concealed by the Thermal Detonator Plate The top of the abdomen is covered by the Cuirass The abdomen has 8 rectangular boxes that have chamfered edges, sit flush on the abdomen and matches the order and placement shown The largest horizontal box has a small black recessed square to on the lower left to the wearer The smaller boxes are identical in size to each other The 2nd box from the wearer's right has diagonal recessed lines The abdomen has 4 vertical raised 'cover strips' along the front half of the abdomen, they start from the belt and disappear under the cuirass the two right strips are smaller the two left strips are larger, with a recessed channel just slightly off center to the right In the first channel between the two right strips are diagonal recessed lines that start from the belt and disappear under the cuirass. Ribbed details run from the inside edge of the outermost 'strips' to a point just above the 4th abdomen box from the right There is a recessed rectangle above the 4th abdomen box from the left, on the plain section of the armor, Diagonal recessed lines extend downwards from the first right-most cover strip, appear to underlap the 2nd coverstrip and terminate over the 4th box from the wearer's right. Diagonal recessed lines extend downwards from the left most cover strip, appear to underlap the large cover strip (front left) and terminate over the same 4th box from the wearer's right. OPTIONAL Level two certification (if applicable): There is a visible ledge that holds the belt in place just below the abdomen boxes, it extends to within an inch from the edge of the Thermal Detonator Mounting Plate There are 5 tabs below this ledge to support the belt. Widest one is at the front and aligns with Cod, with two smaller ones each side of the large one The 2nd box from the wearer's right has 16 diagonal, recessed lines The termination of the diagonal lines forms a small trapezoidal shape above the 4th box from the wearer's right. All the boxes are separate and not moulded to the abdomen
-
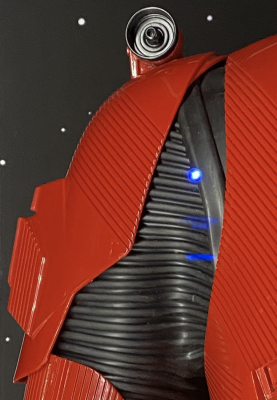
The thermal detonator is divided into two distinct parts, the thermal detonator itself and the armour it is attached to; the mounting plate Thermal Detonator The outer cylinder is finished in a high gloss deep red that matches the colors of the entire costume The internal cylinder is satin black and ribbed The right hand end cap has a chamfered recess that extend inwards to a small circular recess on the inside of the cap The left hand end cap extends from the detonator assembly and there is a small channel that runs the circumference There are no visible seams Is postioned just above the belt Is mounted on the lower section of the mounting plate Thermal detonator mounting plate Finished in a high gloss deep red that matches the colors of the entire costume Sits under the cuirass The belt overlaps the lower section of the plate The mounting plate is a long trapezoidal shape, divided into 4 sections by recessed lines The top and lower trapezoidal shapes are slightly raised outward and have a smooth surface the bottom trapezoid is separated by a channel that runs around the perimeter The recessed lines run parallel to the edges of the top trapezoid section The recessed lines start from the outer edge and terminate in the perimiter channel of the bottom trapezoid OPTIONAL Level two certification (if applicable): The left and right panels of the thermal detonator mounting plate have 36 recessed lines each The satin black, ribbed, internal cylinder on the Thermal Detonator has 36 ribs
-
Pending Agreement Shins Finished in a high gloss deep red that matches the colors of the entire costume Each shin can be divided into 8 panels alternating between recessed lines and flat, comprising of the following: The front panel of each shin is flat and is the same width as the top panel of the boot armour and is squared at the top The front panel has a recessed channel that starts at the top of the panel closest to the inside, extends outward 1/4 way down then back towards the ankle meeting at the top of the spat forming a scalene triangle The front inside panel overlaps the inside panel The inside panel is slightly curved along the top A Clip Greeblie is present on outside panel near the top of the shin The front 3 panels have straight, angular edges at the top, with the recessed lines following the top edges of the two outer panels to base of the shin The back 3 panels, the middle one has a straight line at the top, with the two outer panels curving slightly to the inside and outside panels The outer panels have vertical seams that separate the recessed lines from the flat section Each shin is roughly the mirror opposite of each other with the following differences on the outer panels Right shin has a rectangular section that is about 2/3 up from the bottom The right shin has two elongated trapezoidal boxes that are chamfered with one flat section between them evenly spaced in 3rds Left Shin has a rectangular box appearing to have a lid, directly below the clip greeblie The base of the shins is covered by a spat OPTIONAL Level two certification (if applicable): Clip greeblie is the correct shin greeblie outlined in the document Rectangular box on left shin has the following details Has the appearance of two pieces, base and lid. The lid is a bout 4mm deep with a 1mm recess between lid and base A small oblong shaped recess on the top left base part of the box Front Inside Panel has 48 recessed lines Front Outer Panel has 69 recessed lines Back Inside Panel has 36-38 recessed lines Back outer panel has 50-52 recessed lines
-
Ready for agreement Thighs Finished in a high gloss deep red that matches the colors of the entire costume No holster is present on either thigh Each thigh is comprised of 7 sections, front, inner-front, inner-rear, rear, outer-rear, outer, outer-front Front and rear sections are both raised slightly in appearance and smooth flat surfaces. A diagonal channel runs from the top outer edge of the section panel, to about 1/2 way down towards the inner thigh Each Front inner thigh section has a number of evenly spaced, diagonally recessed lines, starting from top of the section sloping downward from the wearers cod to the front of the thigh terminating 3/4 down the thigh. Left thigh recessed lines terminate approximately at the top of the sniper plate Right thigh recessed lines terminate approximately half-way between the "chocolate bars" Angle of the recesses is roughly 33 degrees from the font section edge Each Rear outer panel has a number of evenly spaced, diagonal recessed lines that slope downwards from outer to inner thigh Each outer section forms a visible vertical seam towards the wearers front, is smooth and has a clip greeblie near the top Each thigh has the appearance of an overlap on the inner thigh where the inner-front section overlaps the inner-rear section Front bottom edges of the thigh are angular in nature and dip towards the wearers knee from the sides Right thigh There are two vertical rectangular boxes above the knee that have chamfered edges that look like "chocolate bars" Each box sits in a slightly larger recessed cavity towards the top leaving a small recessed section exposed at the bottom Recessed channel that traverses the front 3 panels roughly 25-30mm from the bottom Left Thigh Large hexagonal 'sniper plate' just above the knee which has two raised rectangular 'boxes' in the centre of the upper left and upper right faces of the sniper plate two dark grey or matt black, rectangular shaped recesses above the sniper plate, are angled slightly outwards from the knee OPTIONAL Level two certification (if applicable): Inner thigh section has approximately 45 evenly spaced recessed lines Outer-rear section has approximately 34 evenly spaced recessed lines Greeblie clip is the correct thigh greeblie clip (see diagram) and appears to be slotted into a recess (i.e it doesn't sit on top of the armour) The inner-front section overlaps the inner-rear section forming an overlapping closure
-
Up for review Forearms Finished in a high gloss deep red that matches the colors of the entire costume Each forearm is a slightly pentagonal and curved in shape at the wrist opening Each forearm piece is different but can be divided into 6 sections; Inside, Outside, Front Inside, Front Outside, Back Outside, Back Inside. The Front Inside and Front Outside can be seen from the front and the Back Outside and Back Inside can be seen from the rear. Left forearm The left forearm has a more shallow inner elbow cutout than the right that is slightly curved inwards. The Outside forearm section is divided in half by a curve that runs from the elbow to the wrist. Half of this section is smooth with a ‘D’ shaped indentation near the inner elbow. The other half is recessed inwards from the smooth section and has a number of vertical recessed lines with a small rectangular recessed area toward the wrist opening that has a small black recessed square towards the wearers thumb. The rectangular section is roughly 2/3rds the width of the wrist. The outside forearm section has an inward curved edge at the elbow. The Front Inside section has a number of vertical recessed lines the run from the wrist and terminate with a number of recessed lines that are at a 45 degree angle at the elbow end. The diagonally recessed lines cross over to the Front Outside section The front inside section has an angled edge at the elbow opening that does not match the angle of the recessed lines The Front Outside panel is smooth and 2 inwardly angled edges at the elbow opening. The Inside Forearm is raised roughly 10mm with chamfered edges. There is a recessed section with a Pickatinny like rail that has 3 buttons. There are visible ridges with the buttons in the second, fourth and seventh gaps of the rail starting from the wrist. The Pickatinny rail ridges are more spaced on the left than the right forearm. The Inside of the forearm is a panel connected to the rest of the forearm forming a seam. There is another box mounted to the raised section that has a sloped edge running from the rail surface to the box 'face'. The box face has a single black rectangle towards the front outer edge. There is a small recessed black rectangle on the side facing the wearers palm and is closest to the pinky side The Back Inside section has a number of vertical recessed lines that fan out from the wrist towards the elbow. The back inside section has a straight angled edge at the elbow The Back Outside Section has a number of recessed lines at a 45 degree angle, starting from the elbow, sloping from outside to inside as viewed from the back. They terminate just over halfway down the section, the rest of the section is smooth. The Back Outside section has 2 angled edges at the elbow opening Right Forearm The Inside Forearm section is slightly raised compared to the left. It has Pickatinny rail that is not recessed into the forearm like the left and has ridges starting from the elbow end with the last one partially obscured by the wrist box. The Pickatinny rail ridges are less spaced on the right than the left forearm. The inside forearm section has a slight inner curved edge at the elbow opening with two black recessed oblong shapes. There is a box mounted to the raised section on the inside forearm that has a sloped edge running from the rail surface to the box face. The box face has a single black rectangle towards the front outer edge. There is a small recessed black rectangle on the side facing the wearers palm and is closest to the pinky side The Back Inside section has a number of vertical recessed lines that fan out from the wrist towards the elbow. The back inside section has semi-circular edge that curves downwards from the elbow to the inside at the opening The front inside section has two clip greeblies that are recessed into two channels that appear to extend around to the back outside section. The channel closet to the wrist is visible while the second channel ends out the boxes on the outside section. The front inside section has a number of vertical recessed lines starting from the wrist and extend towards the elbow intersecting with a number of diagonally recessed lines. The diagonally recessed lines start at the inside panel seam and wrap around the forearm at the elbow on the front outside panel. The rest of the panel is smooth. The front inside section has a straight angled edge at the opening of the elbow that matches the angle of the recessed lines. The back outside section is smooth, has the two channels from the clip greeblies and an angular recessed section the has a small moulded “P” like clip greeblie closest to the inside of the forearm. The outside forearm has a series or angular boxes; the largest covers most of the forearm and has a number of vertical recessed lines and two recessed oblong shapes on the frontside and backside of the box that have a small black (satin or matte) recessed circle towards the wearers wrist. On top of the largest box and closest to the wrist, and is nearest to the back of the box, is another smaller angular box that also has a small black recessed oblong facing the wearers hand. When viewed from the outside there is an angular pattern formed by a recessed line that is continued from the Front Outside and Back Outside panels. It cuts horizontally across the largest box and diagonally on the smaller outer-most box. The Outside Forearm section has a slightly inward curve at the elbow opening OPTIONAL Level two certification (if applicable): Left Forearm The Outside Forearm has 18 recessed lines The Front Inside Section has 11 vertically recessed lines and 12 diagonal recessed lines The Back Inside section has 11 vertically recessed lines (12 including the panel intersection seam)\ The Back Outside section has diagonally 16 recessed lines Right Forearm The Back Inside section has 11 vertically recessed line (12 including the panel intersection seam). The front inside section has 6 vertical recessed lines and 10 diagonally recessed lines. The large Outside Forearm box has 15 vertical recessed Pickatinny rail has 9 ridges
-
sithtrooper Sith Trooper reference pictures
nanotek replied to gmrhodes13's topic in First Order Sith Trooper
Thanks for gathering all this reference material @gmrhodes13 it’s making life a lot easier. I do understand the effort you’re putting in because I see it all across social media as well! -
Pending agreement Biceps Finished in a high gloss deep red that matches the colors of the entire costume One on each bicep and are mirror opposites of each other The biceps are made up of two parts; inner and outer bicep One seam that faces forward Overlap towards the inner rear of the bicep Clip greeblie is present low and overlaps the seam There is a small rectangular recessed section just above the clip Two black ovals are present on the outside facing side of the bicep Larger vertical recess towards the rear outer section, intersects where the bicep angles down toward the rear The rear of the bicep has an angular line that drops about 25mm to form a rectangular section when viewed from the rear The rectangular sections have approximately 11 recesses on each bicep The angular sections that meet to form the rectangular sections at the back are flat At the bottom of the rear rectangular section is a black horizontal oblong shaped recess There are vertical recessed lines in the front of the bicep Start at the small rectangular recessed section above the clip greeblie The recesses on the outer bicep terminate at a roughly 33 degree angle The vertical recesses on the inner bicep are roughly angled at 45-47 degrees There are 45-47 degree recessed lines that run around the inner bicep terminate at the front seam and bottom of bicep are overlapped at the inside-back by the rectangular section at the back OPTIONAL Level two certification (if applicable): Clip greeblie is the correct bicep greeblie as per diagram The recessed section above the clip has two steps There are a total of 32 vertical recessed lines at the front that start on the inside of the bicep and end on the outside forming a 'V' shape intersecting at the bicep clip There are a total of 25-30 visible diagonal recessed lines that that start at the front seam and continue around the inside of each bicep disappearing behind the overlap on the inner rear
-
complete Sithtrooper Helmet - Draft CRL Development Discussion
nanotek replied to nanotek's topic in CRL Discussion Archive
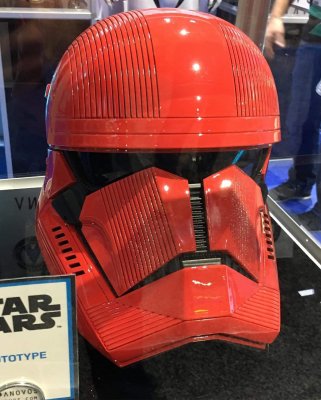
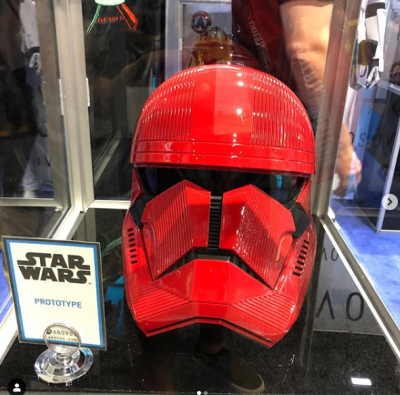
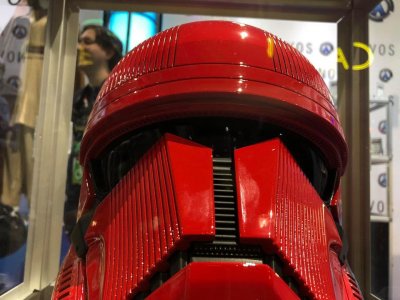
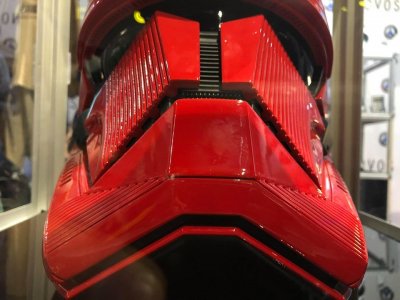
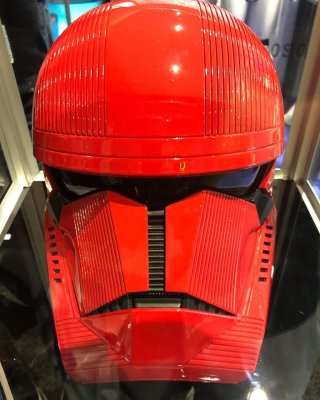
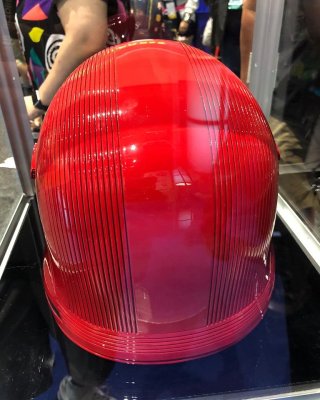
As far as I can tell the brow is extended much the same as the Deathtrooper helmet. With this new pics I think we have a complete view of the helmet now and should be able to finish this CRL. With reference to the pills in the brow, as far as I am aware we are looking at the same bucket from the Anovos stand. It's possible the angle and focus are not allowing you to see those details. But they are clearly seen on the earlier photos provided by @gmrhodes13 -
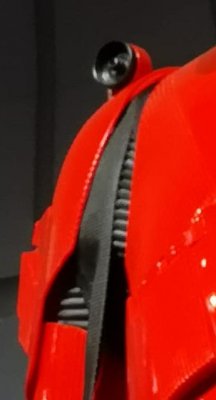
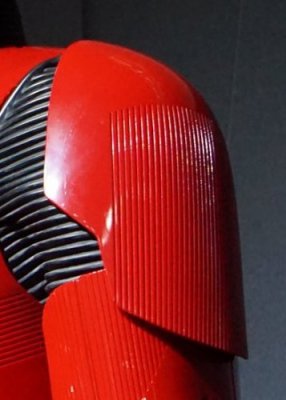
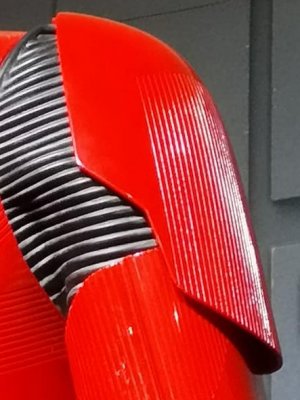
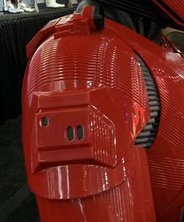
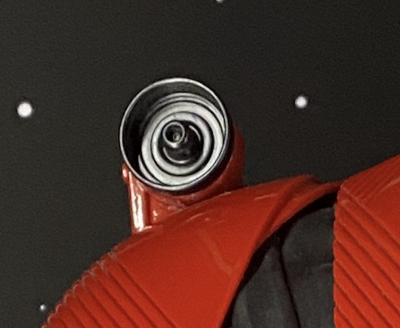
Another one up for agreement Shoulder Bells Finished in a high gloss deep red that matches the colors of the entire costume One on each shoulder and are the same shape but different from each other in features Both the front and back lower edges have a graduated step/angular edge At the top of each shoulder is a small extension or lip that appears from underneath, is rounded and butts up to the cuirass. When viewed from the front it appears as a little ledge that is lower than the top of the shoulder Right Shoulder Has about 16 recessed lines that start from the top edge of the angular section of the bell from front to back forming an arc On the top is a "shoulder mounted sensor telemetry pod", and is mounted on a bracket that is fixed to the top of the shoulder The sensor is circular when seen from the front and side mounted to the bracket The front most part of the sensor is matt black, the remainder is red and matches the armour Has a cone like protuberance forming an antenna from the centre The bracket is red matching the armour There is an angular and chamfered box on the side of the bell The outermost part has an extended raised rectangular chamfered box that has three black oblong recesses areas. Two larger ones to the bottom right and one smaller one to the top left Vertical recessed lines on each side of the box Horizontal channel at the top of box about 6-8mm wide Left Shoulder Has vertical recessed lines running from the bottom to about ¾ up the bell forming an arc The recessed lines terminate in an arc shape that mirrors the arc on the bottom of the bell The total width of the recessed lines equals the same width as the bottom of the bell OPTIONAL Level two certification (if applicable): Right shoulder has approximately 16 horizontal recessed lines 1-2mm wide, spaced about 4-5mm apart each that form the arc Shoulder Mounted Sensor telemetry pod Has 2 recessed and 2 raised concentric circles starting from the cone forming a total of 4 concentric circles Antenna is hollow Shoulder Mounted Sensor bracket has the following details Semi circle shape attached to bracket when viewed from the rear, with a small circle that has a spherical button towards the right side The flat top of the rear part of the bracket has a oblong bubble shape in the back left corner when viewed from the rear There is a horizontal line that runs along the rear of the bracket The outer most side of the bracket is an L shape There is a circular button/pin detail on the top right of the bracket when viewed from the side There is a circular indentation diagonally downwards from the button, when viewed from the side There is an indentation when viewed from the rear Approx 8 vertical recessed line on each side of the angular and chamfered box on the side of the bell Left Shoulder has approximately 36 vertical recessed lines are 1-2mm wide spaced 4-5mm apart
-
Each section of the CRL has been created to keep a track of discussions about each piece. Initiated - discussion topic has been created In Progress - discussion has started and CRL text is being formed Pending Agreement - prior to being added to the master CRL document, agreement shall be reached by the CRL team Complete - Has been moved to the main CRL thread for final approval Armour: Helmet - Complete Cuirass (Chest/Back & Gorget) - Complete Thermal Detonator - Complete Shoulder Bells - Complete Biceps - Complete Forearms - Pending Review Gloves & Hand Armour - Complete Abdomen Section - Complete Codpiece - Complete Posterior Armour - Complete Belt - Complete Thighs - Complete Shins - Complete Spats - Complete Boots & Boot Armor - Complete Soft Goods: Neckseal - Pending Agreement Shoulder Gaskets - Pending Agreement Elbow Gaskets - Pending Agreement Undersuit - Pending Agreement Shorts Gaskets - Pending Agreement Knee Gaskets - Pending Agreement Optional Accessories ST-W48 Blaster - Complete Sonn-Blas FWMB-10B Repeating Blaster - Complete
-
complete Sithtrooper Helmet - Draft CRL Development Discussion
nanotek replied to nanotek's topic in CRL Discussion Archive
Send any pics to me at nanoteknz@gmail.com or google drive them, I can provide updates -
complete Sithtrooper Helmet - Draft CRL Development Discussion
nanotek replied to nanotek's topic in CRL Discussion Archive
Thanks Dennis! For the face plate, I think if you look at the following image you can see how it is separate from the snout and also separate 2 halves. As a personal note, it would also make sense that these are moulded separately so as to make assembly easier. Some cleaner closeup shots of those ribs on the snout would be good. I cannot tell if they are rounded or squared? How did you get the measurement? I agree with the last comment that it would be the same width, would love to get a real world reference next to these objects. We also need to collect some of the other data from the rear and around the sides. Anyone want to help? LOL -
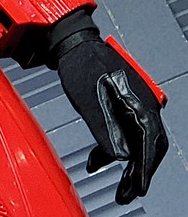
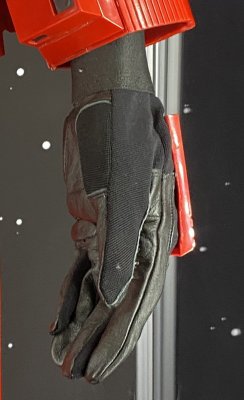
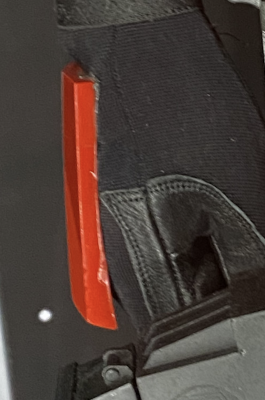
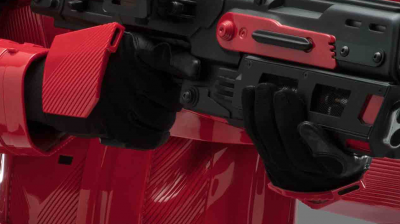
Next up for agreement Gloves and Hand-plates Gloves are all black consisting of the following details An elastic wrist cuff that extends underneath the under-suit The back of the glove is black ribbed Nylon-spandex-like Ottoman material that extends around the thumb Black leather or leather like palm, thumb and forefinger Hand Armour are slightly curved, trapezoidal in shape and are mounted securely over the back of the glove Finished in a high-gloss, deep red that matches the colours of the entire costume A number of recessed lines running parallel to the angle of the front-outer edge of the plate A oval recessed detail is aligned with the index finger of each glove It is matte black inside The face the recessed oval sits in is chamfered outwards slightly from the top to the underneath OPTIONAL Level two certification (if applicable): Gloves 5 padded & double stitched sections on the palm (See gallery image) A cutout section on the palm near the thumb (See gallery image) Two cutout sections in the leather on the index finger (See gallery image) Hand armour 15 recessed lines, 1mm wide at 4mm intervals, following the angle (45 degrees) from the front-outer edge of the plate The inside edge closest to the thumb is thicker than the outer edge Underside of the hand armour is curved and hugs the glove on the back of the hand
-
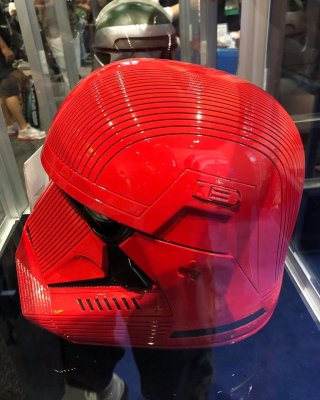
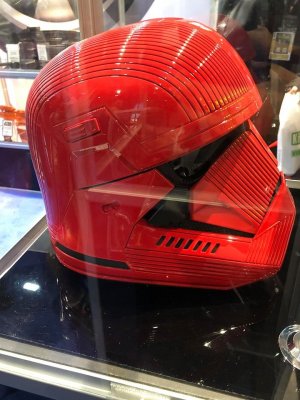
This section of the CRL is now in Pending Agreement State. If accepted all text will be moved to the main part of the Sith Trooper CRL Helmet Finished in a high gloss deep red that matches the colors of the entire costume Lenses are black in color. They may be bubble in shape or flat and must be sufficiently dark enough to obscure the costumer's eyes The lens frame extends back underneath the trap and terminates about 1cm from the back of the trap The brow extends out from the lens forming a significant overhang There are two recessed lines that run parallel to and are above the brow The bottom line recess extends above the clip greeblie running parallel to the trap and connects with the recess at the rear of the helmet The top recess terminates where it intersects with the bottom recess line A "Mohawk" section runs along the centre from front to back but is not raised. 16 recessed lines run parallel to the "Mohawk"-like section from front to back on each side The mohawk starts from the 2nd brow line and extends toward the back, terminating in the recessed lines at the back The frown is semi-gloss black with the following features: The mouth has one centre "tooth" that connects to the snout and is separated by a detail that has greeblie section that has 14 "ribs" The mouth has 4 teeth either side of the centre “tooth" There is no hexagonal mesh in the mouth area between the teeth The area from the bottom of the mouth extending to the tears has hexagonal mesh The centre tooth is the width of the bridge and has 14 little ribs at the top The jawline is angular and has the following flat trapezoidal section the extends 3/4 way down the jawline from the frown flat triangular sections one each side of the trapezoid 10 recessed lines extend from the base of the flat triangular section Each tear (area beneath the corners of lens frame) is angular solid matte black recessed circle in the bottom most corner has 3 recessed lines separating the top tear from the bottom section Face plate is two separate angular pieces that mirror each other with 14 recessed lines on each Curved lower section that starts from the tear and curves towards the front of the jaw forming a filleted ledge. The ledge is more pronounced at the tear end smaller towards the frown. Faceplates are separated by a channel that runs vertically along the bridge of the nose between the lens and frown The bridge of the nose has 10 small rectangular ribs from frown to lens frame with one larger one at the top The side of the jawline has Seven rectangular cut out vents/tube stripe slots are on each side of the helmet. They have the appearance of being black at the base of each slot 5 recessed lines extend from the front of the jaw and terminate in an angled manner below the trap. There angle of termination is complementary to the black trapezoidal shape Two helmet clip greeblies are present over the traps on each side Directly below the traps is a detail comprised of a vertical alignment of shapes in the following order a small raised circular shape a recessed B shape a small raised circular shape Below the traps toward the back and base of the helmet is a small black trapezoidal stripe There are 5 recessed lines at the back forming a trapezoidal shape. The angle at which the recesses terminate are complementary to the rear black trapezoidal shape There is one slightly wider recess channel that extends all the way around the base of the helmet The base of the channel is black is about 8mm wide by 8mm deep matches all the angles of the helmet as shown The bottom of the helmet has a black ledge that runs the perimeter of the helmet that extends back into the interior is about 3/4" to 1" wide matches the angles of the helmet, most notable is the jawline OPTIONAL Level two certification (if applicable): Lenses are bubble-like or bulbous in shape Lens frame has 4 recessed notches near the top of the tear The Brow has the following details There is a cutout section under the brow There is a raised section underneath the brow that has a pattern comprised of 62 recessed pill shapes The teeth are are metallic black or a very dark grey Faceplate pieces are visibly separate pieces, 4 slots under each faceplate for covering the teeth The tube vents are a solid backing and painted black. No mesh or cloth is present The helmet clip greeblies are the correct clips (refer clip greeblies diagram)
-
sithtrooper Sith Trooper reference pictures
nanotek replied to gmrhodes13's topic in First Order Sith Trooper
That cod piece looks like it goes all the way around! That's gonna be a whole lotta NOT fun! -
We'll need it I reckon! Looking at all the details makes me think this CRL will read more like a novel!
-
-
Wook’s DT Build (850 ArmorWorks and Armoryshop)
nanotek replied to wook1138's topic in Imperial Death Trooper
We removed SpecOps from Tapatalk in may due to a host of issues, the browser version of this site is much better to use anyway. I also noticed that the images don't always load on the first go and I have a sneaking suspicion that it's related to how the software handles large images which I will look into. Keep up the good work, it's a tough build but worth it -
Hi there, welcome to SpecOps. There's quite a bit resources here to help you with your build. The biggest factor with the Deathtrooper build is money, it is expensive and depending on the route you go can be a lot of work (and time). Be sure to do a lot of research and ask questions! We are here to help I bought a raw 3D printed kit from ArmoryShop which was a lot of work but the end result is amazing. I have done over 50 troops in it and only ever had to make minor repairs. Because I did all the finishing work myself I am able to repair and repaint it without having to pay extra
-
As others have stated above, get the files from Tom, those files you posted have serious innaccuracies. https://www.facebook.com/TDK-Props-537706609725029/
-
There has been a few more higher priority items to clear out. Is there anything specific you are looking for or would like to add?
-
Build Your Own Cummerbund (With Pictures)
nanotek replied to furiosa's topic in Spec Ops Scout Armory
Yeah it's Forex rigid PVC foam board https://www.display.3acomposites.com/forex.html I ended up using a thick piece of ABS instead which I heated and moulded to form. -
Find the most recent and updated version of the Swamp Trooper CRL in English at the link below: https://databank.501st.com/databank/Costuming:TX_swamptrooper
-
Find the most recent and updated version of the General Weir CRL in English at the link below: https://databank.501st.com/databank/Costuming:TX_general_weir