-
Posts
2,238 -
Joined
-
Last visited
-
Days Won
155
Content Type
Profiles
Forums
Events
Everything posted by nanotek
-
https://www.hangerproject.com/shoe-care-guide/high-gloss-vs-matte-patina/ Also here is an article on how patent leather is created http://www.madehow.com/Volume-6/Patent-Leather.html "In the United States, a common finishing technique used to be a spray application of the polyurethene and/or acrylic. " I can see evidence of masking in one reference picture on the boot. So I imagine the above is correct
-
complete Sithtrooper Biceps - Draft CRL Development Discussion
nanotek replied to nanotek's topic in CRL Discussion Archive
Some of the rigging is visible in the Evolution of the Stormtrooper video, and there is a shot of a display where you can just see the rigging for the bicep. If we do include it, it will be for L2 for sure -

sithtrooper Sith Trooper reference pictures
nanotek replied to gmrhodes13's topic in First Order Sith Trooper
-
Fair call Glen, I have moved discussion about the split in the collar to following location
-
Thanks @JoeShoe, I have edited your post to show the image. @Raider There's a lot of other stuff going on here but I'll focus on the join in the collar at the back. First of all, my preference is screen accuracy above all else, so this is my angle when it comes to the CRL. We have a lot of reference material that shows that there is no join in the collar, that it is one piece of flexible PU rubber, however if it is absolutely impossible to achieve this then we will have to look at relaxing the CRL for entry level approval (L1 vs L2). Considering I have seen that there are some people who have moulded the collar in PU rubber (even though inaccurate when referenced) it is still possible. I am keen to hear from these people and how it went! SecondIy I feel that if we relax the CRL to accomodate certain makers we are setting precedents for other makers to argue how their costume should also be considered to relax the standards. The default should be the CRL influences the makers, not vice versa. All options will be considered at the end of the day, but I don't feel like this one piece is impossible to achieve.
-

complete Sithtrooper Thighs - Draft CRL Development Discussion
nanotek replied to nanotek's topic in CRL Discussion Archive
All of the toys are inaccurate and in my opinion should only be used when there is no other reference material available. Even the 1/6th scale toy has some very obvious inaccuracies! There is no holster on any of the screen used armor displays and I believe we should adhere to this. We can wait for the film to be released on DVD, but I would say it was a decision the toymakers. -

complete Sithtrooper Helmet - Draft CRL Development Discussion
nanotek replied to nanotek's topic in CRL Discussion Archive
I have also finished adding the details for the Helmet. Still need to work out what is baseline requirements and what is level 2 -

complete Sithtrooper Helmet - Draft CRL Development Discussion
nanotek replied to nanotek's topic in CRL Discussion Archive
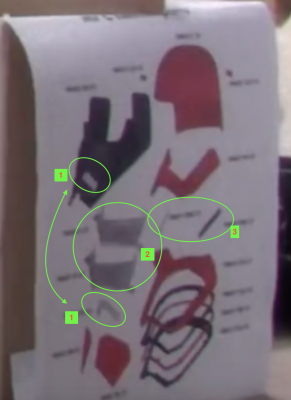
I found some interesting things in the Evolution of the Stormtrooper section that I thought I would share. First of all I think the teeth are a contrasting colour. You can see in the picture of the screen used costume that the teeth are clearly a different colour from the mesh. The teeth are either a gun metal grey or metallic black like what was used on the Death Trooper and the mesh is gloss black When looking a the following assembly instructions for the helmet (taken from Evolution of the Stormtrooper) it become more obvious see below; The teeth are separate parts to the rest of the assembly. You can see the teeth holes in the part marked below I am assuming a double lens is used in the assembly. This would help obscure the wearers eyes. I would love to see what the labels say! The black backing to the vents on the jawline -

sithtrooper Sith Trooper reference pictures
nanotek replied to gmrhodes13's topic in First Order Sith Trooper
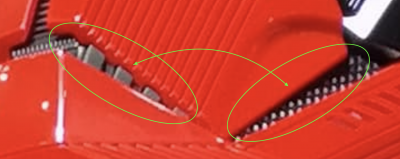
Here is an animated gif I made from the Evolution of the Stormtrooper video. I managed to capture frame by frame the technique they used for the silicone moulds for part of the forearm. I slowed it down to 1.5 seconds per frame. I have a bunch of captures that I will eventually upload, but this was by far the most interesting part for me as it showed that this is not an injection mould technique. -
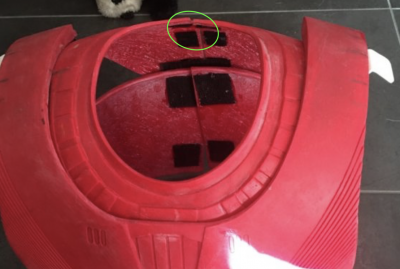
My personal perspective is that there is no visible gap/opening on that part and we would need to observe that in the CRL. @Raider may have a different view on this. If it's closed can you still fit your head through the hole? Has Jim considered moulding that part as PU rubber like other makers? You have done a remarkable job with the costume so far, everything looks fantastic!
-
Hey Glen, one of the things I noticed about Jim's kit is this join at the back, is Jim going to provide an updated piece that doesn't have this?
-
There has been a lot of discussion on Facebook especially about the sloppy belts. From what I hear the DT's were hired actors and were most likely using studio kits. 501st members did the TK's only There was also discussion about the Neuro-Saav Macromotion (NSM) Monitor where someone thought it was a new piece. As far as the pouches go, we can simply add it to the optional accessories. Just provide some photographic evidence.
-
The main differences are: (and I'm kinda repeating myself a little bit from my previous post) 1. Material - Most printers use PLA which is a plant based plastic and requires some effort to get a smooth surface. Fibreglass is an epoxy resin usually made of polyester. There are a couple of makers that do fibreglass kits and they are both different again. Jim Tripon uses a flexible fibreglass composite that is slightly softer and more flexible than regular fibreglass. Whereas Plastic Arms Dealer uses gel-coat and is more rigid and sturdy. (Guys @jimmiroquai @amcclary please correct me if I am wrong) 2. Fibreglass kits require less work as the moulds have been constructed with a smooth surface. Fibreglass kits need to be cleaned and prepared properly to avoid skin contact with fibreglass particles that can cause skin irritation. You also do not want to breath in these particles so a proper respirator is required. 3. 3D printed is cheaper but requires more work - I recommend using 2 Coats of fibreglass resin on the inside and outside of each piece of armour. This will all need to be sanded back and filled with spray putting and primer. Some areas of the armour require strengthening with some fibreglass matting to prevent breakages. 4. Fibreglass kits cannot be resized as easily as 3D Printing Good luck with your build
-
Hi there, this is a complex build and there are a few things you can consider before deciding on your armorer and soft parts. Unfortunately there is no "One size fits all" option and it is ultimately up to you, which means you will have to research, research, research! These suggestions below are not in any real order of significance, but they have an effect on each other. For example if you have no building experience, your costs will go up, but time and effort will go down. If you are building yourself, cost may go down but time will increase (your accuracy may also increase depending on your strategy). 1. Budget - Some kits are more expensive than others. Some are fibreglass, some are 3D printed, some are finished etc. Finished kits are going to be more expensive but less work on your part. If you're building yourself consider items like paint, fillers, fibreglass resin etc (Remember you will still have to add or alter strapping). Where you live will also play a part in how much this will cost you as postage can be super expensive! 2. Build Experience - Are you familiar with how to work with different materials? What is your level of skill? Are you prepared to make mistakes, learn and possibly take months to build? You may have to learn a lot of new skills to complete your build and this will take time to gain research and learn. If you don't know how to paint you will have to rely on others for touch-ups and repairs which can be expensive. 3. Space - depending on how you plan to tackle your build will determine your space requirements. For example if you plan on 3D printing your kit, you will need space to be able to sand, fill, prime and paint. 4. Accuracy - How accurate do you want to go? There are really only a couple of options that come close when it comes to the armor and literally zero options for the undersuit/gaskets. There are also very few accurate leather pouch/holster makers too. 5. Size - The size of your body may determine which armor you will go with. 3D printed offers the greatest flexibility in sizing, where as other kits you may have to make alterations to get it to fit and looking right when strapped. 6. Time - Do you have time constraints? Do you want it now or are prepared to wait? Again (and depending on choice of kit etc) this is a complicated build and no matter which avenue you take there will be some time constraints. All the best with your build!
-

sithtrooper Sith Trooper reference pictures
nanotek replied to gmrhodes13's topic in First Order Sith Trooper
There are a few files available, the accuracy varies as no-one has made a fully accurate helmet yet. You can search on the Facebook build groups or Etsy. Basically you will have to compare the files available to the reference materials that are available here and make a decision about which one you like best -
I'm not sure what is going on as the quality of the pics is pretty poor. Yep the pouch should be more to the right, but I cannot see the TD plate properly. There is supposed to be a recessed inverted V section visible on the back just about the TD. It looks like this part is obscured. I suspect the ab will not be visible either, which it should be but you cannot tell because of the specialist rig over the top.
-

sithtrooper Sith Trooper reference pictures
nanotek replied to gmrhodes13's topic in First Order Sith Trooper
Thanks for leaving this here. I already downloaded the whole lot. They will make very useful referent material! Thanks! -
Thanks for leaving this here. I already downloaded the whole lot. They will make very useful referent material! Thanks!
-
Cold wash on delicate setting. Turn under suit inside out, or put in laundry bags. Also may help to use a wool or delicate detergent
-
Did anyone answer this for you?
-
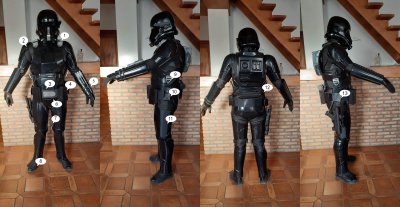
Hi there, sorry I had to rush this because zero time, this means I may also be repeating what others have already said. Apologies for this! First of all, it should be acknowledged that this is a very difficult build and you have put in a great deal of work. It's look great however there are a few things that I feel require some attention to get you across the line. 1. Aircraft Buckle Should be black - D Ring is weathered aluminium 2. Shoulder bells need to be swapped 3. Belt should not overlap circle detail on the ab armor 4. Pouch needs to come towards buckle (all pouches, boxes and holster are spaced quite evenly around the belt) 5. Rubber bands should be closer together and don’t overlap, but rather are embedded into the ladder. There is a channel that runs through the ladder to allow this. Aluminium wrist rockets should be weathered too 6. Cod is hanging too low, should be tucked under belt 7. Inner thigh section should have visible ribs 8. Boot covers need to be secured down better 9. D-Ring and strap should be facing more forward, not straight down as shown 10. Leather pouch should have no visible stitching. Also there appears to be some webbing showing just to the left of the pouch? 11. Outer thigh section should have visible ribs 12. TD is mounted incorrectly to the TD plate, should be higher so that the TD plate can come down and we should be able to see the ^ pattern 13. Holster is incorrect and the blaster is strapped incorrectly. The right holster will set you straight! Again keep up the great work, you're almost there! Sing out if you need any further assistance.
-
Nice work Glenn. Looks great! The image issue is related to how long an image takes to load. I find that if I refresh the page it loads all the images on the 2nd try. I have tried tweaking some settings but it seems to persist. I’ll try again.
-
Welcome, looking forward to your build. I know it was just a quick fitting but remember to lower the biceps a bit as they are not supposed to sit up that high. If you have any questions please shout out! Will be following your journey

